

(Desktop Studio)
Esta página de ayuda es para Desktop Studio. Esta información también está disponible para Studio.
Las acciones son los componentes básicos de Studio scripts. Un script es una red de acciones que enrutan y administran el tráfico de clientes para su centro de contacto. Cada acción tiene un propósito específico y juntas definen lo que logra un guión. Hay acciones que reproducen archivos de audio, indican al script que espere, solicitan un agente y mucho más.
Cada acción representa código que ya ha sido escrito. Esto significa que no necesita ser un experto en secuencias de comandos para crear secuencias de comandos simples en Studio. Sin embargo, si desea crear scripts más complejos, se requiere cierta programación de scripts personalizada.
En la siguiente imagen de un script de ejemplo, puede ver una serie de acciones vinculadas por flechas conectoras. La descripción de este script muestra la manera en que cada acción tiene un fin específico en el script. La descripción se encuentra después de la imagen en el menú desplegable.
 Ver imagen
Esta imagen muestra el principio de un script telefónico entrante básico. Una descripción sigue a la imagen.
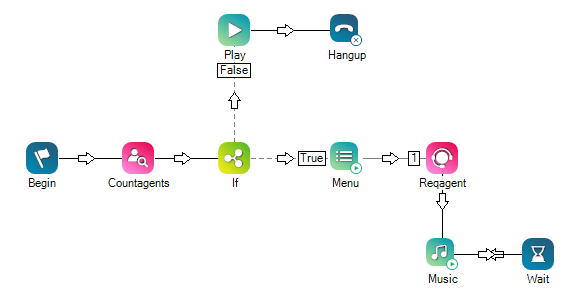
- Cuando un contacto llama a esta organización, el script comienza (acción Begin) y cuenta la cantidad de agentes disponibles (acción Countagents).
- Si es cero (acción If) la cantidad de agentes, el script sigue la ruta ascendente, etiquetada False. Se reproduce un mensaje (acción Play) y el sistema desconecta la llamada (acción Hangup).
- Si (acción If) la cantidad de agentes disponibles es mayor que cero, entonces un menú IVR Respuesta de voz interactiva. menú telefónico automatizado que los contactos utilizan mediante voz o entradas de teclado para obtener información, enrutar una llamada de voz entrante, o ambas cosas. (acción Menu) ofrece a la persona que llama la opción de conectarse con un agente (acción Reqagent). Este menú IVR ofrece solo una opción. Los menús más complejos pueden ofrecer múltiples opciones, cada una con un resultado diferente.
- El contacto espera hasta que un agente entre en la línea. Durante la espera, se reproduce la música en intervalos de 30 segundos (las acciones Music y Wait).
Tipos de Acciones
There are many different kinds of actions in Studio. The following are three of the most basic types, which you will use in nearly every script you create:
- Starting action: There is only one action that can begin a script,
- Event actions:
- Terminating actions: These are actions that can end a script. You must use the appropriate action for the script media type. If you use the wrong terminating action, the script might not be properly ended. For example, background processes may be left running. Additionally, contacts handled by the script may not be ended, which can have negative impacts on the NiCE CXone system.
All other Studio actions fall into categories based on what the action does in a script or the parts of the NiCE CXone platform they interact with. Each category has an icon color associated with it. However, many actions fall into more than one category, so the icon color only indicates one of the categories an action may fall into.
The action categories are described in the following table.
| Category | Details | Examples |
|---|---|---|
| ACD | These actions interact with the NiCE CXone ACD.  . |
|
|
Automation, speech, virtual agent bots |
 . |
|
| Chat | These actions work with chat scripts. . |
|
| Data | These actions allow you to access data and databases.  . |
|
These actions work with email scripts.  . |
|
|
| General and script flow | These actions are generally useful or help create the flow of the script.  . |
|
| Logic | These actions allow you to include scripting logic in your script.  . |
|
| Script | These actions allow you to control and interact with the script itself.  . |
|
| Security | These actions provide security capabilities.  . |
|
| Start | There is only one action that can start a script. It is the only round action and it is solid green  . |
BEGIN |
| Strings | These actions allow you to work with strings.  . |
|
| System and files | These actions allow you to work with files on the system.  . |
|
| Voice and audio | These actions work with voice scripts.  . |
|
Acciones de evento
Se ejecutan las acciones de eventos únicamente cuando ocurre un desencadenante en específico. Los disparadores de eventos incluyen cosas como una llamada que se responde, se transfiere o se pone en espera. Por ejemplo, Onanswer es un evento que se activa cuando se responde a una solicitud de interacción, como cuando un contacto responde la llamada telefónica de un agente en vivo o un agente en vivo responde la pregunta por chat de un contacto.
Cuando se activa un evento, cualquier ejecución de secuencia de comandos que pueda haber estado ocurriendo antes de que ocurriera el desencadenador finaliza. El script procede de la acción del evento.
El siguiente script es un ejemplo que ilustra el evento Onanswer. El script configura un IVR entrante básico con opciones de menú para

Ubicación de Studio Comportamiento
Agrupación organizativa de alto nivel utilizada para administrar el soporte técnico, la facturación y la configuración global de su sistema NiCE CXone..
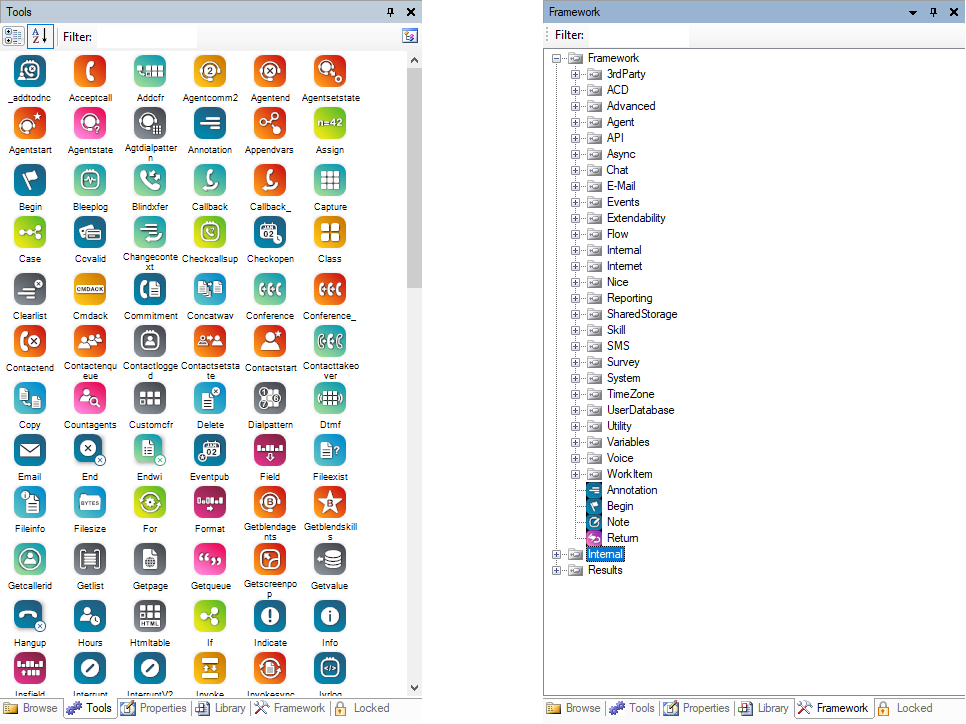
Tools Tab
The Tools tab contains the most common actions used for scripting. On this tab, actions are organized on a palette that has several default categories, such as standard, system, and speech. On the Tools tab, you can choose to view all actions or have them organized into their categories. You can also choose to sort the actions alphabetically or view them in their default order.
Framework Tab
The Framework tab is a complete list of all available actions. Actions on this tab are organized in a tree structure of folders. Each folder is a category. You can expand a folder to see the actions it contains. The Framework tab isn't enabled by default. You can request access to the tab by contacting your account representative.
Action Availability and Media Type
Algunas acciones son visibles en Studio únicamente si el producto o característica con que está relacionado está habilitado para su NiCE CXone sistema. Otras acciones son visibles solo si el script activo tiene el tipo de medio que la acción necesita. Por ejemplo, si una acción solo funciona con scripts de chat y el script activo es un script de teléfono, la acción podría no estar visible hasta que cambie a un script de chat.
Palettes and Categories
On the Tools tab, actions are organized with palettes. There's one palette by default, but you can create custom palettes. Palettes allow you to customize the organization of actions in Studio. For example, you could create palettes for different scripts you work on, or you could create a palette for actions you use a lot and another for actions you only use sometimes.
Each palette must have at least one category. Categories allow you to further organize the actions in the palette. The default palette has several categories, such as system, events, web, and Personal Connection. You can choose to view the actions in a palette by category, or you can choose to view all of the actions at once. Additionally, you can sort actions alphabetically or by the default order they were added to the palette.

Propiedades de acción
Most actions have a set of properties that you can configure. Some properties are required, while others are optional. Properties are how you customize the action to do what you need it to in your script.
You can view an action's properties when it's on the script canvas. The properties appear on the Properties
- ToolName: The name of the action. This is a system property and cannot be changed.
- Category: The location of the action on the Framework tab. This is a system property and cannot be changed.
- ActionID: The ID of the action in the script. IDs are assigned in the order actions are added to the script. The ID is a system property and cannot be changed, except by deleting the action from the script and adding it back. If you delete an action from a script, all connectors that link to and from the action are deleted too.
-
Caption: The label for the action that appears on the script canvas. You can change the caption so that it describes the action's function in the script. This helps scripts be easier to understand and troubleshoot. They are also used in IVR
Respuesta de voz interactiva. menú telefónico automatizado que los contactos utilizan mediante voz o entradas de teclado para obtener información, enrutar una llamada de voz entrante, o ambas cosas. reporting for some actions. You may want to use the setting from one of an action's other properties as the caption. For example, you can give a Music action the name of the music file it plays. You can type the information into the Caption field, or you can copy the value of the property and paste it into the Caption field. To do this, click the name label of the property and press CTRL+C, then click the Caption label and press CTRL+V.
Some actions have an editor that allows you to configure additional properties or add data to the action. El segmento de un aviso de audio reproducido para el contacto. for prompts, such as recording an audio message or designing a TTS prompt.
You can cut, copy, and paste actions in your scripts. When you add an action by copying and pasting into your script, make sure that you update the actions properties if needed.
Input and Output Properties
Some properties hold data the action uses. Other properties store data passed into the action for the rest of the script to use. Properties that store data the rest of the script uses are called output variables. Both properties and output variables appear in the Properties list on an action's Properties tab.
When you configure an output variable property, you are naming a variable to store data passed to the action. You don't need to format the variable name in the property field with curly braces.
Sucursales y Condiciones
El flujo de un script se define conectando acciones entre sí. A veces, una acción solo tiene un resultado posible, por lo que está conectada con otra acción. Cuando una acción tiene más de un resultado posible, puede crear una ruta para cada posibilidad. Estas rutas se denominan ramas de resultados o simplemente ramas.
Las ramas te permiten diseñar tu script para manejar todo tipo de situaciones, como errores, respuestas inesperadas o qué hacer cuando no se responde una llamada telefónica. También puede usar ramas para desarrollar opciones en su script, como crear un menú que solicite al contacto que elija una opción.
Condiciones de la bifurcación de resultados
Cada acción Studio tiene una o más ramas de resultados posibles que puedes configurar. Cada rama de resultado tiene una condición asociada que define lo que debe suceder para que el script siga esa ruta. Las condiciones son resultados posibles de esa acción que se activa cuando se ejecuta el script.
Todas las acciones tienen una rama de resultado Default. Algunas acciones tienen más de una condición de rama de resultado disponible. Además, algunas acciones admiten condiciones personalizadas.
Cada acción de su script debe tener una rama que use la condición Default, incluso si conecta las demás ramas de la acción. Cuando una acción tiene más de una rama de resultado, la rama Default es la que se toma cuando no se cumple ninguna de las otras condiciones. Esto es importante para evitar que los contactos se atasquen en ese punto de la secuencia de comandos en caso de que ocurra algo inesperado.
Callejones sin salida
Es importante estar atento a los callejones sin salida en sus scripts cuando una acción tiene múltiples ramas de resultados. Los callejones sin salida pueden ocurrir cuando faltan ramas o no están configuradas correctamente. Por ejemplo, una acción Music debe estar conectada con una acción Wait. Wait le permite especificar cuánto tiempo se reproduce la acción Music antes de reiniciarse y repetir. Sin Wait, Music se reproduce indefinidamente.
También pueden producirse callejones sin salida si una acción no está configurada con una rama de resultado Default. Si sucede algo inesperado y el script no puede tomar ninguna de las otras ramas de resultados configuradas, tomará la rama Default. Si una acción no tiene una rama Default, el script no puede continuar y el contacto queda bloqueado.
Múltiples conexiones a la misma acción
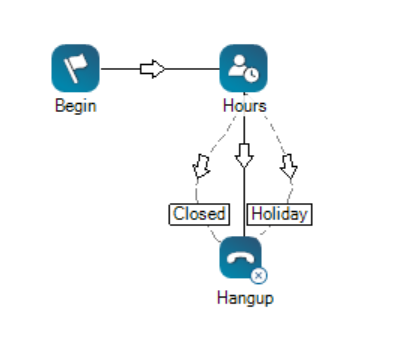
Puede crear múltiples conexiones a la misma acción. Esto es necesario cuando hay más de una condición que puede hacer que el script termine en la acción de destino. En lugar de agregar una copia de la acción de destino al script una vez para cada condición, puede crear tres ramas que terminen en la misma acción.
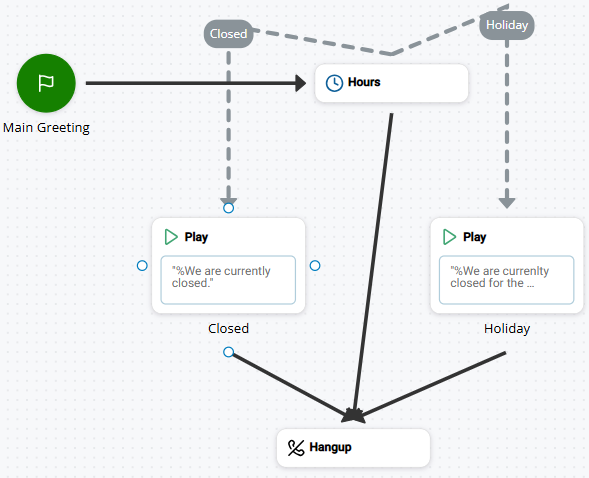
Conectores
Los conectores son líneas que conectan dos acciones. La flecha del conector apunta en la dirección del flujo del script.
Tipos de conectores
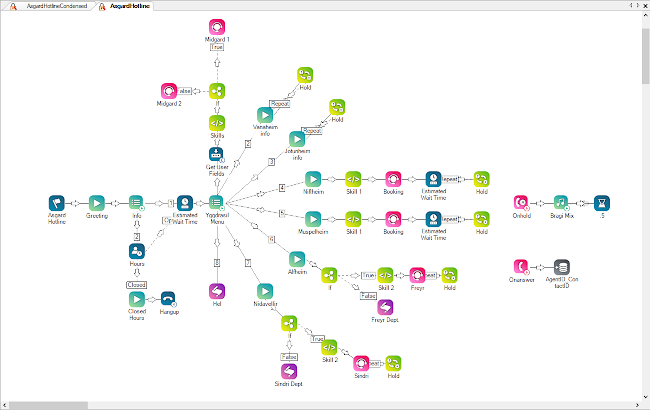
Hay tres tipos de conectores y cada uno tiene un aspecto ligeramente diferente en el lienzo. Aprender a identificarlos puede ayudarlo a comprender un script de un vistazo. El siguiente ejemplo de un script muestra los tres tipos.
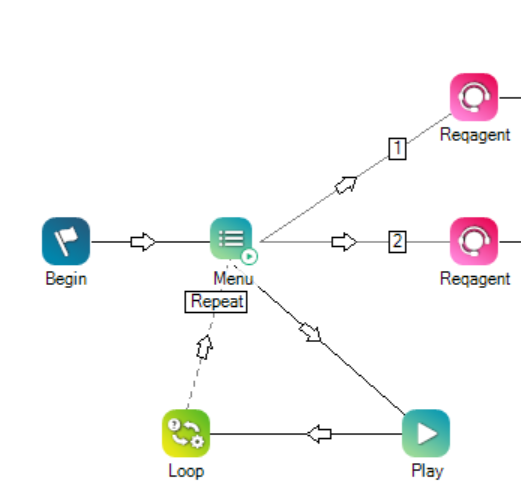
Los tipos de conectores son:
- Predeterminado: Este es un conector que usa una condición de rama Predeterminada. Es una línea negra continua sin etiqueta. En la imagen de ejemplo, el conector que vincula
- Regular: Este es un conector que utiliza cualquier condición de rama excepto la Predeterminada. Es una línea gris discontinua con una etiqueta. La etiqueta coincide con la condición que usa la rama. En la imagen de ejemplo, los conectores que vinculan
- Personalizado: Este es un conector que usa una condición de rama variable. Es una línea gris continua con una etiqueta. La etiqueta coincide con el nombre de la condición personalizada asignada a la rama. En el ejemplo, los conectores que unen desde Menu hacia cada una de las acciones Reqagent de la derecha son conectores personalizados. Sus etiquetas son 1, 2 y 3, que son los nombres de las condiciones
Datos clave sobre los conectores
- Click the connector icon in the lower right corner of the action icon and drag it to the second action. Drop it in the center of the second action.
- When you move an action to a different place on the canvas workspace, the connector moves with the action. It doesn't change shape, but it moves to the nearest side of the stationary action. It the length of the connector changes, too.
-
You can change the shape of the connector so that all branches are easy to see. This helps make your script more readable and easier to update.
-
If you need to change the branch that a connector uses, you must delete the connector and add it again.
-
Delete a connector by clicking on the arrow in the center of the line and pressing the Del key on your keyboard.