

This help page is for Studio. This information is also available for Desktop Studio.
Actions are the building blocks of Studio scripts. A script is a network of actions that route and manage customer traffic for your contact center. Each action has a specific purpose, and together they define what a script accomplishes. There are actions that play audio files, instruct the script to wait, request an agent, and much more.
Each action represents code that has already been written. This means you don't need to be a scripting expert to create simple scripts in Studio. If you want to create more complex scripts, however, some custom scripting is required.
In the following image of an example script, you can see a series of actions linked by connector arrows. The description of this script shows how each action serves a specific purpose in the script. The description is located after the image in the drop-down.
This image shows the beginnings of a basic inbound phone script. A description follows the image.
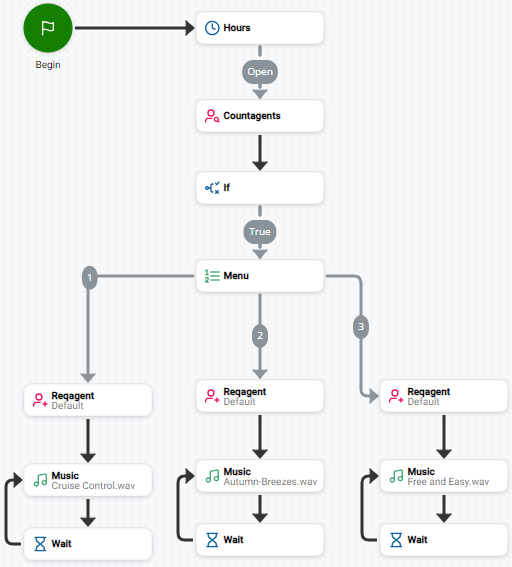
- When a contact calls this organization, the script starts (Begin action) and counts the number of available agents (Countagents action).
- If (If action) the number of agents is zero, the script follows the path that goes up, labeled False. A message plays (Play action) and the system disconnects the call (Hangup action).
- If (If action) the number of available agents is greater than zero, then an IVR
 Interactive Voice Response. Automated phone menu contacts use via voice or key inputs to obtain information, route an inbound voice call, or both. menu (Menu action) offers the caller the option to connect to an agent (Reqagent action). This IVR menu offers only one option. More complex menus can offer multiple options, each with a different result.
 - The contact waits until an agent comes on the line. During the on hold wait, music plays in 30 second intervals (Music and Wait actions).
Types of Actions
There are many different kinds of actions in Studio. The following are three of the most basic types, which you will use in nearly every script you create:
- Starting action: There is only one action that can begin a script,
- Event actions:
- Terminating actions: These are actions that can end a script. You must use the appropriate action for the script media type. If you use the wrong terminating action, the script might not be properly ended. For example, background processes may be left running. Additionally, contacts handled by the script may not be ended, which can have negative impacts on the NiCE CXone system.
All other Studio actions fall into categories based on what the action does in a script or the parts of the NiCE CXone platform they interact with. Each category has an icon color associated with it. However, many actions fall into more than one category, so the icon color only indicates one of the categories an action may fall into.
The action categories are described in the following table.
| Category | Details | Examples |
|---|---|---|
| ACD | These actions interact with the NiCE CXone ACD.  . . |
|
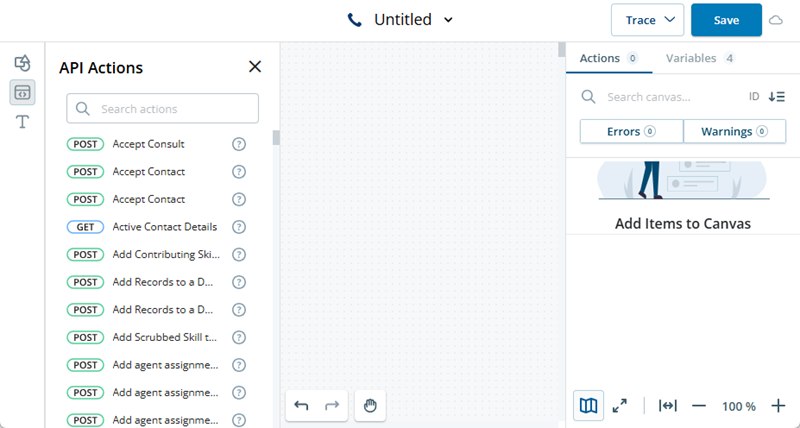
| API |
API actions allow you to use NiCE CXone REST API endpoints in your scripts. You can find them on the API Actions palette on the left side of the script canvas. API actions are white and the verb or icon are outlined in the following colors:
API actions that perform security-related functions have a purple icon |
|
|
Automation, speech, virtual agent bots |
 . . |
|
| Chat | These actions work with chat scripts. . . |
|
| Data | These actions allow you to access data and databases.  . . |
|
These actions work with email scripts.  . . |
|
|
| Event | These actions fire when the appropriate event occurs within the script. Their blocks are pink  . . |
|
| General and script flow | These actions are generally useful or help create the flow of the script.  . . |
|
| Logic | These actions allow you to include scripting logic in your script.  . . |
|
| Script | These actions allow you to control and interact with the script itself.  . . |
|
| Security | These actions provide security capabilities.  . . |
|
| Start | There is only one action that can start a script. It is the only round action and it is solid green  . . |
BEGIN |
| Strings | These actions allow you to work with strings.  . . |
|
| System and files | These actions allow you to work with files on the system.  . . |
|
| Terminating | These actions end a script. Different script media types require different terminating actions. Their blocks are black  . . |
END HANGUP
|
| Voice and audio | These actions work with voice scripts.  . . |
|
| Variables | These actions allow you to work with variables. Their blocks are yellow  . . |
ASSIGN |


 . For example,
 Event Actions
Events actions execute only when a specific trigger occurs. Event triggers include things such as a call being answered, transferred, or put on hold. For example, Onanswer is an event that triggers when a request for interaction is answered, such as a contact answering a live agent's phone call or a live agent answering a contact's chat question.
When an event is triggered, any script execution that may have been happening before the trigger occurred is terminated. The script proceeds from the event action.
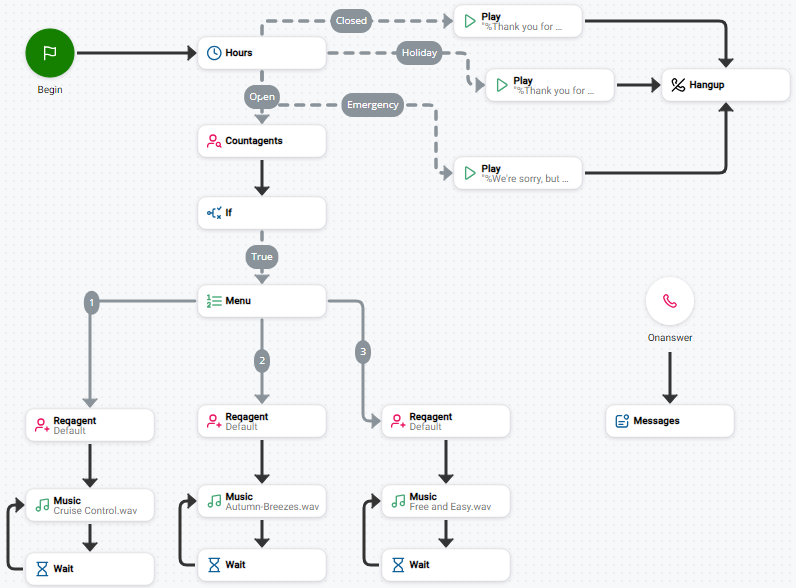
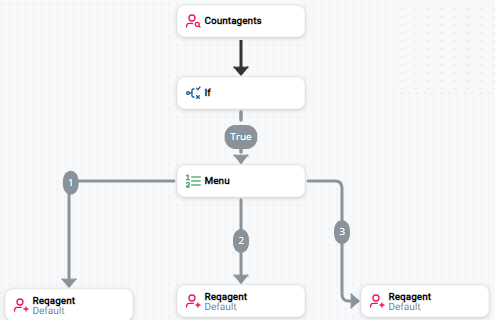
The following example script demonstrates the Onanswer event. The script sets up a basic inbound IVR with menu options for 1, 2, and 3. These represent the numbers the contact presses on the keypad to choose a menu option. The Onanswer event is in the bottom left corner of the script. It's not connected to the main part of the script. Instead it's separate, indicating that it's an event action. As soon as an agent answers the interaction, the script jumps to Onanswer and sends a message to the agent. The message is configured in the Messages action.
Location and Organization of Actions
In Studio, actions are located on the Actions palette and the API Actions palette. The panels slide out from the left side of the script canvas. You can click Actions  or API Actions
  to show or hide the palette. Additionally, you can create a list of frequently-used actions in the Favorites category on the Actions palette.

The Actions palette contains all of the non-API Studio actions. They're categorized to help you locate the ones you need. Each category is drop-down list that you can open or close as needed. You can also use the search bar at the top of the palette to find a specific action quickly.
API actions allow you to use NiCE CXone APIs. On the API Actions palette, you can see the name of the action and the verb associated with the API that action uses. API actions do not have online help pages. Instead, you can use the documentation for the corresponding API. You can find this documentation in the developer's portal ![]() . Not all NiCE CXone APIs have corresponding Studio actions. For some APIs, you need to use the
. Not all NiCE CXone APIs have corresponding Studio actions. For some APIs, you need to use the
If you have trouble finding the API associated with an API action, can use the Desktop Studio application. This gives you access to more information about the action, which you can use to locate the API documentation.
Action Availability and Media Type
Some actions are visible in Studio only if the product or feature they're related to is enabled for your NiCE CXone system. Other actions are visible only if the active script has the media type that the action requires. For example, if an action only works with chat scripts and the active script is a phone script, the action might not be visible unless you switch to a chat script.
Action Properties and Configuration
Most actions have a set of properties that you can configure. Some properties are required, while others are optional. Properties are how you customize the action to do what you need it to in your script.
You can view an action's properties when it's on the script canvas. The properties appear on the Properties
Some actions have an editor that allows you to configure additional properties or add data to the action.  . You can also click Open Editor in the action properties. For example, the Play action's editor is called the sequence editor. This is where you can create sequences
![]() A segment of an audio prompt played for the contact. for prompts, such as recording an audio message or designing a TTS prompt.
A segment of an audio prompt played for the contact. for prompts, such as recording an audio message or designing a TTS prompt. to detach the editor from the window. This allows you to move it around on the page.
You can cut, copy, and paste actions in your scripts. When you add an action by copying and pasting into your script, make sure that you update the actions properties if needed.
Input and Output Properties
Some properties hold data the action uses. Other properties store data passed into the action for the rest of the script to use. Properties that store data the rest of the script uses are called output variables. Both properties and output variables appear in the Properties list on an action's Properties tab.
When you configure an output variable property, you are naming a variable to store data passed to the action. You don't need to format the variable name in the property field with curly braces.
Value and Expression Modes
Many action property fields have two modes you can toggle, Value  and Expression
  . Value mode lets you select the value to complete the field using controls such as plus + and minus - buttons. You can also type a value into the field. Expression mode has no controls, so you need to enter the value directly into the field.
You can switch between the modes using the icons that appear when the cursor hovers over the top of the field.
Result Branches
The action properties include a section for result branches. Result branches define which path the script takes based on what happens when the action fires. This lets you see which result branches the action supports. If the branches are connected in the script, you can see which actions they connect to.
Branches and Conditions
The flow of a script is defined by connecting actions to each other. Sometimes an action has only one possible outcome, so it's connected to one other action. When an action has more than one possible outcome, you can create a path for each possibility. These paths are called result branches or just branches.
Branches allow you to design your script to handle all kinds of situations, such as errors, unexpected responses, or what to do when a phone call isn't answered. You can also use branches to build choices into your script, such as creating a menu that prompts the contact to choose an option.
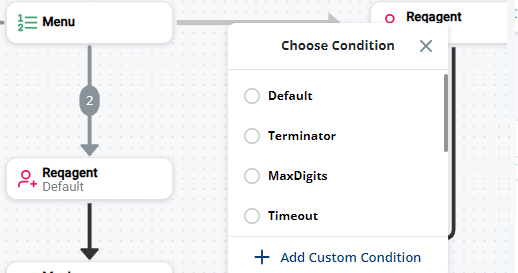
Result Branch Conditions
Each Studio action has one or more possible result branches that you can configure. Each result branch has an associated condition that defines what has to happen for the script to follow that path. The conditions are possible outcomes of that action firing when the script runs.
All actions have a Default result branch. Some actions have more than one result branch condition available. Additionally, some actions support custom conditions.
Every action in your script should have a branch that uses the Default condition, even if you're connecting the action's other branches. When an action has more than one result branch, the Default branch is the one taken when none of the other conditions are met. This is important to keep contacts from getting stuck at that point in the script in the event that something unexpected occurs.
Dead Ends
It's important to be on the lookout for dead ends in your scripts when an action has multiple result branches. Dead ends can happen when branches are missing or not configured properly. For example, a Music action needs to be connected with a Wait action. Wait allows you to specify how long the Music action plays before resetting and repeating. Without Wait, Music plays indefinitely.
Dead ends can also happen if an action isn't configured with a Default result branch. If something unexpected happens and the script cannot take any of the other configured result branches, it will take the Default branch. If an action doesn't have a Default branch, the script cannot continue and the contact is stuck.
Multiple Connections to the Same Action
You can create multiple connections to the same action. This is necessary when there is more than one condition that can result in the script ending up at the target action. Instead of adding a copy of the target action to the script once for each condition, you can create three branches that all end at the same action.
Connectors
Connectors are lines that connect two actions. The connector's arrow points in the direction of the flow of the script.  appears, then dragging to the next action.
Types of Connectors
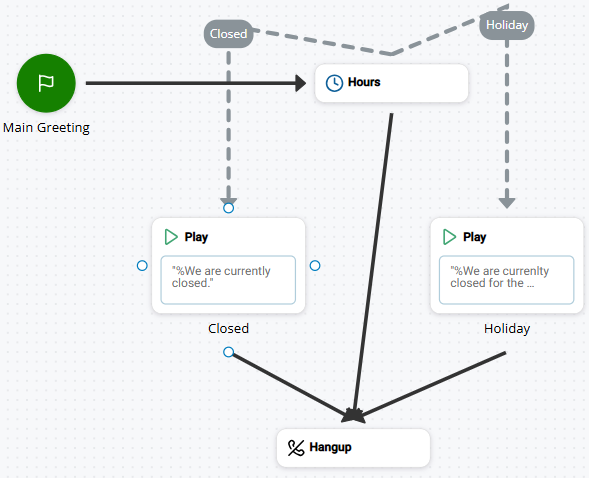
There are three types of connectors and they each look slightly different on the canvas. Learning to identify them can help you understand a script at a glance. The following example of a script shows the three types.
The types of connectors are:
- Default: This is a connector that uses the Default branch condition. It's a solid black line without a label. In the example image, the connector linking
- Regular: This is a connector that uses any branch condition except Default. It's a dashed gray line with a label. The label matches the condition the branch uses. In the example image, the connectors linking
- Custom: This is a connector that uses a variable branch condition. It's a solid gray line with a label. The label matches the name of the custom condition assigned to the branch. In the example, the connectors linking from Menu to each of the Music actions on the right are custom connectors. Their labels are 1, 2, and 3, which are the names of the
Types of Connector Lines
Studio has three types of connector lines you can choose from. The different types allow you to modify the connectors to suit your preferences, and to best fit the needs of each individual script.
The connector line types are:
-
Linear Line: Connectors follow a linear path from action to action. You can add vertices to the line to change the path of portions of the line. This is the default connector line used when you make a new connection between actions. You can add vertex points
 to linear lines to create line segments. You can adjust the angle and length of each segment. Linear lines also have handle bars
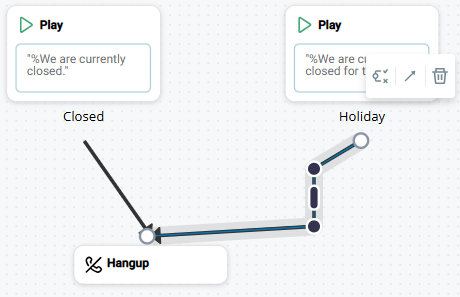
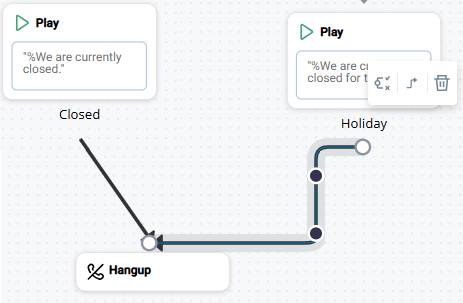
  that you can use to move and adjust portions of the connector line. The following example image shows an unmodified default connector on the left and a linear connector on the right that has been modified.
 -
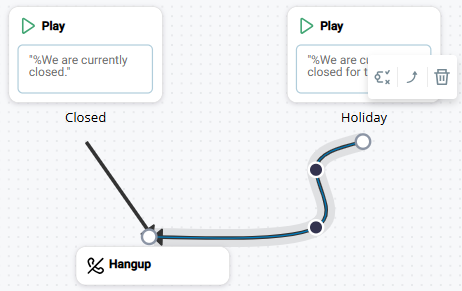
Right Angle Line: Connectors have right angles located at or between vertices, depending on their arrangement. When you switch a connector to a right angle line, all angles convert to right angles. The following example image shows two connector lines. On the left is an unmodified default connector line. One the right is the right angle version of the line in the preceding example image.
-
Curved Line: Connectors are curved lines. A new curve is introduced for every vertex. The sharpness of each curve depends on the arrangement of vertices relative to the starting and ending points of the connector. The following example image shows two connector lines. On the left is an unmodified default connector line. One the right is the curved connector line version of the line in the preceding example image.
You can choose a different connector line type for each connector in your script. For example, you could use the right angle connectors for the majority of connections in your script, and assign the curved type to ones that you want to stand out.
Key Facts About Connectors
- You can click the connector icon of the action you're connecting from and drag it to the second action. Drop it on a connection point on the second action. Connection points are open blue circles that appear when you hover over an action while holding a connector.
- You can click the connector icon and drag away from the action and release the icon. The Top Suggested menu appears with suggestions for the next action to add to the script.
- Connectors reshape automatically based on the relative position of the actions on the canvas when you drag an action to a new location. You can change the shape of a connector by adding 90° angles, diagonals, or convert the lines to curved shapes.
- You can change the condition of a branch without deleting and adding the connector back.
- Delete a connector by clicking the connector line and then clicking the delete icon or pressing Delete on your keyboard.
- To move a connector, you can move one of the actions it's connected to or click and drag the connector on the canvas. You can also click and drag a handlebar on a linear connector, or add a vertex to a connector and drag it to a new location.
Key Actions to Know
The following table contains some of the key actions you need to know to begin scripting. There are many more important and useful actions. This actions described here are only a starting place.
| Action | Details |
|---|---|
|
|
Use this action to create a variable and assign a value to it. |
|
|
This is the first action in every script. |
|
|
This action checks the total number of agents in a particular state |
|
|
Use this action to automatically generate and send an email message. |
|
|
Terminating actions are the last actions in the script. They end the script and the contact, and terminate background processes. |
|
|
Use these actions to create looping or conditional statements in your script. |
|
|
Use this action so the script can determine whether your organization is open, closed, or on holiday. |
|
|
This action plays a message and creates a menu of choices the contact can choose from. |
|
|
This action plays a music file. You can select from a set of files provided with the action. It's useful to play music while a contact is on hold. |
|
|
Use these actions to add notes or annotations to your script. |
|
|
Event actions start a new branch of the script when a certain event happens during an interaction. For example, when an agent answers a call, the script jumps to the |
|
|
This action plays an audio file for the contact. It can use prerecorded audio or text-to-speech, or both. |
|
|
Use this action to record the caller's voice in MP3 format for playback purposes, such as for voicemail. Use |
|
|
This action requests the next available agent to handle a contact. For digital scripts, use the digital version of this action. |
|
|
These actions spawn subscripts or begin another script. |
|
|
Use this action to add custom code to your script. You can use it to create and assign values to variables or dynamic objects. |
|
|
This action directs an existing call to a different phone number outside of NiCE CXone. |
|
|
Use this action to choose the voice and language you want to use with text-to-speech generated by actions such as |
|
|
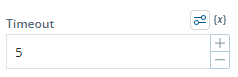
This action adds a pause to the script. |
|
|
This action plays a custom message to the contact, the agent, or both during an interaction. |