

After you create a new script or open an existing script, you can add and configure actions. This page helps you learn how to work with actions in your scripts.
Add and Configure an Action in a Script
Required Permission: ACD > Studio > Scripts >
- In NiCE CXone, click the app selector
 and select Omnichannel Routing > Studio
  .
. - On the Scripts page, locate and double-click to open the script you want to work with
-
Click the actions icon
 in the left icon menu to open the Actions palette.
 - Locate the action you need, then click and drag it to the canvas.
-
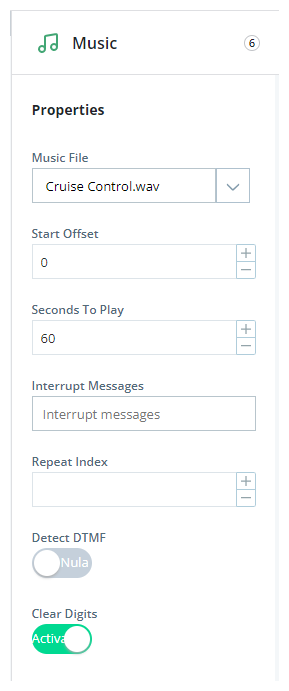
Click the action on the canvas to view its properties. Action properties appear in the Properties section on the right side of the canvas.
- Configure the properties of the action. Each action has different properties. Press F1 to open the online help page for the action that's currently selected on the canvas.
- If you need to remove an action from your script, select it on the canvas, then press DELETE.
- Save your script.

Connect Actions
Required Permission: ACD > Studio > Scripts >
Connecting actions creates the flow of your script. Actions have connection points on all four sides. Connectors start and end at connection points. Each connector has a condition assigned to it. When more than one path is possible, the script determines which path it takes each time it runs based on which condition applies.
There are two methods to connect actions in your script. The first is by dragging a connector from one action to another on the script canvas. The other is by selecting an action for a result branch condition on the action's properties.
Connect with Drag and Drop on the Script Canvas
- In NiCE CXone, click the app selector and select Omnichannel Routing > Studio .
- On the Scripts page, locate and double-click to open the script you want to work with
- Add two actions to the canvas workspace.
- Move the cursor over the first action so the empty connection points appear
 . A gray connector line appears and shows where the default connection will be made.
 - To quick-add a connection:
- Hover the cursor over a connection point until it changes to the blue connector circle
 .
. Click the blue connector circle. The connection is made with the Default condition.
- Hover the cursor over a connection point until it changes to the blue connector circle
- To create a drag-and-drop connection:
- Click and drag the blue connection icon to the connection point on the action you want to connect it to.
Drop the connector onto a connection point of the second action. The connection is made with the Default condition.
- Click and drag the blue connection icon
-
To change the condition for a connector:
- Click the connector line. The connector options menu pops up.
- Click condition
 and select the new condition.
- Modify the path of each connector line as needed.
- To create multiple branches from one action, add additional actions to the script and repeat these steps to connect each one.
- To remove a connector, click the connector line and select the trash can
 from the pop-up menu. You can also press Delete on your keyboard.
 - Save your script.
Connect from the Action Properties
- In NiCE CXone, click the app selector and select Omnichannel Routing > Studio .
- On the Scripts page, locate and double-click to open the script you want to work with
- Add two actions to the canvas workspace.
- Select the first action by clicking on it.
-
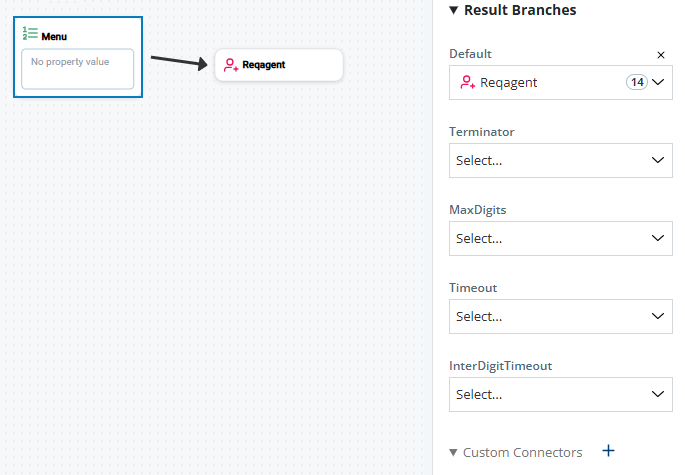
On the properties pane on the right side of the page, scroll down to the Result Branches section.
- For each result branch that you want to configure, click the drop-down for the result branch and select the action you want to connect to.
- Save your script.
Copy and Paste Actions to Another Script
You can copy one or more actions and paste them into another script. This makes it easy to replicate a section of a script in a different script.
- In NiCE CXone, click the app selector and select Omnichannel Routing > Studio .
- On the Scripts page, locate and double-click to open the script you want to work with. The script opens in a new tab.
- Select the actions you want to copy. You can:
- Click and drag on the canvas to select actions and the connectors that originate from them.
- Press and hold CTRL and click actions on the canvas. Only the actions you select are copied. Connectors are copied only if you select the actions where the connectors originate and where they terminate.
- Open a second script or create a new one.
- Press CTRL + V to paste the copied actions to this script.
- Click the group and drag it to where you want it to be on the canvas.
- Connect the pasted-in actions to the existing actions as needed.
- Modify the pasted-in actions' properties as needed.
- Save your script.
Modify Connector Paths
Required Permission: ACD > Studio > Scripts >
When you connect two actions or move an action to a new location, sometimes the connector takes a different path from what you'd prefer. You can modify connector paths on the canvas. You can change:
-
The type of line each connector uses. Connector lines can be linear with right angles, linear with any degree of angle, or curved.
-
The number of angles and curves.
-
The location of each angle and curve.
-
The connection point that the connector attaches to.
Each connector can have a different type of line. The default type is linear. You can undo or redo changes made to the line type, but not other changes to connectors.
- In NiCE CXone, click the app selector and select Omnichannel Routing > Studio .
- On the Scripts page, locate and double-click to open the script you want to work with
- Add two actions to the canvas and connect them.
-
To change the type of connector line, click the connector to select it, then click the line type icon
 and select an option.
 Learn more about fields in this step
Field Details Linear Line Connectors follow a linear path from action to action. You can add vertices to the line to change the path of portions of the line.
Right Angle Line
Connectors have right angles located at or between vertices, depending on their arrangement. When you switch a connector to a right angle line, all angles convert to right angles.
Curved Line
Connectors are curved lines. A new curve is introduced for every vertex. The sharpness of each curve depends on the arrangement of vertices relative to the starting and ending points of the connector.
- To modify a linear connector line:
- Click the connector to select it. The connector is highlighted in light gray. Existing vertices appear as black circles outlined in white
 . Portions of the connector that are vertical or horizontal have handle bars
  on them. Handle bars are either horizontal or vertical, depending on the line where they appear.
 - Click the connector again to add a new vertex.
- Click a vertex and drag it to a new location. The connector segments on either side of the vertex grow or shrink and change angle depending on how you move the vertex.
- Click a handle bar and drag it to move the segment of the connector where the handle bar appears. The connector segments on either side of the handle bar grow longer or shorter depending on which direction you move the handle bar. Horizontal handle bars can move up and down. Vertical handle bars can move from side to side.
- Click the connector to select it. The connector is highlighted in light gray. Existing vertices appear as black circles outlined in white
- To modify a right angle connector line:
- Click the connector to select it. The connector is highlighted in light gray. Existing vertices appear as black circles outlined in white . Right angle connectors do not have handle bars.
- Click the connector to add a new vertex. This adds a new point that affects where and how right angles appear in the connector. However, right angles do not always appear at vertices. Sometimes they appear between vertices, depending on the relationship between the connector line segments and the vertices.
- Click a vertex and drag it to reshape the line. The nearby connector segments adjust depending on where you move the vertex.
- Click the connector to select it. The connector is highlighted in light gray. Existing vertices appear as black circles outlined in white
- To modify a curved connector line:
- Click the connector to select it. The connector is highlighted in light gray. Existing vertices appear as black circles outlined in white . Curved connectors do not have handle bars.
- Click the connector to add a new vertex. This adds a new point that affects where and how curves appear in the connector.
- Click and drag a vertex to reshape the line. The nearby connector segments adjust depending on where you move the vertex.
- Click the connector to select it. The connector is highlighted in light gray. Existing vertices appear as black circles outlined in white
- Double-click a vertex to remove it. The nearby connector segments adjust their path.
- To change where the connector attaches to the action, you can:
- Click the connector line and drag it to a new location. The connection point slides around the perimeter of the action as you move the connector.
- Click the action to select it, then hover the cursor over the connection point where the connector attaches. When the cursor changes to a cross
 , click and drag to a new location. You can move the connector to a new point on the same action or to a different action.
- Save your script.
Add Actions from the Choose Action Menu
Required Permission: ACD > Studio > Scripts >
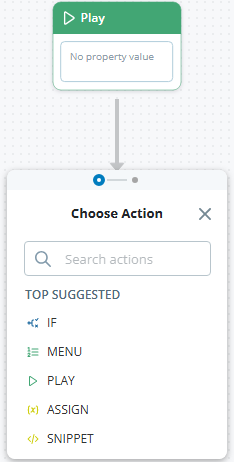
Instead of connecting to an existing action in your script, you can use the Choose Action menu to add an action and connect to it in one step. This menu appears when you drag a connector away from an action and release it without attaching it to another action. .
The Choose Action menu includes the Top Suggested list. This is a selection of the most commonly-used actions. Studio populates this list automatically. You can click an option in the list to add and connect to it.
- In NiCE CXone, click the app selector and select Omnichannel Routing > Studio .
- On the Scripts page, locate and double-click to open the script you want to work with. The script opens in a new tab.
- Add the action you want to work with to the canvas workspace, if it isn't there already.
- Click and drag the action's connection icon away from the action and release it to pop up the Choose Actions menu.
-
To search for an action:
- In the Search actions field, enter the name or part of the name of the action you want to add.
- Click the action you want from the search results on the Choose Action menu.
- To use an action from the Top Suggested list, click the action you want to add.
- Change the branch condition for the connector that was just added, if necessary. Actions added using the Choose Action menu have the Default branch condition.
Change a Branch Condition
Required Permission: ACD > Studio > Scripts >
You can change the condition that a branch uses. The condition determines what must happen for the script to take a particular branch.
- In NiCE CXone, click the app selector and select Omnichannel Routing > Studio .
- On the Scripts page, locate and double-click to open the script you want to work with. The script opens in a new tab.
-
Click to select the connector whose condition you want to change. If you have trouble selecting it, move one of the connected actions further away. Connectors cannot be selected if the actions are too close together.
- To choose a predefined condition:
- Click the condition icon in the menu that pops up.
- Select a new condition from the Choose Condition menu.
- Click the condition icon
-
To choose a custom condition:
-
Scroll down in the list of conditions on the Choose Condition menu to the Custom Conditions section. This section only appears when an action supports custom conditions and custom conditions have been added. If you haven't added a custom condition yet, do so now.
-
Click the custom condition you want to assign to this branch. Custom conditions that aren't assigned to a branch have an empty circle next to them. Custom conditions that are already assigned to branches have a green circle with a check mark next to them. If you click a condition that's already assigned, it's reassigned to the current branch and removed from its previous location.
-
Create a Custom Condition
Required Permission: ACD > Studio > Scripts >
Custom conditions allow you to define what must happen for the script to follow a particular branch. This is helpful when creating IVR![]() Interactive Voice Response. Automated phone menu contacts use via voice or key inputs to obtain information, route an inbound voice call, or both. menus. You can create a branch for each menu option and set the condition for each one to be the DTMF
Interactive Voice Response. Automated phone menu contacts use via voice or key inputs to obtain information, route an inbound voice call, or both. menus. You can create a branch for each menu option and set the condition for each one to be the DTMF![]() Signaling tones that are generated when a contact presses a key on the telephone keypad. digit the contact must enter to select that option.
Signaling tones that are generated when a contact presses a key on the telephone keypad. digit the contact must enter to select that option.
You can create a custom condition in two ways. One is on the script canvas and the other is from the Result Branches section on the action's properties pane.
Create a Custom Condition from the Script Canvas
- In NiCE CXone, click the app selector and select Omnichannel Routing > Studio .
- On the Scripts page, locate and double-click to open the script you want to work with. The script opens in a new tab.
- Add an action that supports custom conditions, such as Menu.
- Add a second action to your script. For example, you can add an action such as Play or Reqagent to create an IVR Interactive Voice Response. Automated phone menu contacts use via voice or key inputs to obtain information, route an inbound voice call, or both. menu with Menu.
-
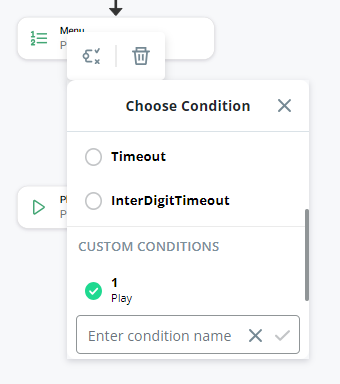
Connect the two actions and click Add Custom Condition in the Choose Condition menu.
-
Enter a name in the Enter condition name field. For example, for an IVR menu, enter the number key the contact must press to follow that branch, such as 1 or 2. The name you enter appears on the script canvas to label the connector line.
-
Click Confirm
 . The condition name appears in an oval with the connector line on the canvas workspace.

Create a Custom Condition from the Action Properties
- In NiCE CXone, click the app selector and select Omnichannel Routing > Studio .
- On the Scripts page, locate and double-click to open the script you want to work with. The script opens in a new tab.
- Add an action that supports custom conditions, such as Menu.
- Add a second action to your script. For example, you can add an action such as Play or Reqagent to create an IVR Interactive Voice Response. Automated phone menu contacts use via voice or key inputs to obtain information, route an inbound voice call, or both. menu with Menu.
- Select the first action on the script canvas.
- On the properties pane, scroll down to the Result Branches section and click the plus sign + next to Custom Connectors.
- Double-click the Custom Connector 1 field label and enter a new name for the custom condition. For example, for an IVR menu, enter the number key the contact must press to follow that branch, such as 1 or 2. The name you enter appears on the script canvas to label the connector line.
- From the Custom Connector 1 drop-down, select the action you want this custom condition to connect to. On the script canvas, a connector with the label name you specified in the preceding step appears between the two actions.
-
Click the plus sign to add another custom connector.
-
Save your script.
Add or Modify an Action's Caption
Required Permission: ACD > Studio > Scripts >
You can add captions to actions on the script canvas. This allows you to add documentation to your script. For example, you could include information about the action and the function it serves in the script.
- In NiCE CXone, click the app selector and select Omnichannel Routing > Studio .
- On the Scripts page, locate and double-click to open the script you want to work with
- Add an action to the script.
- Click the action name and select Add Caption
 .
. - Enter text in the Add Caption field below the action on the canvas.
- Press Enter or click away from the action to exit edit mode.
- To edit an existing caption, double-click the caption field to enter edit mode. You can also click the action name and select Edit Caption .
- To delete a caption, double-click the caption field and delete the text from it, then press Enter.
- Save your script.
Add an Action to the Favorites List
The Favorites category on the Actions palette allows you to create a list of favorite actions that's available in any script you open. When favorited, an action appears under Favorites and its original Actions palette category.
- In NiCE CXone, click the app selector and select Omnichannel Routing > Studio .
- On the Scripts page, locate and double-click to open the script you want to work with
- On the Actions palette , find the action you want to favorite.
- Click the star
 next to the action name. The action appears in the Favorites category.
 - To remove an action from the favorites list, click the star
 next to the action in the Favorites category.