

Email is fully integrated with other digital channels. An email case could be generated from a traditional email or a contact form on your website. The digital email channel offers a different experience from its CXone counterpart:
- Email interactions route to the agent's digital inbox
 Area where cases appear in the digital interaction workspace in an agent application and not the MAX email workspaces.
 - Routing is mostly configured using digital queues Digital First equivalent of a skill; routes each contact to an agent assigned to handle that type of contact and filters, which sync to CXone ACD skills.
Key Facts about CXone Email
- Digital email integrates with several WEM products:
- CXone Recording with screen recording: If your organization uses this feature, you can record agents' work on emails, then search for and play the recordings.
- CXone QM: If your organization uses this feature, you can evaluate emails along with other interactions.
- Interaction Analytics: If your organization uses this feature, you can analyze sentiment in digital emails. The sentiment indicators in digital email cases are also based on Interaction Analytics sentiment analysis.
- Digital email supports forwarding, escalation to chat, and changing the FROM address on outgoing emails.
- Verified SES emails have a total size limit of 40 MB (including base64 encoding). This size limit does not apply if your organization is using a custom SMTP server for emails. Contact your CXone Account Representative for more information about custom SMTP servers.
- If your tenant High-level organizational grouping used to manage technical support, billing, and global settings for your CXone environment already has Proactive Chat and Email, ask your CXone Account Representative for the email ticketing form to set up the email channel.
Add a (Legacy) Email Channel
- Click the app selector
 and select ACD.
 -
Go to DFO > Points of Contact Digital.
-
Click Email.
-
Reach out to your CXone Account Representative to help you configure a channel.
Add a CXone Email Channel
Before adding a CXone Email channel, you need to follow the steps to create and verify an email domain in AWS SES. All inbound emails go through SES before being delivered to CXone.
- Click the app selector and select ACD.
-
Go to DFO > Points of Contact Digital.
-
Click CXone Email.
-
Click Create Channel.
-
Enter the From Address and select your Verified domain from the drop-down. The point of contact
The entry point that an inbound contact uses to initiate an interaction, such as a phone number or email address. is displayed after these fields are filled. Use this point of contact in your DNS (Domain Name Server) to enable email.Learn more about this step
SES is the primary domain type. If you are participating in the controlled release program, you can also create a CXone Email channel with an email domain. You will need to set the email domain in the email support tool for it to be available in Digital Experience. For more information about the controlled release program, contact your CXone Account Representative. -
Enter a Channel Name.
-
If you want to give agents the ability to send manual outbound emails through this channel, click the Has Manual Outbound Flow toggle to turn it on.
-
Click Create New Channel.
If you want agents to be able to change the From address on outgoing emails, you need to create multiple email channels and enable the Reply permission for the Agent role.
CXone Email Channel Settings
After creating a CXone Email channel, you can edit some of the settings. The following settings can be changed directly from the email channels list:
- Outbound flow: Click Activate or Deactivate, depending if you want the email channel to use outbound. If the channel displays Deactivate, that means outbound mail can be sent from that address.
- Force TLS: Click Activate or Deactivate. When active, mail from that address is only sent if the recipient's server is able to establish a secure connection. If a secure connection cannot be established, the mail is not sent and the address is stored as bounced. If you have a custom SMTP channel, this setting is found in the Email Support Tool > Configuration tab.
You can also click Edit to change the following settings:
- Channel Name: Enter the friendly name you give the channel. This is how it appears for you in CXone.
- Display Name: Enter the name your contacts see in front of the From address to help them recognize you. This feature is not supported for custom SMTP channels.
- Spam tag: Use the drop-down to select the tag you want to use for inbound spam emails. If you haven't created a tag for spam, you must do that first. When SES suspects an inbound email is spam, it flags the email before passing it through to CXone. You can associate any emails flagged by SES with a spam tag. The tag can be used to route these emails to a different queue or to just signal to agents that it is a suspected spam email.
Make Changes in the Email Support Tool
The email support tool is not an accessible channel setting within Digital Experience. So, you must contact your CXone Account Representative for help making any changes here. For example, you can change the MAILFROM address in the email support tool with help from your CXone Account Representative.
Create a Branded Template for Outbound Emails
This task is not required.
- Click the app selector and select ACD.
- Go to DFO > Points of Contact Digital.
- Under Your Channels, click Templates.
- Click Create New Template.
- Enter a Name for the template.
- In the Template rules field, enter the HTML for the template. You can view the preview to the right.
- Click Save.

Connect a Template to a Channel
- From the Points of Contact Digital page, find the channel you want and click Edit.
- Choose the template you want to use from the Select template for outbound messages drop-down.
- Click Save.
Create a Formatted Signature for Outbound Emails
This task is not required.
- Click the app selector and select ACD.
- Go to DFO > Points of Contact Digital.
- Under Your Channels, click Automatic Signatures.
- Click Add new signature.
- Enter a Name for the signature.
- You can enter a Plain text signature, HTML signature, or both. Learn more about signature types
The HTML signature will be used first. The plain text signature is only applied if and when HTML is not supported by the channel.
Both signature types support the use of variables like {{firstName}}, {{lastName}}, and {{email}}. This allows you to create a signature that can be used by multiple users.
The HTML signature type allows you format the text with different sizes, colors, bold and underline, bullet points, and more. You can also add links.
- Click Save.
- From the Automatic Signatures page, click Assign users for the signature you just created.
- Locate the users you want to use the signature and click Add. Repeat for all users that you want to use this signature. Changes are saved automatically.
A user can only be assigned to one signature. If you add a user that is already assigned to an existing signature, they will be removed from the existing signature and added to the new one.
Configure Permissions
You need to add this channel![]() A way for contacts to interact with agents or bots. A channel can be voice, email, chat, social media, and so on. to each role that will use the channel. When you add a channel to a role, you need to configure permissions. These determine what users assigned to the role can do when interacting with the channel.
A way for contacts to interact with agents or bots. A channel can be voice, email, chat, social media, and so on. to each role that will use the channel. When you add a channel to a role, you need to configure permissions. These determine what users assigned to the role can do when interacting with the channel.
You can add this channel to existing roles or create a role in the CXone Admin application specifically for this channel. Digital Experience users can only have one role.
If you create a new role for this channel, be sure to include any necessary permissions from the Digital Engagement list on the Permissions tab in the CXone Admin application. When you save the new role, it appears in the ACD > DFO > Roles list, where you can add channels and permissions, as well as assign the role to digital agents![]() An agent who handles digital interactions, such as those on email, chat, social, messaging, and SMS channels. . Agents using CXone Agent need to have the Digital Engagement attribute enabled and be assigned to a digital skill to handle digital interactions. Agents using MAX can handle digital interactions if they have either the Digital Engagement attribute or a digital skill assigned to them.
An agent who handles digital interactions, such as those on email, chat, social, messaging, and SMS channels. . Agents using CXone Agent need to have the Digital Engagement attribute enabled and be assigned to a digital skill to handle digital interactions. Agents using MAX can handle digital interactions if they have either the Digital Engagement attribute or a digital skill assigned to them.
Be sure to add the Reply permission for all roles that need to interact with contacts![]() The person interacting with an agent, IVR, or bot in your contact center.. Without this permission, users with the role can't reply to interactions. In addition to this permission, you must also enable the Skills View permission in the Admin application to allow agents reply to messages.
The person interacting with an agent, IVR, or bot in your contact center.. Without this permission, users with the role can't reply to interactions. In addition to this permission, you must also enable the Skills View permission in the Admin application to allow agents reply to messages.
- Click the app selector and select ACD.
-
Go to DFO > Roles.
- Click the Edit icon for the role you want to use.
- In the Channels section, locate the channel you want to configure permissions for and click Edit permissions.
-
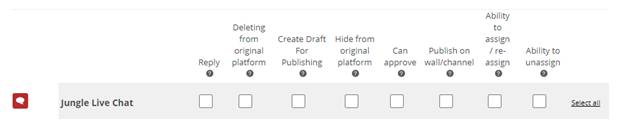
Select the checkboxes in the channel's row for each permission you want to add to the selected role.
Learn more about channel permissions
Depending on how Digital Experience is configured, some permissions may not be available.
Permission
Details
Reply
When selected, users can write replies that are published Posting directly to a social media wall, feed, or account. on behalf of the channel. Users without this permission can write drafts of messages. The drafts must be approved before they can be sent or published. Deleting from original platform When selected, users can delete a message or post A social media thread stems from one original post. A post can result in multiple threads from various contacts. from its original platform (for example, from Facebook or Twitter). Hide from original platform When selected, users can hide a message or post on its original platform (for example, Facebook or Twitter). Can approve When selected, users can approve drafts of replies written by other users. Ability to assign/re-assign When selected, users can assign or re-assign any conversation to themselves or other users. Ability to unassign When selected, users can unassign a conversation from themselves or other users. - Click Save. Continue adding permissions for other channels, as needed.
Configure Routing and Queues
You must create new digital skills in ACD. Using digital scripts is the recommended method for routing digital contacts. It's easier to build and troubleshoot the routing workflow using the visual interface of a Studio script. With routing queues, it can be a challenge to keep track of the many rules required to route contacts. You can also use Workflow Automation to create rules that work with digital skills.
You can still use these steps to configure existing routing queues, but queue creation has completely migrated to ACD skills.
You need to select a default Studio script and a default skill for each channel you create. To configure this for existing channels go to ACD> DFO > Points of Contact Digital.
You need to define how Digital Experience routes messages that come in through this channel![]() A way for contacts to interact with agents or bots. A channel can be voice, email, chat, social media, and so on.. You can modify the filters for existing routing queues
A way for contacts to interact with agents or bots. A channel can be voice, email, chat, social media, and so on.. You can modify the filters for existing routing queues![]() The system uses routing queues to determine which agents to route cases to. Your system administrator creates routing queues so that certain cases are routed to agents with expertise in that type of case. to also route for this channel. Routing queues in Digital Experience are similar to skills
The system uses routing queues to determine which agents to route cases to. Your system administrator creates routing queues so that certain cases are routed to agents with expertise in that type of case. to also route for this channel. Routing queues in Digital Experience are similar to skills![]() Used to automate delivery of interactions based on agent skills, abilities, and knowledge in ACD.
Used to automate delivery of interactions based on agent skills, abilities, and knowledge in ACD.
- Click the app selector and select ACD.
-
Go to DFO > Routing Queues.
- In the table, locate the routing queue you want to work on and click Filters.
- Locate the filter you want to use and click Conditions. You can also add a new filter.
- Click Add condition.
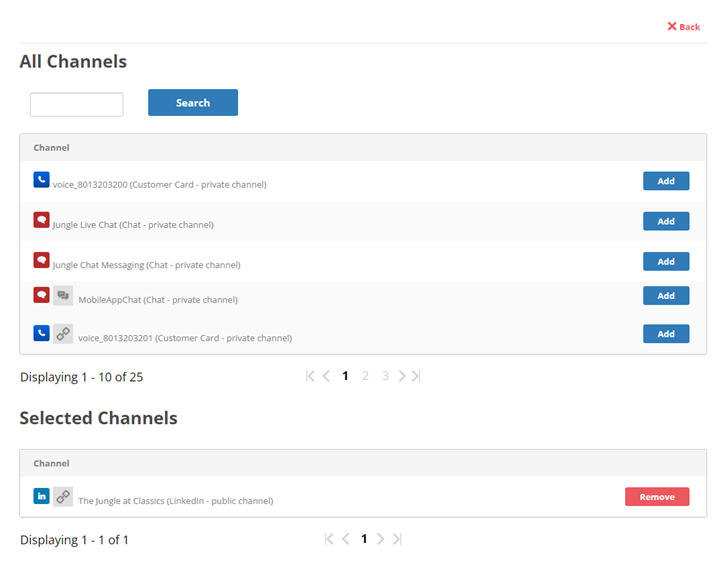
- Use the drop-down to select Included channels rule, then click Create condition for selected type.
- Click Add for each channel you want in the routing queue. Review the Selected Channels section when you're done, then click Back. Changes are saved automatically.
Create a Digital Skill
Required permissions: Skills Create and Skills Edit
Agents using CXone Agent need to have the Digital Engagement attribute enabled and be assigned to a digital skill to handle digital interactions. Agents using MAX can handle digital interactions if they have either the Digital Engagement attribute or a digital skill assigned to them.
The name of a skill should be meaningful. It's helpful to be consistent when naming skills. Decide on a standard format for skill names that works for your organization.
A skill name must have a minimum of 2 characters and a maximum of 30. Skill names may only contain letters, numbers, and these special characters:
- Hyphens (-)
- Underscores (_)
- Periods (.)
- Colons (:)
-
Click the app selector
and select ACD. -
Go to Contact Settings > ACD Skills.
-
Click Create New > Single Skill.
- Set the Media Type to Digital. Digital Any channel, contact, or skill associated with Digital Experience. skills will always be Inbound unless you are using Personal Connection or BYOC.
- Enter a Skill Name.
- Select the Campaign you want the skill to be part of.
- To use rich content in your outbound message, select a Message Template.
- To add a sub-skill to this skill, select the checkbox. This only applies if you use digital routing queues for contact skill assignment. This is not the recommended routing method. Using Studio scripts is the recommended method to manage contacts and assign skills.
-
Configure the remaining optional fields in the Skill Information section as needed.
Learn more about fields in this step
Field Details Agentless Don't select for agent dialing.
When this is selected, Workforce Intelligence Minimum Agents and Workforce Intelligence Minimum Available Agents are not available.
Sub-Skill Allows you to add a sub-skill to a skill. This lets you apply additional filters to match a skill if you use digital routing queues for contact skill assignment. However, using Studio scripts is the recommended method to manage contacts and assign skills. Sub-skill is not compatible with Studio, so it's not recommended to be used. - If you want to use screen pops A configurable pop-up window with information about the contact. It appears on an agent's screen after a certain event, usually when the agent connects to a contact. for this skill, use the POPURL action in Studio. This capability is only supported for the CXone Agent suite.
-
If your organization uses dynamic delivery, use the Routing Configuration section to customize the routing experience for this skill. To do so, select an Evaluation Criteria and configure any related settings.
Content in this section is for a product or feature in controlled release (CR). If you are not part of the CR group and would like more information, contact your CXone Account Representative.
-
Skill Proficiency: This is the default setting. Routing decisions prioritize the agent with the highest configured proficiency level for the skill.
-
Preferred Agent: Routing decisions prioritize the agent who last handled the same case or contact. If you select this option, you must configure these settings:
-
Focus Metric: Specifies which agent is the preferred agent. Choose between:
- Per Case: The agent who most recently handled an interaction linked to the customer case.
- Per Customer: The agent who most recently worked on the interaction with the contact The person interacting with an agent, IVR, or bot in your contact center..
-
Focus Lock: Specifies what happens when the preferred agent is unavailable. Choose between:
-
When Offline: The interaction waits in queue until the preferred agent becomes available or the Fallback Time is exceeded. When the Fallback Time is exceeded, the interaction routes to another agent based on skill proficiency. The receiving agent becomes the new preferred agent for the case or contact.
-
When Available: An agent may be in an available state, but still not be immediately available. For example, they may have an available status, but be handling ACW
State that allows an agent to complete work requirements after finishing an interaction, responding to a message from another contact, or otherwise busy. In this case, you must also configure Fallback Time to determine how long to wait for the preferred agent. When the Fallback Time is exceeded, the interaction routes to another agent based on skill proficiency. The receiving agent becomes the new preferred agent for the case or contact.
-
-
Fallback Time: The number of seconds to wait for the preferred agent to become available. For example, if you enter 900 seconds, the system will wait 15 minutes before routing the contact to another agent. If you choose to use Preferred Agent to route contacts, you must enter a value between 1 and 5,256,000. If you leave this field blank, you receive an error message.
Any interaction that enters the queue without an applicable contact or interaction history routes to an available agent based on skill proficiency.
-
-
-
If you want to change the default service level settings for this skill, modify the fields in the Service Level section.
Learn more about fields in this step
Field
Details
Service Level Threshold The number of seconds agents have to respond to meet an SLA Commitment between a service provider and a customer with a defined service level threshold, including quality, availability, and responsibilities. For example, if your SLA for this skill is to respond to 80% of contacts within 20 seconds, enter a value of 20.Service Level Goal
The percentage of contacts agents must respond to by the Service Level Threshold to meet the SLA. For example, if the SLA for this skill is to respond to 80% of contacts within 20 seconds, enter a value of 80
- To require agents to manually accept or reject interactions for this skill, select the Accept / Reject checkbox. If an agent rejects an interaction, it returns to the queue. This capability is only supported in Agent. This skill setting is related to a feature in controlled release (CR). If you are not part of the CR group and would like more information, contact your CXone Account Representative.
-
To enable a countdown timer for agent responses, go to Agent Response section. This capability is only supported in Agent. You can also do this later.
Learn more about fields in this step
Field Details Enabled Check the box to make the timer appear in the agent console. Clear the box to hide it. Agent First Response Enter how long you want to set the timer for. The countdown timer starts when a contact is assigned to the agent. The countdown ends when the agent sends the first message. Follow on Response
Enter how long you want to set the timer for. The countdown timer starts again when a customer responds to the agent. It ends when the agent sends a reply.
-
To unassign contacts after a timer expires, go to the Customer Response section. This capability is only supported in Agent. You can also do this later.
Learn more about fields in this step
Field Details Enabled Check the box to unassign contacts when the timer expires. Clear the box to have no idle time limit. Customer Idle Time The countdown timer starts when the agent sends the first message to the customer. The contact will automatically unassign the contact from the agent when the timer expires. Time Extension
Check the box to let an agent give the customer more time to respond. This enables a button the agent can click to reset the customer idle timer.
- Click Create. Complete additional configurations to customize or manage your skills.
Configure Default Skill and Studio Script
You need to select a default Studio script and a default skill for each channel you create. To configure this for existing channels go to ACD> DFO > Points of Contact Digital.
-
Click the app selector
and select ACD. -
Go to DFO > Points of Contact Digital.
-
Select the channel you would like to configure and click Edit.
-
Select a Studio script from the drop-down.
-
Select a default skill from the drop-down.
-
Click Save.
Configure Service Level Agreement (SLA)
SLAs help you track how effective your agents are in managing their cases![]() The full conversation with an agent through a channel. For example, an interaction can be a voice call, email, chat, or social media conversation.. Digital Experience lets you configure SLAs globally and per channel. The speed of communication can vary widely from channel to channel, so you might want different SLAs for channels with slower communication speed. For example, a live chat
The full conversation with an agent through a channel. For example, an interaction can be a voice call, email, chat, or social media conversation.. Digital Experience lets you configure SLAs globally and per channel. The speed of communication can vary widely from channel to channel, so you might want different SLAs for channels with slower communication speed. For example, a live chat![]() Agents and contacts interact on a real-time basis takes place in real time, but an email or SMS conversation may take days of back-and-forth between the agent and the customer.
Agents and contacts interact on a real-time basis takes place in real time, but an email or SMS conversation may take days of back-and-forth between the agent and the customer.
SLAs are only calculated during your configured business hours.
Agents can see the current SLAs for a case display when they click in the reply field.
If you want to configure an SLA for this channel, complete this task. Otherwise, you can skip it.
- Click the app selector and select ACD.
-
Go to DFO > SLA.
- Locate the channel you want to configure and click Edit.
- Set the toggle to YES if you want the channel to follow the global SLA or to NO, DIFFERENT to configure a specific SLA for this channel.
-
Use the drop-downs to set the number of days, hours, and minutes to set the First Response Time and Solution Time for this channel.
Learn more about these metrics
Field
Details
First Response Time (FRT) FRT starts counting the second a contact The person interacting with an agent, IVR, or bot in your contact center. creates a request (for example, sends you a message or comments on a post) and runs until an agent replies.Solution Time (ST)
ST is the total amount of time it takes to resolve a case. It starts at the same time as FRT, and runs until the case is marked Resolved by an agent. In reports, ST is sometimes referred to as RT
Resolution time, sometimes called solution time. - Click Save.