本页是跟随 Classics, Inc 的CXone Mpower Bot Builder管理员 Akela Wolfe 构建新机器人的教程。 本教程的目标是帮助您:
- 熟悉 Bot Builder 用户界面。
- 了解机器人中的主要配置以及它们如何协同工作。 主要配置类别包括 intents
 联系人所说/所输入内容背后的含义或目的;联系人想要传达或达成的事情。、entities 在与机器人对话期间从联系人的消息中收集的一条信息。、stories 用于训练机器人以根据意向和上下文进行交互处理。和 rules 用于定义对不随上下文变化的消息的机器人响应。。
 - 了解创建和使用 Bot Builder 机器人的工作流。
在学习本教程之前,请阅读有关 Bot Builder 入门的帮助页面。 它介绍了基本的对话式 AI 概念,并将它们与 Bot Builder 配置相关联。
如果您愿意,您可以跟着 Akela 来学习。 下面每个部分的下拉列表中都包含执行每项任务所需的步骤。
| 概念 | 定义 | 示例 | 机器人做什么 |
|---|---|---|---|

话语 |
联系人 |
“我丢失了密码。” “我的余额是多少?” “你是机器人吗?” |
机器人使用自然语言理解 (NLU) 来分析每个联系人话语,以确定其含义或意图。 |

意图 |
联系人想要传达或完成的内容。 联系人发送的每条消息都有一个意图。 |
“我丢失了密码”具有“重置密码”的意图。 “你好”有“打招呼”的意思。 |
机器人使用 NLU |

实体 |
联系人消息中定义的一条信息。 | 个人或产品名称、电话号码、帐号、位置等。 | 机器人使用 NLU 来识别联系人消息中的实体。 实体帮助机器人理解联系人消息的含义。 |

插槽 |
从联系人的消息中提取并保存以用于机器人响应的实体。 类似于变量。 | 为联系人姓名创建一个时间段可以让机器人在交互期间在响应中使用该姓名,使其更加个性化。 | 当被配置成执行此操作时,机器人会从联系人消息中提取实体并将其保存在插槽中。 可以让机器人稍后在对话中使用此信息。 |

规则 |
定义机器人对不会随上下文改变含义的消息的响应。 |
|
规则是配置机器人如何响应意向的两种方法之一。 规则对于某些类型的意图有用,但不适用于所有意图。 |

故事 |
训练机器人处理基于消息意图和会话上下文的交互。 | 在关于忘记密码的交互中,机器人会回应“我该怎么做? “我该怎么做?”。 如果交互是关于创建新帐户,则响应会大不相同,即使在这两种情况下,联系人都使用相同的词语和相同的意图 - 获取更多信息。 | 情景是配置机器人如何响应意向的两种方法中的第二种。 故事教机器人如何利用对话的上下文来做出适当的响应。 |

机器人操作 |
机器人在处理交互时所说或所做的任何事情。 |
在有关忘记密码的交互中,机器人通过发送网站上的密码重置常见问题解答链接来进行响应。 当联系人表达沮丧时,例如“我不明白! 没用啊!!!”时, 机器人回复“对不起。 您想让我把您转给人工坐席吗?” 当联系人同意后,机器人启动此转移。 |
机器人作是定义您希望机器人如何响应每个意向时使用的选项。 它们可使您灵活地配置每个响应,以实现满足联系人需求的结果。 |
教程范围
本教程不会产生完全工作的机器人。 它指导您完成构建和管理单个用例的过程。 许多机器人将处理多个用例。
本教程仅介绍与机器人直接相关的步骤。 它不涵盖在 中设置和配置数字或语音![]() 联络中心中用于促进客户交互的各类语音和数字通信媒介。通道CXone Mpower所需的步骤。 机器人至少需要一个通道才能在生产环境中工作。 当您准备好创建自己的机器人时,请遵循实施流程,该流程涉及了设置和管理机器人所需的所有步骤。
联络中心中用于促进客户交互的各类语音和数字通信媒介。通道CXone Mpower所需的步骤。 机器人至少需要一个通道才能在生产环境中工作。 当您准备好创建自己的机器人时,请遵循实施流程,该流程涉及了设置和管理机器人所需的所有步骤。
准备
Akela 接到的任务是创建一个新机器人。 她的经理希望该机器人能够回答基本的客户服务问题,例如如何更改密码、更新帐户详细信息等。 她与经理合作,将以下用例确定为机器人的起点:
- 更改密码
- 更改地址
- 更改电话号码
- 更改计费信用卡
Akela 决定她要处理的第一个用例是更改密码。 她与组织中的帮助台坐席交谈并审查交互![]() 通过某个渠道与坐席进行的完整对话。 例如,交互可以是语音呼叫、电子邮件、聊天或社交媒体对话。记录和记录文本。 通过使用此输入,她构建了一个典型的密码重置交互文件。
通过某个渠道与坐席进行的完整对话。 例如,交互可以是语音呼叫、电子邮件、聊天或社交媒体对话。记录和记录文本。 通过使用此输入,她构建了一个典型的密码重置交互文件。
她以前在 Bot Builder 工作过,因此 Akela 知道她的 CXone Mpower 员工资料具有访问 Bot Builder( Bot Builder > 启动 Bot Builder) 所需的权限。
如果您可以访问 CXone Mpower 中的 Bot Builder,则您拥有所需的权限。 在 CXone Mpower 中单击应用程序选择器 ![]() 并选择Bot Builder。 如果 Bot Builder 选项不存在,请与您的 CXone Mpower 管理员联系。
并选择Bot Builder。 如果 Bot Builder 选项不存在,请与您的 CXone Mpower 管理员联系。
创建新机器人
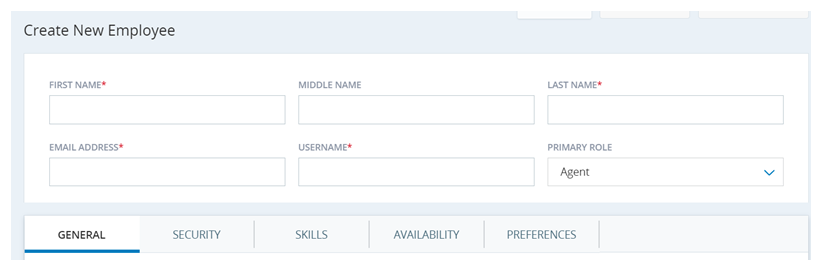
Akela 登录 CXone Mpower 并为她的机器人创建新的员工档案。 这是必需的,因为CXone Mpower将机器人视为用户实体。 所有用户实体必须在 平台 中具有员工配置文件。
- 在 CXone Mpower 中单击应用程序选择器
 并选择Admin。
 -
单击员工。
- 单击创建员工。
-
输入名字和姓氏。 这应该是您计划指定给机器人的同一姓名。 它应是一个听起来很人性化的姓名,但不是人工坐席的姓名。 例如,John Bot。
- 输入您有权访问的工作电子邮件地址。 您必须能够回复 CXone Mpower 发送的邀请。
- 以电子邮件地址的格式输入用户名。 例如,john.bot@classics.com。
-
在“常规”选项卡上,使用属性下拉列表勾选数字参与。
您的机器人还需要虚拟坐席已启用属性。 但是,现在不要添加它。 等到您已将员工配置文件分配给 Bot Builder 中的机器人。 如果您在分配该配置文件之前添加此属性,您将无法将该配置文件分配给机器人。
- 保留所有其他设置的默认值,并单击创建和邀请。
- 当邀请电子邮件到达您输入的电子邮件地址时,单击该链接以接收并按照屏幕上的提示进行操作。 您必须激活员工配置文件,否则它不会同步到 Digital Experience。
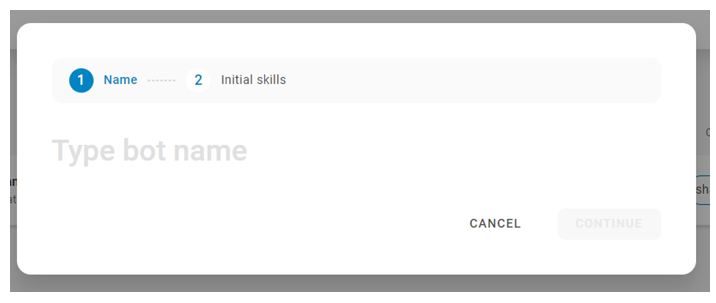
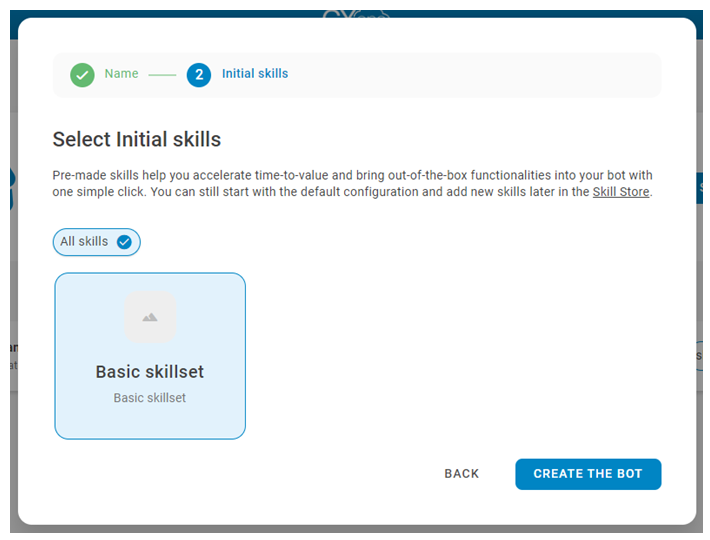
机器人
为机器人创建员工档案后,Akela 在 Bot Builder 中创建一个新机器人。 她给它起了与她在员工配置文件中使用的相同名称,John Bot。
创建意图
在查看了她收集的真实交互后,Akela 整理了一个典型的成功密码重置请求的示例。 对于此意图,其被称为愉快路径。 以下是她的示例:
联系方式![]() 与联络中心的坐席、IVR 或机器人交互的人员。: 您好.
与联络中心的坐席、IVR 或机器人交互的人员。: 您好.
机器人:您好,我可以怎样提供帮助?
联系人:我忘记密码了。
机器人:很遗憾听到这个消息。 您可以在我们的网站上进行重置。
联系人:我该怎么做?
机器人:单击登陆页面右上角的“忘记密码”。 然后输入您的电子邮件地址,系统会为您发送一个重置密码的链接。
联系人:谢谢!
机器人:不客气。 您还需要什么帮助吗?
联系人:不,你帮了很大的忙。 再见。
机器人: 谢谢您联系我们。 再见。
Akela 确定此愉快路径中有五个意图:
- 问候(您好)
- Reset_password(我忘记了密码)
- 说明(我该怎么做?)
- 谢谢(谢谢和您提供了非常大的帮助)
- 再见(再见)
Akela 创建了这些意图:
- 在 Bot Builder 中,Akela 转到 NLU 部分的“意图”选项卡。
- 她创建了一个名为 Conversation_defaults 的文件夹。
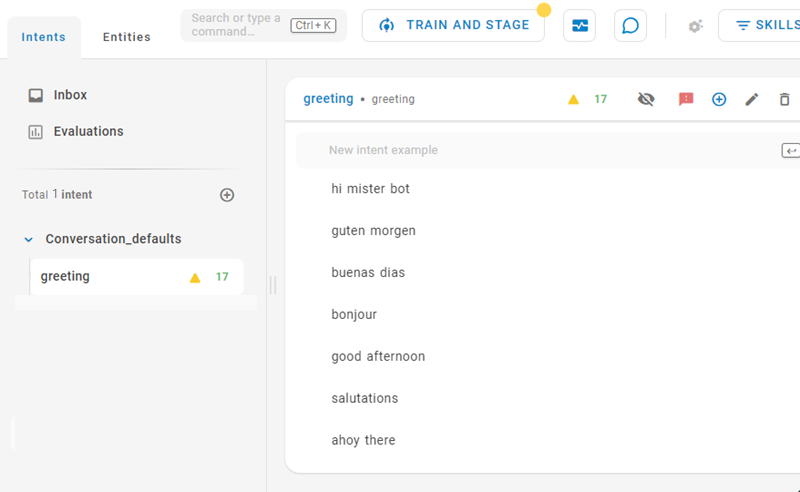
- 在该文件夹中,她创建了一个名为问候的意图。
- Akela 浏览了她收集的交互示例,并添加了联系人使用的所有不同问候作为问候意图的示例。 她添加了您好、嗨、howdy、yo,等等。
- 然后她又添加了两个意图,感谢和再见。 她为其中每一个都添加了示例,包括谢谢、非常感谢和非常感谢您。 对于再见意图,她添加了再见、再会和好的,再见。
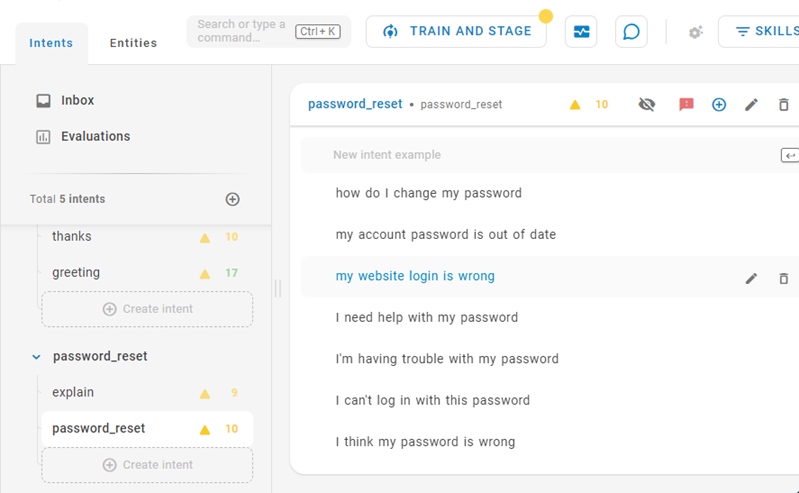
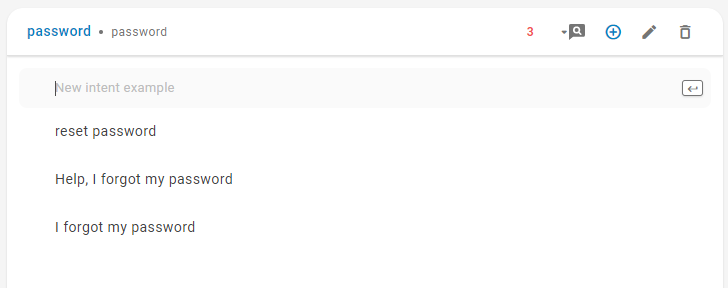
- 接下来,Akela 创建一个名为 password_reset 的文件夹。
- 她添加了名为 Reset_password 和 解释的意图,然后为她交互示例中为每个意图均添加了示例:
- 对于 Reset_password,她添加的示例如我需要更改我的密码、我的密码错误、我的密码需要更新和如何更改我的密码。
- 对于解释,她添加了一些示例,例如我该怎么做、我没有看到该选项和它在哪里。
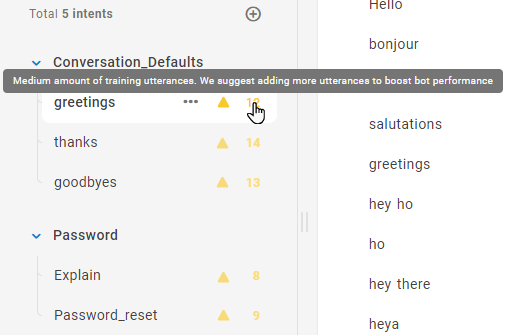
- 当 Akela 在交互示例中找到她的意图时,她继续为她的意图添加示例。 所有这些意图都有中等数量的示例。 她知道更多的示例可帮助她的机器人学习。 但她也知道不建议编造示例。 她现在没有更多要添加的内容,但可以在工作时添加更多内容。
- 单击左侧图标菜单中的NLU
 。
。 -
 。
。 -
输入名称,然后按 Enter。
- 在右侧窗格中,在新意图示例字段中输入此意图特有的短语。 在每个短语后按 Enter。 系统将自动保存更改。或者,使用
 图标为您自动生成 intent 示例。 单击 Add All 以使用所有建议的示例。 如果您不想使用所有建议的示例,请浏览列表并单击要使用的每个示例右侧的加号。
 - 如果此意图的示例包括您的机器人需要识别才能响应此意图的实体 在与机器人对话期间从联系人的消息中收集的一条信息。示例,请选择该示例并将其添加到适当的实体。
- 完成更改后,单击训练和暂存,以更新您的机器人模型 经过训练和上演的机器人版本,以便测试您的更改。
创建规则
Akela 确定规则是向她的机器人示教她创建的一些意图的正确方式。 规则教机器人在每次识别意向时对意向做出相同的响应。 这非常适合问候、再见和感谢等内容。 这些是她想要使用规则的意图。
Akela 执行的操作如下:
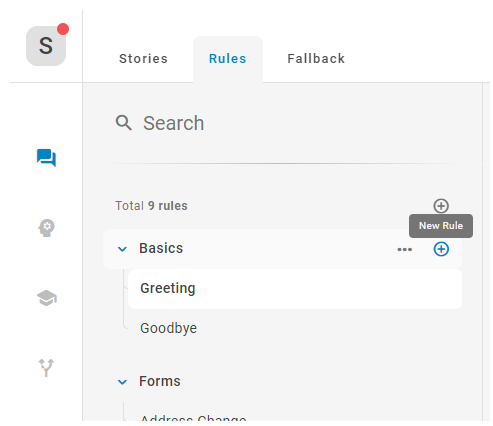
- 她在 Bot Builder “对话”部分的规则选项卡上创建了一个名为 Conversation_defaults 的文件夹。
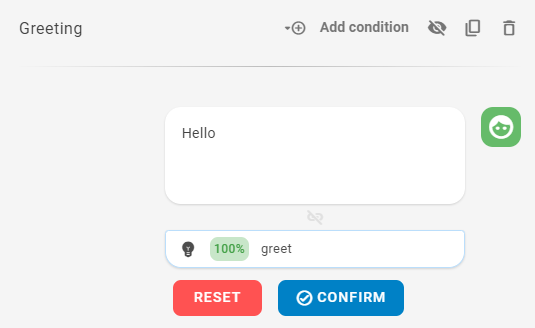
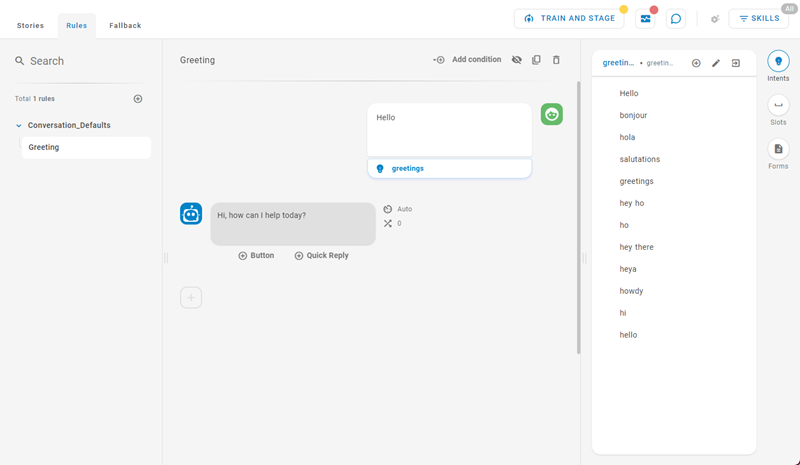
- 在该新文件夹中,Akela 添加了一个名为问候的规则。
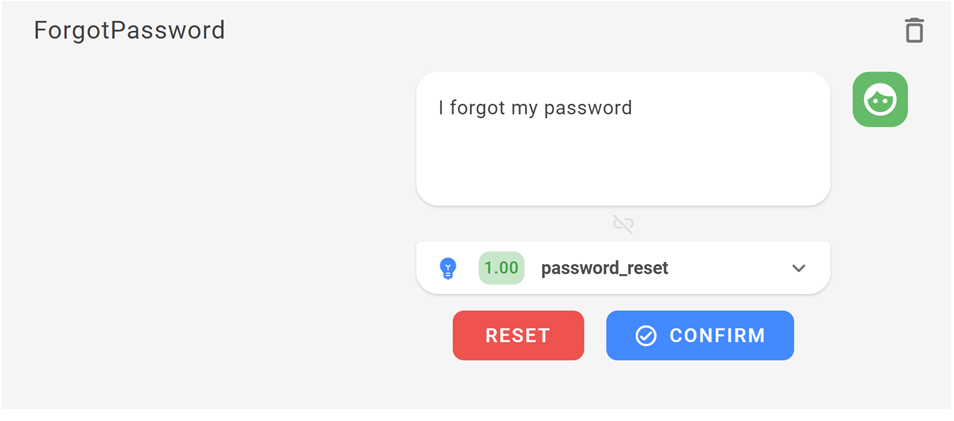
- Akela 使用您好作为示例联系人消息
 来触发问候规则。 当她按 Enter 时,她的机器人正确预测了问候意图,因此她确认了此结果。
 - 接下来,Akela 添加机器人应答
 。 她希望机器人用自己的问候语进行响应,因此她添加了一个消息作并输入嗨,我今天能提供什么帮助? 作为她希望机器人发送给联系人的消息。
 - 最后,她决定,如果联系人经常使用她的机器人,他们可能会注意到它总是做出相同的响应。 为了使体验更像与人类交谈,Akela 在响应
 添加了一些变化。 机器人将随机使用其中一种消息变体。 除了第一条消息之外,她的机器人现在还可以说嗨,感谢您与我们联系。 我能为您做什么? 您好,今天有什么可以帮您的吗?。
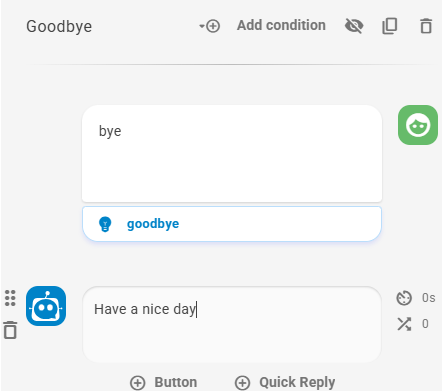
 - Akela 重复此过程并创建再见规则。 她使用再见作为触发联系人消息 。
- 机器人正确预测了再见意图,因此 Akela 确认了此结果。
- 接下来,她添加机器人的应答。 她添加了再见! 作为“消息”操作,以及将祝您有美好的一天。和祝您今天好好休息! 作为变化 。
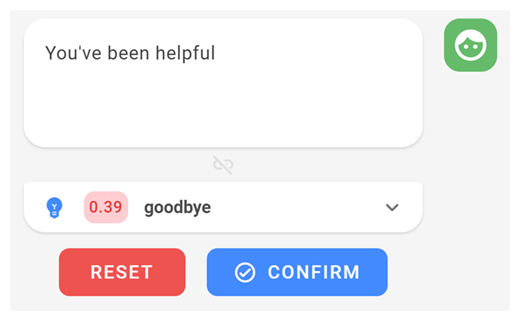
- Akela 添加的最后一个规则是谢谢。 对于此规则,她使用谢谢作为触发联系人消息 。 机器人预测了正确的意图,Akela 确认了此结果。
- 然后她添加了机器人响应。 她添加了不客气! 作为“消息”操作,以及将我很乐意提供帮助。和当然,我随时提供帮助。 作为变化 。
-
 然后单击规则选项卡。
 -
。
- 键入规则的名称并按 Enter。
- 添加联系人消息:
- 在中间面板中,单击右侧的 + 图标。 它变成联系人图标 。 在客户可能会说框中,输入联系人可能发送的消息,然后按 Enter。 Bot Builder 分析此消息并提供意图列表以及每个意图的置信度。
- 如果顶部意图是正确的意图,则单击确认。 如果不是,则单击不正确的意图以展开“意图”列表,选择正确的意图,然后单击确认。
- 在中间面板中,单击右侧的 + 图标。 它变成联系人图标
- 添加机器人响应:
- 在故事页面的中间面板中,将鼠标悬停在左侧的加号 + 上,直到它变为机器人图标 为止。
- 打开一个对话框,您可以在其中向现有响应消息添加变体。
- 在故事页面的中间面板中,将鼠标悬停在左侧的加号 + 上,直到它变为机器人图标
- 单击训练和暂存以在新规则上训练您的机器人。
创建故事
Akela 将为剩下的两个意图(Reset_password 和解释)创建故事。 她引用了她计划的有关忘记密码的愉快路径故事。 经过思考,她决定将“解释”意图与 Reset_password 意图结合起来。 这将缩短对话并改善客户体验。
在 Bot Builder 中,创建她的故事:
- 首先,她在 NLU >“意图”选项卡上隐藏了
 “解释”意图。 这将在机器人单击训练和暂存时将其从机器人中排除。 她现在想保留它,但不想将这些意图示例添加到 Reset_password 意图中。 她希望提供这些信息作为对密码请求的应答将意味着没有人会问“我该怎么做”的问题。
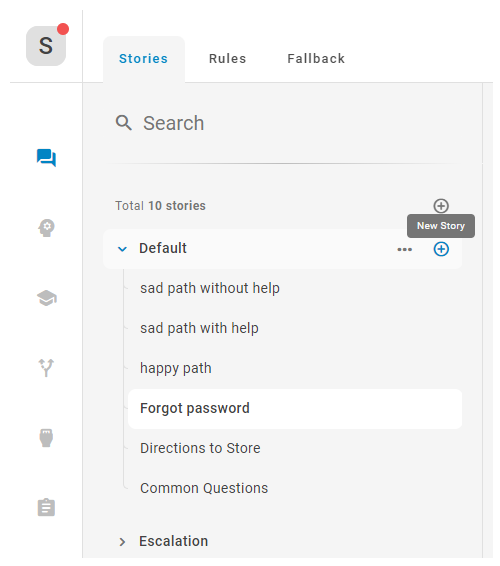
 - 在“对话”部分的“故事”选项卡上,Akela 创建一个名为 Password 的文件夹。
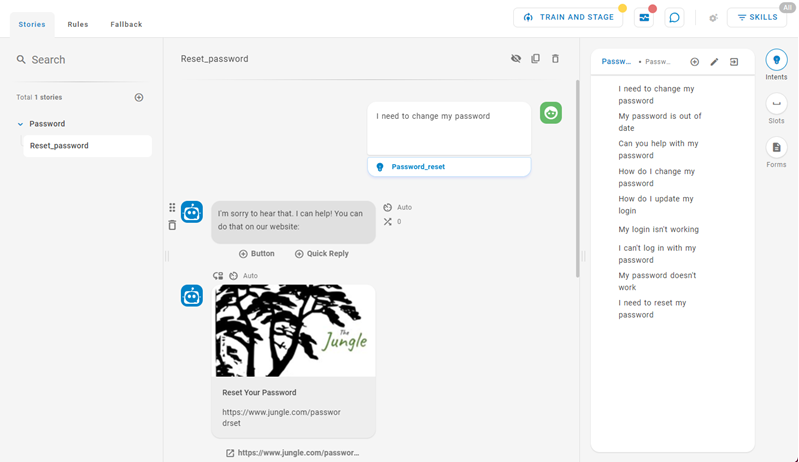
- 在该新文件夹中,她创建了一个 Reset_password 故事。
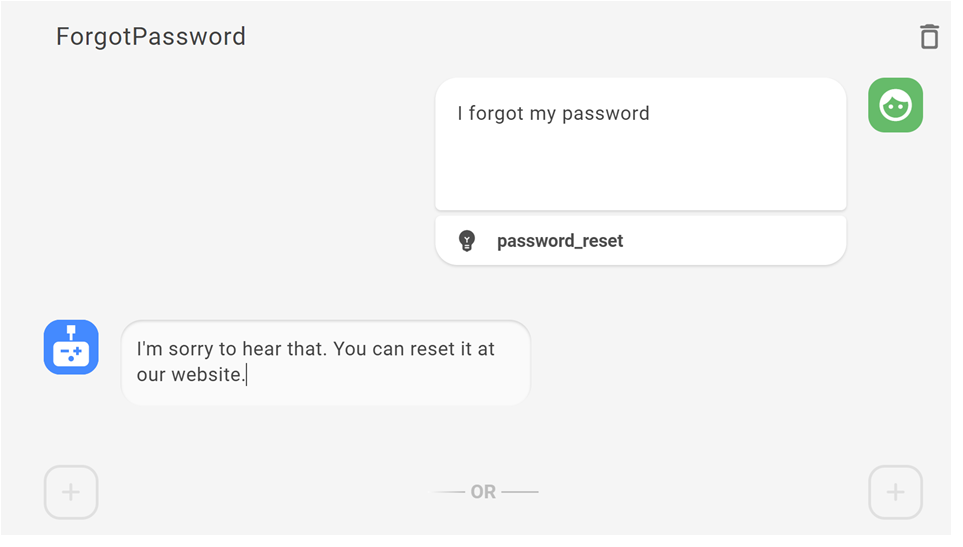
- 她以联系人信息我需要更改我的密码开始此故事。 她的机器人正确预测了Resent_password意图,因此她单击确认。
- 她添加了包含两个部分的机器人应答:
- 首先是“消息”操作,该操作带有文本很遗憾听到这个消息。 我可以帮忙! 您可以在我们的网站上执行此操作:
- 第二个是“富链接”操作,她向该操作中添加了一个可转到有关重置密码的 Jungle 网站页面的链接:www.jungle.com/passwordreset。 她包含了 Jungle 徽标的图像,该图像将显示在带有链接的消息中。
Akela 创建的这个故事只包括与 Reset_password 意图上下文相关的对话其中一部分内容。 注意这一点非常重要,因为向故事中添加与其意图不太相关的更多内容会使机器人感到困惑。 如果将内容添加到与另一个请求相关的故事中,例如更新邮寄地址,机器人会认为更改邮寄地址只能在密码重置请求的上下文中发生,即使您创建了更改邮寄地址的意图也是如此。
- ,输入名称,然后按 Enter。
- 将鼠标悬停在文件夹名称上,然后单击加号。
- 键入故事的名称并按 Enter。
- 添加一个示例,说明联系人 与联络中心的坐席、IVR 或机器人交互的人员。可能会说什么来触发您正在为其创建故事的意图:
- 在中间面板中,单击右侧的加号 +。 它变成联系人图标 。
- 在客户可能会说字段中,输入联系人可能在您创建的场景中发送的消息,然后按 Enter。 Bot Builder 分析此消息并提供意图列表以及每个意图的置信度。
- 如果预测的意图正确,请单击确认。 如果不是,请点击预测的意图以展开列表,然后选择正确的意图并点击确认。
- 在此步骤中处理意图时,Bot Builder 会在页面右侧显示配置所选意图所使用的训练示例列表。 从该列表中,您可以添加示例、修改或删除现有示例。
- 在中间面板中,单击右侧的加号 +。 它变成联系人图标
- 添加机器人响应:
- 在故事页面的中间面板中,将鼠标悬停在加号上,直到它变为机器人图标。
- 打开一个对话框,您可以在其中向刚刚添加的机器人消息添加变体。
- 在故事页面的中间面板中,将鼠标悬停在加号上,直到它变为机器人图标
- 完成更改后,单击训练和暂存,以更新您的机器人模型 经过训练和上演的机器人版本,以便测试您的更改。
训练和测试机器人
在为第一个用例创建每个意图、规则和故事后,Akela 单击训练和阶段。 这将创建一个包含这些配置的新机器人模型。 但这只是训练的第一步。 在完成密码重置用例的规则和故事添加后,Akela 需要测试她的机器人预测和响应用例中意图的能力。
为此,她开始用 Bot Builder进行训练和测试:
- Akela 做的第一件事是单击训练和阶段,以确保她的机器人及时了解她所做的所有更改。
- 在训练进行期间,Akela 找到了密码重置用例的真实对话示例。
- 她单击
 Train and Stage旁边的对话气泡。
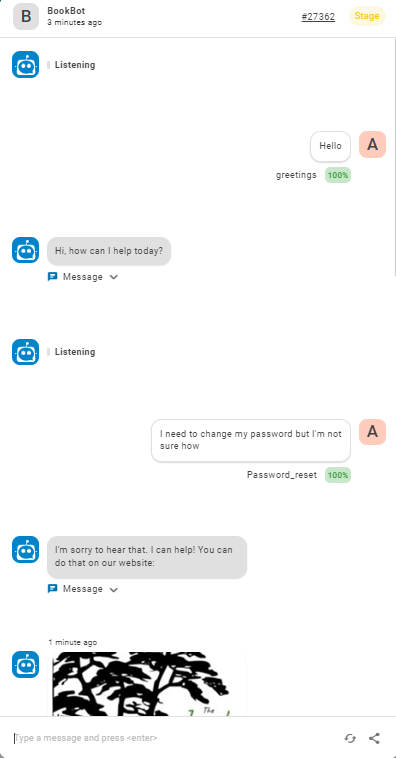
 - Akela 选择其中一个对话示例并扮演了联系人的角色。 她像脚本一样遵循该示例,并以您好开始此对话。
- 机器人表现完美。 Akela 在聊天窗口中单击重置并开始下一个对话示例。
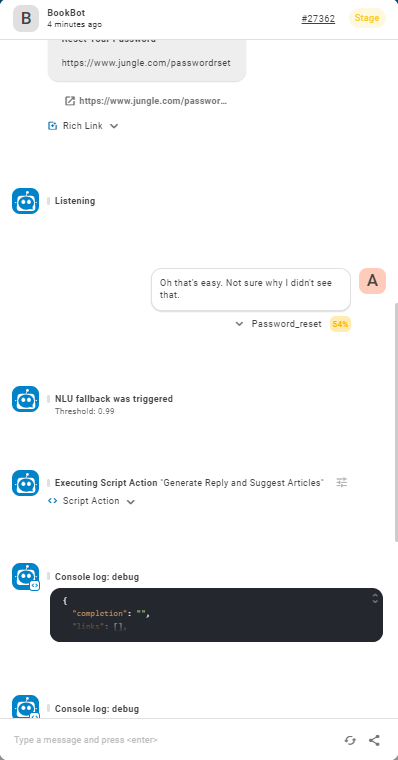
- 这次对话不太顺利。 机器人正确预测了Reset_password意图,但在它响应富链接作后,联系人回复哦,这很容易。 不知道为什么我没有看到它。
- Akela 记下了这个未识别的消息,以便稍后解决它。
- 她继续测试。 她发现机器人发送 URL 消息后,另外两个联系人回复了意外消息:
- 一个人说咄,哈哈! 那很明显! 另一个人说我以前怎么会没看到呢? 谢谢。
- 第二个应答包含单词感谢,因此机器人预测了“感谢”意图。 然而,Akela 知道,如果没有这一点,机器人可能无法做出适当的响应。
- 在测试不同的对话示例时,机器人没有预测出我的帐户被锁定的正确意图。 Akela 将此示例添加到 Reset_password 意图中。
- 她重置此聊天窗口并重复该示例对话。 这次,机器人正确预测了该意图。
- Akela 注意到,虽然我的账户被锁定触发了Reset_password意图,但我很抱歉听到这个消息! 您可以在我们的网站上执行此操作。 不是一个适当的应答。
- Akela 现在有两项任务要做,以优化她的机器人对此意图的响应:
- 为任何意外消息创建回退。
- 创建一个针对联系人因解决方案很简单而感到宽慰的表达的意图。
如果您能找到一些来自联系人的真实密码重置请求示例,请对您在本教程中创建的机器人进行一些测试。 如果您没有真实示例,您可以出于本教程的目的想象一些对话。 试着想想真实人类如何说话和提出问题。
如果您的机器人无法正确预测意图,请记录详细信息,以便您可以在测试后进行更改。
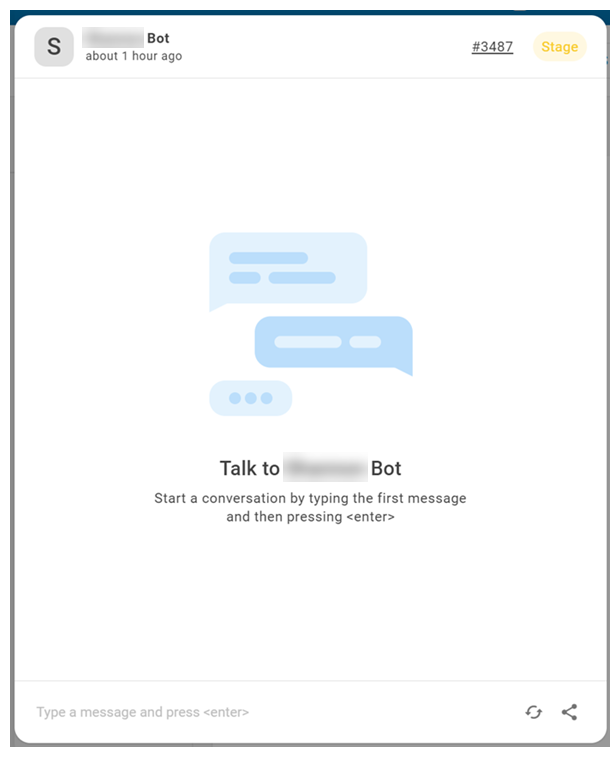
- 在任何页面。
- 就像在任何聊天对话中一样,在聊天窗口底部的字段中输入一条消息 联系人在机器人交互中所说的任何内容,无论是问题还是陈述,书面或口头。。 您的机器人会像在真实交互中一样做出响应。
- 使用聊天窗口中的选项来改进您的机器人:
- 查看机器人所做的意图预测:单击每条消息下方显示的意图预测。 下拉列表将展开以显示匹配意图以及每个意图的置信度。
- 添加您的一条消息作为 Intent 示例:将光标悬停在聊天窗口中的消息上,然后单击带有加号的灯泡
 。
。 - 转到与其中一个机器人响应关联的规则或故事:当机器人响应旁边出现意图时,单击它。 从下拉列表中,单击您想要转到的故事或规则。 Bot Builder 显示选定的规则或故事。
- 查看机器人型号:单击聊天窗口顶部的型号。
- 继续输入消息并查看机器人给出的响应。 如果机器人出现异常响应,您可以随时停止并纠正问题。 例如,您可能需要创建一个新的意图 联系人所说/所输入内容背后的含义或目的;联系人想要传达或达成的事情。或规则 用于定义对不随上下文变化的消息的机器人响应。. 进行更改后,单击 Train and Stage创建新模型,以便您可以测试并查看更改是否有效。
- 如果您需要在更正问题后重新启动交互,请单击 Reset。
创建回退
通过测试,Akela 发现,如果联系人说了一些意想不到的话,机器人不知道如何响应。 她决定创建回退方案来解决这种情况。 回退分为三种:操作、NLU 和富消息传递。 Akela 确定,对于当前的情况,NLU 回退是她需要的类型。 这是因为 NLU 回退适用于联系人说出意外内容的情况。
- 在“对话”>“回退”选项卡上,她单击页面左侧列表中的 NLU。
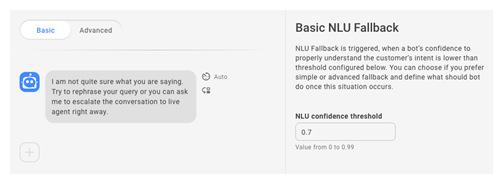
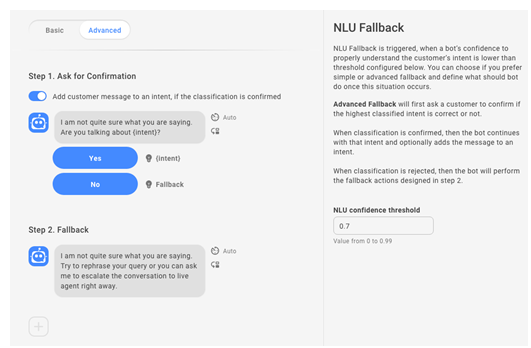
- 她查看“基本”和“高级”选项,然后选择高级。
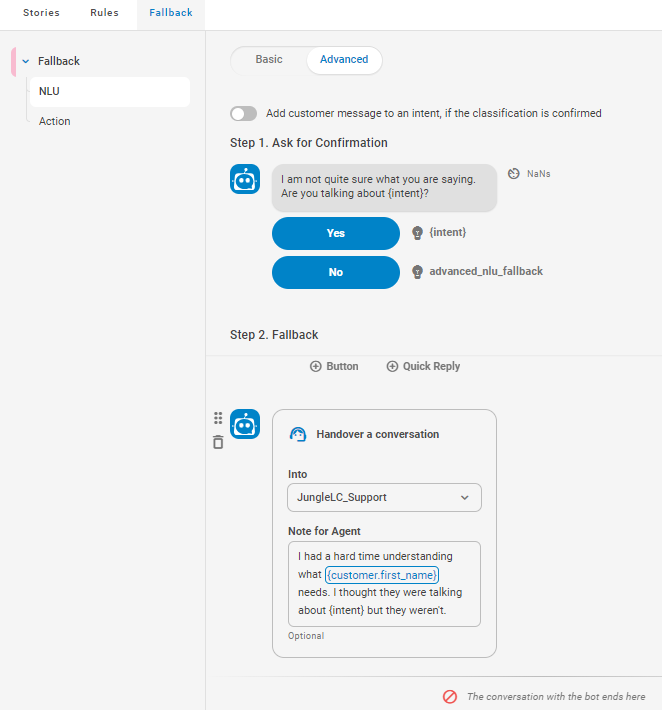
- 在“高级”页面上,她决定不更改步骤 1 的默认机器人消息。
- 对于步骤 2,Akela 添加了一个“消息”操作,然后添加了一个“移交”操作,如下图所示。
- 单击左侧图标菜单中的对话框 。
- 在“回退”选项卡中,单击 NLU。
- 单击切换以选择基本或高级。
- 如果您选择的是基本回退:
- 要为 NLU 置信度阈值使用自定义值,请在字段中输入该值。 这设置了机器人根据联系人的话语 联系人所说或输入的内容。预测意图时必须具备的最低置信度。
- 单击消息以编辑默认回应。
- 如果希望机器人使用移交 将联系人从虚拟坐席转移给人工坐席的操作。规则(如果它仍然无法理解),请单击加号 + 并选择移交。
- 要为 NLU 置信度阈值使用自定义值,请在字段中输入该值。 这设置了机器人根据联系人的话语
- 如果您选择的是高级回退:
- 在步骤 1 中,如果切换已打开,且客户确认了意图,则将消息添加到意图中。 单击消息以编辑默认回应。 您还可更改按钮的文本和意图。
- 在步骤 2 中,单击消息以编辑默认回应。
- 如果希望机器人使用移交 将联系人从虚拟坐席转移给人工坐席的操作。 作如果它仍然无法理解,请单击加号 + 并选择移交。
- 完成更改后,单击训练和暂存,以更新您的机器人模型 经过训练和上演的机器人版本,以便测试您的更改。
优化意图、规则和故事
Akela 致力于解决,从而修复联系人因解决方案很简单而感到宽慰的表达:
- Akela 转到 NLU >“意图”选项卡,然后在 Conversation_defaults 文件夹中创建宽慰意图。 她正在创建的意图是通用的,与任何情况都不具体相关。 这意味着只要联系人表达了宽慰之情,机器人便能够做出响应。
- 她添加了她已经找到的示例,包括嗯,这很明显、我怎么会没看到它和哦,这很容易。
- 接下来,她使用她的一个示例作为联系人信息来创建一个故事。 她让机器人通过“消息”操作进行响应,该操作表示我很高兴能提供帮助! 您还需要什么帮助吗?
重复测试
解决了初次测试中发现的问题后,Akela 重复进行了测试。 当她没有发现任何其他问题时,她会为她计划的其他使用案例添加更多 intent、故事和规则。 添加并测试完所有用例后,她决定将机器人部署到生产环境。
查看对话数据
在她的机器人上线几天后,Akela 在 Bot Builder 的 Insights > 对话选项卡上查看对话数据。 她很快发现,许多用户在同一条消息中同时表达了感谢和再见。 她认为,如果创建了一个多意图,那么对话将会更流畅,这样机器人就可以一起响应这些意图。 多意图涉及联系人在一条消息中具有两个意图的情况。 她开始工作:
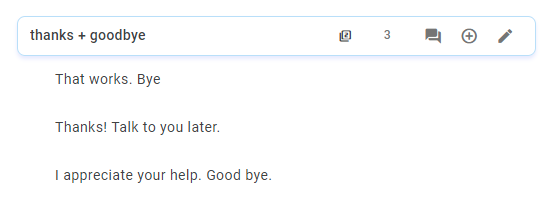
- 在 Conversation_defaults 文件夹中,她创建了一个名为感谢 + 再见的意图。 加号 (+) 使其成为一个多意图。
- Aklea 从她收集的交互示例中添加了这些意图的示例。 她添加的示例如这很有效。 再见、谢谢,稍后再聊、感谢您的帮助,再见和谢谢,再见。
- 接下来,她创建了一个使用“感谢 + 再见”意图的规则。 此机器人应答是一个“消息”操作,内容为不客气。 祝您生活愉快!
- 单击左侧图标菜单中的NLU 。
-
。
- 输入名称,然后按 Enter。 名称应包含由加号 ( + ) 连接的两个意向。
- 在右侧窗格中,在新意图示例字段中输入此意图特有的短语。 在每个短语后按 Enter。 系统将自动保存更改。或者,使用 图标为您自动生成 intent 示例。 单击 Add All 以使用所有建议的示例。 如果您不想使用所有建议的示例,请浏览列表并单击要使用的每个示例右侧的加号。
- 完成更改后,单击训练和暂存,以更新您的机器人模型 经过训练和上演的机器人版本,以便测试您的更改。