

This help page is for Studio. This information is also available for Desktop Studio.
Studio is a visual scripting tool that lets you build scripts to customize routing in NiCE CXone. It's available from within the NiCE CXone platform.
This page provides you with the information you need to know when you're first starting out with Studio.
First-Time Users
You don't need to download or install Studio. The application is accessible from within the NiCE CXone platform. Click the app selector ![]() and select Studio. The application loads showing the Scripts page, as shown in first image in the following section.
and select Studio. The application loads showing the Scripts page, as shown in first image in the following section.
The Scripts page shows all the scripts in your NiCE CXone system. From this page, you can open existing scripts or create new scripts. Scripts open in new tabs in your browser window. You can have more than one script open at a time, and each one is in its own tab.
Using Studio requires the appropriate permissions. If you don't see Studio in the app selector menu or if no scripts load onto the Scripts page, ask your NiCE CXone administrator about your permissions.
Studio User Interface
The home page of Studio is the Scripts page. There are other pages available on the left menu if you have the appropriate permissions.
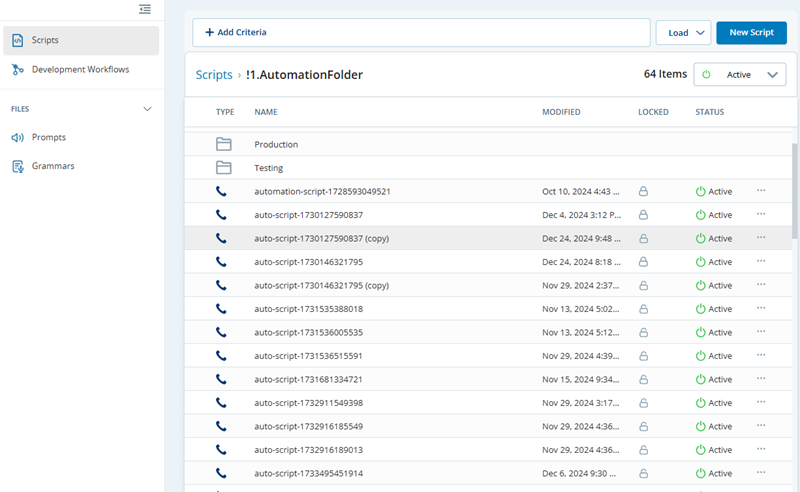
The options available on the Scripts page are described in the following table.
| Field | Details |
|---|---|
| Scripts Page | Click to load the Scripts page, where you can see all scripts available to you. Visibility of scripts may be limited by permissions, depending on how your organization has set up Studio. |
| Add Criteria | This is an option on the Scripts page. It allows you to search for scripts. You can search by script name, the names of actions in the script, words in the captions of actions in the script, variable names or values, and the script's media type |
| Load | This is an option on the Scripts page. It allows you to upload a script or a trace file located on your computer. You can save a loaded script to NiCE CXone. If you don't save the file, it is not stored in your business unit |
| New Script | This is an option on the Scripts page. Click it to create a new script of any supported media type. |
| Scripts |
This is a section on the Scripts page. It shows you all scripts in NiCE CXone that you have permission to view. For each script you can see:
Each script has a more options
|
|
Development Workflows Page |
Allows you to manage your organization's script development workflow life cycle. This page is only visible if you have the appropriate permission in NiCE CXone. |
| Prompts Page | Allows you to view, upload, or play pre-recorded audio prompt files to NiCE CXone. This page is only visible if you have the appropriate permission in NiCE CXone. |
| Grammars Page | Allows you to view or upload grammar files for use in your organization's ASR |
 for editing by a
  . Unlocked scripts are available for editing by any user the appropriate permissions.
 menu, which allows you to:
 Script Canvas Interface
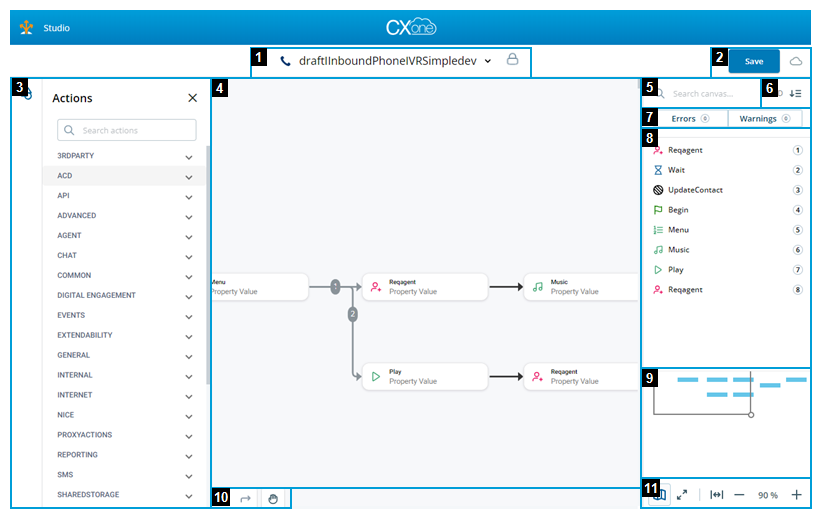
When you view a script, you see the canvas workspace and the tools available to help you work with and manage your script.
|
Field |
Description |
|---|---|
| Script Name, Type, and Options (1) |
This area shows you:
|
| Trace (2) |
Click to start a script trace, which allows you to capture and view data when the script runs. There are two trace options:
|
|
Save and Create (3) |
Save the script. When you create a new script, this button is called Create. Click it to choose a location and name the script before saving for the first time. The Create option only becomes available after you add the first action |
| Palettes and canvas options (4) |
This menu contains three options:
|
| Action palettes (5) |
Click The Actions palette
The API Actions palette Both action palettes have a search bar. Enter the name of an action. As you type, actions matching the characters you've entered so far appear in the search results on the Actions palette. Click and drag the action you want to the canvas. On both action palettes, you can click the question mark next to an action to load the help page for that action. However, most of the API actions do not have help pages because the APIs they use are fully documented in the NiCE CXone developer portal |
| Canvas Workspace (6) |
The workspace where you create and edit scripts. The canvas contains blocks called actions. Actions are linked with connector lines and have properties you can configure. Navigate around the canvas by:
|
| Actions and Variables tabs (7) |
View lists of either actions or variables in the script. When the Actions tab is selected, the options and information described in this table in rows 8-11 is visible. When the Variables tab is selected, the following options are available:
|
| Search in the script (8) |
Search for actions in the script. The search results show you all actions matching the characters you enter, along with the action ID of each one. Click an entry in the search results to highlight the corresponding action on the script canvas. The selected action's properties appear in the Properties section on the right side of the page. You may need to scroll the canvas to locate the action. The search bar is only visible when no actions are selected on the canvas and the Actions tab is selected in the properties panel. |
| Sort actions list (9) |
Click Sort By The sort option is only visible when no actions are selected on the canvas and the Actions tab is selected in the properties panel. |
| Errors and Warnings (10) |
View current errors and warnings in the script. The circle on the button displays the current number of errors or warnings. Errors prevent you from saving the script, but warnings do not. Click to view the current errors or warnings. Click the button again to hide the list of issues. The Errors and Warnings options are only visible when no actions are selected on the canvas and the Actions tab is selected in the properties panel. |
|
or Action properties (11) |
When no actions are selected on the canvas, this space shows a list of the actions currently on the script canvas:
When an action is selected on the script canvas, this space displays the Properties section:
|
| Canvas Preview (12) |
Shows you the entire canvas. Click the rectangle in the canvas preview and move it around to navigate around your script. The canvas workspace shows you the part of the script currently surrounded by the preview rectangle on the canvas preview. Click an action in the canvas preview to go to that action in the script. Studio centers on the action you clicked. For actions near the edge of the canvas, Studio comes as close as possible to centering on the action. |
| Undo, Redo, and Hand Tools (13) |
Click Click Click |
| Canvas Viewing Tools (14) | Click  to pin and unpin the canvas preview. to pin and unpin the canvas preview. Click Click Use the zoom options |
 : The script is unlocked (in read-only mode). The menu gives you the option to
  : Click to display the list of
  : Click to
  next to an action to add it to the Favorites category. The action appears in both categories and in all scripts you open unless you click the star
  in the Favorites category to remove it.
  tool, then clicking and dragging the canvas. You can toggle the Hand tool by pressing and holding the space bar on your keyboard.
  : Click to expand all variables in the list. This reveals the action or actions where each variable is used.
  : Click to collapse the variables list. This hides the actions where each variable is used.
  : Click to refresh the list of variables. This will load any new variables you've added to your script.
  : Displays the number of redacted variables. Click to add variables to the redaction list. Redacting variables eliminates their values from traces and logs.
  next to a variable name to expand it and show the actions that modify the variable.
  to the right of the search bar and choose the sort order for the list of actions in your script. You can sort by action ID or name and in ascending or descending order.
  to undo recent changes.
  to redo recently-undone changes. This option is only available immediately after undoing a change.
  to change the cursor to the hand tool. This allows you to grab the canvas to move it. Click the icon again to change the cursor back to a selection arrow.
  to open the script in full screen mode. Click again to exit full screen mode.
  to make the script shrink or expand to fit to the current size of the browser window.
  to zoom your view of the canvas in or out. Zoom level is saved per script and per user. The next time you open a script, it displays with same zoom level.
Studio scripts cannot be deleted. However, you can deactivate them. Deactivating a script removes it from the Scripts page, unless you choose to filter the list to view All or Deactivated scripts.
Create Your First Script
The steps in this section show you how to create a script, add an action, close the script, and reopen it, The Start Using Studio section on this page has suggestions for help pages you can read to learn how to build a full script.
- In NiCE CXone, click the app selector
 and select Omnichannel Routing > Studio
  .
. - On the Scripts page
 , click New Script and select a media type
 A medium, such as voice, email, and chat, through which a contact connects with an intended recipient.. For example, to create a phone script, choose Phone. The new script canvas opens in a separate tab and the browser's focus shifts to it.
 - Click Actions
 on the left side of the page to slide open the Actions palette.
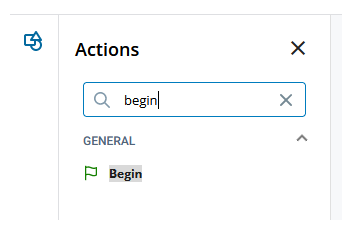
 -
Enter begin in the Search actions field.
-
Drag and drop Begin from the search result onto the script canvas workspace. The icon that appears on the canvas is called an action
Performs a process within a Studio script, such as collecting customer data or playing music.. - Click Edit Caption
 , enter a caption, then press Enter to save it. A caption is text that appears on the canvas under the action.
 - Click Create to save the script.
-
On the Create New Script window, enter a Name for the script and select the Location in NiCE CXone file storage where you want to save the script.
- You can create a folder for your scripts by clicking Create New Folder at the bottom of the Location drop-down. Enter a name for the new folder in the field that appears at the top of the list in the drop-down.
- Click Create.
- Close the tab containing the script you just created and return to the tab in your browser that shows the Scripts page.
-
On the Scripts page:
- Refresh the page.
- Navigate to the location where you saved the script you created in the previous steps. If you need to return to a previous level in the file structure, click the breadcrumbs at the top left of the page.
- Double-click the script to open it. The script opens in a new tab.
Changes to scripts are automatically saved locally in your browser. This prevents you from losing unsaved work if your browser closes unexpectedly. If this happens, the next time you open the script, Studio prompts you to open it with the unsaved changes.


Scripting with Studio
Studio has a graphical interface that lets you create basic scripts with minimal knowledge of scripting languages.
This section provides a high-level introduction to the basics of scripting in Studio. You can also follow this tutorial to create a basic script in Studio. The Fundamentals section of the online help provides more in-depth information.
Script Media Types
Studio scripts all have an assigned media type. The media type must correlate to the channel![]() Various voice and digital communication mediums that facilitate customer interactions in a contact center. in NiCE CXone that the script will work with. Media type is selected when you create a new script. The Studio script types are:
Various voice and digital communication mediums that facilitate customer interactions in a contact center. in NiCE CXone that the script will work with. Media type is selected when you create a new script. The Studio script types are:
|
|
|
|
|
|
|
|
|
|
Generic |
Chat | Phone | Voicemail | Work Item | SMS |
|


Actions
The basic building blocks of Studio scripts are called actions. Actions are how you add specific functionality to your script. There are hundreds of actions in Studio. The Actions section of the online help contains detailed pages for most of the actions. You can access online help for an action directly from Studio by selecting the action and pressing F1 on your keyboard.
You can learn more about actions in general and how to use them in scripts on the Action Basics page. In the online help, action names appear in bold orange capital letters, like this:
Branches and Conditions
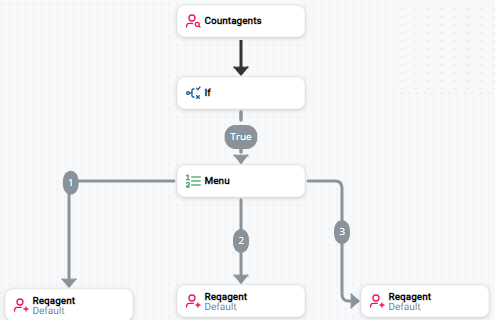
Branches are used when an action has two or more possible outcomes. They help you create the workflow your organization requires. For example, you can offer contacts a choice or build script paths to handle errors.
When you connect actions in your script, you must assign a branch condition to the connection. The condition determines the circumstances under which the script follows that branch. For example, most actions have an Error branch condition. When you assign this condition to the branch, the script will follow it if it encounters an error when running. Some actions only have one condition, called Default. Other actions have two or more conditions.
In the online help, the names of branches and branch conditions appear in bold green letters, as shown in this example: Success.

Connectors
Connectors are how you link actions and create the flow of your script. On the canvas, connectors appear as thin lines that connect two actions. Connectors have arrows at one end that point in the direction of the script's flow. They may also have labels on them. The labels indicate the branch condition currently assigned to that branch. Branches without labels are the Default branch.
Audio Prompts
Audio prompts are a fundamental part of many scripts. These are audio files that the script plays to provide information to the contact or ask the contact to make a choice or input information using their phone. You can learn more about prompts in Studio, including using text-to-speech or recording your own audio prompts to use in scripts.
In the online help, audio prompts are often referred to as sequences. This is because the prompts are created with a sequence of commands that define the components that make up each prompt and the order in which each component is played.
For example, you might want to start your IVR![]() Interactive Voice Response. Automated phone menu contacts use via voice or key inputs to obtain information, route an inbound voice call, or both. with a greeting prompt. You want it to play a recorded message that greets the contact, then a second recorded prompt that instructs the contact to choose an option but to pay attention because the menu options changed recently. Finally, you want it to play a text-to-speech (TTS
Interactive Voice Response. Automated phone menu contacts use via voice or key inputs to obtain information, route an inbound voice call, or both. with a greeting prompt. You want it to play a recorded message that greets the contact, then a second recorded prompt that instructs the contact to choose an option but to pay attention because the menu options changed recently. Finally, you want it to play a text-to-speech (TTS![]() Allows users to enter recorded prompts as text and use a computer-generated voice to speak the content.) prompt that lists all menu options. In the script, you create this single greeting prompt by adding a series of three separate sequences, one for each part of the single prompt.
Allows users to enter recorded prompts as text and use a computer-generated voice to speak the content.) prompt that lists all menu options. In the script, you create this single greeting prompt by adding a series of three separate sequences, one for each part of the single prompt.
Breaking a prompt into sequences is necessary if you combine prerecorded audio and TTS prompts. Even if your prompts are all pre-recorded audio, breaking it into sequences instead of using a single, long recorded message makes the prompt easier to manage over time. If one part changes, you don't have to record the entire prompt again. You only need to record a new version of the part that's different.
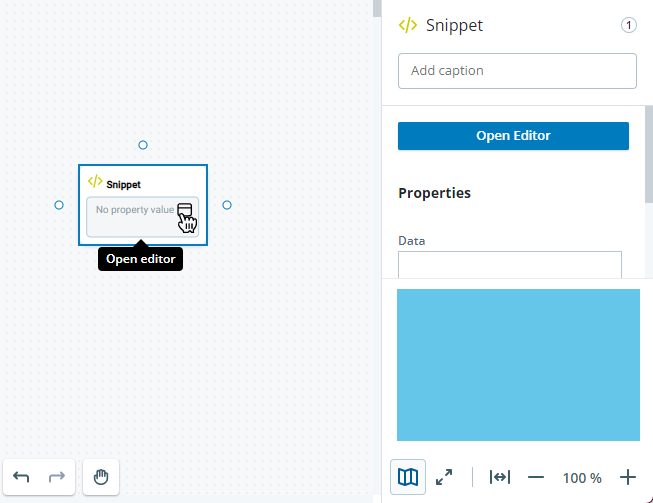
The Snippet Scripting Language
Snippet is the in-house scripting language used for all custom scripting needs in Studio. Custom scripting isn't required to create basic scripts, but it helps you fine-tune your scripts to achieve the workflow your organization needs. Some advanced features require custom scripting.
Custom Snippet code is added to scripts with the  to open the snippet editor window. This icon appears when your cursor moves over the action icon on the canvas. You can also select the action on the canvas and click Open Editor in the properties panel on the right side of the page.
You can learn about custom code snippets and how you can use them to customize your scripts. Additional reference information about scripting with Snippet in Studio is available in the technical reference guide section of the online help.
Script Changes are Automatically Saved
Script changes are automatically saved. This helps prevent losing your changes if your browser crashes or your computer reboots without warning. Auto-saves occur after each script change. If a script closes with unsaved changes, you're prompted to load the version of the script with the changes the next time you open that script. If you decline this option, the last saved version of the script opens.
Changes are saved locally in the browser you use. They're only saved on the computer where you make the change. If you open the script in a different browser or on a different computer, the last saved version of the script loads.
Keyboard Shortcuts
You can use the following keyboard shortcuts with Studio:
| Action | Shortcut |
|---|---|
| Copy | Ctrl+ C (Select actions on canvas or text first.) |
| Cut | Ctrl+ X (Select actions on canvas or text first.) |
| Debugger - Open | Ctrl + Shift + D (From within the SNIPPET action editor window.) |
| Delete an Action | Delete |
| Fit to Screen | Ctrl+0 |
| Full Screen Mode | Ctrl+Shift+F |
| Multi-Select (select more than one action on the canvas) | Ctrl (Press and hold while clicking each action.) |
| Pan (Hand) | Spacebar (Press and hold while clicking and dragging the canvas.) |
| Paste | Ctrl+V (You can copy and paste property values, text in the |
| Redo | Ctrl+Y |
| Toggle Breakpoint | F9 (From within the SNIPPET action editor window when running the debugger.) |
| Toggle Comments | Ctrl+/ (From within the SNIPPET action editor window when running the debugger.) |
| Undo | Ctrl+Z |
| Zoom In | Ctrl + (Press + repeatedly while holding Ctrl to zoom in further.) |
| Zoom Out | Ctrl - (Press - repeatedly while holding Ctrl to zoom out further.) |
Start Using Studio
- Create your first script with a tutorial.
- Learn to work with scripts in Studio. This page introduces you to the steps and tasks needed to create basic scripts.
- Learn about using actions in scripts.
- Learn about file storage in NiCE CXone.
- Review the scripting best practices.
- Deepen your understanding of the technical concepts needed to script with Studio.