

Vous pouvez définir les connaissances auxquelles les Bot Builder bots![]() Une application logicielle qui traite les interactions avec les clients à la place d’un agent en chair et en os. peuvent accéder dans Expert et les transmettre au contact
Une application logicielle qui traite les interactions avec les clients à la place d’un agent en chair et en os. peuvent accéder dans Expert et les transmettre au contact![]() La personne qui interagit avec un agent, un IVR ou un robot dans votre centre d’appels.. Cela vous donne un meilleur contrôle sur qui peut accéder aux connaissances Expert lorsque vous parlez avec un bot via Autopilot Knowledge.
La personne qui interagit avec un agent, un IVR ou un robot dans votre centre d’appels.. Cela vous donne un meilleur contrôle sur qui peut accéder aux connaissances Expert lorsque vous parlez avec un bot via Autopilot Knowledge.
Vous pouvez définir l’accès à l’aide d’une ou de plusieurs des options suivantes :
- Accès basé sur les rôles et les autorisations.
- Accès au niveau de la page basé sur la confidentialité de la page, le chemin ou les balises.
Accès basé sur les rôles et les autorisations
L'accès basé sur les rôles et les autorisations vous permet de définir les connaissances que le bot peut fournir en fonction des Expert rôles et autorisations. Vous pouvez configurer un accès dynamique ou statique :
- Dynamique : L'accès dynamique vous permet de définir l'accès aux connaissances différemment pour chaque personne qui utilise le bot en fonction des rôles et des autorisations dans Expert. La configuration de cette option nécessite d'associer des comptes d'utilisateurs autorisés à des rôles et des permissions dans Expert. Le jeton d'autorisation du contact est transmis à Expert, qui fournit uniquement les connaissances auxquelles le contact a accès en fonction de ses autorisations. Le bot utilise seulement les connaissances auxquelles le contact a l'autorisation d'accéder pour générer des réponses ou suggérer des articles au contact.
- Statique : L'accès statique vous permet de définir l'accès aux connaissances en fonction d'un seul Expert utilisateur, que vous attribuez dans les configurations Autopilot Knowledge du bot. Le bot peut fournir toutes les connaissances dont il dispose en fonction du rôle et des autorisations de l'utilisateur Expert que vous attribuez au bot. Tous les contacts reçoivent des connaissances provenant du même bassin d'informations possibles.
Si vous configurez les deux types d'accès aux connaissances basés sur les rôles et les autorisations, l'accès dynamique a priorité sur l'accès statique.
Configurer l'accès dynamique aux connaissances
Vous pouvez utiliser cette fonctionnalité avec :
- Tout fournisseur d'identité SSO (IDP) qui Expert supporte
 .
. - Digital
 Tout canal, contact ou compétence associé à Digital Experience. clavardage.
Lorsqu'aucun jeton n'est fourni, le type d'utilisateur par défaut est admin.
Les étapes de configuration de l'accès aux connaissances basé sur les autorisations sont différentes selon l'endroit où Autopilot Knowledge est configuré. Consultez les étapes sur cette page pour votre configuration :
- En tant que widget sur une plateforme tierce.
- Directement dans Guide.
Configurer l'accès dynamique aux connaissances à partir d'une plateforme tierce
- Suivez les instructions de l'aide en ligne Expert pour utiliser le jeton API du serveur. Cela vous permet de générer le jeton d'authentification propre à l'utilisateur à passer au clavardage numérique Tout canal, contact ou compétence associé à Digital Experience.. Un exemple de code est disponible.
- Dans CXone Mpower, créez un nouveau numérique champ personnalisé pour les cas. Ce champ transmettra le jeton d'authentification au CXone Mpowerplateforme.
-
Utilisez la commande API numérique chat JavaScript API dans votre script de clavardage pour transmettre le jeton à chaque nouvelle interaction.
cxone('chat', 'setCaseCustomField', 'webauthtoken', document.getElementById('mt-user-authtoken').innerText);/*]|>*/ </script> -
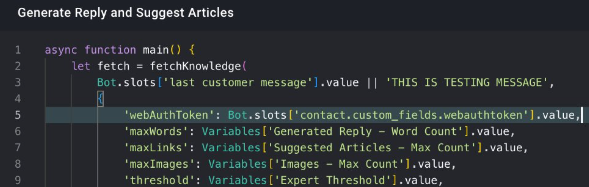
Ajoutez un nouveau paramètre appelé webAuthToken à votre script d’intégration Autopilot Knowledge. Utilisez la valeur dynamique du champ personnalisé de cas dans le nouveau paramètre. Dans l'exemple, le champ personnalisé est appelé webauthtoken.
async function main() {
  let fetch = fetchKnowledge(
    Bot.slots['last customer message'].value || 'THIS IS A TESTING MESSAGE',
       {
		'webAuthToken': Bot.slots['contact.custom_fields.webauthtoken'].value,
		'maxWords': Variables ['Generated Reply - Word Count'].value,
		[truncated]

Configurer l'accès dynamique aux connaissances à partir de Expert
Lorsque vous configurez l’accès aux connaissances dans Expert, vous n’avez pas besoin de générer un jeton d’API serveur. Il est généré automatiquement et disponible via le script deki dans Expert. Le jeton d'API du serveur vous permet de générer les jetons d'authentification spécifiques à l'utilisateur qui sont transmis au clavardage numérique.
- Dans CXone Mpower, créez un nouveau numérique champ personnalisé pour les cas. Ce champ transmettra le jeton d'authentification au CXone Mpower plateforme.
-
Extrayez le jeton généré directement de n'importe quelle page Expert via Deki Script :
<span id="mt-user-authtoken" class='mt-hide'>user.authtoken</span> -
Utilisez la commande API numérique chat JavaScript API dans votre script de clavardage pour transmettre le jeton à chaque nouvelle interaction. Utilisez document.getElementById(‘mt-user-authtoken') pour extraire le jeton de la page Expert et stocker la valeur dans le champ personnalisé webauthtoken de manière dynamique.
cxone('init', '2436'); cxone('chat', 'init', 2436, 'chat_26983c3-08e9-49d2-b935-2070e8657c8b'); cxone('chat', 'setCaseCustomField', 'webauthtoken', document.getElementById('mt-user-authtoken').innerText);/*]|>*/ </script> -
Ajoutez un nouveau paramètre appelé webAuthToken à votre script d’intégration Autopilot Knowledge. Utilisez la valeur dynamique du champ personnalisé de cas dans le nouveau paramètre. Dans l'exemple, le champ personnalisé est appelé webauthtoken.
async function main() {
  let fetch = fetchKnowledge(
    Bot.slots['last customer message'].value || 'THIS IS A TESTING MESSAGE',
       {
		'webAuthToken': Bot.slots['contact.custom_fields.webauthtoken'].value,
		'maxWords': Variables ['Generated Reply - Word Count'].value,
		[truncated]

Configurer l'accès statique aux connaissances
- Dans Expert, configurez un compte utilisateur avec le rôle et les permissions qui permettent d'accéder aux connaissances que vous voulez que le bot puisse fournir aux contacts.
- Dans CXone Mpower, cliquez sur le sélecteur d’application
 et sélectionnezBot Builder.
 - Cliquez sur le robot avec lequel vous souhaitez travailler.
- Cliquez surIntégrations
 dans le menu d’icônes de gauche.
 -
Cliquez sur l’onglet
-
Sélectionnez l'intégration du script Autopilot Knowledge.
-
Sous Variables, cliquez sur Expert - Nom d’utilisateur pour le développer.
-
Dans Valeur par défaut, entrez le nom de l'utilisateur Expert que vous souhaitez attribuer à votre bot. La valeur par défaut est admin. Votre modification est enregistrée automatiquement.
Configurer l'accès aux connaissances au niveau de la page
Vous pouvez configurer l'accès aux connaissances au niveau de la page. Cela vous permet de définir quelles pages votre bot peut envoyer aux contacts en fonction des critères suivants :
- Confidentialité des pages : choisissez le type de pages que le bot peut lire en fonction de ses paramètres de confidentialité. Vous pouvez en savoir plus sur la confidentialité des pages dans Expert .
- Chemins de page : Dans Expert, les chemins organisent des groupes de pages dans des ordres personnalisés avec des éléments de navigation séquentiels. Vous pouvez spécifier les chemins à partir desquels votre bot peut lire. Vous pouvez en apprendre davantage sur les chemins dans Expert .
- Balises de page : dans Expert, les balises de page organisent des groupes de pages par sujet. Vous pouvez spécifier les balises de page attribuées au contenu auquel votre bot peut accéder. Vous pouvez en apprendre davantage sur les balises dans Expert .
Ces critères sont définis comme des variables de script dans le script Autopilot Knowledge dans Bot Builder. Pour chacun d'eux que vous souhaitez utiliser pour définir l'accès aux connaissances, vous pouvez le configurer avec les critères spécifiques que vous souhaitez appliquer à votre bot.
- Dans CXone Mpower, cliquez sur le sélecteur d’application et sélectionnezBot Builder.
- Cliquez sur le robot avec lequel vous souhaitez travailler.
- Cliquez surIntégrations dans le menu d’icônes de gauche.
- Dans l’onglet Scripts, cliquez sur l’intégration de script Autopilot Knowledge.
- Sous Variables, cliquez sur la variable que vous voulez utiliser et changez la valeur comme suit :
- Expert - Confidentialité de la page : entrez le type de confidentialité de page que vous souhaitez utiliser. La valeur par défaut est Combiné. D'autres valeurs possibles sont Privé ou Public.
- Expert - Chemins de page : saisissez un ou plusieurs chemins à partir desquels votre bot peut lire. Séparez chaque chemin par une virgule ( , ). Par exemple, path_1, path_2, etc. dans la valeur de la variable, où path_1 et path_2 sont les chemins réels dans Expert. La valeur par défaut est None.
- Expert - Balises de page : saisissez les noms des balises de page attribuées au contenu auquel votre bot peut accéder. Séparez chaque nom de balise par une virgule ( , ). Par exemple, tag_1, tag_2, où tag_1 et tag_2 sont les noms de balises Expert réels. La valeur par défaut est Aucun.
-
Lorsque vous avez terminé vos modifications, cliquez sur Entraîner et préparer pour mettre à jour votre modèle
Version d’un robot logiciel qui a été entraîné et testé de robot afin de tester ce changement.