

This is the fourth step of setting up Agent Workspace (Embedded) (Agent Embedded) in Salesforce. This step is optional. You can skip to the next step: configure workflows.
When an agent receives an interaction![]() The full conversation with an agent through a channel. For example, an interaction can be a voice call, email, chat, or social media conversation., NiCE CXone Agent Workspace (Embedded) (Agent Embedded) for Salesforce (Agent Workspace for Salesforce) can display a screen pop
The full conversation with an agent through a channel. For example, an interaction can be a voice call, email, chat, or social media conversation., NiCE CXone Agent Workspace (Embedded) (Agent Embedded) for Salesforce (Agent Workspace for Salesforce) can display a screen pop![]() A pop-up window with information about the contact that appears on an agent's screen after an event such as connecting to a contact. to the agent. You can configure the following kinds of screen pops:
A pop-up window with information about the contact that appears on an agent's screen after an event such as connecting to a contact. to the agent. You can configure the following kinds of screen pops:
- Pinned Salesforce records
- Salesforce flows

- URLs
- Visualforce pages
- Salesforce search pages
- Object home pages
- List views
- New record forms
Configure Salesforce Record Screen Pops
You can configure created records to automatically appear as screen pops![]() A pop-up window with information about the contact that appears on an agent's screen after an event such as connecting to a contact. in Salesforce. This is part of configuring Salesforce workflows.
A pop-up window with information about the contact that appears on an agent's screen after an event such as connecting to a contact. in Salesforce. This is part of configuring Salesforce workflows.
-
Open the Snippet for Create Workflow SNIPPET action in your script.
-
In the workflow payload, copy this line of code and paste it before DYNAMIC create[RecordName]Payload:
createPayload.screenPop = "true"Make sure that createPayload matches the earlier lines in your workflow. For example, if you're using the standard Create Case workflow, this line should be createCase.screenPop = "true".
-
Save your script.
Configure Flow Screen Pop
You can use this option to display Salesforce flows  as screen pops
![]() A pop-up window with information about the contact that appears on an agent's screen after an event such as connecting to a contact.. Flow screen pops open in a new tab in Salesforce if:
A pop-up window with information about the contact that appears on an agent's screen after an event such as connecting to a contact.. Flow screen pops open in a new tab in Salesforce if:
-
You use Lightning Experience.
-
You've selected console navigation
for your Lightning App .
In all other Salesforce interfaces, and in Lightning Apps with standard navigation, flow screen pops appear in a pop-up.
This type of screen pop uses a CustomEvent action. If your script requires more than one custom event, use a new instance of CustomEvent for each one.
If you already have a flow screen pop script for Salesforce Agent (SFA), you can use its SNIPPET in addition to the scripting below.
-
In Studio, open the script you modified for Salesforce integration.
-
Add a SNIPPET action to the script after the ONANSWER or ONASSIGNMENT action.
-
Change the SNIPPET action's Caption property to indicate its purpose, such as Screen Pop to Flow.
-
Open the snippet action's editor and add the following code:
DYNAMIC payloadJSON

payloadJSON.contactId="{contactid}"
payloadJSON.data.popType = "poptoflow"
payloadJSON.data.params.flowDevName = "[Flow_Name]"
payloadJSON.data.params.flowArgs = "firstName=[First_Name]&ani={ANI}&lastName=[Last_Name]"

ASSIGN reqPayload="{payloadJSON.AsJson()}"
In this snippet:
- popType: This must be set to poptoflow so the screen pop contains a flow.
-
flowDevName: Replace [Flow_Name] with the API name of the flow you want to pop.
 Learn how to find the API names of flows
-
In Salesforce, click Setup
 in the top right.
 -
Use the Quick Find box to search for Flows, and then click Flows under Process Automation.
-
Select the flow you want to pop.
-
In the Flow Builder, click Settings
 in the top left.
 -
Locate the flow's API name in the Orchestration API Name field.
-
- flowArgs: Enter one or more arguments to pass as a query string in the URL. This is an optional property. If you've included a SNIPPET from a flow screen pop script for Salesforce Agent (SFA), you can leave this property blank: payloadJSON.data.params.flowArgs = "".
- Add a CustomEvent action after the Screen Pop to Flow SNIPPET action.
-
Change the CustomEvent action's Caption property to indicate its purpose, such as Send Screen Pop to Flow.
-
Configure the CustomEvent action's EventName property with ScreenPopCustomSettings. Do not use a different event name.
- Save your script.
Configure a URL Screen Pop
You can use this option to display any URL as a screen pop![]() A pop-up window with information about the contact that appears on an agent's screen after an event such as connecting to a contact.. To set up this type of screen pop, use the POPURL action in your script. If you want to pop more than one page, you need a POPURL action for each.
A pop-up window with information about the contact that appears on an agent's screen after an event such as connecting to a contact.. To set up this type of screen pop, use the POPURL action in your script. If you want to pop more than one page, you need a POPURL action for each.
Third-party URLs always pop to a new browser tab. Salesforce URLs can pop in the current Salesforce Lightning tab or a new tab, depending on how the agent has configured the Panel Open in Browser setting.
The following images show script examples for voice and digital scripts.
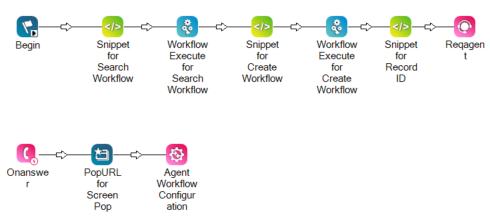
Desktop Studio voice script:
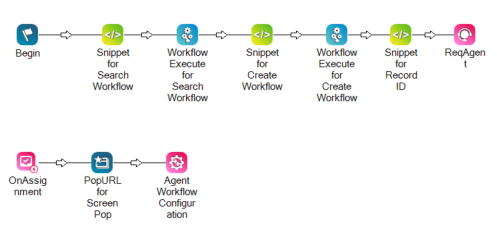
Desktop Studio digital script:
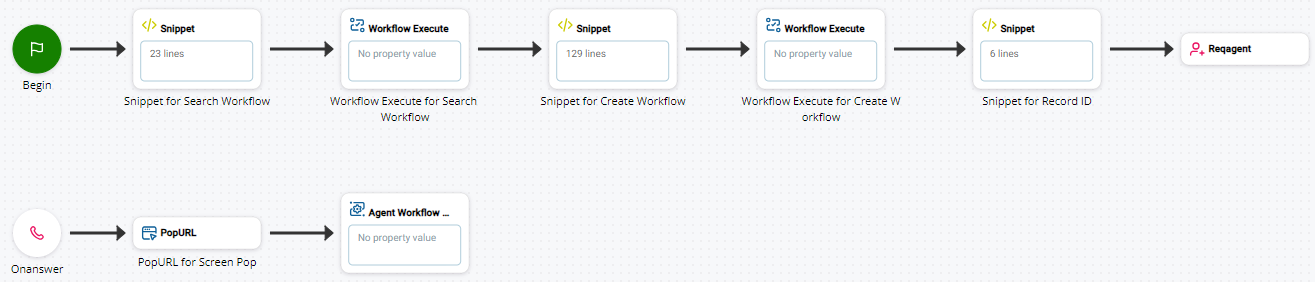
Studio voice script:
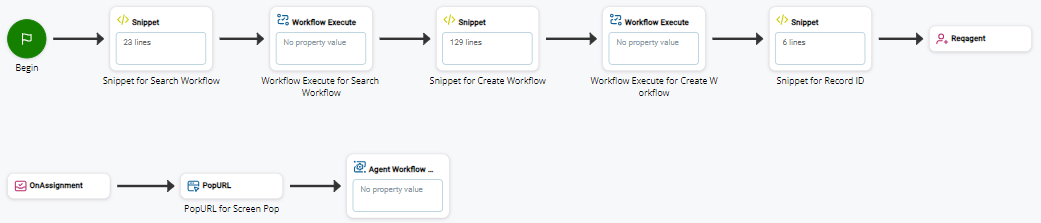
Studio digital script:
-
In Studio, open the script you modified for Salesforce integration.
-
Add a POPURL action to the script after the ONANSWER or ONASSIGNMENT action.
-
Configure the POPURL action's URL property with the URL of the page you want to screen pop to agents.
-
Save your script.
Configure a Visualforce Screen Pop
You can use this option to display Visualforce pages as screen pops![]() A pop-up window with information about the contact that appears on an agent's screen after an event such as connecting to a contact..
A pop-up window with information about the contact that appears on an agent's screen after an event such as connecting to a contact..
This type of screen pop uses a CustomEvent action. If your script requires more than one custom event, use a new instance of CustomEvent for each one.
-
In Studio, open the script you modified for Salesforce integration.
-
Add a SNIPPET action to the script after the ONANSWER or ONASSIGNMENT action.
-
Change the SNIPPET action's Caption property to indicate its purpose, such as Screen Pop to Visualforce.
-
Open the snippet action's editor and add the following code:
DYNAMIC payloadJSON payloadJSON.contactId="{contactid}" payloadJSON.data.popType = "popvisualforcepage" payloadJSON.data.params.url = "[VisualforceAPIname]?&_c={contactid}&ani={ANI}" ASSIGN reqPayload="{payloadJSON.AsJson()}" In this snippet:
- popType: This must be set to popvisualforcepage so the screen pop contains the Visualforce page.
-
url: Enter the Visualforce page's API name in the [VisualforceAPIname] placeholder. For example, vjSamplePage?&c={contactid}&ani={ANI}. The query parameters beginning with ?&c= are optional.
Learn how to find the API names of Visualforce pages
-
In Salesforce, click Setup
in the top right. -
Use the Quick Find box to search for Visualforce Pages, then click Visualforce Pages.
-
Locate the Visualforce page's API name in the Name column.
-
- Add a CustomEvent action after the Screen Pop to Visualforce SNIPPET action.
-
Change the CustomEvent action's Caption property to indicate its purpose, such as Send Screen Pop to Visualforce.
-
Configure the CustomEvent action's EventName property with ScreenPopCustomSettings. Do not use a different event name.
- Save your script.
Configure a Search Screen Pop
You can have a Salesforce search page appear as a screen pop![]() A pop-up window with information about the contact that appears on an agent's screen after an event such as connecting to a contact. when the agent receives an interaction
A pop-up window with information about the contact that appears on an agent's screen after an event such as connecting to a contact. when the agent receives an interaction![]() The full conversation with an agent through a channel. For example, an interaction can be a voice call, email, chat, or social media conversation.. This search page displays the results for a search string you configure.
The full conversation with an agent through a channel. For example, an interaction can be a voice call, email, chat, or social media conversation.. This search page displays the results for a search string you configure.
This type of screen pop uses a CustomEvent action. If your script requires more than one custom event, use a new instance of CustomEvent for each one.
-
In Studio, open the script you modified for Salesforce integration.
-
Add a SNIPPET action to the script after the ONANSWER or ONASSIGNMENT action.
-
Change the SNIPPET action's Caption property to indicate its purpose, such as Screen Pop to Search.
-
Open the snippet action's editor and add the following code:
DYNAMIC payloadJSON payloadJSON.contactId="{contactid}" payloadJSON.data.popType = "searchstring" payloadJSON.data.params.searchString = "[text entered in Salesforce search bar]" ASSIGN reqPayload="{payloadJSON.AsJson()}" In this snippet:
- popType: This must be set to searchstring so the screen pop contains the search page.
- searchString: Enter the text you want to be entered in the search bar at the top of Salesforce. The minimum length is three characters.
For example, if this line is payloadJSON.data.params.searchString = "billing", the text billing is entered in the Salesforce search bar. All the records containing the text billing appear in the results.
- Add a CustomEvent action after the Screen Pop to Search SNIPPET action.
-
Change the CustomEvent action's Caption property to indicate its purpose, such as Send Screen Pop to Search.
-
Configure the CustomEvent action's TargetAgent property with {agentid}.
-
Configure the CustomEvent action's EventName property with ScreenPopCustomSettings. Do not use a different event name.
-
Configure the CustomEvent action's PersistInMemory property with False.
-
Configure the CustomEvent action's Data property with {reqPayload}.
- Save your script.
Configure an Object Home Screen Pop
You can have the home page of a Salesforce record, or object, appear as a screen pop![]() A pop-up window with information about the contact that appears on an agent's screen after an event such as connecting to a contact. when the agent receives an interaction
A pop-up window with information about the contact that appears on an agent's screen after an event such as connecting to a contact. when the agent receives an interaction![]() The full conversation with an agent through a channel. For example, an interaction can be a voice call, email, chat, or social media conversation.. The object home page lists all the records for that record type. For example, if you screen pop to the home page of the account object, that home page lists all the account records in your Salesforce instance.
The full conversation with an agent through a channel. For example, an interaction can be a voice call, email, chat, or social media conversation.. The object home page lists all the records for that record type. For example, if you screen pop to the home page of the account object, that home page lists all the account records in your Salesforce instance.
This type of screen pop uses a CustomEvent action. If your script requires more than one custom event, use a new instance of CustomEvent for each one.
-
In Studio, open the script you modified for Salesforce integration.
-
Add a SNIPPET action to the script after the ONANSWER or ONASSIGNMENT action.
-
Change the SNIPPET action's Caption property to indicate its purpose, such as Screen Pop to Object Home.
-
Open the snippet action's editor and add the following code:
DYNAMIC payloadJSON payloadJSON.contactId="{contactid}" payloadJSON.data.popType = "objecthome" payloadJSON.data.params.scope = "[record API name]" ASSIGN reqPayload="{payloadJSON.AsJson()}" In this snippet:
- popType: This must be set to objecthome so the screen pop contains the record's home page.
-
scope: Enter the record's API name, such as account, case, or lead.
To find the API name for the record, open Salesforce and navigate to Setup
> Object Manager. Click the record's name. On the Details page that opens, find the API Name.
- Add a CustomEvent action after the Screen Pop to Object Home SNIPPET action.
-
Change the CustomEvent action's Caption property to indicate its purpose, such as Send Screen Pop to Object Home.
-
Configure the CustomEvent action's EventName property with ScreenPopCustomSettings. Do not use a different event name.
- Save your script.
Configure a List Screen Pop
You can have the list view of a Salesforce record appear as a screen pop![]() A pop-up window with information about the contact that appears on an agent's screen after an event such as connecting to a contact. when the agent receives an interaction
A pop-up window with information about the contact that appears on an agent's screen after an event such as connecting to a contact. when the agent receives an interaction![]() The full conversation with an agent through a channel. For example, an interaction can be a voice call, email, chat, or social media conversation.. List views include New This Week, Recently Viewed, and any custom list views you've configured.
The full conversation with an agent through a channel. For example, an interaction can be a voice call, email, chat, or social media conversation.. List views include New This Week, Recently Viewed, and any custom list views you've configured.
This type of screen pop uses a CustomEvent action. If your script requires more than one custom event, use a new instance of CustomEvent for each one.
-
In Studio, open the script you modified for Salesforce integration.
-
Add a SNIPPET action to the script after the ONANSWER or ONASSIGNMENT action.
-
Change the SNIPPET action's Caption property to indicate its purpose, such as Screen Pop to List.
-
Open the snippet action's editor and add the following code:
DYNAMIC payloadJSON payloadJSON.contactId="{contactid}" payloadJSON.data.popType = "list" payloadJSON.data.params.listViewId = "[list API name]" payloadJSON.data.params.scope = "[record API name]" ASSIGN reqPayload="{payloadJSON.AsJson()}" In this snippet:
- popType: This must be set to list so the screen pop contains the record's list view.
-
listViewId: Enter the list's API name, including the namespace in the prefix. For example, Test__MyOpenCases.
Learn how to find the API names of list views
-
In Salesforce, open the list view you want to screen pop.
-
Click List View Controls
in the top right, then click Rename. -
Locate the list view's API name in the List API Name field.
-
-
scope: Enter the record's API name, such as account, case, or lead.
To find the API name for the record, open Salesforce and navigate to Setup
> Object Manager. Click the record's name. On the Details page that opens, find the API Name.
- Add a CustomEvent action after the Screen Pop to List SNIPPET action.
-
Change the CustomEvent action's Caption property to indicate its purpose, such as Send Screen Pop to List.
-
Configure the CustomEvent action's EventName property with ScreenPopCustomSettings. Do not use a different event name.
- Save your script.
Configure a New Record Form Screen Pop
If no matching records are found in a search, you can have the form to create a new Salesforce record appear as a screen pop![]() A pop-up window with information about the contact that appears on an agent's screen after an event such as connecting to a contact..
A pop-up window with information about the contact that appears on an agent's screen after an event such as connecting to a contact..
This type of screen pop uses a CustomEvent action. If your script requires more than one custom event, use a new instance of CustomEvent for each one.
-
In Studio, open the script you modified for Salesforce integration.
-
Add a SNIPPET action to the script after the ONANSWER or ONASSIGNMENT action.
-
Change the SNIPPET action's Caption property to indicate its purpose, such as Screen Pop to New Record Form.
-
Open the snippet action's editor and add the following code:
DYNAMIC payloadJSON DYNAMIC fieldValues payloadJSON.contactId="{contactid}" payloadJSON.data.popType = "newrecordmodal" payloadJSON.data.params.entityName = "[record API name]" fieldValues.Phone = "{ANI}" payloadJSON.data.params.defaultFieldValues = "{fieldValues.AsJson()}" ASSIGN reqPayload="{payloadJSON.AsJson()}" In this snippet:
- popType: This must be set to newrecordmodal so the screen pop contains the form to create a new record.
-
entityName: Enter the record's API name, such as account, case, or lead.
To find the API name for the record, open Salesforce and navigate to Setup
> Object Manager. Click the record's name. On the Details page that opens, find the API Name. -
defaultFieldValues: Include this property to pre-populate the fields in the new record form. For example, the code above populates the Phone field with the {ANI} variable. This is an optional property.
- Add a CustomEvent action after the Screen Pop to New Record Form SNIPPET action.
-
Change the CustomEvent action's Caption property to indicate its purpose, such as Send Screen Pop to New Record Form.
-
Configure the CustomEvent action's EventName property with ScreenPopCustomSettings. Do not use a different event name.
- Save your script.
The next step of setting up Agent Workspace (Embedded) (Agent Embedded) in Salesforce is to configure workflows.