

This page describes the tasks you can complete in Settings  in NiCE CXone Agent Workspace (Embedded) (Agent Embedded). Agent Workspace (Embedded) (Agent Embedded) automatically saves your changes to these settings. It remembers them even if you clear your browser's cache and cookies.
Change the Default Call Volume
This setting only applies to Integrated Softphone.

-
In Agent Workspace (Embedded) (Agent Embedded), click More
 > Settings.
 - Select Login & Voice Preferences from the drop-down.
- Adjust the volume slider under Softphone.
- Agent Workspace (Embedded) (Agent Embedded) automatically saves your changes.
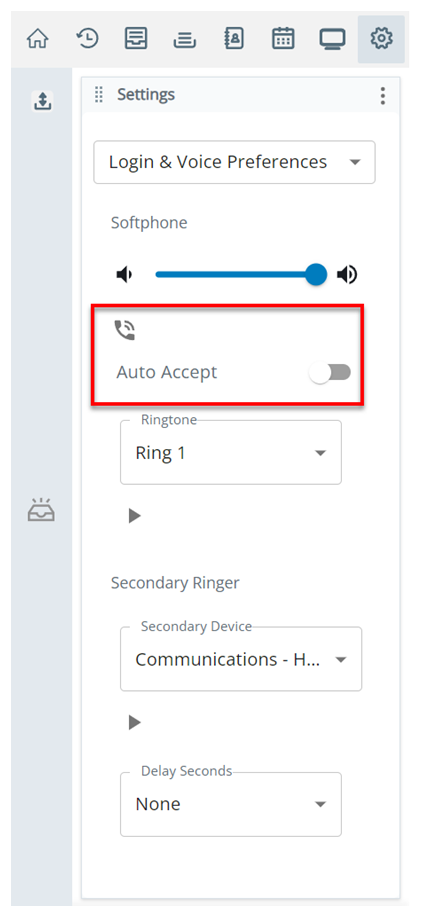
Configure Auto Accept for Incoming Calls
This setting only applies to Integrated Softphone.
-
In Agent Workspace (Embedded) (Agent Embedded), click More > Settings.
- Select Login & Voice Preferences from the drop-down.
- Enable Auto Accept to allow Integrated Softphone to answer incoming calls.
- Agent Workspace (Embedded) (Agent Embedded) automatically saves your changes.
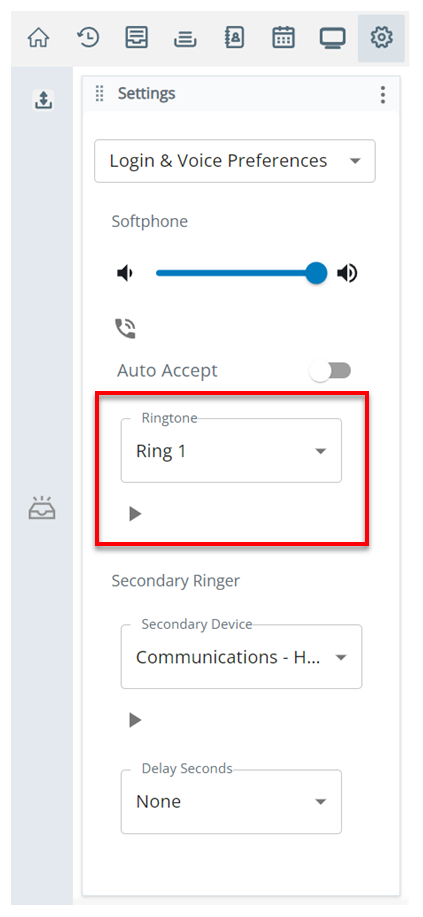
Change Your Ringtone
This setting only applies to Integrated Softphone.
-
In Agent Workspace (Embedded) (Agent Embedded), click More > Settings.
- Select Login & Voice Preferences from the drop-down.
-
Select a Ringtone for Integrated Softphone from the drop-down. Click Play Ringtone
 to hear an audio sample.
- Agent Workspace (Embedded) (Agent Embedded) automatically saves your changes.
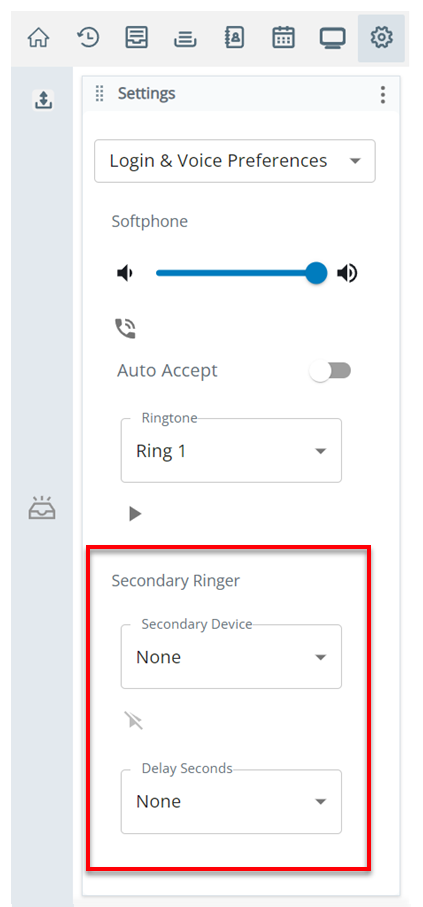
Configure Your Secondary Ringer
This setting only applies to Integrated Softphone.
You can select a headset as your secondary device. If you do this, make sure the headset is connected to your computer before you log in to Agent Workspace (Agent) again. Otherwise, Agent Workspace (Agent) does not remember the headset as your secondary device.
-
In Agent Workspace (Embedded) (Agent Embedded), click More > Settings.
- Select Login & Voice Preferences from the drop-down.
-
Select a Secondary Device from the drop-down to serve as backup for handling voice interactions. Click Play Ringtone to test the secondary ringer.
- Select a number, 0–10, from the Delay Seconds drop-down to specify how many seconds you want the system to wait before playing a ringtone to your secondary ringer.
- Agent Workspace (Embedded) (Agent Embedded) automatically saves your changes.
Enable and Use AI Noise Cancellation
When AI Noise Cancellation is enabled, Settings includes controls for reducing the background noise and echoes on either side, or both sides, of a phone call. Removing noise like other voices, traffic, and typing makes calls more professional. It also enables you to better focus on your calls.
-
Make sure AI Noise Cancellation is enabled for your system. Your administrator can help with this.
-
Make sure you've added the Agent Noise Cancellation Extension to your browser.
-
In Agent Workspace (Embedded) (Agent Embedded), click More > Settings.
- Select Login & Voice Preferences from the drop-down.
- To turn on AI Noise Cancellation for your side of calls, enable the toggle next to the microphone icon
 . Adjust the Sensitivity level.
 - To turn on AI Noise Cancellation for the contact's side of calls, enable the toggle next to the speaker icon
 . Adjust the Sensitivity level.
 - Agent Workspace (Embedded) (Agent Embedded) automatically saves your changes.
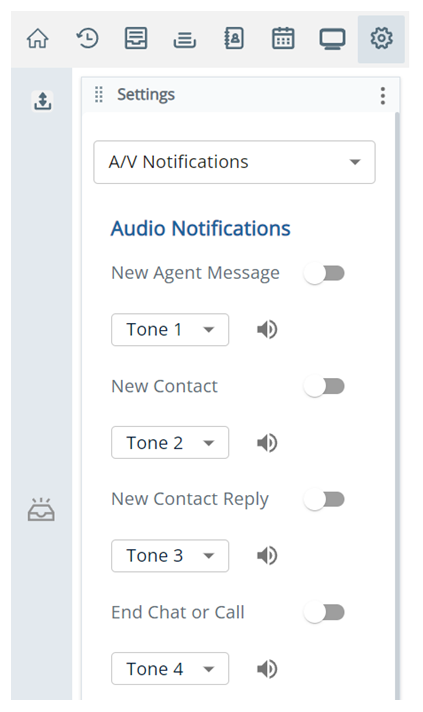
Set Up Notification Sounds
You can enable settings to hear notification sounds for different events. To hear these audio notifications, you must perform an action in Agent Workspace (Embedded) (Agent Embedded), such as clicking a menu icon or changing your agent state![]() The availability status of an agent.. Browsers require you to interact with web applications before allowing audio notifications from them. If you launch Agent Workspace (Embedded) (Agent Embedded) and receive a new interaction
The availability status of an agent.. Browsers require you to interact with web applications before allowing audio notifications from them. If you launch Agent Workspace (Embedded) (Agent Embedded) and receive a new interaction![]() The full conversation with an agent through a channel. For example, an interaction can be a voice call, email, chat, or social media conversation., but haven't yet interacted with the agent application, no audio notification occurs.
The full conversation with an agent through a channel. For example, an interaction can be a voice call, email, chat, or social media conversation., but haven't yet interacted with the agent application, no audio notification occurs.
- Ensure the following:
- Your computer is not set to Do Not Disturb.
- Notifications are enabled in your computer's settings.
- Notifications are enabled for your browser in your computer's settings.
- Your browser is not in incognito mode.
- Notifications are allowed for the Agent Workspace (Agent) URL (https://cxagent.nicecxone.com/) in your browser settings. You can use these instructions for Google Chrome or these instructions for Microsoft Edge.
- In Agent Workspace (Embedded) (Agent Embedded), click More > Settings.
-
Select A/V Notifications from the drop-down.
- Find the Audio Notifications section.
- To hear a tone when you receive a message from another agent, enable New Agent Message.
- To hear a tone when you receive a new inbound call, chat, email, SMS, or social interaction, enable New Contact.
- To hear a tone when you receive a response to a new chat, email, SMS, or social interaction, enable New Contact Reply.
- To hear a tone when a chat or call ends, enable End Chat or Call.
- In the drop-down next to each setting, select the tone you want to hear for each event. There are ten tones to choose from. Click Listen
 to play a sample.
Set Up Notification Pop-Ups
You can enable settings to see notification pop-ups for different events.

- Ensure the following:
- Your computer is not set to Do Not Disturb.
- Notifications are enabled in your computer's settings.
- Notifications are enabled for your browser in your computer's settings.
- Your browser is not in incognito mode.
- Notifications are allowed for the Agent Workspace (Agent) URL (https://cxagent.nicecxone.com/) in your browser settings. You can use these instructions for Google Chrome or these instructions for Microsoft Edge.
- In Agent Workspace (Embedded) (Agent Embedded), click More > Settings.
-
Select A/V Notifications from the drop-down.
- Find the Visual Notifications section.
- To see a pop-up notification when you receive a message from another agent, enable New Agent Message.
- To see a pop-up notification when you receive a new inbound call, chat, email, SMS, or social interaction, enable New Contact.
- To see a pop-up notification when you receive a response to a new chat, email, SMS, or social interaction, enable New Contact Reply.
- To see a pop-up notification when a chat or call ends, enable End Chat or Call.
Change Where Screen Pops Open
Administrators can set up screen pops![]() A pop-up window with information about the contact that appears on an agent's screen after an event such as connecting to a contact. in multiple ways. One of these is Studio actions
A pop-up window with information about the contact that appears on an agent's screen after an event such as connecting to a contact. in multiple ways. One of these is Studio actions![]() Performs a process within a Studio script, such as collecting customer data or playing music..
Performs a process within a Studio script, such as collecting customer data or playing music..
There are two agent settings that allow you to determine if screen pops open inside or outside Agent Workspace (Embedded) (Agent Embedded):
-
Panel Open in Browser: General is for screen pops that use any Studio action other than PAGE.
-
Panel Open in Browser: Page Action Only is for screen pops that use the PAGE Studio action.
Contact your administrator to learn which setting you should use. You can also test enabling and disabling the settings until screen pops work the way you want.
Depending on how your administrator has configured screen pops, following the steps below may not change where they open. Some screen pops always open in a new browser tab or window.
- In Agent Workspace (Embedded) (Agent Embedded), click More > Settings.
-
Select Display & Keyboard from the drop-down.
-
If the screen pops do not use the PAGE Studio action:
-
Enable Panel Open in Browser: General to have them display in an external browser tab.
-
Disable Panel Open in Browser: General to have them display in Screen Pops
 inside Agent Workspace (Embedded) (Agent Embedded).
-
-
If the screen pops use the PAGE Studio action:
-
Enable Panel Open in Browser: Page Action Only to have them display in an external browser tab.
-
Disable Panel Open in Browser: Page Action Only to have them display in Screen Pops
inside Agent Workspace (Embedded) (Agent Embedded).
-
- Agent Workspace (Embedded) (Agent Embedded) automatically saves your changes.
Enable Auto Expand for New Interactions
You can set Agent Workspace for Salesforce to expand if you receive a new interaction![]() The full conversation with an agent through a channel. For example, an interaction can be a voice call, email, chat, or social media conversation. while the agent application is minimized. This applies to calls, digital
The full conversation with an agent through a channel. For example, an interaction can be a voice call, email, chat, or social media conversation. while the agent application is minimized. This applies to calls, digital![]() Any channel, contact, or skill associated with Digital Experience (DX). interactions, voicemails, and work items
Any channel, contact, or skill associated with Digital Experience (DX). interactions, voicemails, and work items![]() Customizable method of delivering contacts to an agent via Studio scripts.. It is currently only available for Agent Workspace for Salesforce.
Customizable method of delivering contacts to an agent via Studio scripts.. It is currently only available for Agent Workspace for Salesforce.
- In Agent Workspace for Salesforce, click More > Settings.
-
Select Display & Keyboard from the drop-down.
-
To have Agent Workspace for Salesforce expand when you receive new interactions, turn on Enable auto expand of agent.
-
To have Agent Workspace for Salesforce stay minimized when you receive new interactions, turn off Enable auto expand of agent.
-
- Agent Workspace for Salesforce automatically saves your changes.
Change Email Sort Order
You can change the order emails appear in based on when they were sent.
- In Agent Workspace (Embedded) (Agent Embedded), click More > Settings.
-
Select Display & Keyboard from the drop-down.
- In Email Message Sort Order, select how you want to sort emails:
- Oldest to newest (default): The oldest emails in the thread appear at the top.
- Newest to oldest: The newest emails in the thread appear at the top.
- Agent Workspace (Embedded) (Agent Embedded) automatically saves your changes.
Choose to Send or Not Send with Enter Key
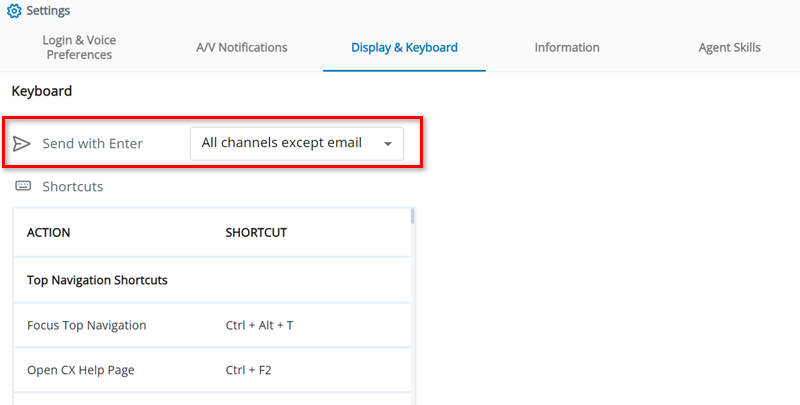
You can choose how the Enter key on your keyboard behaves when you're writing messages.
- In Agent Workspace (Embedded) (Agent Embedded), click More > Settings.
-
Select Display & Keyboard from the drop-down.
-
In the Send with Enter drop-down, select one of the following options:
-
All channels: Send all messages using the Enter key.
-
All channels except email: Send all messages except emails using the Enter key. When you're writing emails, Enter starts a new line.
-
No channels: Don't send messages using the Enter key. Instead, Enter starts a new line.
-
- Agent Workspace (Embedded) (Agent Embedded) automatically saves your changes.
View Supported Keyboard Shortcuts

Settings displays the keyboard shortcuts you can use in Agent Workspace (Embedded) (Agent Embedded). Go to ![]() > Settings
> Settings
Learn more about how to navigate Agent Workspace (Embedded) (Agent Embedded) using a keyboard.
| Action | Keyboard Shortcut |
|---|---|
| Top Navigation Shortcuts | |
| Focus Top Navigation | CTRL + ALT + T |
| Open this help page | CTRL + F2 |
| Open Notifications |
CTRL + ALT + N |
| Connect Agent Voice Link (Agent Leg) |
CTRL + ALT + C |
| Focus Agent States | CTRL + ALT + O |
| Quick Bar Shortcuts | |
| Focus Quick Bar | CTRL + ALT + B |
| Go to Home (Contact History) |
CTRL + Shift + H |
| Open Interaction Search |
CTRL + Shift + 1 |
| Open Queue Counter |
CTRL + Shift + Q |
| Open Directory |
CTRL + Shift + Z |
| Open Schedule |
CTRL + Shift + X |
| Open WEM |
CTRL + Shift + 2 |
| Open Settings |
CTRL + Shift + 4 |
| Open Custom Workspace |
CTRL + Shift + K |
| Open Reporting |
CTRL + Shift + 5 |
| Open Launch |
CTRL + Shift + 6 |
Open Customer Card  |
CTRL + Shift + U |
| Open Multiparty |
CTRL + Shift + V |
Open Copilot for Agents  |
CTRL + Shift + Y |
| Open Quick Responses |
CTRL + Shift + 3 |
| Open Screen Pops |
CTRL + Shift + F |
| Open More Menu |
CTRL + M |
| App Space Shortcuts | |
| Focus App Space | CTRL + ALT + P |
| Open Customer Card |
CTRL + ALT + U |
| Open Contact History |
CTRL + ALT + H |
| Open Interaction Search |
CTRL + ALT + 1 |
| Open Queue Counter |
CTRL + ALT + Q |
| Open Directory |
CTRL + ALT + Z |
| Open Schedule |
CTRL + ALT + X |
| Open WEM |
CTRL + ALT + 2 |
| Open Custom Workspace |
CTRL + ALT + K |
| Open Multiparty |
CTRL + ALT + V |
| Open Copilot for Agents |
CTRL + ALT + Y |
| Open Quick Responses |
CTRL + ALT + 3 |
| Open Screen Pops |
CTRL + ALT + F |
| Open More Menu |
CTRL + ALT + M |
| Phone Control Shortcuts | |
| Accept Incoming Call | CTRL + ALT + A |
| Reject Incoming Call | CTRL + ALT + R |
| Call Hold |
ALT + H |
| Call Mute |
ALT + M |
| Call Mask |
ALT + N |
| Call Record |
ALT + R |
| Open Keypad |
ALT + K |
| Go Back to Phone Controls from Keypad |
ALT + L |
| Hang Up |
ALT + \ |
| General Shortcuts | |
| Open Outcome Panel |
CTRL + ALT + D |
| Go to Next Tab |
|
| Go to Previous Tab |
|
| Switch Digital Interactions | CTRL + ALT + I |
|
Reordering Search Column Shortcuts (These keyboard shortcuts reorder the columns on the Interactions, Messages, and Threads tabs in Search |
|
| Move Up |
CTRL + U |
| Move Down |
CTRL + D |
|
Reordering Apps in Menu (These keyboard shortcuts are available for reordering the options under More |
|
| Move Up |
CTRL + U |
| Move Down |
CTRL + D |
View Information
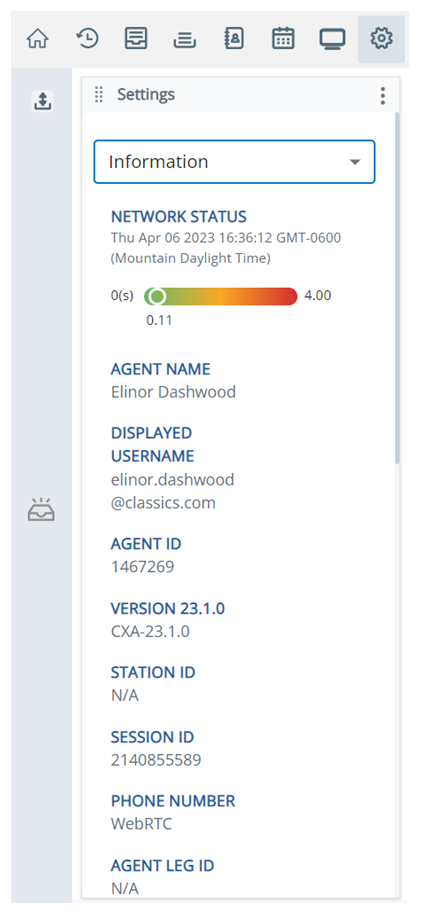
The Information displays details about your current session, including:
-
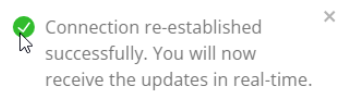
Network Status: The performance of the connection between Agent Workspace (Embedded) (Agent Embedded) and the NiCE CXone platform. If the connection is poor, a warning icon
 appears next to Settings . When the connection issue is resolved, a pop-up message appears. It indicates that you can now interact with contacts in real time.
 With a strong network connection, Agent Workspace (Embedded) (Agent Embedded) refreshes every 5–10 seconds. With a normal connection, it refreshes every 10–15 seconds.
-
Telemetric Data: If you use ChromeOS, this section displays your device's processor name, CPU usage, and memory usage. You must enable this.
-
General Information: Information about you (Agent Name, Displayed Username, Agent ID, and so on) and your Agent Workspace (Embedded) (Agent Embedded) instance (Version, Session ID, Caller ID, and so on).
-
Interaction Routing: Information about how contacts are routed to you. This includes the maximum number of contacts you can handle at a time, your routing method (static or dynamic/omni), if you can request interactions, and if Agent Workspace (Embedded) (Agent Embedded) automatically focuses on incoming interactions.
-
Logging Configuration: In the Log Level drop-down, you can select the level of console log data you want to be passed from Agent Workspace (Embedded) (Agent Embedded) to NiCE CXone Technical Support to help with troubleshooting. This controls the logs that are shown in real time. Selecting a higher log level includes all lower-level logs. For example, if you select if you select Info as the log level, logs from the Debug and Trace levels are also included.
 Learn more about log levels
Log Level Details Trace (Lowest) Shows the path the code took to reach a certain point. These logs are useful for debugging complex flows or understanding the call stack.
Debug (Low) Displays detailed debugging information. Developers use this to log variables, states, or steps during development.
Info (Medium) Shows general informational messages such as the progress or state of the application.
Warn (High) Flags potential, non-critical issues that don’t stop the app.
Error (Higher) Indicates serious issues or failures that may affect functionality.
Fatal (Highest) Represents a critical error that causes the application to crash. These are often used in logging libraries; they are not native to console in browsers.
This page is helpful for verifying session information and troubleshooting. Your administrator may ask you to navigate to this page to share these details. To do so, click ![]() > Settings
> Settings
View Skill Assignments
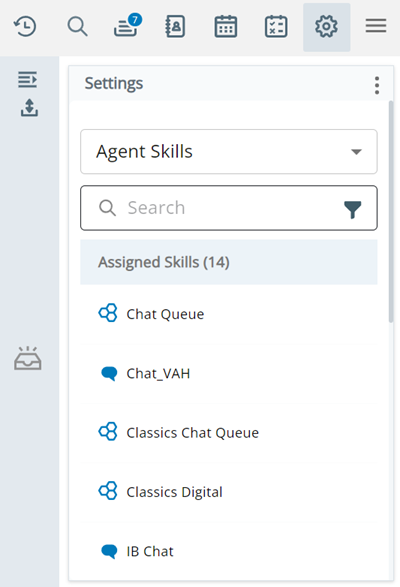
The Agent Skills page in Settings displays the skills![]() Used to automate delivery of interactions based on agent skills, abilities, and knowledge. you're currently assigned to. Use the search bar at the top to search for a specific skill. Click Filter
Used to automate delivery of interactions based on agent skills, abilities, and knowledge. you're currently assigned to. Use the search bar at the top to search for a specific skill. Click Filter ![]() to filter by Media Type, including:
to filter by Media Type, including:
-
Chat
-
Digital
-
Email
-
Voice
-
Voicemail
To navigate to the Agent Skills page, click ![]() > Settings
> Settings