

You can enable co-browse for voice and digital![]() Any channel, contact, or skill associated with Digital Experience (DX). skills. Co-browse allows agents to share browser sessions with contacts
Any channel, contact, or skill associated with Digital Experience (DX). skills. Co-browse allows agents to share browser sessions with contacts![]() The person interacting with an agent, IVR, or bot in your contact center.. This helps them share information faster.
The person interacting with an agent, IVR, or bot in your contact center.. This helps them share information faster.
Enable Co-Browse for Voice Skills
This involves Studio scripting. Your organization's NiCE CXone administrator, agent application administrator, and Studio script developer may need to coordinate to complete this task.

-
Make sure Co-Browse is enabled for your system. Your account representative can help with this.
-
Launch and log in to Studio.
-
Open the script assigned to the voice skill. This is the script you selected in the Transferred to Script field in ACD Skills.
-
Click the ONANSWER action in your script. In the Properties pane, make sure these properties are set to their default values:
-
SkillNameVar: SKLNAME
-
AgentFirstName: FIRST
-
AgentLastName: LAST
-
AgentID: AGENTID
-
-
Add a SETSECURITYUSER action after ONANSWER. In the Properties pane, set Agent to {AGENTID}.
-
Add an AGENTLIST action after SETSECURITYUSER. This action is located on the Framework tab. In the Properties pane, set:
-
AgentId to {Global:__agentId}.
-
ListVar (out) to Agents.
-
-
Add a SNIPPET action after AGENTLIST. Double-click the SNIPPET action. Copy each of the following lines of code and paste them into the Text View tab of the Editor window.
ASSIGN agentEmail = agents[1].Email ASSIGN agentFirstName = agents[1].FirstName ASSIGN agentLastName = agents[1].LastName ASSIGN businessUnitId = agents[1].BusinessUnitId -
Add a GETPAGE action after SNIPPET. In the Properties pane, set:
-
URL to https://nic.surf.ly/get_token?agentFirstName={agentFirstName}&agentEmail={agentEmail}&businessUnitId={businessUnitId}.
-
ResultVar to token.
-
-
Add an INDICATE action after GETPAGE. In the Properties pane, set ActionValue to https://app.surfly-us.com/embed/start/?agent_token={token}.
-
Save your script.
Enable Co-Browse for Digital Skills
This involves Studio scripting. Your organization's NiCE CXone administrator, agent application administrator, and Studio script developer may need to coordinate to complete this task.
-
Make sure Co-Browse is enabled for your system. Your account representative can help with this.
-
Launch and log in to Studio.
-
Open the script assigned to the digital skill. This is the script you selected in Points of Contact Digital.
-
Click the ONASSIGNMENT action in your script. In the Properties pane, make sure these properties are set to their default values:
-
SkillID: SKLID
-
SkillName: SKLNAME
-
AgentFirstName: FIRST
-
AgentLastName: LAST
-
UserID: USERID
-
AgentID: AGENTID
-
PriorAgentFirstName: PRIORFIRST
-
PriorAgentLastName: PRIORLAST
-
PriorUserID: PRIORUSERID
-
PriorAgentID: PRIORAGENTID
-
IsTransfer: ISTRANSFER
-
-
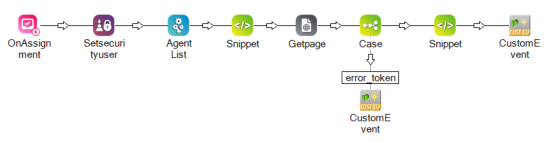
Add a SETSECURITYUSER action after ONANSWER. In the Properties pane, set Agent to {AGENTID}.
-
Add an AGENTLIST action after SETSECURITYUSER. This action is located on the Framework tab. In the Properties pane, set:
-
AgentId to {agentID}.
-
ListVar (out) to Agents.
-
-
Add a SNIPPET action after AGENTLIST. Double-click the SNIPPET action. Copy each of the following lines of code and paste them into the Text View tab of the Editor window.
ASSIGN agentEmail = agents[1].Email ASSIGN agentFirstName = agents[1].FirstName ASSIGN agentLastName = agents[1].LastName ASSIGN businessUnitId = agents[1].BusinessUnitId -
Add a GETPAGE action after SNIPPET. In the Properties pane, set:
-
URL to https://nic.surf.ly/get_token?agentFirstName={agentFirstName}&agentEmail={agentEmail}&businessUnitId={businessUnitId}.
-
ResultVar to token.
-
-
Add a CASE action after GETPAGE. In the Properties pane, set Variable to token.
-
Add a CUSTOMEVENT action under CASE. Connect CASE to CUSTOMEVENT using a variable branch condition. Name the variable branch condition error_token.
-
In the Properties pane of the CUSTOMEVENT action, configure these variables:
-
TargetAgent: {AGENTID}
-
EventName: CoBrowse-Event
-
Data: Disabled
-
-
Add a second SNIPPET action after CASE. Double-click the SNIPPET action. Copy each of the following lines of code and paste them into the Text View tab of the Editor window.
DYNAMIC cobrowseEvent ASSIGN cobrowseEvent.url = "https://app.surfly-us.com/embed/start/?agent_token={token}" ASSIGN cobrowseEvent.contactId = "{Global:__contactId}" -
Add a second CUSTOMEVENT action after the second SNIPPET. In the properties pane, configure these variables:
-
TargetAgent: {AGENTID}
-
EventName: CoBrowse-Event
-
Data: {cobrowseEvent.asjson()}
-
-
Save your script.