

External routing allows you to route cases from NiCE CXone to the Salesforce Omni-Channel widget. This way, your agents can use the native Omni-Channel widget screens they're familiar with to handle chats and cases.
Before completing the tasks in this topic, you need to have a campaign![]() A grouping of skills used to run reports. that you want your external routing skills assigned to. If you don't have this campaign set up yet, create one. You also need to create three Omnichannel Routing (ACD) skills
A grouping of skills used to run reports. that you want your external routing skills assigned to. If you don't have this campaign set up yet, create one. You also need to create three Omnichannel Routing (ACD) skills![]() Used to automate delivery of interactions based on agent skills, abilities, and knowledge., one Studio script, and one point of contact
Used to automate delivery of interactions based on agent skills, abilities, and knowledge., one Studio script, and one point of contact![]() The entry point that an inbound contact uses to initiate an interaction, such as a phone number or email address.. This topic covers these tasks.
The entry point that an inbound contact uses to initiate an interaction, such as a phone number or email address.. This topic covers these tasks.
External routing is not supported for FedRAMP.
Complete each of these tasks in the order given.
Configure Salesforce for External Routing
Visit developer.salesforce.com to start. Use the search box at the top to search for Integrate External Routing for Omni-Channel. Use the instructions to finish setting up external routing in Salesforce. You need a Salesforce account with admin permissions to complete this task.
Presence Sync in the Salesforce Agent Settings should not be selected with using External Routing. If Presence Sync is selected, the Work Item will not be routed to the Salesforce Omni-Channel widget and the Work Item will be refused.
Create Omnichannel Routing (ACD) Skills in NiCE CXone
Required permissions: Skills Create
You need to create three Omnichannel Routing (ACD) skills![]() Used to automate delivery of interactions based on agent skills, abilities, and knowledge. in NiCE CXone. One skill needs to be for the Work Item media type and is used for Omni-Channel. The other two need to be for the channels you're routing to the Omni-Channel widget.
Used to automate delivery of interactions based on agent skills, abilities, and knowledge. in NiCE CXone. One skill needs to be for the Work Item media type and is used for Omni-Channel. The other two need to be for the channels you're routing to the Omni-Channel widget.
Salesforce Agent does not support persistent work items. You cannot switch skills from Real-Time to persistent after they're set.
-
Click the app selector
 and select ACD.
 -
Go to Contact Settings > ACD Skills.
-
Click Create New > Single Skill.
- In the Skill Information section, set the Media Type to Work Item for the first skill you create. For the other two skills, choose the media type of the channels you're routing to Omni-Channel.
- Enter a Skill Name that identifies which channel this skill routes.
- Select the Campaign you want the skill to be a part of.
- Configure other settings on the Name & Other Details page as needed.
- Click Create.
- Repeat this task to create two more skills.
Create a Script in NiCE CXone
Required permissions: Scripts Create
The script you create reads the work item payload from the Omni-Channel skill that you created. It must map the service channel ID (received from the payload) to the skill ID.
In the script, use a Snippet Studio action to define the logical flow for routing chats and cases to one of the three skills you created earlier in this topic. You can also use the snippet to set up other variables for routing.
| Variable | Details |
|---|---|
| ASSIGN skill = "{__skill}" | The skill value necessary for routing. |
|
DYNAMIC WI FROM __Workitem |
Creates a user-defined object that can be used in the script or in actions that require an object input value. |
| ASSIGN PayloadJSON = WI.WorkItem.WorkItemPayload.$value | Assigns the unique identifier from the object created with DYNAMIC WI FROM _Workitem. |
| DYNAMIC WIPayLoad FROM PayloadJSON | Creates a user-defined object that can be used in the script or in actions that require an object input value. |
| ASSIGN WIXML = __Workitem | Assigns the Work Item ID to the WIXML (work item XML). |
| ASSIGN PayloadReplace = WIXML.substr(WIXML.indexof("<WorkItemPayload>"),WIXML.indexof("</WorkItemPayload>")-1) | Captures payload for future reference. |
| ASSIGN sfOmniChannelId = "{WIPayLoad.ServiceChannelId}" | Indicates Service Channel ID (Case channel or LiveChatTranscript channel). |
| ASSIGN workItemId="{WIPayLoad.WorkItemId}" | Indicates Salesforce Case ID or Salesforce LiveChatTranscript ID. |
If sfOmniChannelId = Case Channel // Service Channel ID for Case
SFDCQuery=”Select Type FROM Case WHERE ID = '{WorkItemId}'"
// Query SFDC by WorkItemId return the Case type
If Type = Mechanical Then
Route to WI_Mech_Case_Skill
Else if SFDC Type = Electrical then
Route to WI_Elect_Case_Skill
Else
Route to WI_Default_Case_Skill
Else
If sfOmniChannelId = Chat Channel
// Service Channel ID for Live Chat Transcript
SFDCQuery="SELECT AccountID, SLA__c FROM LiveChatTranscript WHERE Id = '{workItemId}'" // WorkItemId = LiveChatTranscriptId,
If SLA__c = 'Platinum' then // SLA__c = custom field on the Account
Route to WI_Platinum_skill
Else if
SLA__c = Gold then
Route to WI_Gold_Skill
Else
Route to WI_Default_Skill
ASSIGN skill = "{__skill}" // skill value necessary for routing
DYNAMIC WI FROM __Workitem
ASSIGN PayloadJSON = WI.WorkItem.WorkItemPayload.$value
DYNAMIC WIPayLoad FROM PayloadJSON
ASSIGN sfOmniChannelId = " {WIPayLoad.ServiceChannelId} "
//Get the ServiceChannelID from Salesforce & Map to the Skill ID
IF sfOmniChannelId.indexof('0N9f2000000PkSn') > 0 //Case { skill = '1229' //Salesforce Cases }
ELSE
{
IF sfOmniChannelId.indexof('0N9f2000000PlTN') > 0
{ skill = '1230' //Salesforce Chat }
ELSE
{ skill = '1220' //Salesforce Omni-Channel }
}
-
In Studio, click File > New.
- In the Create New Script window, select Work Item as the script type. Verify that the correct Business Unit is selected and click OK.
-
Add the Begin action, Snippet action, and Reqagent action to the canvas and connect them in this order.
- Double-click the Snippet action and click Text View to edit.
- Add scripting logic in the text editing field, following the example provided in this section.
If you need help or have questions about coding Snippet actions, contact your Account Representative.
- Configure the Reqagent properties according to the needs of your organization.
- Customize the script with additional actions if there are other things that you want to occur during messaging events, such as when the interaction begins, is transferred, or ends.
- Save the script.
Create a Point of Contact in NiCE CXone
Required permissions: Points of Contact Create
-
Click the app selector
and select ACD. -
Go to Contact Settings > Point of Contact.
- Click Create New and select Single Point of Contact.
- For Media Type , select Work Item.
- Enter a Name for this point of contact.
- Select the work item Skill you created for Omni-Channel.
- Select the Script you created to route externally to Omni-Channel.
- If you want the interactions that come through this point of contact to be included in IVR
 Interactive Voice Response. Automated phone menu contacts use via voice or key inputs to obtain information, route an inbound voice call, or both. reporting, click IVR Reporting Enabled.
 - Click Create Point of Contact.
- Copy the Point of Contact ID and save it to use when you configure Salesforce.
Create a PushTopic for External Routing
Complete this task in Salesforce. You need a Salesforce account with admin permissions to complete this task.
- In your Salesforce Agent organization, click your profile name > Developer Console.
- Select the Debug tab and click Open Execute Anonymous Window.
-
Paste the following code into the box:
PushTopic pushTopic = new PushTopic();
pushTopic.Name = '{ }'; // replace {} with your desired name for push topic, within 25 characters long
pushTopic.Query = 'Select Id, Serial, QueueId, WorkItemId, IsPushed, ServiceChannelId, LastDeclinedAgentSession, CreatedDate from PendingServiceRouting where RoutingModel =\'ExternalRouting\'';
pushTopic.ApiVersion = 44.0;
pushTopic.NotifyForOperationCreate = true;
pushTopic.NotifyForOperationUpdate = true;
pushTopic.NotifyForOperationDelete = true;
pushTopic.NotifyForFields = 'All';
insert pushTopic;
- Click Execute and the push topic is created.
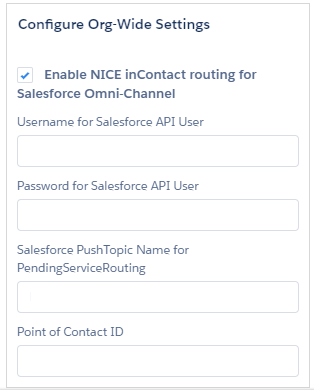
Configure Salesforce Agent and Org Wide Settings
Complete this step in Salesforce. The API user that you create must have Read access to the PushTopic you created in the previous step.
-
If you are using Salesforce Classic, click All Tabs > Salesforce Agent Settings.
If using the Lightning Experience, click the App Launcher icon (indicated by a grid of dots) > View All > Salesforce Agent Settings.
- Enter the API username for Username for Salesforce API User.
-
Enter the password for Password and Security Token for Salesforce API User.
If your Salesforce user is not configured to have login IP ranges in the profile, you must generate a security token to enter with your password. To generate a security token, click your profile name > My Settings > Personal > Reset My Security Token. Enter the Salesforce API user password followed by the security token with no added spaces.
- Enter the Salesforce PushTopic Name for Salesforce PushTopic Name for PendingServiceRouting.
- Enter the NiCE CXone Point of Contact ID for Point of Contact ID.