

本页提供了在 Bot Builder 中设置新机器人所需的基本任务。 这是机器人实施流程中的第二步。
除了在 Bot Builder 中创建新机器人外,设置机器人还需要配置 CXone Mpower 来将联系人路由到机器人。 这些配置是:
-
CXone Mpower 员工配置文件:CXone Mpower 将 Bot Builder 机器人视为用户实体。 他们必须拥有 CXone Mpower 员工配置文件,以便 CXone Mpower 能够将联系人路由给他们。 该员工配置文件必须启用两个属性:
-
Digital Engagement.
-
虚拟坐席已启用。 当您将员工配置文件指定为机器人主体时,这将自动应用。
-
- 数字 ACD 技能:创建一项或多项 数字化 ACD 技能
 用于根据坐席的技能、能力和知识自动传递交互。并将它们分配到机器人的员工配置文件。
 - 数字路由队列或 Studio 脚本:可由数字路由队列或Studio脚本通过系统路由联系人。 当您创建数字 ACD 技能时,会自动创建相应的路由队列。 您可以配置路由队列,也可以使用脚本进行路由。
- 数字联络点 (POC):POC 呼入联系人用来发起交互的入口点,如电话号码或电子邮件地址。 是联系人进入 CXone Mpower 系统的入口点。
这些配置协同工作,将联系人路由到您的机器人,如下图所示:
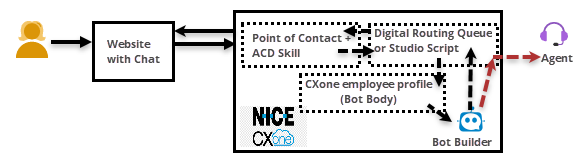
在上图中,您可以看到将联系人路由到您的机器人遵循与将联系人路由到人工坐席相同的流程。 CXone Mpower使用相关联络点及其默认 ACD 技能或 Studio 脚本路由到坐席,无论是机器人还是人类。
按照给定的顺序完成以下每一个任务。
为机器人创建 CXone Mpower 员工帐户
所需权限: Admin > 员工
为机器人创建员工配置文件是创建机器人的第一步。 创建机器人员工配置文件时请遵循以下最佳实践:
- 不要机器人使用真人的名字。 如果您使用一个类似人的姓名,则不要选择真人的姓名。
- 不要对多个Bot Builder机器人使用相同的员工配置文件。 为了进行路由和报告,每个机器人都应有自己独特的配置文件。
- 请机器人及其员工配置文件使用相同的名称。 当您管理多个机器人时,这一点可以简化您的工作。
- 确保使用您有权访问的电子邮件地址。 这可使您接收并回复 CXone Mpower 的邀请。 您可以为多个机器人员工配置文件使用相同的电子邮件地址。
- 在 CXone Mpower 中单击应用程序选择器
 并选择Admin。
 -
单击员工。
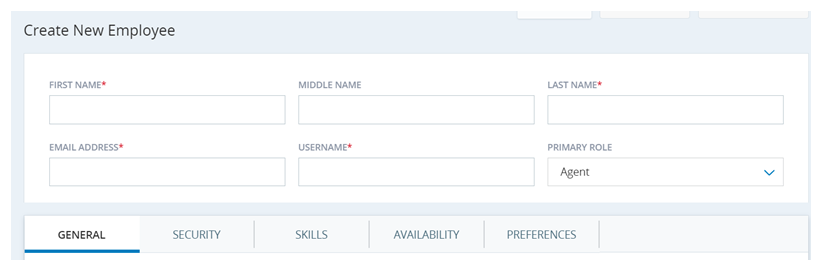
- 单击创建员工。
-
输入名字和姓氏。 这应该是您计划指定给机器人的同一姓名。 它应是一个听起来很人性化的姓名,但不是人工坐席的姓名。 例如,John Bot。
- 输入您有权访问的工作电子邮件地址。 您必须能够回复 CXone Mpower 发送的邀请。
- 以电子邮件地址的格式输入用户名。 例如,john.bot@classics.com。
-
在“常规”选项卡上,使用属性下拉列表勾选数字参与。
您的机器人还需要虚拟坐席已启用属性。 但是,现在不要添加它。 等到您已将员工配置文件分配给 Bot Builder 中的机器人。 如果您在分配该配置文件之前添加此属性,您将无法将该配置文件分配给机器人。
- 保留所有其他设置的默认值,并单击创建和邀请。
- 当邀请电子邮件到达您输入的电子邮件地址时,单击该链接以接收并按照屏幕上的提示进行操作。 您必须激活员工配置文件,否则它不会同步到 Digital Experience。
在 Bot Builder 中设置机器人
您可以从头开始创建新机器人,也可以将现有机器人复制或导入到 Bot Builder。 创建或导入机器人后,您必须将您创建的员工配置文件分配给该机器人。
创建新机器人
- 使用您自己的帐户登录 CXone Mpower。
- 单击应用程序选择器 并选择Bot Builder。
-
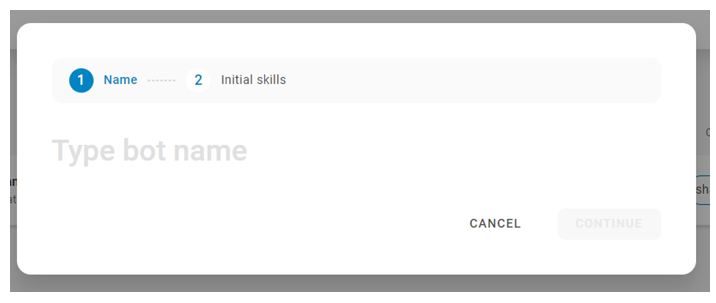
单击创建机器人。
-
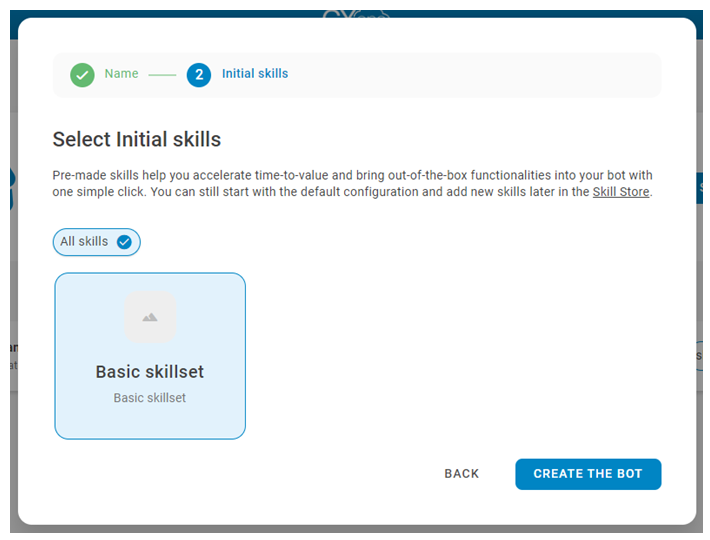
输入名称并单击继续。
-
- 设置完成可能需要几分钟时间。 您可以等待或单击进入机器人以在设置完成时浏览Bot Builder界面。
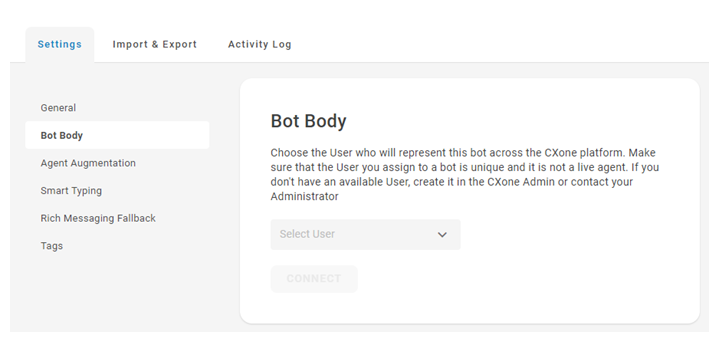
- 创建机器人后,转到首选项
 > 设置 > 机器人主体。
 -
复制机器人
- 使用您自己的帐户登录 CXone Mpower。
- 为新机器人创建一个 CXone Mpower 员工配置文件。 如果您复制机器人只是为了进行备份,则不需要员工配置文件。
- 在 CXone Mpower 中单击应用程序选择器 并选择Bot Builder。
-
单击您要复制的机器人。
- 单击左侧图标菜单中的偏好 。
-
在“常规”选项卡上,单击复制。
- 输入新机器人的名称,然后单击确认。
- 单击页面顶部显示的成功消息中的打开链接。 如果您没有看到此消息,则可从主 Bot Builder 页面打开重复的机器人。 单击页面左上角的机器人头部
 即可返回主页面。
 - 设置完成可能需要几分钟时间。 您可以等待或单击进入机器人来浏览 Bot Builder 界面。
- 如果您为此机器人创建了员工配置文件,请在 Bot Builder 中转到首选项 > 设置 > 机器人主体。
-
选择机器人的 CXone Mpower 员工配置文件,然后单击连接。
导入机器人
导入的文件扩展名必须是 YAML 或 YML。 如果您尚未导出机器人文件,请在完成这些步骤之前执行此操作。
- 使用您自己的帐户登录 CXone Mpower。
- 为导入的机器人创建一个 CXone Mpower 员工配置文件。
- 在 CXone Mpower 中单击应用程序选择器 并选择Bot Builder。
-
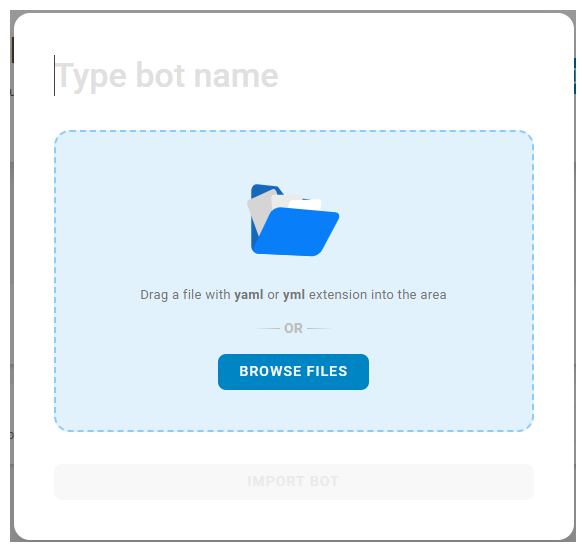
单击导入机器人。
-
输入机器人名称,然后拖放或单击浏览文件,将 YAML 或 YML 机器人文件导入 CXone Mpower Bot Builder。 单击导入机器人。
- 设置完成可能需要几分钟时间。 您可以等待或单击进入机器人来浏览 Bot Builder 界面。
- 创建机器人后,转到首选项 > 设置 > 机器人主体。
-
从下拉列表中选择一个用户。 您应选择一个专门为机器人创建的用户。 单击连接。
将机器人的员工配置文件分配给 ACD 技能
所需权限:
CXone Mpower 将 Bot Builder 机器人![]() 代替现场人工坐席处理客户交互的软件应用程序。视为用户。 为了让您的机器人接收联系人
代替现场人工坐席处理客户交互的软件应用程序。视为用户。 为了让您的机器人接收联系人![]() 与联络中心的坐席、IVR 或机器人交互的人员。,需要为其分配 ACD 技能
与联络中心的坐席、IVR 或机器人交互的人员。,需要为其分配 ACD 技能![]() 用于根据坐席的技能、能力和知识自动传递交互。,就像人工坐席一样。
用于根据坐席的技能、能力和知识自动传递交互。,就像人工坐席一样。
按照步骤将技能添加到用户或将用户添加到技能。 使用您为机器人创建的 CXone Mpower 员工配置文件。 您不得将多个机器人分配给一个路由技能,但每个机器人可以分配给多个技能。
将 ACD 技能分配给联络点
所需权限:
如果您尚未这样做,则为正在与 Bot Builder 机器人一起使用的数字渠道创建一个联络点![]() 呼入联系人用来发起交互的入口点,如电话号码或电子邮件地址。 (POC)。 对于 POC 中的默认技能,将其配置为使用您分配给机器人员工配置文件的 ACD 技能。 有关创建 POC 的信息可在您正在使用的特定数字渠道的帮助页面上找到。
呼入联系人用来发起交互的入口点,如电话号码或电子邮件地址。 (POC)。 对于 POC 中的默认技能,将其配置为使用您分配给机器人员工配置文件的 ACD 技能。 有关创建 POC 的信息可在您正在使用的特定数字渠道的帮助页面上找到。
确保分配给 POC 的 Studio 脚本正确路由联系人。 例如,如果您想在高峰时段使用 Bot Builder 机器人作为溢出坐席,则必须使用脚本逻辑来定义何时将联系人路由到机器人以及何时将其路由到人工坐席的条件。 路由到机器人的 Reqagent 操作应使用相应的数字 ACD 技能进行配置。