

Complete cada una de estas tareas en el orden indicado.
Requisito previo
Antes de continuar, asegúrese de haber desarrollado el middleware para conectar su canal digital a NiCE CXone. Esto es necesario antes de poder configurar una integración de BYOC en NiCE CXone.
Agregar una Integrar de BYOC
Cada BYOC actúa como un nuevo tipo DE canal, como el chat o el correo electrónico. Esto significa que cada BYOC puede contener múltiples canales de ese tipo.
- Haga clic en el selector de aplicaciones
 y seleccioneACD.
-
Vaya a Digital > Bring Your Own Channel.
- Hacer clicAgregar.
- Enter all details for your BYOC channel. Many of these details come from the middleware
 and should be provided by your engineering team.
 Learn more about fields in this step
Field Details Name The name for your channel integration. Integration box URL
The fully-qualified URL to be used for HTTPS message callbacks from NiCE CXone. Message callbacks notify your server of a message event, like message received or message delivered. This is the URL that NiCE CXone should use to communicate with your middleware.
This comes from the middleware and your engineering team should provide this.
Authorization URL The fully-qualified URL of your authentication server. This can be a separate URL from your middleware message processing URL.
If you leave this field blank, the Integration box URL is used.
Add action URL The fully-qualified URL for the page you created to add a channel. You create this page on your own, outside of NiCE CXone.
This comes from the middleware and your engineering team should provide this.
Reconnect action URL The fully-qualified URL for the page you created to reconnect an existing channel if it has been disconnected.
This can be the same as Add action URL, if you only have one page to point to.
This comes from the middleware and your engineering team should provide this.
Remove action URL The fully-qualified URL for the page you created to delete a channel. This can be the same as Add action URL, if you only have one page to point to.
This comes from the middleware and your engineering team should provide this.
Client ID
Used to provide an OAuth 2.0 authorization for message callbacks to your integration.
This comes from the middleware and your engineering team should provide this.
Client Secret Used to provide an OAuth 2.0 authorization for message callbacks to your integration.
This comes from the middleware and your engineering team should provide this.
Token content type Controls how NiCE CXone sends credentials to your OAuth 2.0 /token endpoint. Choose the format that works best with your middleware:
JSON: Send a JSON payload. This is the default.
Form url‑encoded: Send credentials as x-www-form-urlencoded data.
Client Certificate If you have mTLS security enabled, enter the mTLS certificate here. This must be in PEM format.
mTLS secures both sides of a connection. This ensures that both the BYOC middleware and NiCE CXone verify each other.
Your developers implementing your middleware can provide you with the certificate. Your organization is responsible for mTLS implementation. NiCE CXone does not provide or configure this for you.
Enabling mTLS security also enables typing indicators for your BYOC channel. Both agents and contacts see moving dots when the other party is typing.
Private Key If you have mTLS security enabled, enter the certificate's private key here. The private key is mandatory if you want to have mTLS security. This must be in PEM format.
Your developers implementing your middleware can provide you with the key. Your organization is responsible for mTLS implementation. NiCE CXone does not provide or configure this for you.
Certificate Authority The entity who issued your digital certificates. Your engineering team should provide this.
When configuring mTLS, this field is optional. If you leave this blank, it can open your system to certain security risks. If you do not include a certificate authority, NiCE CXone assumes that your certificates were generated legitimately and are correct. If you do want to include a certificate authority, this allows NiCE CXone to verify the certificates before any data is sent.
Certificate Password If the Private Key was password protected, enter the password here. Color The color of the button displayed on the Points of Contact Digital page in NiCE CXone. Icon The icon on the button displayed on the Points of Contact Digital page in NiCE CXone. This icon is also used in the agent UI. Use Digital 3.0 Outbound API for replies Select Enable to automatically update endpoints to the latest version.
- Hacer clicGuardar. Esto le redirige a la página de la lista de integraciones de BYOC.
- En la página de la lista de integraciones de BYOC, localice su nuevo BYOC y anote el Integration ID. Lo necesitará para crear un canal.
Configurar Canales y Mensajes
Permiso requerido: ACD > Digital Engagement > Ajustes de canal
-
Vaya a Digital > puntos de contacto digital.
-
Haga clic en el botón de su BYOC. Esto abre la URL que ingresó en el campo Add action URL cuando configuró su integración.
-
Si su equipo de ingeniería creó una interfaz de usuario amistosa con el middleware
, puede completar un formulario para crear un punto Any channel, contact, or skill associated with Digital Experience (DX).de contacto The entry point that an inbound contact uses to initiate an interaction, such as a phone number or email address. digital (canal). De lo contrario, puede llamar directamente a Channel API . Para este paso, necesitará el Integration ID que se generó cuando creó la integración de BYOC.Ver ejemplo
var(--codeSnippetCopyLabel)Ejemplo de Llamada a la API del CanalPOST /dfo/3.0/contact/channels
{
"id": "cd7d9728-5c64-433f-b49b-8924c97c2aa6",
"idOnExternalPlatform": "myOwnId45678",
"channelIntegrationId": "YOUR INTEGRATION ID",
"realExternalPlatformId": "forum",
"name": "My discussion forum",
"isPrivate": true,
"hasTreeStructure": false
}Cualquier mensaje enviado a través de este canal es manejado automáticamente por el middleware mediante la Message API
. Ver ejemplo
var(--codeSnippetCopyLabel)Ejemplo de Llamada a la API de Mensaje
POST /dfo/3.0/channels/YOUR CHANNEL ID/messages
{
   "idOnExternalPlatform":"comment-300001",
   "thread":{
      "idOnExternalPlatform":"thread-1001"
   },
   "messageContent":{
      "type":"TEXT",
      "payload":{
         "text":"Hello, can you help me, please?"
      }
   },
   "createdAtWithMilliseconds":"2021-01-15T03:20:50.52-04:00",
   "direction":"inbound",
   "authorEndUserIdentity":{
      "idOnExternalPlatform":"5459",
      "firstName":"Peter",
      "lastName":"Solo",
      "nickname":"@peter007"
   }
}
Eliminar Canales
Para eliminar un canal, puede llamar a la API de Digital Engagement directamente o usar la interfaz de Digital Experience (DX). Para eliminar un canal de Digital Experience (DX):
-
Vaya a Digital > puntos de contacto digital.
-
Busque el canal en la lista Sus Canales.
-
Haga clic en borrar. Esto abre la URL que ingresó en el campo Quitar la URL de la acción cuando configuró su integración.
Crear una Plantilla de mensaje Digital
Permisos requeridos: ACD > Outbound > Plantillas de mensaje Crear
Complete estos pasos para cada mensaje que desee enviar a contactos The person interacting with an agent, IVR, or bot in your contact center..
-
Haga clic en el selector de aplicaciones
y seleccioneACD. -
Vaya a Outbound > Plantillas de mensaje.
-
Hacer clicCrear nuevo.
-
Defina el Tipo como Digital e ingrese un nombre para la plantilla de mensaje.
- Introducir el Cuerpo del mensaje.
- Si desea agregar variables al cuerpo del mensaje, escriba el nombre exacto de un campo asignado en la lista de contactos y enciérrelo entre llaves. Por ejemplo, si su lista de contactos tiene una columna llamada Nombredepila e ingresa {FirstName} en algún lugar del Cuerpo del mensaje, el nombre de pila del contacto aparecerá en el mensaje en lugar de la variable.
- Seleccione la Dirección si el idioma del mensaje se lee de derecha a izquierda.
- Hacer clicCrear.
Crear una Habilidad Digital saliente de ACD
Después de crear una ACD habilidad, puede modificarla si es necesario habilitar la ocultación de llamada. Aunque esto no es obligatorio, algunos proveedores digitales pueden exigirlo.
Permisos obligatorios: ACD > Habilidades Crear, Editar
NiCE CXone usa ACD habilidades para enrutar interacciones The full conversation with an agent through a channel. For example, an interaction can be a voice call, email, chat, or social media conversation. a los agentes. Después de crear una nueva habilidad, debe asignarla a los agentes que manejarán este tipo de interacción.
Para gestionar interacciones The full conversation with an agent through a channel. For example, an interaction can be a voice call, email, chat, or social media conversation. digitales, los agentes que usan Agent Workspace (Agent) deben tener habilitado el atributo Digital Engagement en su perfil de empleado de Admin y estar asignados a una habilidad Used to automate delivery of interactions based on agent skills, abilities, and knowledge. digital ACD. Los Agentes que usan MAX pueden gestionar interacciones digitales si tienen asignado el atributo Digital Engagement o una habilidad digital.
El nombre de una habilidad debe ser significativo y único. Ayuda ser constante al nombrar las habilidades. Decida un formato estándar para los nombres de las habilidades que funcione para su organización.
El nombre de una habilidad debe tener un mínimo de 2 caracteres y un máximo de 30. Los nombres DE habilidad solo pueden contener letras, números y estos caracteres especiales:
- Guiones (-)
- Guiones bajos (_)
- Puntos (.)
- Puntos y coma (:)
-
Haga clic en el selector de aplicaciones
y seleccioneACD. -
Vaya a Configuración del contacto > ACD Habilidades.
-
Haga clic en Crear nuevo > Habilidad única.
- Defina el Tipo de Medio a Digital y entrante/saliente a Saliente.
- Entrar a nombre de la Habilidad.
- Establezca el Digital Punto de contacto en Bring Your Own Channel.
- Seleccione el Digital nombre del Punto de contacto del canal que está utilizando.
- Seleccione la Campaña de la que quiere que la habilidad forme parte.
- Seleccione una Plantilla de mensaje del menú desplegable.
-
Configure los campos opcionales restantes en la sección Información de la Habilidad según sea necesario.
Obtenga más información acerca de los campos de este paso
Campo Detalles Sin agente Personal Connection Marca automáticamente los números de teléfono de los contactos de una lista de llamada y reproduce un mensaje pregrabado o un menú de IVR
Interactive Voice Response. Automated phone menu contacts use via voice or key inputs to obtain information, route an inbound voice call, or both..Esta opción está seleccionada de forma predeterminada para Proactive SMS, Proactive Email y Bring Your Own Channel digital. No se puede borrar.
No seleccione esta opción para marcado de agente.
Cuando se selecciona esto, agentes mínimos de Workforce Intelligence y agentes mínimos disponibles de Workforce Intelligence no están disponibles.
Activar la combinación basada en prioridades Cuando se selecciona, este campo habilita priority-based blending
Agents can receive interactions from all eligible ACD, Personal Connection dialer, and Digital Experience (DX) skills assigned to them, based on relative skill priority. Personal Connection skills work as they normally would, no matter the dialing ratio. para la habilidad. Esto significa que cuando un agente inicia sesión en el sistema y configura el estado como disponible, recibe comunicaciones de todas las habilidades elegibles. El orden de entrega de contactos se basa en la prioridad relativa de la habilidad. Si elige utilizar la combinación basada en prioridades, debe configurar la combinación basada en prioridades en todas las habilidades que desee que un agente use al mismo tiempo.Plantilla de mensaje La plantilla de mensaje para esta habilidad. Esta opción solo aplica a las habilidades de Proactive SMS y Proactive Digital BYOC.
No permitir transferencias a la habilidad cuando está cerrado Determina si las interacciones se pueden transferir a esta habilidad cuando su perfil de horas de operación está configurado como Cerrado. Seleccione esta opción para impedir la transferencia o déjela sin seleccionar para permitir la transferencia durante las horas cerradas.
-
Si su sistema está configurado para divisiones, use el campo Division para especificar a qué división
Separate data securely between lines of business. Data can only be accessed from within the division it's part of. se asignará la habilidad. Después de haber asignado la habilidad a una División, no podrá cambiarla. Para configurar esta opción, debe tener el permiso de Asignación de división. - Hacer clicCrear. Realice las configuraciones adicionales para personalizar o administrar sus habilidades.
Cargar Lista de llamada
Debe cargar una lista de llamadas de los contactos que desea contactar con su nuevo canal. If usted no ha..creó su lista de llamada todavía, hágalo ahora.
Si va a volver a cargar una lista de llamadas después de realizar actualizaciones críticas, detenga la habilidad ACD asociada. Reinicie la habilidad ACD cuando termine de cargar las listas de llamadas.
Al asignarle un nombre a su lista de llamadas cargada, use solo letras, números, guiones ( - ) y guiones bajos ( _ ). No incluya espacios ni los siguientes caracteres: : / ? # [ ] @ ! $ & ' ( ) * + , ; = %. Si un nombre de lista contiene alguno de ellos, algunas operaciones que hacen referencia a la lista por nombre no podrán ubicar la lista y devolverán un error en su lugar.
-
Haga clic en el selector de aplicaciones
y seleccioneACD. -
Vaya a Listas > Calling.
-
Haga clic en Seleccionar archivo.
-
Lea el acuerdo de cumplimiento y haga clic en aceptar para continuar.
- Entrar aLista de nombres. Use solo letras, números, guiones ( - ) y guiones bajos ( _ ) en el Nombre de lista.
- Select the Upload New radio button if you want to select a new list from your computer, or Select Existing if you want to modify a list you already uploaded.
Si está cargando, haga clic en Elija el archivo. Si está modificando, escriba el Nombre del archivo o haga clic en Browse. Busque y seleccione la lista de llamadas que desea cargar o usar. Configure los campos opcionales según sea necesario.
Obtenga más información acerca de los campos de este pasoCampo
Detalles
Fecha de caducidad de la lista La fecha de eliminación de la lista de llamadas NiCE CXone. Esta configuración no afecta la caducidad de los registros individuales en la lista. Para establecer la fecha de vencimiento de los registros de la lista, utilice la fecha de vencimiento del lote en el siguiente paso del asistente de carga. Habilidad Si desea asignar la lista de llamada a una ACD habilidad Used to automate delivery of interactions based on agent skills, abilities, and knowledge. específica, seleccione una del menú desplegable Habilidad. No puede cargar la lista a una Proactive SMS habilidad si no hay una plantilla de mensaje asignada a la habilidad.Comenzar Habilidad cuando esté completa
La Habilidad que seleccionó comienza automáticamente cuando NiCE CXone termina de procesar la lista de llamadas.
- Hacer clicpróximo.
- If you used the first row of your calling list to label the columns, select Use First Row as Column Names next to Header. Review the automatic mapping done by PC, map any unmapped fields, and configure time zone handling and an expiration date. Learn more about fields in this task
Field
Details
No time zone found? The action NiCE CXone takes if it can't use calling list data to map a time zone to the record. NiCE CXone checks the record first for a time zone, then a zip code, then a city and state, and finally the area code of the primary phone number.
If NiCE CXone can't match a time zone to the record, it takes the action you specify here:
- Reject: Removes the record from eligibility for dialing.
- Select time zone: Attaches a default time zone to the record. Use the drop-down to select the default time zone.
If you live outside of North America, or if you believe the automatic time zone mapping won't work for your calling list, designate the appropriate time zone for each record on your list. See Configurar BYOC para Proactive Digital for a list of time zone abbreviations and full names.
Batch expiration date The default expiration date for all records in this batch. Once the contact expires, PC no longer attempts to reach that contact. You can specify expiration dates for individual records in the calling list by including an expiration date column in the calling list itself and then mapping the column to the Expiration Date field.
The expiration occurs at the beginning of the date you select (12:00 AM).
-
Si esto no se ha hecho ya por usted, asigne su teléfono números y direcciones de correo electrónico en Mapear Destinos. Agregue y elimine destinos según sea necesario.
Si asigna un campo de teléfono a una habilidad específica ACD, esta aparece en las opciones de cadencia para esa habilidad. Si no desea incluir un número DE teléfono específico en los Intentos máximos o en el orden de llamadas de la cadencia, no asigne esos números de teléfono a los campos. Una vez que asigna el campo, no podrá quitarlo de la configuración de cadencia.
- When the file uploads, PC displays the progress and the number of records that loaded successfully and unsuccessfully. If the calling list contains invalid records, use the following steps to fix the errors.
Haga clic en Enlace de descarga en el cuadro de advertencia que aparece.
Abra el archivo para ver los problemas con la carga. En este ejemplo, el registro en la fila 6 no tiene un número DE teléfono:
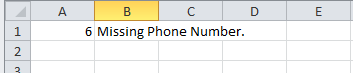
- Solucione el problema en la lista de llamada y guárdela.
- Cargue el archivo actualizado.
Iniciar la nueva habilidad de ACD
Permisos requeridos: ACD > Outbound > Gestor de marcadores Editar y acceso a campañas
Si planea crear una programación, puede saltar este paso. Si desea activar y desactivar manualmente la habilidad PC ACD, realice los siguientes pasos después de completar toda la configuración.
-
Haga clic en el selector de aplicaciones
y seleccioneACD. -
Vaya a Configuración del contacto > ACD Habilidades.
-
Haga clic en la habilidad
Used to automate delivery of interactions based on agent skills, abilities, and knowledge. que desea comenzar. -
Haga clic en Inicio.
-
Cuando haya terminado de usar la habilidad, haga clic en Detener.