This page is a tutorial that follows Akela Wolfe, a NiCE CXone Bot Builder administrator for Classics, Inc, as she builds a new bot. The goal of this tutorial is to help you:
- Become comfortable with the Bot Builder user interface.
- Understand the main configurations that go into a bot and how they work together. The main configuration categories are intents
 The meaning or purpose behind what a contact says/types; what the contact wants to communicate or accomplish., entities A piece of information gathered from the contact's messages during conversations with a bot., stories Used to train a bot for interaction handling based on intent and context., and rules Used to define a bot response to messages that don't change with context..
 - Understand the workflow of creating and working with Bot Builder bots.
Before going through this tutorial, read the help page about getting started with Bot Builder. It introduces essential Conversational AI concepts and relates them to Bot Builder configurations.
You can follow along with Akela if you want. The steps necessary to do each of the tasks are included in drop-downs in each section below.
| Concept | Definition | Example | What the Bot Does |
|---|---|---|---|

Utterance |
Anything a contact |
"I lost my password." "What is my balance?" "Are you a bot?" |
The bot uses Natural Language Understanding (NLU) to analyze each contact utterance to determine its meaning, or intent. |

Intent |
What the contact wants to communicate or accomplish. Every message the contact sends has an intent. |
"I lost my password" has the intent of "reset password". "Hello" has the intent of "greeting". |
The bot analyzes a contact's message using NLU |

Entity |
A defined piece of information in a contact's message. | Person or product name, phone number, account number, location, and so on. | The bot uses NLU to identify entities in a contact's message. Entities help the bot understand what the contact's message means. |

Slot |
An entity extracted from a contact's message and saved for use in bot responses. Similar to a variable. | Creating a slot for contact name lets the bot use that name in responses during an interaction, making it more personal. | When configured to do so, the bot extracts an entity from a contact message and saves it in a slot. You can have your bot use this information later in the conversation. |

Rule |
Defines bot responses to messages that don't change meaning with context. |
|
Rules are one of two ways you can configure how your bot responds to an intent. Rules are useful for certain kinds of intents, but not all intents. |

Story |
Trains a bot to handle an interaction based on message intent and conversational context. | In an interaction about a forgotten password, the bot would respond to "How do I do that?" in one way. If the interaction were about creating a new account, the response would be quite different even though in both cases the contact is using the same words with the same intent—to get more information. | Stories are the second of two ways you can configure how your bot responds to an intent. Stories teach the bot how to use the context of the conversation to respond appropriately. |

Bot Action |
Anything a bot says or does while handling an interaction. |
In an interaction about a forgotten password, the bot responds by sending the link to the password reset FAQ on the website. When a contact expresses frustration, such as "I don't understand! It's not working!!!" the bot responds with "I'm sorry. Would you like me to transfer you to a human agent?" When the contact says yes, the bot initiates the transfer. |
Bot actions are the options you have when defining how you want your bot to respond to each intent. They give you the flexibility to configure each response to achieve the outcome that meets the contact's needs. |
Tutorial Scope
This tutorial does not result in a full working bot. It guides you through the process of building and managing a single use case. Many bots will handle more than one use case.
This tutorial only covers the steps that happen directly related to the bot. It does not cover the steps required to set up and configure a digital or voice channel![]() Various voice and digital communication mediums that facilitate customer interactions in a contact center. in NiCE CXone. The bot requires at least one channel to work in a production environment. When you're ready to create your own bot, follow the implementation process, which covers all steps required to set up and manage your bot.
Various voice and digital communication mediums that facilitate customer interactions in a contact center. in NiCE CXone. The bot requires at least one channel to work in a production environment. When you're ready to create your own bot, follow the implementation process, which covers all steps required to set up and manage your bot.
Preparation
Akela has been given the task of creating a new bot. Her manager wants the bot to answer basic customer service questions, such as how to change passwords, update account details, and so on. Working with her manager, she identifies the following use cases as the starting place for the bot:
- Change password
- Change address
- Change phone number
- Change billing credit card
Akela decides that the first use case she will work on is changing passwords. She talks to the help desk agents in her organization and reviews interaction![]() The full conversation with an agent through a channel. For example, an interaction can be a voice call, email, chat, or social media conversation. recordings and transcripts. Using this input, she builds a file of typical password reset interactions.
The full conversation with an agent through a channel. For example, an interaction can be a voice call, email, chat, or social media conversation. recordings and transcripts. Using this input, she builds a file of typical password reset interactions.
She has worked in Bot Builder before, so Akela knows that her NiCE CXone employee profile has the permission the required to access Bot Builder( Bot Builder > Launch Bot Builder).
If you can access Bot Builder in NiCE CXone, you have the needed permission. In NiCE CXone, click the app selector ![]() and select Bot Builder. If the Bot Builder option isn't there, talk to your NiCE CXone administrator.
and select Bot Builder. If the Bot Builder option isn't there, talk to your NiCE CXone administrator.
Create a New Bot
Akela logs in to NiCE CXone and creates a new employee profile for her bot. This is required because NiCE CXone treats bots as user entities. All user entities must have employee profiles in the platform.
- In NiCE CXone, click the app selector
 and select Admin.
 -
Click Employees.
- Click Create Employee.
-
Enter a First Name and a Last Name. This should be the same name you plan to give your bot. It should be a human-sounding name, but not the name of a real agent. For example, John Bot.
- Enter a working Email Address that you have access to. You must be able to respond to the invitation that NiCE CXone sends.
- Enter a Username in the format of an email address. For example, john.bot@classics.com.
-
On the General tab, use the Attributes drop-down to select Digital Engagement.
Your bot also needs the Virtual Agent Enabled attribute. However, do not add it now. Wait until you have assigned the employee profile to the bot in Bot Builder. If you add this attribute before assigning the profile, you won't be able to assign the profile to the bot.
- Leave all other settings at their default values and click Create & Invite.
- When the invitation email arrives at the email address you entered, click the link to accept and follow the on-screen prompts. You must activate the employee profile or it will not sync to Digital Experience (DX).

bot
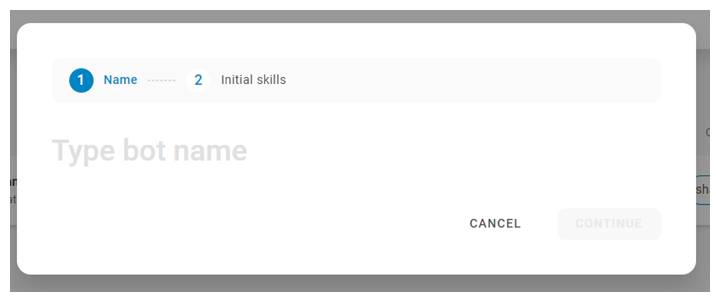
After creating an employee profile for the bot, Akela creates a new bot in Bot Builder. She gives it the same name that she used in the employee profile, John Bot.
- Log in to NiCE CXone with your own account.
- Click the app selector and select Bot Builder.
-
Click Create Bot.
-
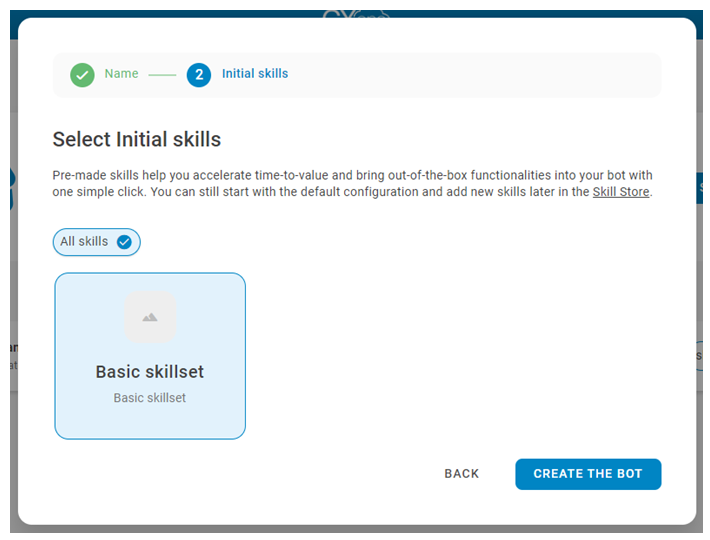
Enter a Name and click Continue.
-
- It may take several minutes for the setup to complete. You can wait or click Enter the bot to explore the Bot Builder interface while setup completes.
Create Intents
After reviewing the real-life interactions she gathered, Akela puts together an example of a typical successful password reset request. This is known as the happy path for this intent. This is her example:
Contact![]() The person interacting with an agent, IVR, or bot in your contact center.: Hello.
The person interacting with an agent, IVR, or bot in your contact center.: Hello.
Bot: Hi, how can I help?
Contact: I forgot my password.
Bot: I'm sorry to hear that. You can reset it at our website.
Contact: How do I do that?
Bot: Click Forgot Password in the upper right corner of the landing page. Then enter your email address and the system will send you a link to reset your password.
Contact: Thank you!
Bot: You're welcome. Is there anything else I can do for you?
Contact: No. You've been very helpful. Goodbye.
Bot: Thank you for contacting us. Goodbye.
Akela determines there are five intents in the happy path:
- Greeting (Hello)
- Reset_password (I forgot my password)
- Explain (How do I do that?)
- Thanks (Thank you and You've been very helpful)
- Goodbye (Goodbye)
Akela creates these intents:
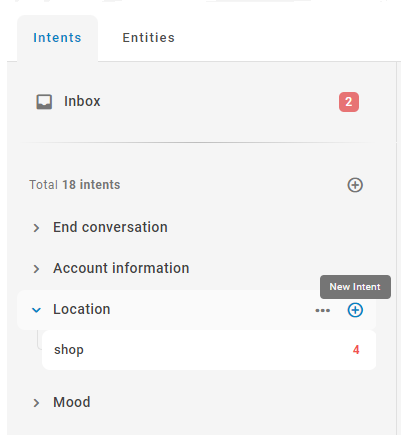
- In Bot Builder, Akela goes to the Intents tab in the NLU section.
- She creates a folder called Conversation_defaults.
- In it, she creates an intent called greetings.
- Akela goes through the interaction examples she gathered and adds all the different greetings contacts used as examples for the greetings intent. She adds hello, hi, howdy, yo, and so on.
- Then she adds two more intents, thanks and goodbyes. She adds examples for each of them, including thank you, thanks very much, and thank you so much for the thanks intent. For the goodbyes intent, she adds bye, so long, and ok goodbye.
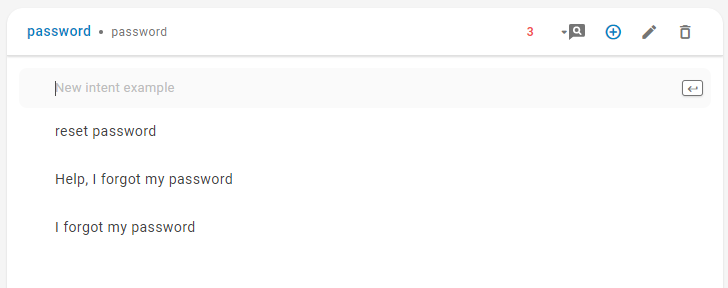
- Next, Akela creates a folder called password_reset.
- She adds intents called Reset_password and explain, then adds examples for each one from her interaction examples:
- For Reset_password she adds examples such as I need to change my password, my password is wrong, my password needs updated, and how do I change my password.
- For explain, she adds examples such as how do I do that, I don't see that option, and where is it.
- Akela continues adding examples to her intents as she finds them in her interaction examples. All the intents have a medium number of examples. She knows that more examples help her bot will learn. However, she also knows that making up examples isn't recommended. She doesn't have more to add right now, but can add more as she works.


- Click NLU
 in the left icon menu.
 -
 .
. -
Enter a name and press Enter.
- In the pane on the right, enter phrases in the New intent example field that are unique to this intent. Press Enter after each phrase. Changes are saved automatically. Or, use the
 icon to automatically generate intent examples for you. Click Add All to use all suggested examples. If you do not want to use all of the suggested examples, go through the list and click the plus sign to the right of each example to use.
 - If the examples for this intent include an example of an entity A piece of information gathered from the contact's messages during conversations with a bot. that your bot needs to recognize to be able to respond this intent, select the example and add it to the appropriate entity.
- When you're finished making changes, click Train and Stage to update your bot model Version of a bot that has been trained and staged to test this change.
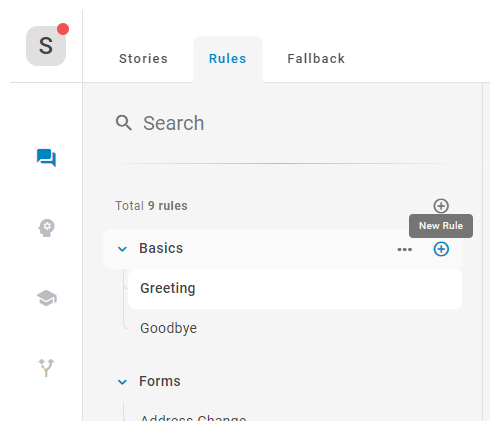
Create Rules
Akela decides that rules are the right way to teach her bot some of the intents she created. Rules teach an bot to give the same response to an intent every time the intent is recognized. This is ideal for things such as greetings, goodbyes, and thank-yous. These are the intents she wants to use rules for.
This is what Akela does:
- She creates a folder on the Rules tab in the Dialogues section of Bot Builder called Conversation_defaults.
- In the new folder, Akela adds a rule called Greeting.
- Akela uses Hello as the example contact message
 to trigger the Greetings rule. When she presses Enter, her bot correctly predicts the greetings intent, so she confirms the result.
 - Next, Akela adds the bot response
 . She wants the bot to respond with its own greeting, so she adds a Message action and enters Hi, how can I help today? as the message she wants her bot to send to the contact.
 - Finally, she decides that if contacts use her bot often they might notice that it always responds the same. To make the experience more like talking to a human, Akela adds some variations
 to the response. The bot will randomly use one of the message variations. In addition to the first message, her bot can now say Hi and thanks for contacting us. What can I do for you? and Hello, what can I assist you with today?.
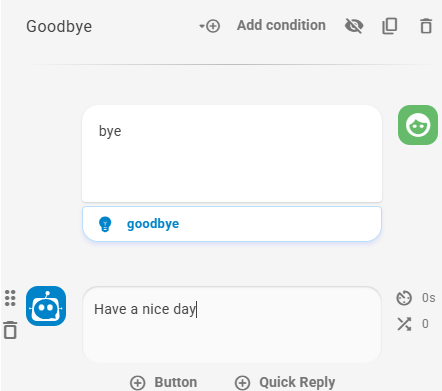
 - Akela repeats this process and creates a Goodbyes rule. She uses Bye as the triggering contact message .
- The bot correctly predicts the goodbye intent, so Akela confirms the result.
- Next, she adds the bot's responses. She adds Goodbye! as a Message action with Have a nice day., and Have a great rest of your day! as the variations .
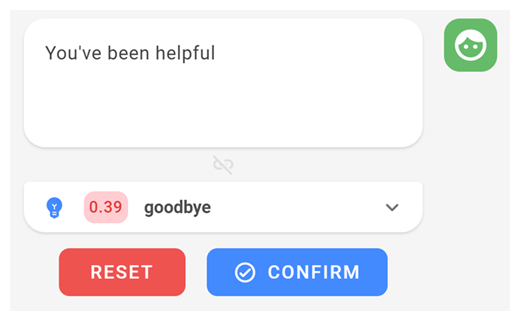
- The last rule Akela adds is Thanks. For this rule, she uses Thank you as the triggering contact message . The bot predicts the correct intent and Akela confirms the result.
- Then she adds bot responses. She adds You're welcome! as a Message action with I'm happy to help., and Of course, I'm here to help. as the variations .


-
 in the left icon menu, then click the Rules tab.
 -
.
- Type a name for the rule and press Enter.
- Add the contact's message:
- In the middle panel, click the + icon on the right. It turns into the contact icon . In the Customer may say box, enter a message a contact might send and then press Enter. Bot Builder analyzes the message and offers a list of intents with a confidence level for each.
- If the top intent is the correct intent, click Confirm. If it's not, click the incorrect intent to expand the Intents list, then select the correct intent and click Confirm.
- In the middle panel, click the + icon on the right. It turns into the contact icon
- Add a bot response:
- In the middle panel of the story page, hover over the plus sign + on the left until it changes to a bot icon .
- to open a dialogue where you can add variations to the existing response message.
- In the middle panel of the story page, hover over the plus sign + on the left until it changes to a bot icon
- Click Train and Stage to train your bot on the new rule.
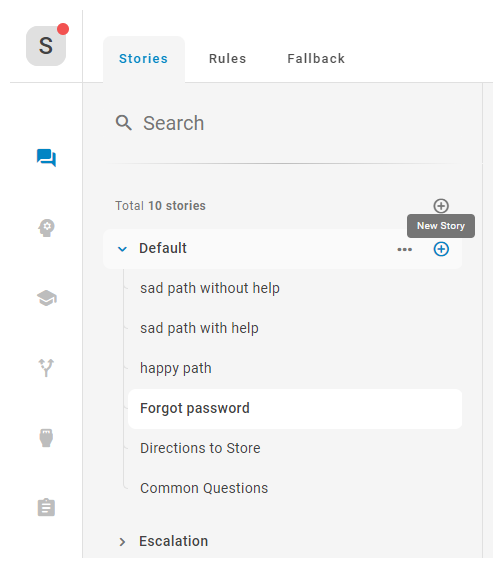
Create Stories
Akela is going to create stories for the two remaining intents , Reset_password and Explain. She refers to her planned happy path story for a forgotten password. After thinking about it, she decides to combine the Explain intent with the Reset_password intent. This will shorten the conversation and improve customer experience.
In Bot Builder, creates her story:
- First, she hides
 the Explain intent on the NLU > Intent tab. This will exclude it from the bot when she clicks Train and Stage. She wants to keep it for now, but doesn't want to add the intent examples to the Reset_password intent. She hopes that providing the information as a response to requests about passwords will mean no one asks "how do I do that" questions.
 - On the Stories tab in the Dialogues section, Akela creates a folder called Password.
- In the new folder, she creates a Reset_password story.
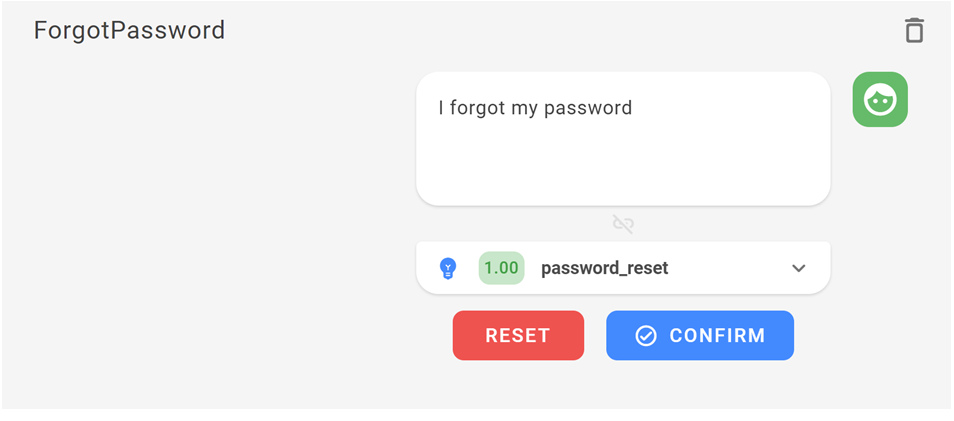
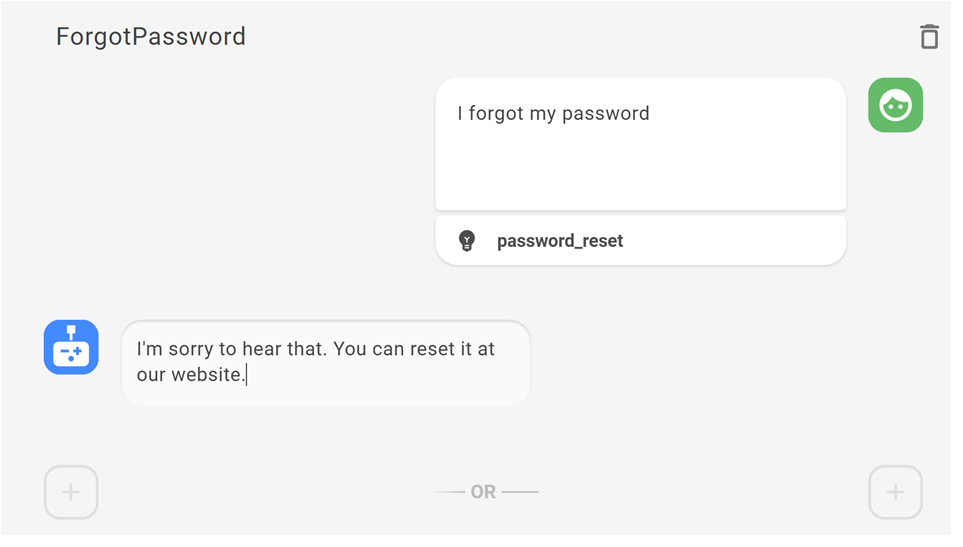
- She starts the story with a contact message of I need to change my password. Her bot correctly predicts the Resent_password intent, so she clicks Confirm.
- She adds a bot response with two parts:
- First is a Message action with the text I'm sorry to hear that. I can help! You can do that on our website:
- Second is a Rich Link action, to which she adds a link to the Jungle website page about resetting passwords: www.jungle.com/passwordreset. She includes an image of the Jungle logo, which will appear in the message with the link.

The story Akela creates includes only the part of the conversation that is relevant to the context of the Reset_password intent. This is important to note, because adding more content to a story than is relevant to its intent can confuse the bot. If you add content to the story related to another request, such as updating a mailing address, the bot will think that changing mailing addresses can only happen within the context of a password reset request, even if you create an intent for changing mailing addresses.
- , enter a name, and press Enter.
- Hover over the folder name and click the plus sign .
- Type a name for the story and press Enter.
- Add an example of what the contact The person interacting with an agent, IVR, or bot in your contact center. might say to trigger the intent you're creating a story for:
- In the middle panel, click the plus sign + on the right. It turns into the contact icon .
- In the Customer may say field, enter a message a contact might send in the scenario you're creating, then press Enter. Bot Builder analyzes the message and offers a list of intents with a confidence level for each.
- If the predicted intent is correct, click Confirm. If it's not, click the predicted intent to expand the list, then select the correct intent and click Confirm.
- While you're working with the intent in this step, Bot Builder displays a list of the training examples the selected intent is configured with on the right side of the page. From this list, you can add examples, modify or delete existing examples.
- In the middle panel, click the plus sign + on the right. It turns into the contact icon
- Add the bot response:
- In the middle panel of the story page, hover over the plus sign until it changes to an bot icon .
- to open a dialogue where you can add variations to the bot message you just added.
- In the middle panel of the story page, hover over the plus sign until it changes to an bot icon
- When you're finished making changes, click Train and Stage to update your bot model Version of a bot that has been trained and staged to test this change.
Train and Test the Bot
After creating each the intents, rules, and stories for her first use case, Akela clicked Train and Stage. This creates a new bot model that includes these configurations. However, this is only the first step in training. After she finishes adding the rules and story for the password reset use case, Akela needs to test the ability of her bot to predict and respond to the intents in the use case.
To do this, she starts training and testing in Bot Builder:
- The first thing Akela does is click Train and Stage to ensure that her bot is up to date with all the changes she's made.
- While the training is in progress, Akela finds her real-world conversation examples for the password reset use case.
- She clicks the speech bubble
 next to Train and Stage.
 - Akela chooses one of the conversation examples and plays the role of the contact. She follows the example like a script and starts the conversation with Hello.
- The bot performs flawlessly. Akela clicks Reset in the chat window and starts the next conversation example.
- This conversation doesn't go so well. The bot correctly predicts the Reset_password intent, but after it responded with the rich link action, the contact replied Oh that's easy. Not sure why I didn't see that.
- Akela makes a note of the unrecognized message so she can address it later.
- She continues testing. She finds that two other contacts responded with unexpected messages after the bot sends the URL message:
- One said DUH haha! That was obvious! and the other said How'd I miss that before? Thanks.
- The second response includes the word thanks, so the bot predicted the Thanks intent. However, Akela knows that without that, the bot would probably have failed to respond appropriately.
- When testing a different conversation example, the bot doesn't predict the right intent for I'm locked out of my account. Akela adds this example to the Reset_password intent.
- She resets the chat window and repeats the example conversation. This time, the bot correctly predicts the intent.
- Akela notices that although I'm locked out of my account triggered the Reset_password intent, the response of I'm sorry to hear that! You can do that on our website. isn't an appropriate response.
- Akela now has two tasks to do to refine the responses her bot gives to this intent:
- Create fallback for any unexpected message.
- Create an intent for contacts' expressions of relief that the solution was easy.


If you can find some real-world examples for password reset requests from your contacts, run some tests on the bot you created in this tutorial. If you don't have real-world examples, you can imagine some conversations for the purposes of the tutorial. Try to think of how real humans talk and ask questions.
If your bot doesn't correctly predict the intent, keep track of the details so you can make changes after testing.
- From any page in the top toolbar.
- Enter a message Anything a contact says in a bot interaction, whether question or statement, written or spoken. in the field at the bottom of the chat window, just as you would in any chat conversation. Your bot responds as it would in a real interaction.
- Use the options in the chat window to improve your bot:
- View the intent predictions the bot made: Click the intent prediction that appears under each of your messages. The drop-down expands to show you the matching intents with the confidence level for each.
- Add one of your messages as an intent example: Hover the cursor over the message in the chat window and click the lightbulb with a plus sign
 .
. - Go to the rule or story associated with one of the bot responses: When an intent appears next to the bot response, click it. From the drop-down, click the story or rule you want to go to. Bot Builder displays the selected rule or story.
- View the bot models: Click the model number at the top of the chat window.
- Continue to enter messages and review the responses that your bot gives. If at any point the bot responds in an unexpected way, you can stop and correct the issue. For example, you might need to create a new intent The meaning or purpose behind what a contact says/types; what the contact wants to communicate or accomplish. or rule Used to define a bot response to messages that don't change with context.. After you make a change, click Train and Stage to create a new model so you can test and see if the change worked.
- If you need to restart the interaction after correcting an issue, click Reset.

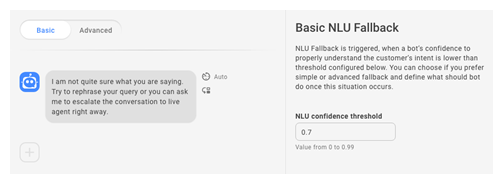
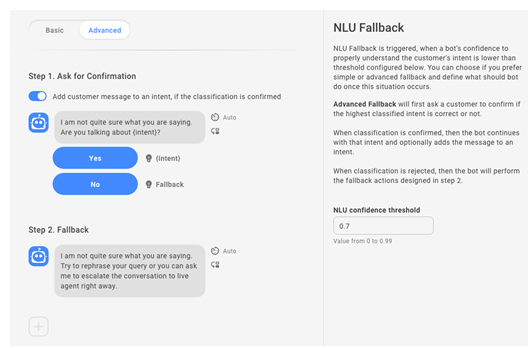
Create Fallback
Through her testing, Akela discovered that if the contact said something unexpected, the bot didn't know how to respond. She decides to create fallback to address the situation. There are three kinds of fallback: action, NLU, and rich messaging. Akela determines that for the current case, NLU fallback is the kind she needs. This is because NLU fallback is for situations where the contact says something unexpected.
- On the Dialogues > Fallback tab, she clicks NLU in the list on the left side of the page.
- She looks at the Basic and Advanced options and chooses Advanced.
- On the Advanced page, she decides not to change the default bot message for step 1.
- For step 2, Akela adds a Message action followed by a Handover action, as shown in the following image.

- Click Dialogues in the left icon menu.
- On the Fallback tab, click NLU.
- Click the toggle to select either Basic or Advanced.
- If you selected Basic fallback:
- To use a custom value for NLU confidence threshold, enter that value in the field. This sets the minimum confidence level the bot must have to predict an intent based on a contact's utterance What a contact says or types..
- Click the message to edit the default response.
- If you want your bot to use the handover The transfer of a contact from a virtual agent to a live agent. rule if it still doesn't understand, click the plus sign + and select Handover.
- To use a custom value for NLU confidence threshold, enter that value in the field. This sets the minimum confidence level the bot must have to predict an intent based on a contact's utterance
- If you selected Advanced fallback:
- Under Step 1, if the toggle is turned on and the customer confirms the intent, the message is added to the intent. Click the message to edit the default response. You can also change the text and intents of the buttons.
- Under Step 2, click the message to edit the default response.
- If you want your bot to use the handover The transfer of a contact from a virtual agent to a live agent. action if it still doesn't understand, click the plus sign + and select Handover.
- When you're finished making changes, click Train and Stage to update your bot model Version of a bot that has been trained and staged to test this change.
Refine Intents, Rules, and Stories
Akela works on the other issue found during testing, fixing contacts' expressions of relief that the solution was easy:
- Akela goes to the NLU > Intents tab and creates a relief intent in the Conversation_defaults folder. The intent she's making is generic and not specifically related to any situation. This means anytime a contact expresses relief, the bot can respond.
- She adds the examples she found already, including well DUH that was obvious, how'd I miss that, and oh that's easy.
- Next, she creates a story using one of her examples as the contact message. She has the bot respond with a Message action that says I'm glad to I could help! Is there anything else I can do for you?
Repeat Testing
After fixing the issues she found during her initial testing, Akela repeats the testing. When she doesn't find any additional issues, she adds more intents, stories, and rules for the other use cases she planned. When all the use cases have been added and tested, she decides to deploy her bot to production.
Review Conversation Data
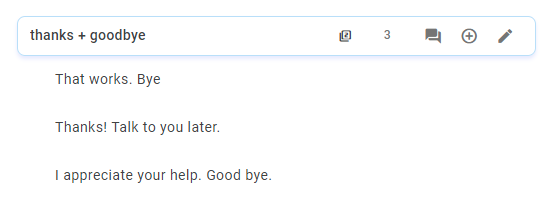
After her bot has been live for a few days, Akela reviews the conversation data on the Insights > Conversation tab in Bot Builder. It soon becomes clear that many users combine thanks and goodbye in the same message. She decides that the conversation will have a better flow if she creates a multi-intent so the bot can respond to these intents together. A multi-intent covers situations when the contact has two intents in a single message. She starts to work:
- In the Conversation_defaults folder, she creates an intent called thanks + goodbye. The plus sign ( + ) makes this a multi-intent.
- Aklea adds examples for these intents, taken from the example interactions she gathered. She adds examples such as That works. Bye, Thanks talk to you later, I appreciate your help, goodbye, and thanks, see ya.
- Next, she creates a rule that uses the thanks + goodbye intent. The bot response is a Message action that says You're welcome. Have a great day.
- Click NLU in the left icon menu.
-
.
- Enter a name and press Enter. The name should contain both intents connected by a plus character ( + ).
- In the pane on the right, enter phrases in the New intent example field that are unique to this intent. Press Enter after each phrase. Changes are saved automatically. Or, use the icon to automatically generate intent examples for you. Click Add All to use all suggested examples. If you do not want to use all of the suggested examples, go through the list and click the plus sign to the right of each example to use.
- When you're finished making changes, click Train and Stage to update your bot model Version of a bot that has been trained and staged to test this change.