

Connect or Change the Bot Body
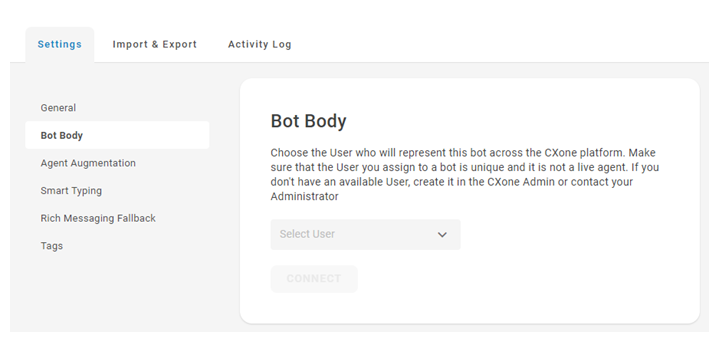
The bot body is a NiCE CXone employee account created for use with a Bot Builder bot. Bot Builder requires an employee account for routing through the NiCE CXone system.
-
In NiCE CXone, click the app selector
 and select Bot Builder.
 - Click the bot you want to work with.
- On the menu on the left side of the page, click Preferences
 > Settings > Bot Body.
 -
Select the NiCE CXone employee account to use for this bot. If you need to, create a new account for the bot.
-
Click Connect.
Chat with Your Bot
Bot Builder lets you chat with your already-created bot![]() A software application that handles customer interactions in place of a live human agent. to help it learn. You can also test your newly-created dialogues
A software application that handles customer interactions in place of a live human agent. to help it learn. You can also test your newly-created dialogues![]() Stories, rules, and flows in Bot Builder. and intents. You can talk to a bot before it has been deployed.
Stories, rules, and flows in Bot Builder. and intents. You can talk to a bot before it has been deployed.
- In NiCE CXone, click the app selector and select Bot Builder.
- Click the bot you want to work with.
- From any page, click the speech bubble
 in the top toolbar.
- Enter a message
 Anything a contact says in a bot interaction, whether question or statement, written or spoken. in the field at the bottom of the chat window, just as you would in any chat conversation. Your bot responds as it would in a real interaction.
 - Use the options in the chat window to improve your bot:
- View the intent predictions the bot made: Click the intent prediction that appears under each of your messages. The drop-down expands to show you the matching intents with the confidence level for each.
- Add one of your messages as an intent example: Hover the cursor over the message in the chat window and click the lightbulb with a plus sign
 .
. - Go to the rule or story associated with one of the bot responses: When an intent appears next to the bot response, click it. From the drop-down, click the story or rule you want to go to. Bot Builder displays the selected rule or story.
- View the bot models: Click the model number at the top of the chat window.
- Continue to enter messages and review the responses that your bot gives. If at any point the bot responds in an unexpected way, you can stop and correct the issue. For example, you might need to create a new intent The meaning or purpose behind what a contact says/types; what the contact wants to communicate or accomplish. or rule Used to define a bot response to messages that don't change with context.. After you make a change, click Train and Stage to create a new model so you can test and see if the change worked.
- If you need to restart the interaction after correcting an issue, click Reset.

Share Your Bot
When you feel your bot![]() A software application that handles customer interactions in place of a live human agent. is well-trained, you should test it with actual users. To help you do this, you can share your bot with others. The more interactions your bot handles, the more data Bot Builder collects on your bot's performance. This data is available in the bot management tools in Bot Builder.
A software application that handles customer interactions in place of a live human agent. is well-trained, you should test it with actual users. To help you do this, you can share your bot with others. The more interactions your bot handles, the more data Bot Builder collects on your bot's performance. This data is available in the bot management tools in Bot Builder.
You can review the conversation data to find places where contacts are having trouble communicating with the bot. By adjusting the bot's configuration, you can improve its performance.
You can test with users in your company. Don't test with users from your bot team, though. You want users who will test your bot's limits, not users who already know what it can and cannot do. For the same reason, don't give your testers detailed instructions. They should only know as much about your bot's domain as your customers would.
You can also have your real customers test your bot. These users do not need to have access to NiCE CXone or to Bot Builder.
To share your bot:
- In NiCE CXone, click the app selector and select Bot Builder.
- Click the bot you want to work with.
- From any page, click Talk to your bot.
- Click Share
 .
. - The URL field automatically displays a link you can copy and share to your test users. You can add a Description to help your test users understand what to expect from the bot.

View List of Bot Models
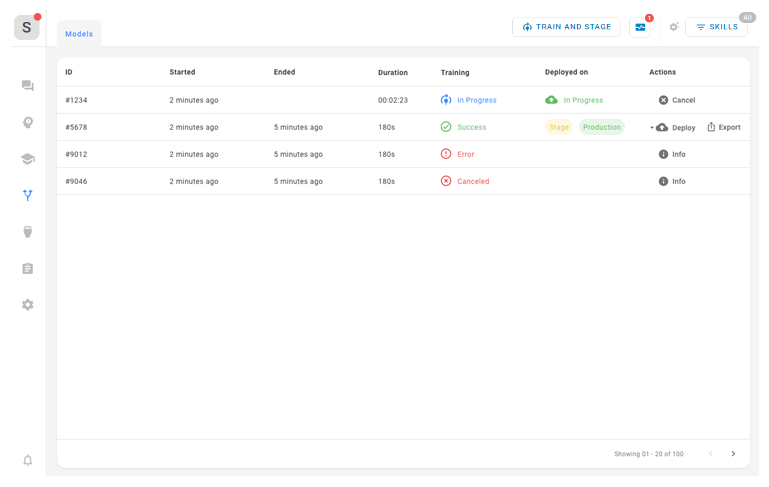
You can view the list of models for your bot. A new model is created every time you click Train and Stage. The list shows you when the model was trained, the results of each training, and how long it look. You can also see which models have been deployed and whether they're deployed to stage or production. From this page, you can export or deploy models.
- In NiCE CXone, click the app selector and select Bot Builder.
- Click the bot you want to work with.
- Click Deployment
 in the left icon menu.
Deploy to Stage
Every time you click the Train and Stage button, your bot is deployed to stage.
If you are making improvements to a bot that's been deployed to production, Train and Stage creates a new bot model![]() Version of a bot that has been trained and staged and deploys that model to
Version of a bot that has been trained and staged and deploys that model to
You can also deploy a model to stage from the Training and Deployment page:
- In NiCE CXone, click the app selector and select Bot Builder.
- Click the bot you want to work with.
- Click Deployment in the left icon menu.
- In the Actions column for the model Version of a bot that has been trained and staged you want to deploy, click the drop-down and select Stage.
Deploy to Production
If your bot![]() A software application that handles customer interactions in place of a live human agent. is handling a channel where SLA
A software application that handles customer interactions in place of a live human agent. is handling a channel where SLA![]() Commitment between service provider and customer with defined service level thresholds including quality, availability, and responsibilities. is important, you should set up an automated safety net before you deploy the bot.
Commitment between service provider and customer with defined service level thresholds including quality, availability, and responsibilities. is important, you should set up an automated safety net before you deploy the bot.
Deploying a model![]() Version of a bot that has been trained and staged to production sends that configuration and data to the bot user in NiCE CXone. This does not mean the bot will immediately become active and start receiving cases.
Version of a bot that has been trained and staged to production sends that configuration and data to the bot user in NiCE CXone. This does not mean the bot will immediately become active and start receiving cases.
- In NiCE CXone, click the app selector and select Bot Builder.
- Click the bot you want to work with.
- Click Deployment in the left icon menu.
- In the Actions column for the model Version of a bot that has been trained and staged you want to deploy, click the drop-down and select Production.
Roll Back to a Previous Model
If you discover that your current production model has a problem that you need to address, you can roll back to a previous model. Be sure that you choose a model known to be stable.
- In NiCE CXone, click the app selector and select Bot Builder.
- Click the bot you want to work with.
- Click Deployment in the left icon menu.
- Locate the model you want to roll back to and click Deploy in the Actions column.
- Select Stage if the model is currently not deployed. If the model is currently in stage, skip this step.
- Select Production.
Reactivate an Inactive Bot
Bots![]() A software application that handles customer interactions in place of a live human agent. that haven't engaged in conversations with contacts
A software application that handles customer interactions in place of a live human agent. that haven't engaged in conversations with contacts![]() The person interacting with an agent, IVR, or bot in your contact center. or Bot Builder users for 30 days are automatically deactivated. You can reactivate an inactive bot to begin working with it again.
The person interacting with an agent, IVR, or bot in your contact center. or Bot Builder users for 30 days are automatically deactivated. You can reactivate an inactive bot to begin working with it again.
You can still see deactivated bots in Bot Builder. They're highlighted in yellow and Bot Builder displays a message indicating that they're deactivated.
- In NiCE CXone, click the app selector and select Bot Builder.
- Click the bot you want to work with.
- Click Preferences in the left icon menu.
- On the Settings tab, click Reactivate Bot.
Delete a Bot
You can delete a bot at any time. You may want to export your bot's prior to deleting it.
-
In NiCE CXone, click the app selector
and select Bot Builder. - Click the bot you want to work with.
- On the menu on the left side of the page, click Preferences .
- On the Settings tab, click Delete Bot.
- Confirm your intention to remove the selected bot. This action cannot be undone.