

This help page provides information about the DEVone integration of the Omilia voice biometrics service, an agent assist application. NiCE CXone also supports Omilia text and voice virtual agents.
Prerequisites
Before you can set up Omilia to work with NiCE CXone, you must have:
- An Omilia Cloud Platform account.
- At least one Voice Biometric profile in the Omilia Cloud Platform Console.
Customize a Script for Omilia
Required permissions:
Use this sample as a foundation to customize your script to integrate Omilia into NiCE CXone.
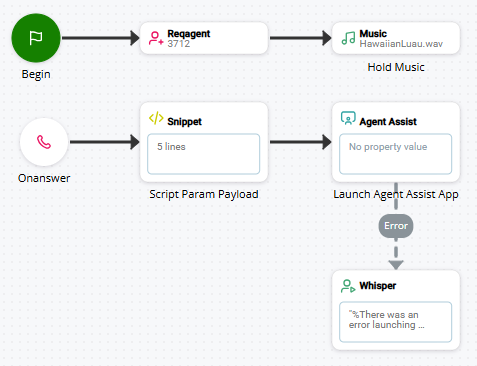
You can download a JSON version of the script that you can import into Studio. The actions in the example script are configured with the essential settings required for an Omilia integration.
To complete the configuration of your script:
- Assign the Omilia configuration app to the Agent Assist action.
-
Ensure that the
 Also known as caller ID. Listed phone number of an incoming voice call.. This is used to identify the contact to Omilia. If the ANI isn't included, the agent can add the ANI to enroll the contact's voice. If you use any other information as Omilia biokeys, include them in the custom payload. For example:
 DYNAMIC customPayload customPayload.Ani="{ani}" customPayload.user_id="+15558001234" customPayloadJSON="{customPayload.asJSON()}" - Ensure that the scriptParams property in the Agent Assist action is set to {customPayloadJSON}.
- Add initialization snippets to the script using Snippet actions. You can do this to customize your agent assist application.
- Reconfigure the action connectors to ensure proper contact flow and correct any potential errors.
- Complete any additional scripting and test the script.
Add an App to Agent Assist Hub
Required permissions:
You need to add a profile app for Omilia to Agent Assist Hub.
- Click the app selector
 and select Other > Connections Hub and then click Agent Assist Hub.
 -
Click Add Agent Assist App.
-
Enter an Agent Assist App Name and click
-
Click Next.
-
Complete the Configuration page using the information in the following drop-down.
Learn more about the fields in this step
Field Details Base URL Enter the base URL for your instance of OmiliaVoice Biometrics. This is provided by the OmiliaNiCE CXone team during implementation.
The NiCE CXone ACD connects to OmiliaVoice Biometrics via this WebSocket URL. NiCE CXone sends the audio of the customer's voice over the WebSocket so OmiliaVoice Biometrics can access it.
VB Profile Enter the ID of the OmiliaVoice Biometrics voice biometrics profile you want to use. This is provided by the OmiliaNiCE CXone team during implementation.
This field is case-sensitive.
API Bearer Token Enter the API bearer token that's used to authenticate communication with OmiliaVoice Biometrics. This is provided by the OmiliaNiCE CXone team during implementation.
Bio User ID This field identifies the format used for the ID assigned to each contact's voiceprint.
Participants OmiliaVoice Biometrics only verifies contact voices. The only option that's available for this setting is Patron Only and it cannot be changed.
Open in Embedded Mode Click to enable if you want voice biometric status and options to open in the NiCE CXone Agent Workspace (Agent) application custom workspace. This option is currently only supported in full-screen mode.
When this option is disabled, the voice biometric status and options appear as a screen pop
A pop-up window with information about the contact that appears on an agent's screen after an event such as connecting to a contact. for the agent. -
Click Create.
-
Click Close.
Assign the Omilia App to an Action
Required permissions:
If you haven't done so already, you need to assign the ![]() Performs a process within a Studio script, such as collecting customer data or playing music. in your Studio script.
Performs a process within a Studio script, such as collecting customer data or playing music. in your Studio script.
- In Studio, open the script you want to use.
-
If you haven't done so already, add the Agent Assist action to the correct location in your script.
-
 on the Agent Assist action.
 -
In the left column, click the checkmark
 next to the agent assist application or profile you want to assign to this script.
An alternative to using the checkmark is to create a variable in your Studio script. Use the variable to pass the app or profile name into the Assign Launch Config Name property of the AGENT ASSIST action.
- Click Close.