

This is the first step of setting up Agent Workspace (Embedded) (Agent Embedded) in Salesforce.
This page explains how to install NiCE CXone Agent Workspace (Embedded) (Agent Embedded) in Salesforce. Once it's installed, agents can use it to handle interactions directly inside Salesforce. When it's installed in Salesforce, Agent Workspace (Embedded) (Agent Embedded) is called Agent Workspace for Salesforce.
Agent Workspace for Salesforce is only available in Salesforce Lightning. It is compatible with the following Salesforce solutions:
-
Salesforce Sales Cloud
-
Salesforce Service Cloud
-
Salesforce Marketing Cloud
Complete each of these tasks in the order given.
Before You Begin
- Confirm that you do not have a namespace defined in your Salesforce org. You typically define a namespace when you use a developer org to create a managed package for distribution. Agent Workspace for Salesforce has its own namespace and will not run in an org that has one already defined. If you have one already defined, refer to the Salesforce help.
- Ensure you are installing and using Agent Workspace for Salesforce on a supported platform and in a supported browser.
- If you already have a contact center definition named NiCE CXone Contact Center, rename it before you install the application, because the installation will fail as it tries to create a new contact center definition.
Download Agent Workspace for Salesforce from the Salesforce AppExchange
When you download Agent Workspace for Salesforce from the Salesforce AppExchange for the first time, 25 trial licenses are installed for 30 days. Work with your account representative to adjust the number of licenses and update them to active licenses.
Agent Workspace for Salesforce is supported by the following Salesforce editions:
- Professional
- Enterprise
- Unlimited
- Developer
- Performance
-
Log in to the Salesforce org where you want to install Agent Workspace for Salesforce.
-
Navigate to NiCE CXone Agent Workspace for Salesforce Embedded OpenCTI
 in the Salesforce AppExchange.
 -
Click Get It Now.
-
Click Install in Production. If prompted, log in first by clicking Log in to the AppExchange.
- Agree to the terms and conditions, and then click Confirm and Install.
- If prompted, enter your Username and Password and log in.
-
Choose whether to Install for Admins Only, Install for All Users, or Install for Specific Profiles..., then click Install.
If you choose Install for Specific Profiles..., you have the option to choose which profiles have access to the package. You can set a global policy by using the Set access level for all profiles to setting, and then modify profiles from there.
-
Grant access to api.incontact.com and click Continue.
- When the installation has completed, click Done.
Assign Users to Your License
Agent Workspace for Salesforce is a license-managed application. When you install a trial of the application, you have 25 licenses that expire after 30 days. You must talk to your
account representative to create a work order to update to an active license with your desired number of seats based on your contract. If you are installing Agent Workspace for Salesforce into a sandbox![]() A copy of a production environment used for testing agent applications., no licenses are needed.
A copy of a production environment used for testing agent applications., no licenses are needed.
Once you install the application, you must assign users to a license or the application will not load when your users log in to Salesforce.
-
In Salesforce, click Setup
 in the top right.
 -
Use the Quick Find box to search for Installed Packages, and then click Installed Packages.
-
Find the NICE CXone Agent for Salesforce package with the publisher CXAE_Salesforce. Click Manage Licenses. If you are assigning users in the Salesforce sandbox, Manage Licenses will not exist and you can skip this step.
-
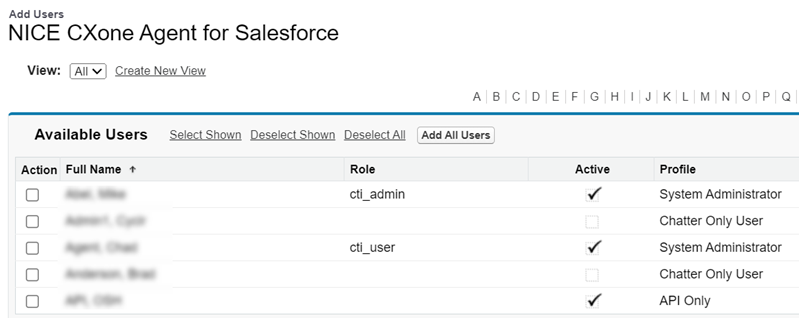
Click Add Users.
-
Search for and add users to your license.
Enable Agent Workspace for Salesforce in Lightning Experience
You must add Agent Workspace for Salesforce to the utility bar for each Lightning Experience app you want your agents to be able to view Agent Workspace for Salesforce in.
-
In Salesforce, click Setup
in the top right. -
Use the Quick Find box to search for App Manager. Click App Manager in the results.
-
Find the app in which you want to enable Agent Workspace for Salesforce. In the App Type column, verify that the app uses the Lightning Experience.
- Click the drop-down arrow
 on the right for that app. Click Edit.
 - In the App Settings menu on the left, click Utility Items (Desktop Only).
- Click Add Utility Item.
- Search for Open CTI Softphone, then click Open CTI Softphone.
- Click Save at the bottom.
Configure the Call Center
When you install Agent Workspace for Salesforce to your Salesforce instance, two call centers will be installed:
All Agent Workspace for Salesforce users should be assigned to one of those call centers. All the other, older call centers should not be used and can be deleted.
-
In Salesforce, click Setup
in the top right. -
Use the Quick Find box to search for Call Centers, then click Call Centers in the results.
-
Review the information and click Continue.
-
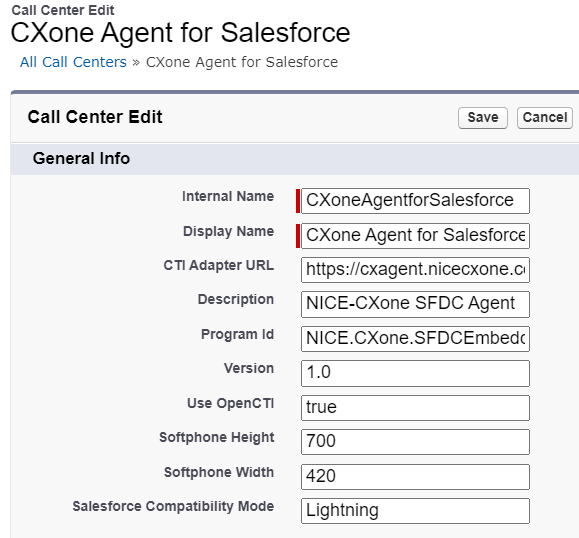
Click Edit next to the
-
Make sure the CTI Adapter URL field has the appropriate value for your organization:
-
Non-FedRamp customers: https://cxagent.nicecxone.com/login?base=https://login.salesforce.com/&app=cxa_sfdc
- NiCE CXone FedRamp Moderate customers: https://cxagent.nicecxone-gov.com/login?base=https://login.salesforce.com/&app=cxa_sfdc
-
-
The recommended Softphone Height is 700 pixels and the recommended Softphone Width is 420 pixels, but you can adjust this to better fit the computer resolution. Anything less than 365 pixels is not supported.
-
Click Save.
Assign Users to the Agent Workspace for Salesforce Call Center
After modifying the call center definition, you must assign users to the Agent Workspace for Salesforce call center. You can do this by modifying the call center or modifying individual users.
Modify the Call Center
-
In Salesforce, click Setup
in the top right. -
Use the Quick Find box to search for Call Centers, then click Call Centers.
-
If the Say Hello to Salesforce Call Center screen appears, click Continue.
-
Select the appropriate call center:
-
CXone Agent for Salesforce
-
CXone Agent for Salesforce FedRamp
Do not click Edit next to the call center name.
-
-
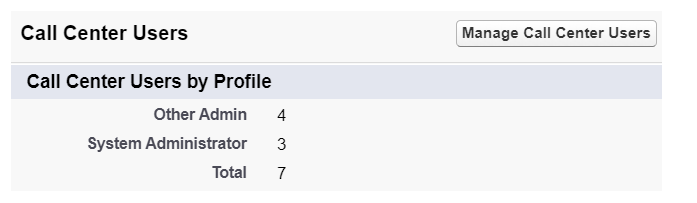
In the Call Center Users section, click Manage Call Center Users.
-
Click Add More Users. Search for users by configuring the filter fields and clicking Find.
-
When the search results appear, check the box next to the users you want to add, then click Add to Call Center.
Modify Individual Users
-
In Salesforce, click Setup
in the top right. -
Use the Quick Find box to search for Users, and then click Users.
-
Click Edit next to the user you want to add to the call center.
-
Scroll down to the bottom right part of the General Information section. Enter CXone Agent for Salesforce or CXone Agent for Salesforce FedRamp in the Call Center field, or use the search button to search for configured call centers.
- Click Save.
Allow URLs
You need to add
-
In Salesforce, click Setup
in the top right. -
Use the Quick Find box to search for Trusted URLs, then click Trusted URLs.
-
Click New Trusted URL.
-
Enter an API Name for the trusted URL. For example, NICECXone.
-
In the URL field, enter
-
Select all the checkboxes in the CSP Directives section.
-
Click Save & New.
-
Enter an API Name for the trusted URL. For example, NiCE CXoneAPI.
-
In the URL field, enter
-
Select all the checkboxes in the CSP Directives section.
-
Click Save.
Enable Click2Jack
Clickjacking happens when attackers add malicious elements, such as buttons, to your site. When users click these elements, they are directed to the attacker's site.
Enabling Click2Jack helps protect you from clickjack attacks. It also prevents issues from Google third-party cookie deprecation.
-
In Salesforce, click Setup
in the top right. -
Use the Quick Find box to search for Session Settings, then click Session Settings.
-
In the Trusted Domains for Inline Frames section, click Add Domain.
-
In the Domain field, enter https://mydomain.lightning.force.com. Replace mydomain with your Salesforce domain name. Click Save & New.
-
In the Domain field, enter https://mydomain.my.salesforce.com. Replace mydomain with your Salesforce domain name. Click Save.
Enabling Click2Jack may cause issues for non-agent Salesforce users. They may not be able to open lighting components or Visualforce pages if any of the following are assigned to them:
-
A NiCE CXone call center.
-
The NiCE CXone Softphone utility bar item.
-
A lightning app with NiCE CXone components.
-
A Visualforce page with NiCE CXone components.
The next step of setting up Agent Workspace (Embedded) (Agent Embedded) in Salesforce is to set up a CRM configuration.