

This is the second step of integrating Microsoft Dynamics with Agent Workspace (Agent).
![]() Various voice and digital communication mediums that facilitate customer interactions in a contact center. you want. For example, if you want to configure Microsoft Dynamics integration for digital chat, modify your digital chat script. After you add the actions to the script, you need to customize them. This involves specifying the workflows you want to use.
Various voice and digital communication mediums that facilitate customer interactions in a contact center. you want. For example, if you want to configure Microsoft Dynamics integration for digital chat, modify your digital chat script. After you add the actions to the script, you need to customize them. This involves specifying the workflows you want to use.
Complete each of these tasks in the order given.
Download Template Script
Download this folder of template scripts. It contains voice and digital scripts for Desktop Studio and NiCE CXone Studio.
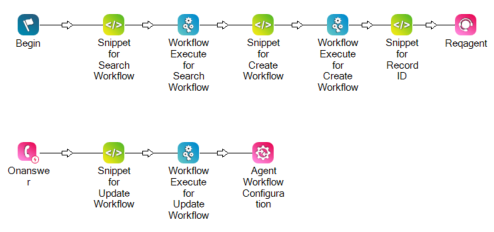
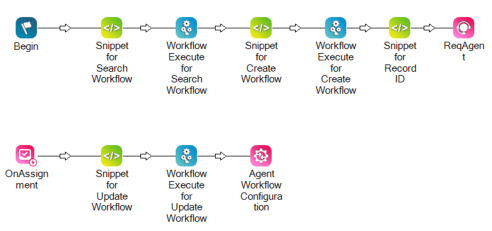
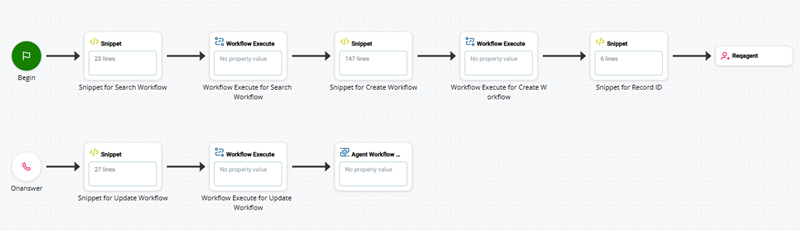
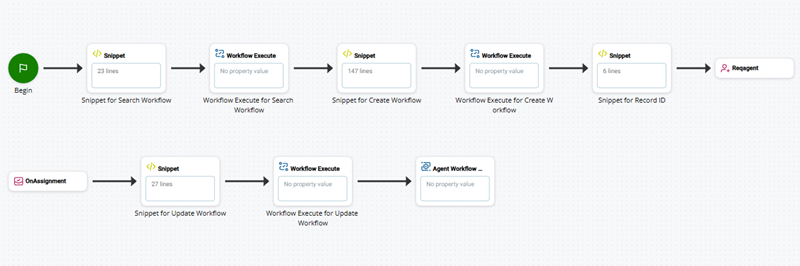
Each template script contains SNIPPET and WORKFLOW EXECUTE actions. This pair of actions is needed for each workflow you want to add to your script. The template scripts include three pairs of SNIPPET and WORKFLOW EXECUTE actions: one for a Search workflow, one for a Create workflow, and one for an Update workflow. You can delete the actions for the type of workflow you don't want. You can also copy and paste the SNIPPET and WORKFLOW EXECUTE actions to add more Create, Search, and Update workflows to your script.
Add Actions to Your Script
Modify your existing script for the channel you're working with.
| Action | Caption | Description |
|---|---|---|
| SNIPPET | Snippet for Search Workflow | This action holds the code for the Search workflow you want to use. |
|
WORKFLOW EXECUTE |
Workflow Execute for Search Workflow |
This action executes the Search workflow you specified in the preceding SNIPPET action. It converts the workflow payload into JSON and passes it to Agent Workspace (Agent). You can also configure the ENHANCED WORKFLOW EXECUTE action for Search workflows. This allows you to easily set up and test workflows. |
| SNIPPET | Snippet for Create Workflow | This action holds the code for the Create workflow you want to use. |
| WORKFLOW EXECUTE | Workflow Execute for Create Workflow |
This action executes the Create workflow you specified in the preceding SNIPPET action. It converts the workflow payload into JSON and passes it to Agent Workspace (Agent). You can also configure the ENHANCED WORKFLOW EXECUTE action for Create workflows. This allows you to easily set up and test workflows. |
| SNIPPET | Snippet for Record ID | This action holds the record ID for the record created by the Create workflow. |
| SNIPPET | Snippet for Update Workflow | This action holds the code for the Update workflow you want to use. |
| WORKFLOW EXECUTE | Workflow Execute for Update Workflow | This action executes the Update workflow you specified in the preceding SNIPPET action. It converts the workflow payload into JSON and passes it to Agent Workspace (Agent). |
| AGENT WORKFLOW CONFIGURATION | None | This action executes workflows when the agent manually triggers them in Agent Workspace (Agent). It moves information between the script and Agent Workspace (Agent), depending on the workflow the agent used. |
In Desktop Studio
-
Click File > Import from File. Select the voice or digital template script for Desktop Studio.
-
Open the script you want to modify.
-
Copy these actions from the template script and paste them where they belong in your existing script:
Action Caption SNIPPET Snippet for Search Workflow WORKFLOW EXECUTE
Workflow Execute for Search Workflow
SNIPPET Snippet for Create Workflow WORKFLOW EXECUTE Workflow Execute for Create Workflow SNIPPET Snippet for Record ID SNIPPET Snippet for Update Workflow WORKFLOW EXECUTE Workflow Execute for Update Workflow AGENT WORKFLOW CONFIGURATION None -
Save your script.
In NiCE CXone Studio
- In NiCE CXone, click the app selector
 and select Omnichannel Routing > Studio
  .
. -
Click Load Script. Select the voice or digital template script for NiCE CXone Studio.
-
Open the script you want to modify.
-
Add these actions to your script:
Action Caption SNIPPET Snippet for Search Workflow WORKFLOW EXECUTE
Workflow Execute for Search Workflow
SNIPPET Snippet for Create Workflow WORKFLOW EXECUTE Workflow Execute for Create Workflow SNIPPET Snippet for Record ID SNIPPET Snippet for Update Workflow WORKFLOW EXECUTE Workflow Execute for Update Workflow AGENT WORKFLOW CONFIGURATION None Copying actions between scripts isn't yet supported in NiCE CXone Studio.
-
Copy the code from each SNIPPET action in the template script and paste it into the corresponding SNIPPET action you added to your script.
-
Save your script.
Customize Studio Actions
Customize the Studio actions for:
Snippet for Search Workflow
This SNIPPET action contains the code for each Microsoft Dynamics Search workflow. You can only configure one workflow per SNIPPET. You must have one SNIPPET action and one WORKFLOW EXECUTE action for each workflow.
-
If you're using Desktop Studio, double-click the SNIPPET action in your script named Snippet for Search Workflow.
-
If you're using NiCE CXone Studio, select the SNIPPET action in your script named Snippet for Search Workflow and click Open Editor in the action's properties.
-
Determine which workflow you're using in this SNIPPET, then delete the code for the other workflows.
-
For the workflow you want to use, edit the code according to the instructions for that workflow.
-
To configure more than one Search workflow in this script:
-
Copy and paste this SNIPPET.
-
Copy and paste the WORKFLOW EXECUTE action that follows this SNIPPET.
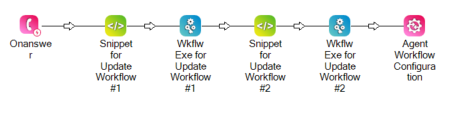
 View image of example script with multiple Search workflows
In Desktop Studio:
View image of example script with multiple Search workflows
In Desktop Studio: In Studio:
-
-
Save your script.
Workflow Execute for Search Workflow
This action must come after a SNIPPET with the code for a Microsoft Dynamics Search workflow.
You can also configure the ENHANCED WORKFLOW EXECUTE action for Search workflows. This allows you to easily set up and test workflows.
-
If you're using Desktop Studio, double-click the Workflow Execute action in your script named Workflow Execute for Search Workflow to launch the Workflow Execute wizard.
-
If you're using NiCE CXone Studio, select the Workflow Execute action in your script named Workflow Execute for Search Workflow and click Open Editor in the action's properties. This launches the Workflow Execute wizard.
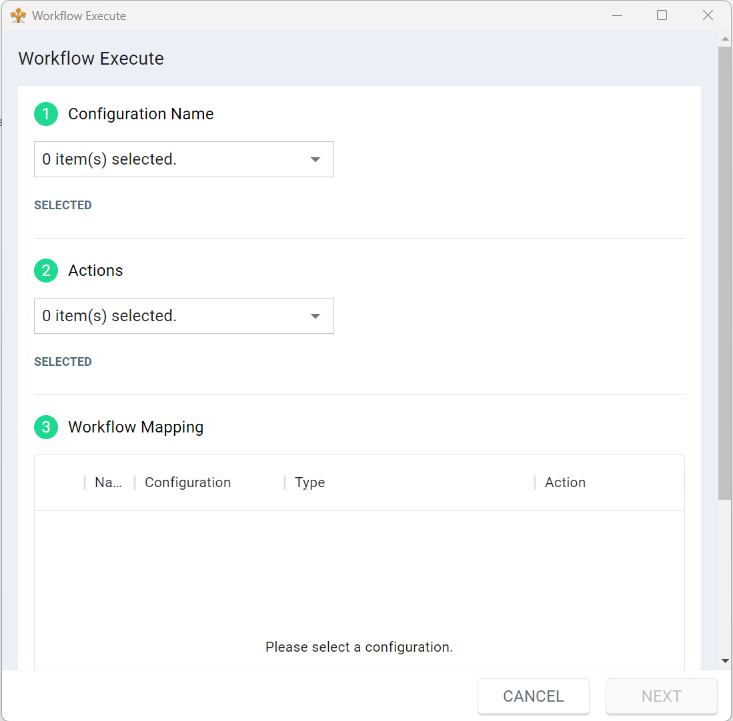
- In the Configuration Name field, select the Microsoft Dynamics integration you want this Workflow Execute action to use. The drop-down displays the names of all configured integrations in your NiCE CXone system.
-
In the Actions field, select
-
Under
- Click Next.
- Verify your selections in the pop-up window. If you need to change a selection, click No and make your change.
- Click Yes in the pop-up window to apply your selections to the Workflow Execute properties.
- Save your script.
Snippet for Create Workflow
This SNIPPET action contains the code for each Microsoft Dynamics Create workflow. You can only configure one workflow per SNIPPET. You must have one SNIPPET action and one WORKFLOW EXECUTE action for each workflow.
-
If you're using Desktop Studio, double-click the SNIPPET action in your script named Snippet for Create Workflow.
-
If you're using NiCE CXone Studio, select the SNIPPET action in your script named Snippet for Create Workflow and click Open Editor in the action's properties.
-
Determine which workflow you're using in this SNIPPET, then delete the code for the other workflows.
-
For the workflow you want to use, edit the code according to the instructions for that workflow.
-
To configure more than one Create workflow in this script:
-
Copy and paste this SNIPPET.
-
Copy and paste the WORKFLOW EXECUTE action that follows this SNIPPET.
View image of example script with multiple Create workflows
In Desktop Studio:

In Studio:

-
-
Save your script.
Workflow Execute for Create Workflow
This action must come after a SNIPPET with the code for a Microsoft Dynamics Create workflow.
You can also configure the ENHANCED WORKFLOW EXECUTE action for Create workflows. This allows you to easily set up and test workflows.
-
If you're using Desktop Studio, double-click the Workflow Execute action in your script named Workflow Execute for Create Workflow to launch the Workflow Execute wizard.
-
If you're using NiCE CXone Studio, select the Workflow Execute action in your script named Workflow Execute for Create Workflow and click Open Editor in the action's properties. This launches the Workflow Execute wizard.
- In the Configuration Name field, select the Microsoft Dynamics integration you want this Workflow Execute action to use. The drop-down displays the names of all configured integrations in your NiCE CXone system.
-
In the Actions field, select
-
Under
- Click Next.
- Verify your selections in the pop-up window. If you need to change a selection, click No and make your change.
- Click Yes in the pop-up window to apply your selections to the Workflow Execute properties.
- Save your script.
Snippet for Record ID
This SNIPPET action holds the record ID for the record created by the Create workflow. If you do not have any Create workflows in your script, you can delete this action. If you have more than one Create workflow, this action can hold the record IDs for each.
-
If you're using Desktop Studio:
-
Right-click the WORKFLOW EXECUTE action in your script named Workflow Execute for Create Workflow.
-
Copy the value of the resultSet (out) property.
-
Double-click the SNIPPET action in your script named Snippet for Record ID.
-
Paste the value of the resultSet (out) property between the curly brackets in the code, replacing the word array.
-
Change [RecordType] to the type of record created by the Create workflow.
-
-
If you're using NiCE CXone Studio:
-
Select the WORKFLOW EXECUTE action in your script named Workflow Execute for Create Workflow.
-
From the properties panel on the right, copy the value of the Result Set property.
-
Select the SNIPPET action in your script named Snippet for Record ID and click Open Editor in the action's properties.
-
Paste the value of the Result Set property between the curly brackets in the code, replacing the word array.
-
Change RecordType to the type of record created by the Create workflow.
-
-
If you have more than one Create workflow in your script, repeat the steps above for each Create workflow.
-
Save your script.
Snippet for Update Workflow
This SNIPPET action contains the code for each Microsoft Dynamics Update workflow. You can only configure one workflow per SNIPPET. You must have one SNIPPET action and one WORKFLOW EXECUTE action for each workflow.
-
If you're using Desktop Studio, double-click the SNIPPET action in your script named Snippet for Update Workflow.
-
If you're using NiCE CXone Studio, select the SNIPPET action in your script named Snippet for Update Workflow and click Open Editor in the action's properties.
-
Edit the Update workflow code according to the instructions for that workflow.
-
To configure more than one Update workflow in this script:
-
Copy and paste this SNIPPET.
-
Copy and paste the WORKFLOW EXECUTE action that follows this SNIPPET.
View image of example script with multiple Update workflows
In Desktop Studio:
In Studio:

-
-
Save your script.
Workflow Execute for Update Workflow
This action must come after a SNIPPET with the code for a Microsoft Dynamics Update workflow.
-
If you're using Desktop Studio, double-click the Workflow Execute action in your script named Workflow Execute for Update Workflow to launch the Workflow Execute wizard.
-
If you're using NiCE CXone Studio, select the Workflow Execute action in your script named Workflow Execute for Update Workflow and click Open Editor in the action's properties. This launches the Workflow Execute wizard.
- In the Configuration Name field, select the Microsoft Dynamics integration you want this Workflow Execute action to use. The drop-down displays the names of all configured integrations in your NiCE CXone system.
-
In the Actions field, select
-
Under
- Click Next.
- Verify your selections in the pop-up window. If you need to change a selection, click No and make your change.
- Click Yes in the pop-up window to apply your selections to the Workflow Execute properties.
- Make sure the value of the cacheKey (out) property is not cacheKey. It can be set to anything besides cacheKey. For example, cacheKey-null.
- Save your script.
Agent Workflow Configuration
This action executes workflows when the agent manually triggers them in Agent Workspace (Agent). It moves information between the script and Agent Workspace (Agent), depending on the workflow the agent used.

-
Select the AGENT WORKFLOW CONFIGURATION action in your script.
-
In the properties panel on the right, locate the AgentUserId property. If this is a voice script, make sure the property's value is {global:__AgentID}. If this is a digital script, make sure the property's value is {AgentID}.
-
Locate the searchCacheKey property. Make sure the property's value is set to {cacheKey}.
-
If you're using Desktop Studio, double-click the Agent Workflow Configuration action in your script. This launches the Custom CRM Configurations wizard.
-
If you're using NiCE CXone Studio, select the Agent Workflow Configuration action in your script and click Open Editor in the action's properties. This launches the Custom CRM Configurations wizard.
- Select the Custom CRM Configuration you want this Agent Workflow Configuration action to use. The drop-down displays the names of all configured integrations in your NiCE CXone environment.
-
Select one or more Actions that you want agents to be able to perform when this script runs.
Learn more about action types
Field Value Details Select all supported actions. Agents can add timeline information to the Activities section of the customer card.
Data Memorialization
Agents can add data from the selected record in the Activities section of the customer card to the record of the current contact. You determine the data that can be added by mapping it for Microsoft Dynamics in Agent Integrations in NiCE CXone.
Agents can perform a second-level search. After performing an initial search, they can search to reveal more information about the initial search results. The Search must be selected to have any search records displayed in the Customer Card.
Select this option if you want to choose a dynamic data mapping.
-
In the
- Click Next.
- Verify your selections on the
- Click Save in the
- Save your script.

Test Your Script
Test your script by simulating an interaction in Desktop Studio or NiCE CXone Studio.
The next step of integrating Microsoft Dynamics with Agent Workspace (Agent) is to configure workflows.