

Login authenticators control how users log in to NiCE CXone. They allow you to:
-
Choose the type of authentication used.
-
Restrict logins to certain locations.
-
Define password complexity.
-
Require multi-factor authentication.
-
Set password policies for length and password reuse.
You can create login authenticators for different authentication needs in your organization. If you use external authentication with your login authenticator, additional setup steps may be required.
Each NiCE CXone user's employee profile must have a login authenticator. Users can only be assigned one login authenticator. Login authenticators are not required, but users cannot log in to NiCE CXone without one. Backend users, such as for integrations, can log in with their assigned access keys, so they don't need a login authenticator.
You can assign login authenticators to employee profiles individually or in bulk. Alternatively, you can assign users to the login authenticator.
Authentication Types
NiCE CXone supports both internal and external authentication:
- Internal authentication is performed by NiCE CXone. The system authenticates users with a user name and password. You can choose to require multi-factor authentication and location-based login restrictions. To use internal authentication, create a login authenticator and choose the System type of authentication, then configure the password policy.
- External authentication relies on third-party identity providers (IdPs). The system uses federation to authenticate users with the IdP. Additional setup is required to use external authentication.
NiCE CXone has a default login authenticator called System Default. It uses internal authentication. You can modify its configuration to meet the needs of your organization.
You can read more about authentication and authorization in NiCE CXone.
Password Requirements in System Login Authenticators
For system login authenticators, you can specify requirements for user passwords. You can:
- Specify the number of days the password is valid. After the specified number of days, the system requires users to change their passwords.
- Require passwords to have a minimum number of characters.
-
Specify the number of previous passwords that NiCE CXone remembers. Users cannot reuse passwords that NiCE CXone remembers.
-
Configure the maximum number of allowed password attempts. If a user enters the wrong password the configured number of times, the account automatically locks for 30 minutes. As an administrator, however, you can unlock a user's account sooner than 30 minutes. You can configure the maximum number of attempts to anything between three and ten. The default is six.
-
If a user forgets their password, they can request a password reset link be sent by email.
When a user sets or changes their password, the password change field requires the new password to meet the requirements set in the user's assigned login authenticator. As the user types in a new password, NiCE CXone displays the login authenticator rules. The system evaluates the new password based on those rules and color-codes the rules in real time.
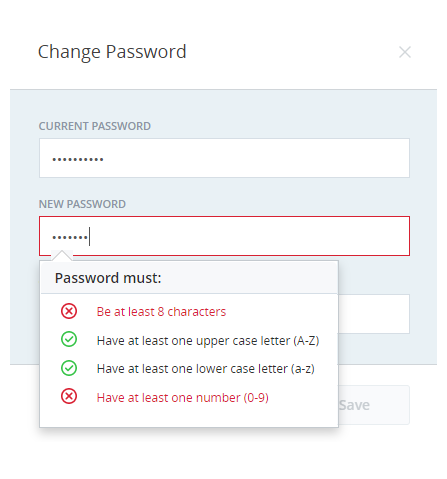
Rules that the password meets appear in green and are marked with a checkmark. Rules that are not met appear in red and are marked with X.
Key Facts About Login Authenticators
- When you modify a login authenticator, the changes become effective as soon as they're saved. Users who are logged in at the time of the change are not affected. If their password doesn't meet the new password policy, the system requires the user to change their password the next time they log in.
- Login authenticators can restrict logins to specific locations. You can define a location in NiCE CXone and select it when you create a login authenticator. Locations can include a set of IP addresses, ranges, or subnets. If you do this, users without both the correct credentials and location cannot log in.
- With OpenID Connect login authenticators, you can set up single logout with your IdP. To do so, you have to include an End Session Endpoint in the LA. You also have to add the Signout Redirect URI to the allowlist in your IdP.