

Tenant Management (TM) is an administrative application that enables business partners to support their own tenants![]() High-level organizational grouping used to manage technical support, billing, and global settings for your NiCE CXone system. and customers.
High-level organizational grouping used to manage technical support, billing, and global settings for your NiCE CXone system. and customers.
Using TM, you can view the applications and features available to your tenants. You can also impersonate your tenants to provide technical support. Only NiCE users can create a tenant or turn features on or off for a tenant. Contact your partner account manager for help.
Tenants can have parent-child-grandchild relationships. When viewing a tenant, the Child Tenant tab displays that tenant's children. Parent tenants can impersonate their child tenants to provide support. Tenants can view information for their grandchild tenants but cannot impersonate them. As an administrator creating or viewing a tenant, the Parent drop-down allows you to select a parent, if applicable.
View Tenant Details
Required role: TM Admin
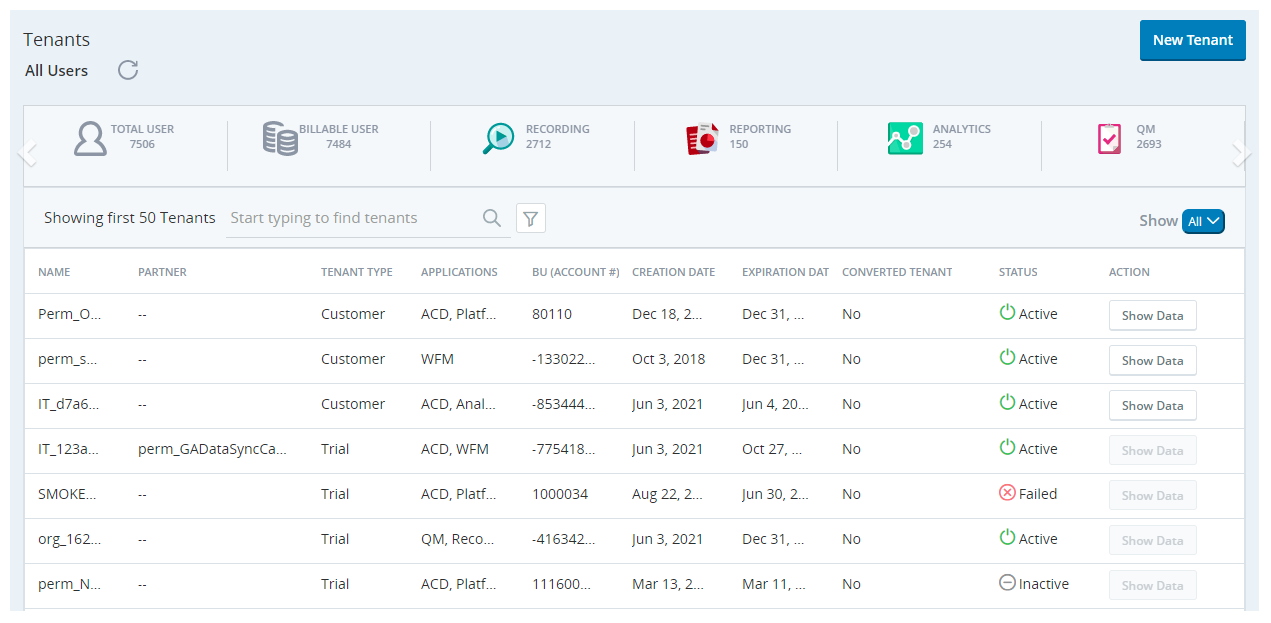
In the dashboard that appears above the tenant![]() High-level organizational grouping used to manage technical support, billing, and global settings for your NiCE CXone system. list on the Tenants page, you can view the following details about your tenants:
High-level organizational grouping used to manage technical support, billing, and global settings for your NiCE CXone system. list on the Tenants page, you can view the following details about your tenants:
- Total Users
- Billable Users
- User counts for each of the applications licensed to the tenants
Details about using this page:
- Click and drag the column title to reorder the columns.
- The Converted Tenant column indicates whether the tenant has been migrated from Central to NiCE CXone.
- Click a row to view and manage more details of that particular tenant.
- To view details of a tenant in the dashboard above the table, click the Show Data button on that tenant's row.
Configure a Tenant
Required role: TM Admin or Implementation Partner TM Admin
Impersonate & Configure allows you to impersonate any tenant![]() High-level organizational grouping used to manage technical support, billing, and global settings for your NiCE CXone system. associated with your partner account. You can use your elevated permissions to do things for them that they are unable to do. The tenants with the status Central are not editable.
High-level organizational grouping used to manage technical support, billing, and global settings for your NiCE CXone system. associated with your partner account. You can use your elevated permissions to do things for them that they are unable to do. The tenants with the status Central are not editable.
- In the left navigation menu, click Tenants.
- Click the tenant you want to configure.
- On the upper right portion of the Tenants page, click the Action icon
 , and then select Impersonate & Configure.
 - Configure the tenant as needed.
- When you are done, click Stop in the message at the top of the page.
- The impersonation message may not appear in all NiCE CXone applications. If you want to stop impersonating and do not see the message on the current page, navigate to the Admin application and then click Stop.
System Type Selection:
System type selection is only for customers with a Third-Party Telephony Providers license. Customers using MS Teams or Amazon Connect as their third party integration do not need to select a system type.
During tenant creation, you must select one of four system types based on the contract and the customer's provided concurrent calls estimation. The default is Standard.
The system type cannot be changed after the tenant is created.
-
Lab – Development, lab, or pre‑production environments
-
Standard – Supports up to 4,000 concurrent calls; recommended for small- to medium‑scale deployments
-
Large – Supports up to 8,000 concurrent calls; designed for large‑scale enterprise environments
-
Very Large – Supports more than 8,000 concurrent calls; ideal for enterprise‑grade customers with high call volumes
Support a Tenant
Required role: TM Admin or Implementation Partner TM Admin
The Use Impersonation option allows you to impersonate any tenant![]() High-level organizational grouping used to manage technical support, billing, and global settings for your NiCE CXone system. associated with your partner account. You can do things for the tenant as if you were the tenant administrator.
High-level organizational grouping used to manage technical support, billing, and global settings for your NiCE CXone system. associated with your partner account. You can do things for the tenant as if you were the tenant administrator.
- In the left navigation menu, click Tenants.
- Select the tenant you want to configure.
- On the upper right portion of the Tenant page, click the Action icon, and then select Impersonate & Support.
- Provide needed support for the tenant.
- When you are done, click Stop in the message at the top of the page.
The impersonation message may not appear in all NiCE CXone applications. If you want to stop impersonating and do not see the message on the current page, navigate to the Admin application and then click Stop.
Support a Child Tenant Through the Admin Menu
Required role: Parent Tenant Administrator
The Parent Tenant Administrator role allows you to impersonate child tenants![]() High-level organizational grouping used to manage technical support, billing, and global settings for your NiCE CXone system.. It can used as a primary role or a secondary role. This role is automatically created when you:
High-level organizational grouping used to manage technical support, billing, and global settings for your NiCE CXone system.. It can used as a primary role or a secondary role. This role is automatically created when you:
- Create the first child for a tenant.
- Assign the TM license to the parent tenant.
- Log in to NiCE CXone.
- Click the app selector
 and select Admin.
 - Click TM.
- In the list of the Child Tenants, click the child tenant you want to support.
- When the Tenants page for the child tenant opens, click the Settings button and select Impersonate & Support or Impersonate & Configure.
- Perform any actions needed to support the child tenant and stop impersonating when you're done.
Applications and Configurations for Tenants
Only internal NiCE users have the ability to manage applications and configurations for tenants![]() High-level organizational grouping used to manage technical support, billing, and global settings for your NiCE CXone system.. However, you can view complete information about the applications and features your tenants are enabled to use. Expand the following drop-down to learn more.
High-level organizational grouping used to manage technical support, billing, and global settings for your NiCE CXone system.. However, you can view complete information about the applications and features your tenants are enabled to use. Expand the following drop-down to learn more.
View applications and configurations
| Application Name in Tenant Management | Features | Configuration settings |
| ACD |
This application includes much of the functionality associated with the base NiCE CXone communications platform. Features and applications are grouped into these categories:
|
No settings. |
| ActOne | Features for the ActOne application. | No settings. |
| Adapters | Enable the adapters for Presence Sync and Directory Sync. Presence Sync allows you to sync agent states between ACD and your application. Directory Sync allows agents to use MAX to consult their contacts from other applications, such as Microsoft Teams. |
Directory Sync Settings: The presence look-up applications you can use to sync agent states between ACD and your selected applications. |
| Analytics | Enables Interaction Analytics (CXone). If the tenant uses Interaction Analytics (CXone) with Recording Management (CXone), you must select Recording Advanced and enable stereo recording. Go to Tenants > Applications & Features > Recording > Recording Mode and select Recording Advanced and Stereo. Select either Interaction Analytics (CXone) Advanced or Interaction Analytics (CXone) Premium. Using NiCE CXone metrics with Interaction Analytics (CXone) requires Premium. |
No settings. |
| Analytics Models |
Enables behavioral models for use in NiCE CXone:
|
No settings. |
| Analytics Services |
When the Analytics Services license is enabled and:
|
No settings. |
| AI Agents (Cognigy) | Enables AI Agents (Cognigy). | No settings. |
| NEVA Discover Studio | Enables NEVA Discover Studio. | No settings. |
|
BCP This feature is part of a Controlled Release program. Contact your account representative if you're interested in knowing more. |
Enables Multi-Region Business Continuity Plan (Business Continuity Plan).
|
Available Regions: Select the region where your Multi-Region Business Continuity Plan (Business Continuity Plan) tenant is located. DR Tenant: Select the ID of your Multi-Region Business Continuity Plan (Business Continuity Plan) tenant. Passkey: Click Generate Passkey, then click Copy Passkey. Save the passkey somewhere secure or provide it to the user who will enable the backup system. When enabling the backup system, the user must enter the passkey. |
| Bot Builder | Enables Bot Builder. | No settings. |
| Dashboard (New) | Enables Dashboard. | No settings. |
| Coaching | Enables Coaching. | No settings. |
| Supervisor |
|
|
| Legacy Dashboard | Enables the legacy Legacy Dashboardapplication | |
| Engagement Manager | You can switch on Engagement Manager for a tenant configured with Workforce Management (IEX Integrated) 7.2.9 or 7.3.1 or later and using the NiCE CXoneACD. Engagement Manager provides a mobile app for viewing the schedules and receiving notifications. | No settings |
| Actions | Enables NiCE CXoneActions. | No settings. |
| Automated Summary (AutoSummary) | If Automated Summary (AutoSummary) is enabled, the Automated Summary (AutoSummary) and Topic AI applications will be enabled and will be visible under the NiCE CXone Applications menu. | No settings. |
| Knowledge Management (Expert) | Enables Knowledge Management (Expert). | Knowledge Management (Expert) Hostname: Enter the hostname for the tenant's instances of Knowledge Management (Expert) |
| Guide | Enables engagement rules for Guide. | No settings. |
| Data Policies |
Controls the applications available in Interactions Hub:
|
No settings. |
| Knowledge Hub | Enables Knowledge Hub. | No settings. |
| NiCE CXone Desktop Discovery |
Enables NiCE CXoneDesktop Discovery and allows selection of the following features:
|
|
| Orchestrator | If Orchestrator is enabled, the NiCE CXoneOrchestrator feature will be enabled. It is the only feature with this application. | No settings. |
| Monitoring Gateway |
Controls the applications available in Monitoring Gateway:
|
Voice Diagnostics: Enter the Empirix data specific to the tenant. |
| AI Routing | If NiCE CXoneAI Routing is enabled, the Voice feature will be enabled. It is the only feature with this application. | ACD Integration: Choose the integration that AI Routing should use for your tenant. |
| Performance Management (Integrated) (Standalone) (New) | Enables Performance Management (Integrated) (Standalone). | No settings. |
| Platform Services |
For Cloud Storage Services, select the following flags to give access to the tenant:
Cloud Storage Services is available by default to all NiCE CXone users. Select Custom Storage and Custom KMS to make them available on the Storage Settings page. For Data Share, select the Data Share option. For Data Streams, select the Data Streams option. You can opt to enable IVR Log. |
Cloud Data Share: Select whether the tenant uses the NiCE CXone Snowflake account or their own. |
| QM |
Enables Quality Management (CXone):
If you are using QM with Recording Management (CXone), you must select Recording Advanced. Go to Tenants > Applications & Features > Recording and select Recording Advanced. If you are using QMAdvanced with Recording Management (CXone), you must select Recording Advanced and enable stereo mode. Go to Tenants > Applications & Features > Recording and select Recording Advanced and Stereo. |
Recording Source: Select from the drop-down of applications you can use with QM. |
| Recording |
Recording options License options:
|
Recording Mode: Select either stereo or mono.
|
| Reporting | If Reporting is enabled, the Custom Reports feature will be enabled. It is the only feature with this application. | No settings |
| Feedback Management | If Feedback Management is enabled, the Feedback Management feature will be enabled. It is the only feature with this application. | Feedback Management Settings: Enter the URL for the tenant's instance of Feedback Management. |
| SSA | If SSA is enabled, the Self-Service Analytics feature will be enabled. It is the only feature with this application. | No settings |
| WFI | Enables Workforce Intelligence. | No settings |
| WFM | Enables Workforce Management (CXone). |
ACD Integration: Select from the drop-down of supported ACD integrations. If integrating your ACD via the WFM Engagement Hub, you need to have the WFM Advanced license enabled. |
| X-Sight |
Enables features for X-Sight in the following categories:
|
No settings. |
| X-Sight AI |
The following features are available:
|
No settings. |
| Agent Integrations |
Enables the following features for Agent Workspace (Agent) applications:
These settings apply to: Agent Workspace (Agent), Agent Workspace (Embedded) (Agent Embedded), Agent Workspace (Browser Extension) (Agent Integrated). and Agent Workspace for Microsoft Teams (Agent for Microsoft Teams). |
No settings. |
| Automation & AI |
Enables the following features:
|
No settings. |
| Divisions |
Enables divisions for the tenant. Contains the following settings:
|
 .
.Enter Tenant Ownership Information
The Ownership tab in the Tenant profile allows you to save ownership information.
- In NiCE CXone, click the app selector and select TM.
- In the left navigation menu, click Tenants.
- Select the tenant you want to configure.
- Click Ownership.
- Enter the owner's name and email.
- Select the owner's Type and Line of Business from the drop-downs.
- Click Save.
Configure an ACD Integration for NiCE CXone WFM
The following helps you configure ACD in NiCE CXone WFM.
-
Click the app selector
and select TM. The TM page displays a list of all existing tenants. -
Select the tenant for which you are configuring the WFM application. If the tenant is new, click New Tenant on the TM page.
-
Click the Applications & Features tab.
-
Locate WFM. Enable the toggle associated with it.
-
Click Settings
 .
. -
In the settings dialog box, click Next.
-
Choose the type of ACD from the ACD Integration drop-down.
-
Choose InContact ACD if you want to integrate the NiCE CXone ACD.
-
For non-NiCE CXone ACDs, select Third-Party ACD. If you are integrating a third-party ACD, enter a Name and, optionally, its Version.
-
-
Click Finish.
Export Tenant Management Users
Required permissions: Admin > Bulk Upload
You can export a list of Tenant Management users. The exported data is saved as a CSV file and includes relevant user details such as name, email, role, and status. This makes it easier for you to prepare for audits or other compliance processes.
You can choose to download only active employees or all employees. The Download Employees window provides a history of previous download requests. You can see the date and time the request was made and the status of the request, such as Failed, In Progress, or Complete.
- Log in to NiCE CXone using your Tenant Management user account.
- In NiCE CXone, click the app selector and select Employees.
- Click Download Employees.
- Click either Download All Employees or Download Active Employees. The file download begins. When complete, you can open it from the location on your computer where downloaded files are saved.
- Click Close.