This page is about handling public interactions on social media platforms, also called public posts. You can also handle private social messages in Agent.
You can handle social platform interactions in CXone Mpower Agent if your administrator has enabled them for you. Social platform interactions assigned to you appear in the Interactions Menu, marked by the Public icon  and one of these icons:
-
 : Apple Apps Reviews
 -
 : Facebook
 -
 : Google Play
 -
 : Google Maps
 -
 : Instagram
 -
 : LinkedIn
 -
 : X (formerly known as Twitter)
 -
 : YouTube
You can like and reply to public posts from within Agent.
Like Public Posts
-
Launch Agent and sign in.
- Select the public post from the Interactions Menu.
-
The contact's
 The person interacting with an agent, IVR, or bot in your contact center. post appears
 . Agent will send your like to the social platform.
Reply to Public Posts
You can reply to posts made on your organization's page. You can also reply to posts where your organization's account is @ mentioned.
Social platform interactions may be automatically routed and assigned to you. If you reply to an interaction that isn't assigned to you, Agent does not automatically assign it to you. You must manually assign the interaction to yourself.
- Select the public post you want to reply to from the Interactions Menu.
- The contact's post appears
 > Reply.
 -
Draft your reply in the response field
 or insert an Emoji
  . You can copy and paste images to include them as attachments. You cannot resize them.
 -
Click Send Message. The message may take a few seconds to send.
If you need to send the message for approval
-
Click the arrow next to Send Message
 and select an approval queue. Someone assigned to that queue will review your message.
-
Click Request Approval.
The message is removed from your inbox and delivered to a reviewer. If the reviewer approves your message, it will be sent to the contact. If they reject it, it will be sent back to you.
-
Hide Posts
You can hide a post from its original platform. Hidden posts are still visible in Agent. You can unhide the post to display it again on the platform. Delete the post if you want it to be deleted forever.
- In the Interactions Menu, select the public post you want to hide.
- The contact's post appears > Hide.
- To unhide the post, click the three dots > Unhide.
Transfer Public Posts
You can transfer public posts to other agents. If you don't know who to transfer the post to, you can transfer it to a skill![]() Used to automate delivery of interactions based on agent skills, abilities, and knowledge or team. The post is then assigned to an agent with that skill or team.
Used to automate delivery of interactions based on agent skills, abilities, and knowledge or team. The post is then assigned to an agent with that skill or team.
- Select the public post you want to transfer from the Interactions Menu.
- Assign the public post a Status of New or Open. If the post has a different status, it cannot be transferred.
- Click Consult / Transfer
 .
. - In the Directory, search for the agent, skill, or team you want to transfer the post to. You can use the drop-down below the search bar to switch between directories.
- Hover over the agent, skill, or team in the search results and click Transfer
 .
.
Elevate Public Posts
You can elevate a![]() A way for contacts to interact with agents or bots. A channel can be voice, email, chat, social media, and so on.. This allows you to select the best channel for handling the contact. For example, if you could better assist a contact over the phone, you can elevate the
A way for contacts to interact with agents or bots. A channel can be voice, email, chat, social media, and so on.. This allows you to select the best channel for handling the contact. For example, if you could better assist a contact over the phone, you can elevate the
| Current interaction channel | Can elevate to | |||
|---|---|---|---|---|
| Voice | SMS | |||
| Chat | Voice | SMS | ||
| Voice | SMS | |||
| SMS | Voice | SMS | ||
| Private Social | Voice | SMS | ||
| Public Social | Voice | SMS | ||
| Voice | SMS | |||
You cannot elevate interactions with a status![]() Result assigned by the agent or system at the end of a voice (disposition) or digital (status) interaction. of Closed. Do not elevate interactions when you're in an unavailable state
Result assigned by the agent or system at the end of a voice (disposition) or digital (status) interaction. of Closed. Do not elevate interactions when you're in an unavailable state![]() The availability status of an agent.
The availability status of an agent.
-
Click Add Outbound

-
Enter the contact's ID for the channel
A way for contacts to interact with agents or bots. A channel can be voice, email, chat, social media, and so on. you want to elevate to. For example, if you're elevating the -
Select the channel you want to elevate to.
-
Select a skill
Used to automate delivery of interactions based on agent skills, abilities, and knowledge from the drop-down if it appears. -
Click Start. The elevation starts.
 appears.


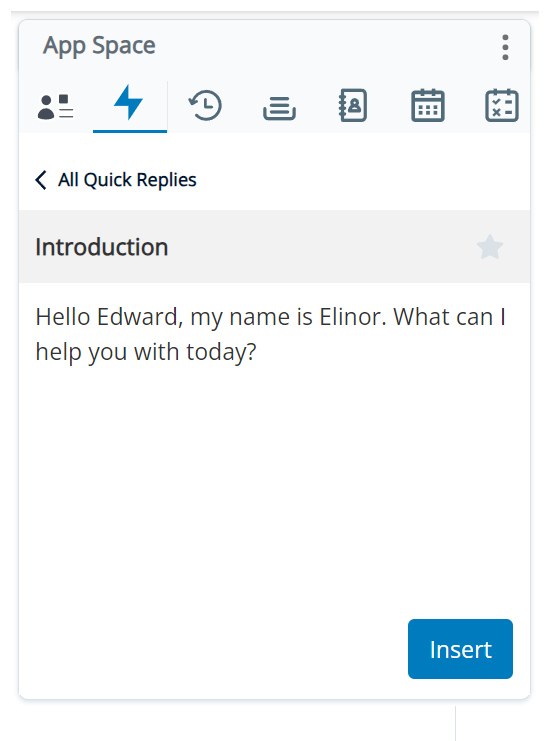
Use Quick Responses
Quick responses are pre-written replies you can select and send to contacts. Some quick responses have custom fields where you can enter values, such as the contact's name.
- Open an interaction in Agent.
-
 .
.
- Select the quick response you want to use:
- From the list of quick responses that appears under the View All tab.
- By searching for a specific quick response using the Search bar.
- From the Favorites tab.
- You can click Favorite
 to the right of the quick response name to have it appear on the Favorites tab. Favorites are removed when you clear your browser's cache.
 - In the quick response form, fill in any custom fields, and click Insert. The quick response appears in the response field
- Edit the quick response if necessary, then click Send Message.
Add Notes and Tags
You can add notes and tags to individual
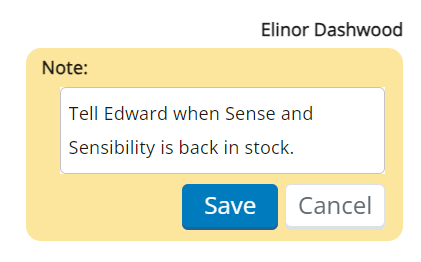
Add a Note
You can add a note to a
-
Record information about the contact. If the interaction is transferred to another agent, your note can help them handle the interaction.
-
Give your supervisor, manager, or coach context about a response you sent.
-
Click Add Notes
 under the response field
 -
In the yellow Note box that appears, enter your note.
-
Click Save.
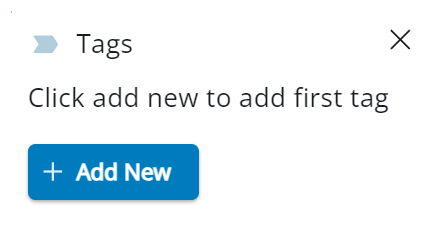
Add a Tag
You can add a tag to a
-
Help you find that
-
Categorize the
-
Click Add Tags
 next to the contact's name in the
 -
Click + Add New.
-
Select a tag from the drop-down list, or create a new tag by entering a name.
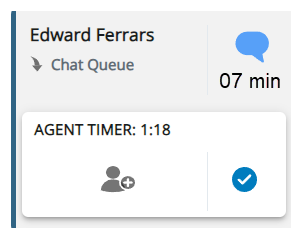
View Response Timers
If your Agent administrator has enabled them, response timers for
-
Agent Timer: Indicates how long the contact has been waiting on you to respond. When fifty percent of your allotted time is left, the alert icon
 appears in yellow. When the timer reaches 0:00, the alert icon
  appears in red.
 -
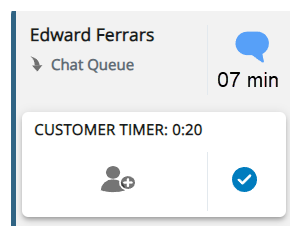
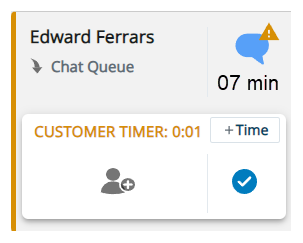
Customer Timer: Indicates how long you've been waiting for the contact to respond.
When fifty percent of the contact's allotted time is left, the alert icon
appears in yellow. You can give the contact more time to respond by clicking +Time, if your administrator has enabled this for you. When the timer runs out, the interaction is removed from your inbox. If the contact responds after this, the interaction is re-assigned to an agent.
Use the Customer Card
If your administrator has enabled it for you, the customer card provides information to help you handle contacts.
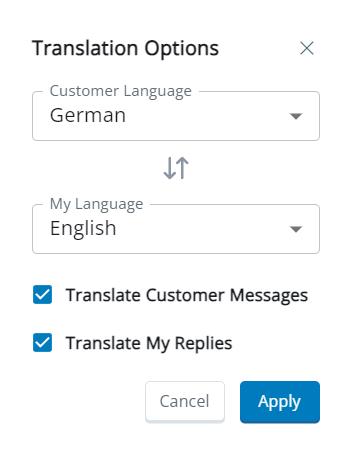
Translate Social Platform Interactions
If the contact speaks a different language, Agent can translate their messages into your language in real time. It displays both the contact's original message and the translation. It can also translate your messages into the contact's language. The contact does not see your original message, but is informed that your message is translated.
Your administrator must enable this for you.
-
Click Options
at the top right of the open interaction. -
Select Translate Messages.
-
In the Customer Language drop-down, select the contact's language. Select your language in the My Language drop-down.
-
To translate the contact's messages into your language, select Translate Customer Messages.
-
To translate your messages into the contact's language, select Translate My Replies.
-
Click Apply. A notification appears above the response field, letting you know messages are being translated.
Delete Post Content or Author Name
You can delete the content of inbound and outbound
You can also delete a public post from its original platform. When you do this, the post is still visible in Agent, but is marked with "Deleted." This is available for both the original post in a thread and the comments in a thread. This post or comment is deleted forever. If you hide a post from its original platform instead of deleting it, you can unhide the post later.
Your administrator must enable this for you.
-
Click the three dots
 next to the specific
 -
To delete the content of the
-
To delete the name of the author of the
-
To delete a post or a comment from its original platform, click Delete Entire Message.
-
In the pop-up that appears, click Delete.
Assign Statuses to Social Platform Interactions
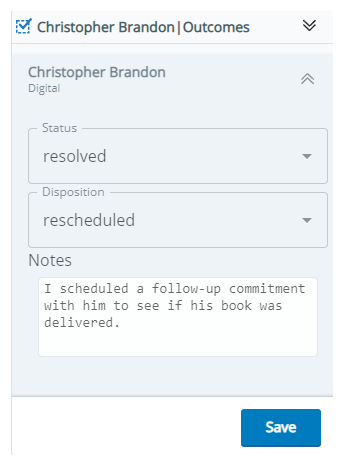
In the Outcomes window, you can assign a status![]() Result assigned by the agent or system at the end of a voice (disposition) or digital (status) interaction. to an interaction. Statuses indicate the result of the interaction. For example, if you answered a contact's question, you could select Resolved. Note that:
Result assigned by the agent or system at the end of a voice (disposition) or digital (status) interaction. to an interaction. Statuses indicate the result of the interaction. For example, if you answered a contact's question, you could select Resolved. Note that:
-
You cannot change an interaction's status after it's set to Closed.
-
In order to edit the Status, Disposition, Notes, and Tags of an interaction, it must be assigned to you. If you are previewing an interaction, you cannot edit those fields.
-
You may need to assign a status to an interaction before you can close it.
If the contact![]() The person interacting with an agent, IVR, or bot in your contact center. ends the interaction first, the status, disposition, notes, and tags you added are not mapped to your CRM
The person interacting with an agent, IVR, or bot in your contact center. ends the interaction first, the status, disposition, notes, and tags you added are not mapped to your CRM![]() Third-party systems that manage such things as contacts, sales information, support details, and case histories.. However, they still appear in Agent for future viewing.
Third-party systems that manage such things as contacts, sales information, support details, and case histories.. However, they still appear in Agent for future viewing.
-
Open an interaction that is assigned to you. Click Outcome
 in the Interactions Menu.
 - Select a Status from the drop-down.
- If the Disposition field appears, select a disposition. These options depend on the skill Used to automate delivery of interactions based on agent skills, abilities, and knowledge for the interaction.
- You can enter Notes about the interaction. You can also add Tags to help you find the interaction later.
- Click Save.
A green check mark will appear next to interactions marked with a status of Resolved.
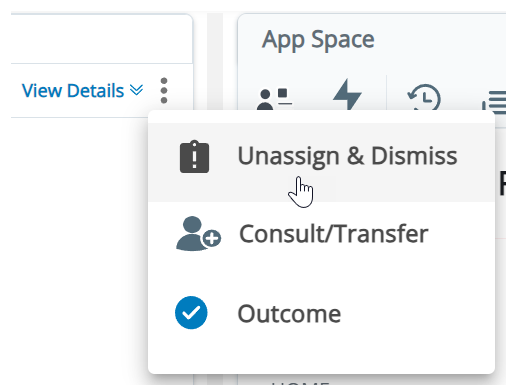
Close Social Platform Interactions
When you're done handling an interaction, you should close it. Your administrator configures the maximum number of ![]() Any channel, contact, or skill associated with Digital Experience. interactions
Any channel, contact, or skill associated with Digital Experience. interactions
If your administrator has configured this,
You can manually close an interaction by following these steps:
-
Assign the
-
Click Options
at the top right of the open interaction. - Select Unassign & Dismiss. The interaction is then closed and removed from your Interactions Menu.