You can handle emails in CXone Mpower Agent if your administrator has enabled them for you. Any emails assigned to you appear in the Interactions Menu, marked by ![]() .
.
Send Outbound Emails
To send outbound emails, you must have an outbound email skill![]() Used to automate delivery of interactions based on agent skills, abilities, and knowledge assigned to you.
Used to automate delivery of interactions based on agent skills, abilities, and knowledge assigned to you.
When you send an outbound email, it is assigned to you if you're in an available or a working state![]() The availability status of an agent. It is not assigned to you if you're in an unavailable state.
The availability status of an agent. It is not assigned to you if you're in an unavailable state.
-
Launch Agent and sign in.
- In the Interactions Menu, click
 .
. - In the Directory, enter the name of the contact
 The person interacting with an agent, IVR, or bot in your contact center. you want to send an email to. You can use the drop-down below the search bar to switch between directories. To view all Directory entries, make sure All is selected in the drop-down. Then click in the search bar, leave it empty, and press the Enter key on your keyboard.
 - Click the contact's name in the search results. Under Channels, click Email
 .
. - If prompted, select a skill Used to automate delivery of interactions based on agent skills, abilities, and knowledge from the drop-down and click Start.
- To change the email address you're sending from, click the drop-down arrow
 next to the From field and select a different email address.
 - To CC or BCC recipients, click CC or BCC in the top right corner of the email draft. You can search for Directory entries in the CC and BCC fields that appear.
-
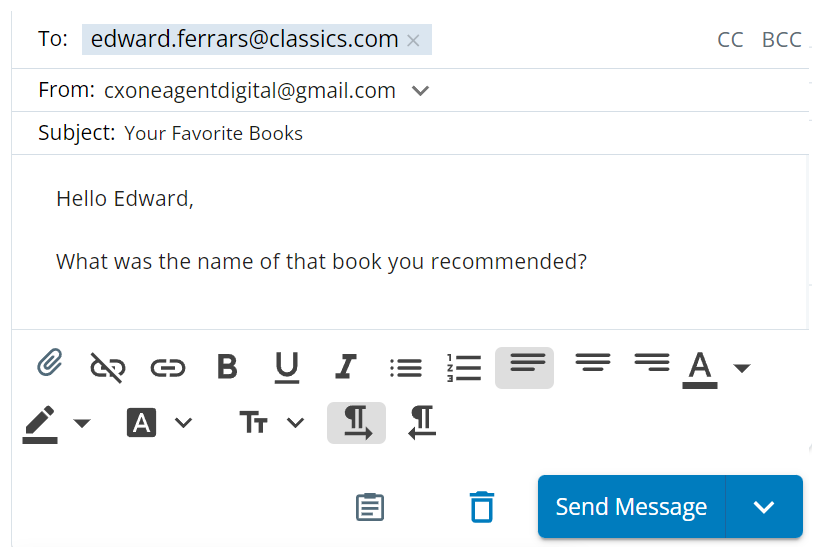
Draft your email in the response field at the bottom. You can:
-
Copy and paste images to include them as attachments. You cannot resize them.
-
Attach files
 .
. -
Insert a table with up to 50 rows and 50 columns. You can copy and paste a table with up to 250 rows and 250 columns. The formatting of tables from Microsoft Excel and Google Sheets will be preserved. However, copying and pasting a table from a PDF may result in formatting issues.
-
Copy and paste text from documents in Google Docs and reports in Sabre. The formatting of this text will be preserved.
-
-
Click Send Message.
If you need to send the message for approval
-
Click the arrow next to Send Message
 and select an approval queue. Someone assigned to that queue will review your message.
-
Click Request Approval.
The message is removed from your inbox and delivered to a reviewer. If the reviewer approves your message, it will be sent to the contact. If they reject it, it will be sent back to you.
-
Answer Inbound Emails
When you open an email interaction, Agent automatically scrolls down to display the most recent email in the thread.
Email interactions may be automatically routed and assigned to you. If you reply to an interaction that isn't assigned to you, Agent does not automatically assign it to you. You must manually assign the interaction to yourself.
-
Launch Agent and sign in.
- Select the inbound email
 from the Interactions Menu.
 - If Reject and Accept appear, click Accept.
- Read the contact's email message
- Draft your response in the response field at the bottom. You can copy and paste images to include them as attachments. You cannot resize them.
-
To change the email address you're sending from, click the drop-down arrow
next to the From field and select a different email address. - To CC or BCC recipients, click CC or BCC in the top right corner of the email draft. You can search for Directory entries in the CC and BCC fields that appear.
-
If you need to send the message for approval
-
Click the arrow next to Send Message
and select an approval queue. Someone assigned to that queue will review your message.
-
Click Request Approval.
The message is removed from your inbox and delivered to a reviewer. If the reviewer approves your message, it will be sent to the contact. If they reject it, it will be sent back to you.
-
Forward Emails
You can forward emails to other users, but you cannot make any changes to them first. The forwarded copy is exactly the same as the email when it was originally received.
-
Click Options
 at the top right of the open email.
 -
Select Forward.
-
Enter the email address you want to forward the email to.
-
Click Send Message.
Transfer Emails
You can transfer emails to other agents. If you don't know who to transfer the email to, you can transfer it to a skill![]() Used to automate delivery of interactions based on agent skills, abilities, and knowledge or team. The email is then assigned to an agent with that skill or team.
Used to automate delivery of interactions based on agent skills, abilities, and knowledge or team. The email is then assigned to an agent with that skill or team.
- Select the email you want to transfer from the Interactions Menu.
- Assign the email a Status of New or Open. If the email has a different status, it cannot be transferred.
- Click Consult / Transfer
 .
. - In the Directory, search for the agent, skill, or team you want to transfer the email to. You can use the drop-down below the search bar to switch between directories.
- Hover over the agent, skill, or team in the search results and click Transfer
 .
.
Download Email Transcripts
You can download the full transcript of an email interaction as a PDF. It does not include attachments. This is supported for:
-
Chrome, Edge, and Island browsers.
-
ChromeOS, macOS, and Windows operating systems.
-
Click Options
at the top right of the open email. -
Select Download Transcript.
-
In the pop-up that appears, configure the file name, location, and file format.
Send Email Transcripts to Contacts
You can send the full transcript of a
-
Click Options
at the top right of the open email. -
Select Send Transcript.
-
In the pop-up that appears, enter the contact's email address.
-
Click Send.
Elevate Emails
You can elevate a![]() A way for contacts to interact with agents or bots. A channel can be voice, email, chat, social media, and so on.. This allows you to select the best channel for handling the contact. For example, if you could better assist a contact over the phone, you can elevate the
A way for contacts to interact with agents or bots. A channel can be voice, email, chat, social media, and so on.. This allows you to select the best channel for handling the contact. For example, if you could better assist a contact over the phone, you can elevate the
| Current interaction channel | Can elevate to | |||
|---|---|---|---|---|
| Voice | SMS | |||
| Chat | Voice | SMS | ||
| Voice | SMS | |||
| SMS | Voice | SMS | ||
| Private Social | Voice | SMS | ||
| Public Social | Voice | SMS | ||
| Voice | SMS | |||
You cannot elevate interactions with a status![]() Result assigned by the agent or system at the end of a voice (disposition) or digital (status) interaction. of Closed. Do not elevate interactions when you're in an unavailable state
Result assigned by the agent or system at the end of a voice (disposition) or digital (status) interaction. of Closed. Do not elevate interactions when you're in an unavailable state![]() The availability status of an agent.
The availability status of an agent.
-
Click Add Outbound

-
Enter the contact's ID for the channel
A way for contacts to interact with agents or bots. A channel can be voice, email, chat, social media, and so on. you want to elevate to. For example, if you're elevating the -
Select the channel you want to elevate to.
-
Select a skill
Used to automate delivery of interactions based on agent skills, abilities, and knowledge from the drop-down if it appears. -
Click Start. The elevation starts.
 appears.


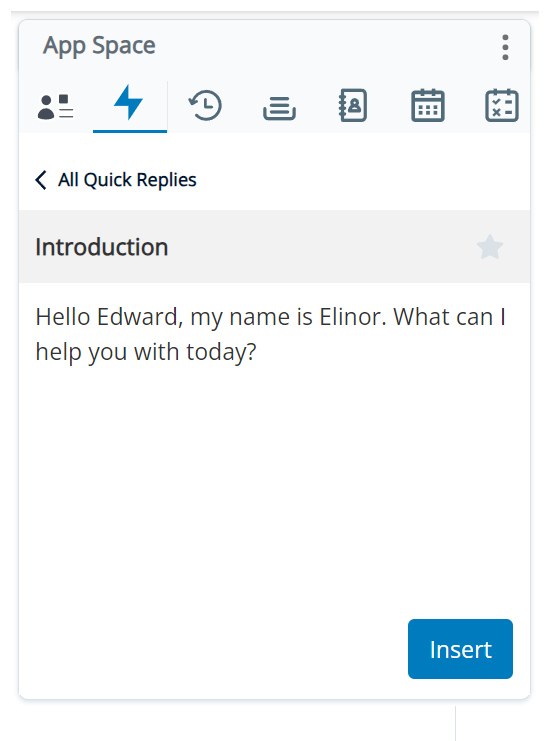
Use Quick Responses
Quick responses are pre-written replies you can select and send to contacts. Some quick responses have custom fields where you can enter values, such as the contact's name.
- Open an interaction in Agent.
-
 .
.
- Select the quick response you want to use:
- From the list of quick responses that appears under the View All tab.
- By searching for a specific quick response using the Search bar.
- From the Favorites tab.
- You can click Favorite
 to the right of the quick response name to have it appear on the Favorites tab. Favorites are removed when you clear your browser's cache.
 - In the quick response form, fill in any custom fields, and click Insert. The quick response appears in the response field
- Edit the quick response if necessary, then click Send Message.
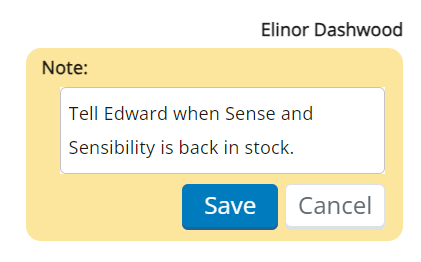
Add Notes and Tags
You can add notes and tags to individual
Add a Note
You can add a note to a
-
Record information about the contact. If the interaction is transferred to another agent, your note can help them handle the interaction.
-
Give your supervisor, manager, or coach context about a response you sent.
-
Click Add Notes
 under the response field
 -
In the yellow Note box that appears, enter your note.
-
Click Save.
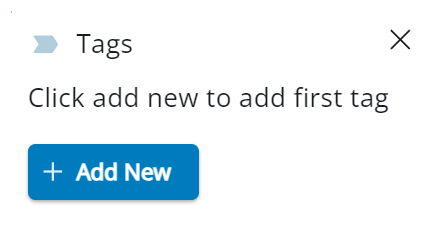
Add a Tag
You can add a tag to a
-
Help you find that
-
Categorize the
-
Click Add Tags
 next to the contact's name in the
 -
Click + Add New.
-
Select a tag from the drop-down list, or create a new tag by entering a name.
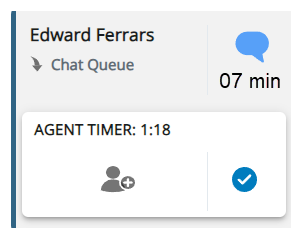
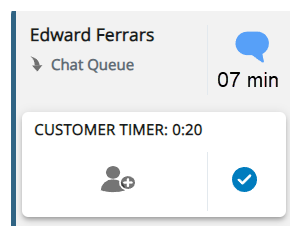
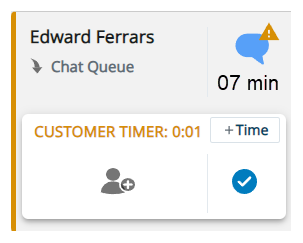
View Response Timers
If your Agent administrator has enabled them, response timers for
-
Agent Timer: Indicates how long the contact has been waiting on you to respond. When fifty percent of your allotted time is left, the alert icon
 appears in yellow. When the timer reaches 0:00, the alert icon
  appears in red.
 -
Customer Timer: Indicates how long you've been waiting for the contact to respond.
When fifty percent of the contact's allotted time is left, the alert icon
appears in yellow. You can give the contact more time to respond by clicking +Time, if your administrator has enabled this for you. When the timer runs out, the interaction is removed from your inbox. If the contact responds after this, the interaction is re-assigned to an agent.
Use the Customer Card
If your administrator has enabled it for you, the customer card provides information to help you handle contacts.
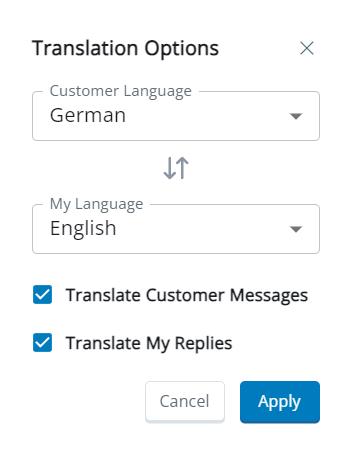
Translate Emails
If the contact speaks a different language, Agent can translate their messages into your language in real time. It displays both the contact's original message and the translation. It can also translate your messages into the contact's language. The contact does not see your original message, but is informed that your message is translated.
Your administrator must enable this for you.
-
Click Options
at the top right of the open interaction. -
Select Translate Messages.
-
In the Customer Language drop-down, select the contact's language. Select your language in the My Language drop-down.
-
To translate the contact's messages into your language, select Translate Customer Messages.
-
To translate your messages into the contact's language, select Translate My Replies.
-
Click Apply. A notification appears above the response field, letting you know messages are being translated.
Delete Email Content or Author Name
You can delete the content of inbound and outbound
Your administrator must enable this for you.
-
Click the three dots
 next to the specific
 -
To delete the content of the
-
To delete the name of the author of the
-
In the pop-up that appears, click Delete.
Assign Statuses to Emails
In the Outcomes window, you can assign a status![]() Result assigned by the agent or system at the end of a voice (disposition) or digital (status) interaction. to an interaction. Statuses indicate the result of the interaction. For example, if you answered a contact's question, you could select Resolved. Note that:
Result assigned by the agent or system at the end of a voice (disposition) or digital (status) interaction. to an interaction. Statuses indicate the result of the interaction. For example, if you answered a contact's question, you could select Resolved. Note that:
-
You cannot change an interaction's status after it's set to Closed.
-
In order to edit the Status, Disposition, Notes, and Tags of an interaction, it must be assigned to you. If you are previewing an interaction, you cannot edit those fields.
-
You may need to assign a status to an interaction before you can close it.
If the contact![]() The person interacting with an agent, IVR, or bot in your contact center. ends the interaction first, the status, disposition, notes, and tags you added are not mapped to your CRM
The person interacting with an agent, IVR, or bot in your contact center. ends the interaction first, the status, disposition, notes, and tags you added are not mapped to your CRM![]() Third-party systems that manage such things as contacts, sales information, support details, and case histories.. However, they still appear in Agent for future viewing.
Third-party systems that manage such things as contacts, sales information, support details, and case histories.. However, they still appear in Agent for future viewing.
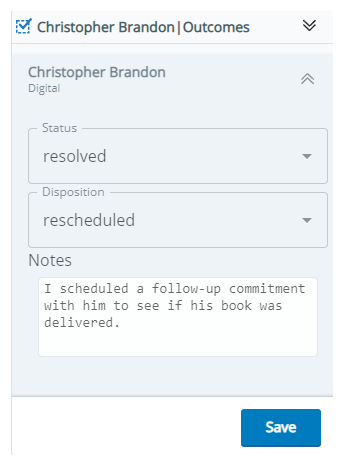
-
Open an interaction that is assigned to you. Click Outcome
 in the Interactions Menu.
 - Select a Status from the drop-down.
- If the Disposition field appears, select a disposition. These options depend on the skill Used to automate delivery of interactions based on agent skills, abilities, and knowledge for the interaction.
- You can enter Notes about the interaction. You can also add Tags to help you find the interaction later.
- Click Save.
A green check mark will appear next to interactions marked with a status of Resolved.
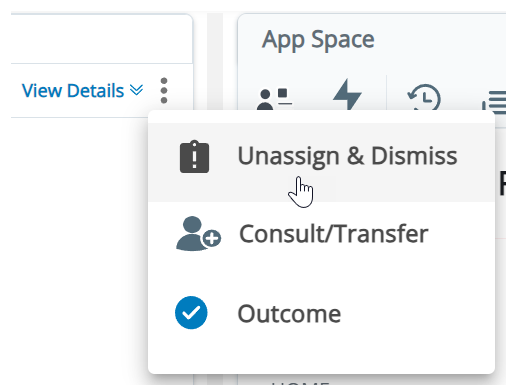
Close Emails
When you're done handling an interaction, you should close it. Your administrator configures the maximum number of
If your administrator has configured this,
You can manually close an interaction by following these steps:
-
Assign the
-
Click Options
at the top right of the open interaction. - Select Unassign & Dismiss. The interaction is then closed and removed from your Interactions Menu.