| Concept | Definition | Example | What the Bot Does |
|---|---|---|---|

Utterance |
Anything a contact |
"I lost my password." "What is my balance?" "Are you a bot?" |
The bot uses Natural Language Understanding (NLU) to analyze each contact utterance to determine its meaning, or intent. |

Intent |
What the contact wants to communicate or accomplish. Every message the contact sends has an intent. |
"I lost my password" has the intent of "reset password". "Hello" has the intent of "greeting". |
The bot analyzes a contact's message using NLU |

Entity |
A defined piece of information in a contact's message. | Person or product name, phone number, account number, location, and so on. | The bot uses NLU to identify entities in a contact's message. Entities help the bot understand what the contact's message means. |

Slot |
An entity extracted from a contact's message and saved for use in bot responses. Similar to a variable. | Creating a slot for contact name lets the bot use that name in responses during an interaction, making it more personal. | When configured to do so, the bot extracts an entity from a contact message and saves it in a slot. You can have your bot use this information later in the conversation. |

Rule |
Defines bot responses to messages that don't change meaning with context. |
|
Rules are one of two ways you can configure how your bot responds to an intent. Rules are useful for certain kinds of intents, but not all intents. |

Story |
Trains a bot to handle an interaction based on message intent and conversational context. | In an interaction about a forgotten password, the bot would respond to "How do I do that?" in one way. If the interaction were about creating a new account, the response would be quite different even though in both cases the contact is using the same words with the same intent—to get more information. | Stories are the second of two ways you can configure how your bot responds to an intent. Stories teach the bot how to use the context of the conversation to respond appropriately. |

Bot Action |
Anything a bot says or does while handling an interaction. |
In an interaction about a forgotten password, the bot responds by sending the link to the password reset FAQ on the website. When a contact expresses frustration, such as "I don't understand! It's not working!!!" the bot responds with "I'm sorry. Would you like me to transfer you to a human agent?" When the contact says yes, the bot initiates the transfer. |
Bot actions are the options you have when defining how you want your bot to respond to each intent. They give you the flexibility to configure each response to achieve the outcome that meets the contact's needs. |
Create a New Form
- In NiCE CXone, click the app selector
 and select Bot Builder.
 - Click the bot you want to work with.
- Click Dialogues
 in the left icon menu.
 - In the right pane, click Forms and then click New Form.
- Enter a name for your new form and press Enter.
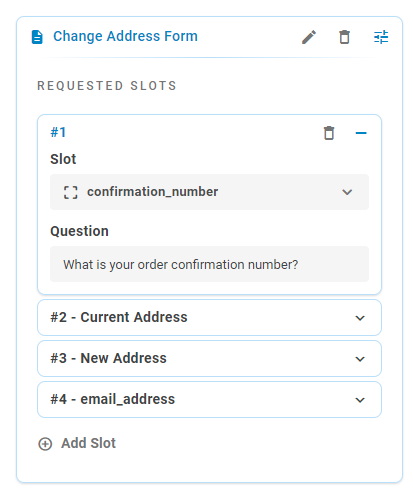
- Under Requested Slots, click Add Slot.
- Select the Slot from the drop-down, then enter the Question the bot should ask the customer to get the correct information. For example, if your Slot is Name, your Question could be What is your name?
- Repeat the previous two steps for any additional slots you want to add to the form.
Activate a Form
You need to include a form in a story![]() Used to train a bot for interaction handling based on intent and context. or rule
Used to train a bot for interaction handling based on intent and context. or rule![]() Used to define a bot response to messages that don't change with context. to describe when the bot should run the form. When the story or rule is triggered, the form will activate and the bot will start to ask the questions.
Used to define a bot response to messages that don't change with context. to describe when the bot should run the form. When the story or rule is triggered, the form will activate and the bot will start to ask the questions.
- In NiCE CXone, click the app selector and select Bot Builder.
- Click the bot you want to work with.
- Click Dialogues in the left icon menu.
- Add a new story or rule. In this example, the name could be Address Change.
- Enter the message a customer may send. In this example, it could be I need to change my address.
The bot attempts to assign an intent
 The meaning or purpose behind what a contact says/types; what the contact wants to communicate or accomplish.. If the intent is correct, click Confirm. Otherwise, select the correct intent from the list. If the intent you need does not exist, type an intent name into the search field and click Create intent. This creates a new intent based on this message. You can add more examples to the intent later.
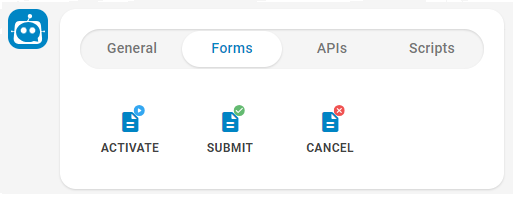
 - Hover over the plus sign until it changes to a bot icon, click the Forms tab, and then click the
- In the bot response, click the drop-down to select a form.

Submit a Form
A form is automatically submitted once all required slots are filled. However, your bot will continue to listen for the next user message, rather than automatically acknowledge that the form was submitted. This can leave the customer wondering whether their submission was successful. For a better customer experience, you can use a rule![]() Used to define a bot response to messages that don't change with context. or story
Used to define a bot response to messages that don't change with context. or story![]() Used to train a bot for interaction handling based on intent and context. to define what the bot should do after a form is submitted.
Used to train a bot for interaction handling based on intent and context. to define what the bot should do after a form is submitted.
Any slots collected from the customer can be used as variables to show the bot has collected the data. To use a variable, enclose the name of the entity![]() Keyword or phrase defined in your company profile in Interaction Analytics (CXone). Related to an entity type. Can include variants. in curly brackets.
Keyword or phrase defined in your company profile in Interaction Analytics (CXone). Related to an entity type. Can include variants. in curly brackets.
- In NiCE CXone, click the app selector and select Bot Builder.
- Click the bot you want to work with.
- Click Dialogues in the left icon menu.
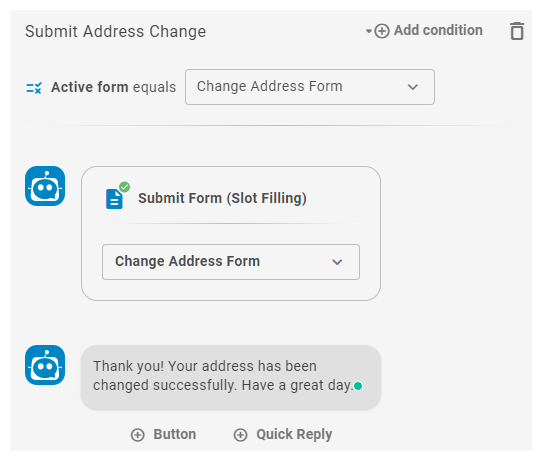
- Add a new story or rule. In this example, the name could be Submit Address Change.
- Click Add condition, then click Active Form. Click the drop-down to select a form. This ensures that the rule only runs if the specified form is active.
- Hover over the plus sign until it changes to a bot icon, click the Forms tab, and then click the
- In the bot response, click the drop-down to select a form.
- Add a message from your bot letting the customer know their submission was successful.
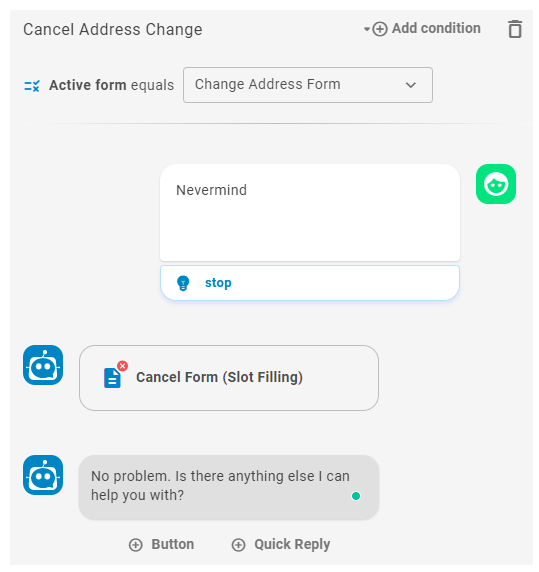
Cancel a Form
A customer may change their mind in the middle of filling out a form and decide not to complete it. This can turn into a delicate situation with a customer, so defining a way for your bot to handle this gracefully is a good idea.
Akela's bot was receiving some requests to stop the address change process. The bot wasn't sure how to handle this, so it would handover to an agent, leaving customers frustrated. Akela decided to create a rule her bot could follow to cancel the address change form after it had been activated.
- In NiCE CXone, click the app selector and select Bot Builder.
- Click the bot you want to work with.
- Click Dialogues in the left icon menu.
- Click the Rules tab.
- Click New rule.
- Enter a name for the rule. In this example, the name could be Cancel Address Change.
- Click Add condition, then click Active Form. Click the drop-down to select a form. This ensures that the rule only runs if the specified form is active.
- Enter the message a customer may send. In this example, it could be Nevermind.
The bot attempts to assign an intent
The meaning or purpose behind what a contact says/types; what the contact wants to communicate or accomplish.. If the intent is correct, click Confirm. Otherwise, select the correct intent from the list. If the intent you need does not exist, type an intent name into the search field and click Create intent. This creates a new intent based on this message. You can add more examples to the intent later. - Hover over the plus sign until it changes to a bot icon, click the Forms tab, and then click the
- Add a message from your bot letting the customer know their request was cancelled.
Interruptions
Once a bot starts asking form questions, it will keep doing so until all the slots in the form are filled and is not able to process other things. Customers do not always answer all of a form's questions from start to finish. They may ask questions, change their mind, or otherwise change the subject in the middle of the form. These are called interruptions. To handle situations like this, you can write rules or stories that include common interruptions.
An interruption with a recognized intent![]() The meaning or purpose behind what a contact says/types; what the contact wants to communicate or accomplish. triggers one of the following behaviors:
The meaning or purpose behind what a contact says/types; what the contact wants to communicate or accomplish. triggers one of the following behaviors:
- If the recognized intent is in a rule Used to define a bot response to messages that don't change with context., the bot responds to an interrupted message based on the rule design. The bot then returns to the form loop.
- If the recognized intent is in a story Used to train a bot for interaction handling based on intent and context., the bot response may vary based on the story design. Once the intent is fulfilled, the bot returns to the form loop.
- If the recognized intent has low confidence, the bot responds with the NLU fallback phrase, then continues in the form loop.
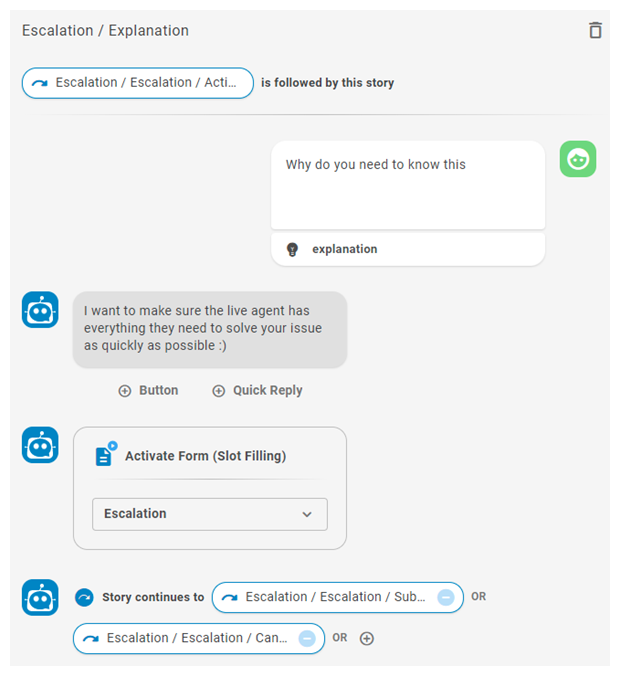
A common use for forms is agent escalation. The bot will gather information to pass on to the live agent to simplify the process once the agent is connected. Many times, a customer will ask why the bot needs their information. This is considered an interruption. The bot adjusts to the new intent long enough to answer the question, then returns to the form loop.