

This is the first step of setting up Agent Workspace (Embedded) (Agent Embedded) in ServiceNow.
Hidden link for redirect from SNOW > InstallCXAEInSNOW.htm
This page explains how to install NiCE CXone Agent Workspace (Embedded) (Agent Embedded) in ServiceNow. Once it's installed, agents can use it to handle interactions directly inside ServiceNow.
Complete each of these tasks in the order given.
Allow the Agent Workspace (Embedded) (Agent Embedded) URL
-
In ServiceNow, click All in the top menu, enter sys_properties.list, and press Enter on your keyboard.
-
In the search bar at the top, set the drop-down to for text and enter onmessage_enforce_same_origin_whitelist. Press Enter.
-
In the table, select glide.ui.concourse.onmessage_enforce_same_origin_whitelist.
-
In the Value field, enter one of these:
-
If you are not on FedRAMP: https://cxagent.nicecxone.com?app=cxa_snow
-
If you are on FedRAMP: https://cxagent.nicecxone-gov.com?app=cxa_snow
-
-
Click Update.
Create an OAuth Endpoint
Create an OAuth endpoint in ServiceNow to specify the redirect URL and refresh token lifespan. The refresh token lifespan defines how long a refresh token can be used before it expires. Once a refresh token expires, you must re-authenticate the ServiceNow configuration.
-
In ServiceNow, click All in the top menu.
-
Go to System OAuth > Application Registry.
-
Click New.
-
Select Create OAuth JWT API endpoint for external clients.
-
Give the OAuth endpoint a Name.
-
In the Redirect URL field, enter one of the following URLs, depending on your region:
-
North America: https://nicecxone.integration-authentication.com/oauth2/token
-
Europe: https://nicecxone.eu1.integration-authentication.com/oauth2/token
-
Asia Pacific: https://nicecxone.ap1.integration-authentication.com/oauth2/token
-
-
In Refresh Token Lifespan, enter the number of seconds you want a refresh token to be valid for. For example, you could enter 8,640,000 which is 100 days.
-
In Access Token Lifespan, enter 3600.
-
In the Token Format drop-down, select the type of access token you want ServiceNow to issue:
-
JWT: JSON web token.
-
Opaque: Random string token.
-
-
In the Client Type drop-down, select Iframe Embedded.
-
In the Scope Restriction drop-down, select one of the following:
-
Broadly scoped: The access token is not limited to a specific user account.
-
Useraccount scoped: The access token is limited to a specific ServiceNow user's roles and permissions.
-
-
Click Submit.
Create an OpenFrame Configuration
-
In ServiceNow, click All in the top menu and search for OpenFrame. Click Configurations under OpenFrame in the search results.
-
Click New.
-
Fill out the OpenFrame Configuration form.
-
Give the configuration a Name and Title.
-
For Order, enter 1.
-
Select Show Presence Indicator.
-
Select Active.
-
For Width, enter 420. This is the recommended width. If you enter a value less than 420, the Agent Workspace (Embedded) (Agent Embedded) interface will be condensed. A horizontal scroll bar will appear. Depending on your browser zoom and screen resolution, you may experience functionality issues with buttons.
-
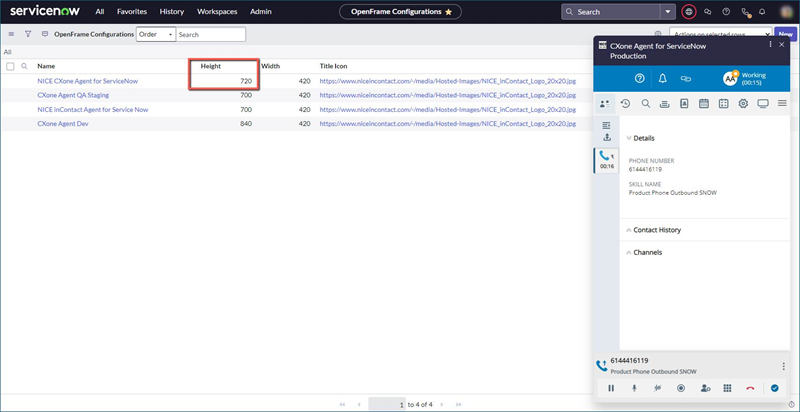
For Height, enter 720. This is the recommended height.
If your agents use ServiceNow in a window shorter than 720 pixels, customize the OpenFrame configuration height.
-
For URL, enter your Agent Workspace (Embedded) (Agent Embedded) URL, followed by _snow&base=, followed by your ServiceNow instance URL. Your Agent Workspace (Embedded) (Agent Embedded) URL is one of these:
-
If you are not on FedRAMP: https://cxagent.nicecxone.com?app=cxa
-
If you are on FedRAMP: https://cxagent.nicecxone-gov.com?app=cxa
For example, if you are not on FedRAMP, and your ServiceNow instance URL is https://ven0123.service-now.com/, your URL would be https://cxagent.nicecxone.com?app=cxa_snow&base=https://ven0123.service-now.com/.
-
 Learn more about fields in this step
Field Details Name The name of the OpenFrame configuration. Title
The title of the configuration as it appears in the configuration's header. Subtitle The subtitle of the configuration as it appears in the configuration's header. Order Determines the priority of the configuration. Only the configuration with the lowest order number is used. So, the value for the configuration for Agent Workspace (Embedded) (Agent Embedded) should be 1. Enable collapsed view When enabled, allows agents to use Agent Workspace (Embedded) (Agent Embedded) in a smaller window. Show presence indicator When enabled, shows the agent's state The availability status of an agent..Active When enabled, activates the OpenFrame configuration. Agent Workspace (Embedded) (Agent Embedded) will only work if this setting is enabled. Width The width of Agent Workspace (Embedded) (Agent Embedded) in pixels. Height The height of Agent Workspace (Embedded) (Agent Embedded) in pixels. This doesn't include the OpenFrame configuration's header. Icon Class The CSS class of the Title Icon. OpenFrame supports icon-phone and icon-video. Title Icon The icon displayed in the OpenFrame configuration's header. User Group The groups who will use Agent Workspace (Embedded) (Agent Embedded). Select groups in the Available box, then click Add
 . If you don't add any groups, Agent Workspace (Embedded) (Agent Embedded) will be available for all groups by default.
If you add specific groups, you also need to assign those groups to the OpenFrame user role. If you add all groups, you do not need to do this.
URL Includes three components:
-
First, your Agent Workspace (Embedded) (Agent Embedded) URL.
-
Second, _snow&base=.
-
Third, your ServiceNow instance URL.
For example: https://cxagent.nicecxone.com?app=cxa_snow&base=https://ven0123.service-now.com/.
Configuration Space for a JSON encoded string. -
-
Click Submit.
Customize the OpenFrame Configuration Height
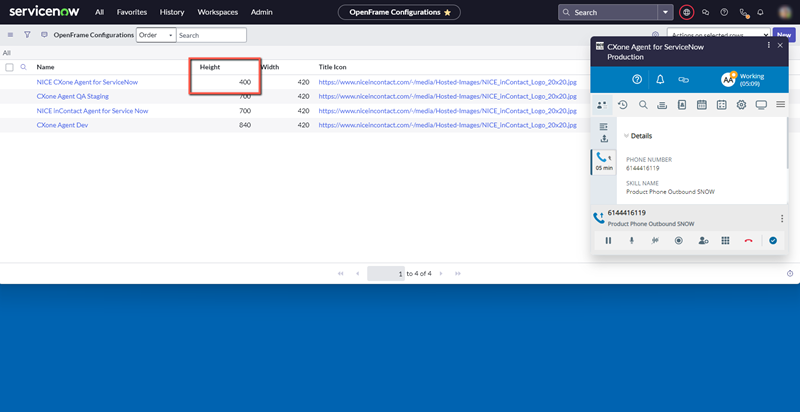
If the OpenFrame configuration height is longer than the ServiceNow window, agents handling calls have to scroll down to see the voice control panel.
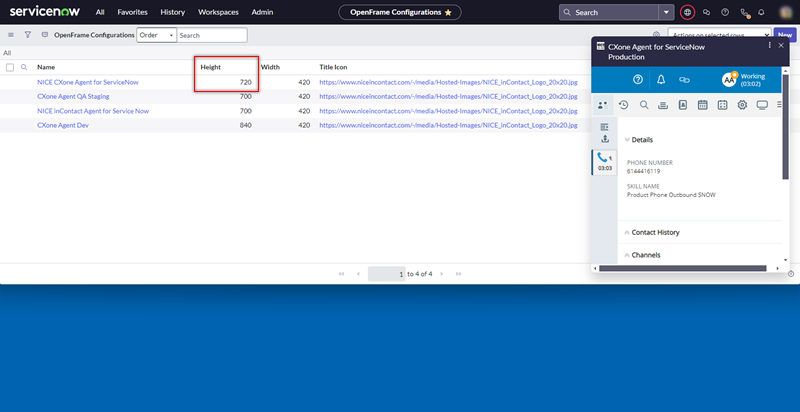
So, if your agents use a ServiceNow window shorter than 720 pixels, enter a value less than 720 for Height. The Agent Workspace (Embedded) (Agent Embedded) interface will be condensed, but the voice control panel will always be visible to agents handling calls. Perform testing to find the right height for the window size.
Assign OpenFrame User Role to Groups
If you added specific groups to the User Group field when you created the OpenFrame configuration, you also need to add the OpenFrame user role to those groups. If you added all groups, you can skip these steps.
-
In ServiceNow, click All in the top menu.
-
Go to System Security > Users and Groups > Groups.
-
Open the same group you selected in the User Group field in the previous task.
-
Under the Roles tab, click Edit.
-
Select the sn_openframe_user role, then click the right arrow
. -
Click Save. Repeat for any other groups you added to the OpenFrame configuration.
The next step of setting up Agent Workspace (Embedded) (Agent Embedded) in ServiceNow is to set up a CRM configuration.