Create Workflow Data Profiles
Required permissions: Workflow Data Create
-
Click the app selector
 and select ACD.
 -
Go to Contact Settings > Workflow Data.
- Click Create New.
-
Enter a Name and optionally a Description for the profile, then click Next.
-
If your profile needs to use a multi-select data collection, click Add Collection and complete the required fields.
 Learn more about fields in this step
Field
Details
Type Select from these values:
- None: Placeholder value to show that no data type has been selected. You cannot save a collection if Type is set to None.
- StringArray: Select if your collection consists of a string: one or more text values.
- NumericArray: Select if your collection consists of one or more numeric values.
Value Enter one or more text or numeric values, depending on the selection you made for Type. Press Enter between values. - Repeat the previous step until you are done creating multi-select collections, then click Next.
-
If your profile needs to use a regular data collection, click Add Data and complete the fields for the collection. If you created a multi-select data collection, you can add any of those data items to this data collection.
 Learn more about fields in this step
Field
Details
Type Select from:
- None: Placeholder value to show that no data type has been selected. You cannot save a collection if Type is set to None.
- Boolean: Select if your collection consists of a simple on (1) or off (0) response.
- Date: Select if your collection consists of a single date.
- Decimal: Select if your collection consists of a numeric value that includes one or more decimal places.
- Integer: Select if your collection consists of a whole numeric value.
- String Select if your collection consists of a non-numeric value (such as text or a number that is not being used numerically, like a PIN).
- Phone: Select if your collection consists of a numeral value that the script will treat as a phone number.
- Email: Select if your collection consists of an email address. The value must be correctly formatted or you will not be able to save the collection.
- MultiSelect: Select if your collection consists of a value from a multi-select collection you previously created, then select the multi-select collection and finally the specific value.
- StringArray: Select if your collection consists of a string: an array of non-numeric values.
- NumericArray: Select if your collection consists of one or more numeric values.
- DateTimeRange: Select if your collection consists of a date range. You can enter the values using date and time selectors. The date and time format matches the standard format for the browser language you're using. For example, the date format for American English is MM/(D)D/YYYY and the time format is HH:MM [AM|PM]. The date format for UK English is (D)D/MM/YYYY and the time format is HH:MM.
Also, even though the interface displays times in your location, the actual values are stored as UTC. This is important to know when referencing these values in Studio scripts.
Value Enter the text or numeric value, depending on the selection you made for Type. Use a pipe to separate multiple values. - Repeat the previous step until you are done creating data collections, then click Create Profile.
Deactivate a Workflow Data Profile
Required permissions: Workflow Data Deactivate
-
Click the app selector
 and select ACD.
 -
Go to Contact Settings > Workflow Data.
- Click the data profile you want to deactivate.
- Click Deactivate.
Use a Workflow Data Profile
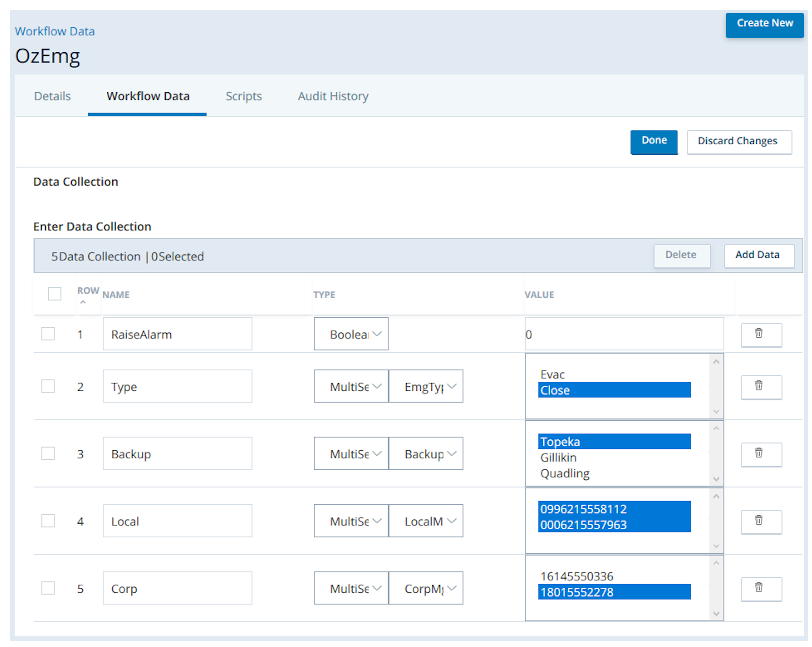
The steps for using a workflow data profile vary depending on the profile. Once the CXone Mpower administrator and script writer have created and tested the profile and script, the administrator should document the steps required to use the profile in day-to-day contact center operations. As an example, the following steps explain how to use the OzEmg profile discussed earlier and shown here.
Also, even though the interface displays times in your location, the actual values are stored as UTC. This is important to know when referencing these values in Studio scripts.
-
Click the app selector
 and select ACD.
 -
Go to Contact Settings > Workflow Data.
- Click the OzEmg data profile.
- Click Workflow Data.
- Click Edit.
- For RaiseAlarm, change the Value from 0 to 1.
- Select the Type of emergency.
- For Backup, select the contact center that calls should be routed to.
- For Local, select the phone numbers for any managers who should be notified.
- If you are evacuating the contact center, use the Corp field to select phone numbers for corporate managers who should be notified.
- Click Done.


