

Content on this page is for a product or feature in controlled release (CR). If you are not part of the CR group and would like more information, contact your Account Representative.
Message templates make it easy for agents to send messages to contacts. Your agents may send the same type of message, like appointment confirmations, many times every day. With message templates, you can ensure that your agents all send messages the same way.
WhatsApp channels require message templates if you initiate contact with customers outside WhatsApp's 24-hour window for communication.
Approval for both channels and templates are managed by Meta and may take up to a week.
Create a WhatsApp Channel
- Click the app selector
 and select ACD.
 -
Go to Digital > Points of Contact Digital.
-
Click WhatsApp (Cloud API).
-
Click Create Channel.
-
Click Login with Facebook. This redirects you to Facebook.
-
Enter your login information. If you are already logged in with the correct account, click Continue as [your name]. If you are logged in to an incorrect account, click Log into another account.
-
Click Get Started.
-
Click Continue to connect your account and accept the sharing permissions.
-
Fill in your business information or ensure that autofill entered it correctly.
-
Create or select your WhatsApp Business Account.
-
Enter your Business name.
-
Enter your Business website or profile page.
-
Enter a Country for your business. You may also add an address.
-
Click Next.
-
-
Create or select the WhatsApp Business profile and click Next. If you are selecting an existing profile, continue to step 12.
-
If you are creating a new business profile, enter the display name and click Next.
-
Select a Category for your business and enter a Business Description.
-
You can add a Website to your profile.
-
Click Next.
-
-
Verify the phone number for your WhatsApp Business account. This number cannot be registered to an existing WhatsApp account.
-
Enter the phone number for your WhatsApp Business account.
-
Select either Text Message or Phone Call for your verification method and click Next.
-
Enter the six-digit verification code you received and click Next.
-
-
Click Finish.
-
In CXone Mpower, complete the fields with your channel's information.
-
Select the Phone number you used in a previous step. Note that it could take up to a few hours for WhatsApp to approve the phone number.
-
Click Create. A green bar at the top of the screen displays [Channel Name] was created.
-
-
Log into your WhatsApp Manager to view the new phone number and check its current status.
After you have connected your account, you can add any number of channels that are linked to that account. Each channel represents a different phone number. You will need to verify the phone number each time you create a channel.
Note: Channel approvals are handled by Meta and may take up to a week.
Add a WhatsApp Template
After the channel is created and approved, you can proceed to create a template in WhatsApp Manager.
- Go to Business Manager
 and select your business.
 -
Click the menu icon.
-
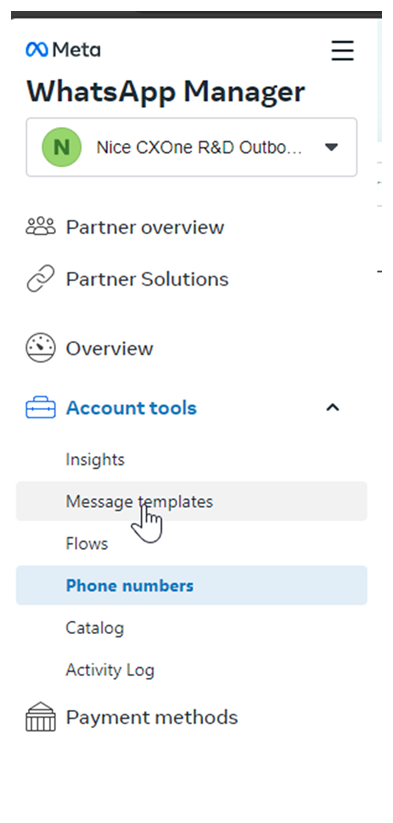
Click WhatsApp Manager.
-
Go to Account tools > Message Templates
-
Click Create message template.
-
Choose your category, name, and languages.
-
Click Continue.
-
Header: (Optional) Add a title or choose which type of media you'll use for this header.
-
Body: Enter the text for your message in the language you've selected. You can edit text formats, add emojis or include variables.
-
Sample for body content: If you want to include variables, you must add example for each variable in your body text. Make sure these are representative examples and do not include any actual customer information.
-
-
When completed, click Submit.
Your template will be sent for review. The status of your template is viewable under Message templates. After your template has been approved, you can begin sending messages with that template.
Note: Template approval process may take up to 24 hours.
Create a Proactive WhatsApp Skill
-
Click the app selector
and select ACD. -
Go to Contact Settings > ACD Skills.
-
Click Create New > Single Skill.
-
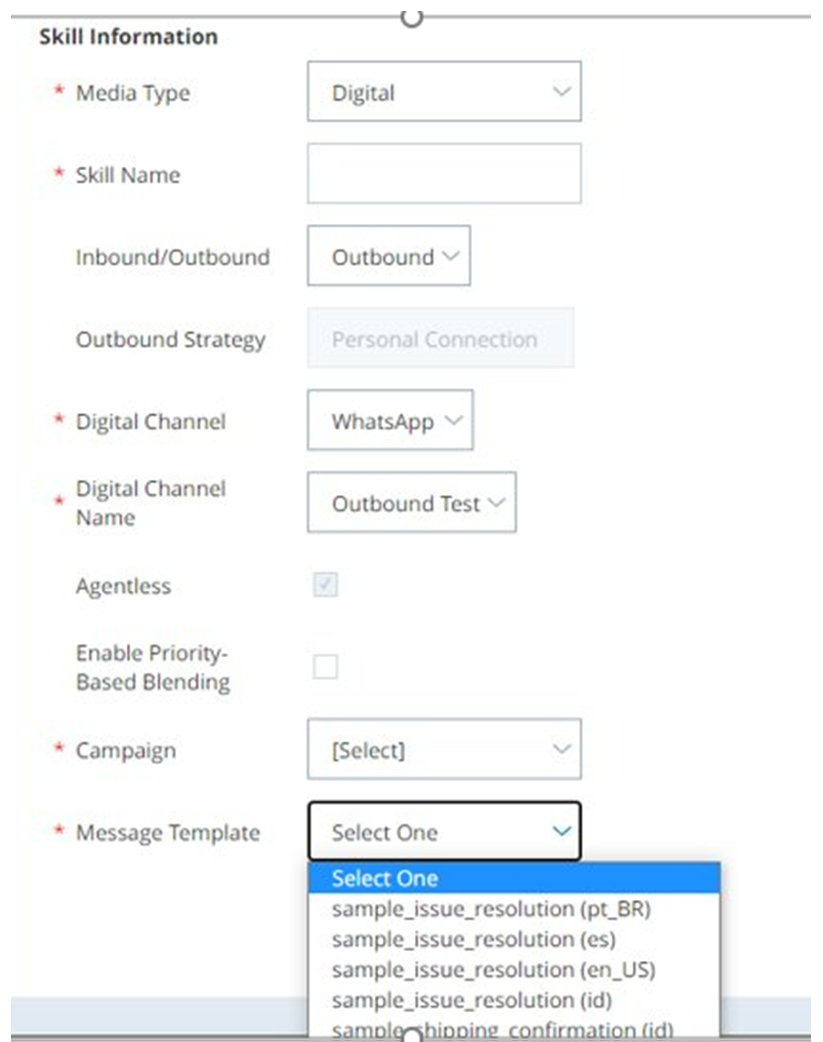
Set the Media Type to WhatsApp, Inbound/Outbound to Outbound, and Outbound Strategy to Personal Connection.
-
Set the Digital Channel to WhatsApp and Digital Channel Name to Outbound.
-
Enter a Skill Name and select the Campaign you want the ACD skill to be part of.
-
Select a Message Template from the drop-down. The message templates come from what was set up in WhatsApp templates. There may be a list of generic templates until the approved ones are created.
-
Configure the remaining optional fields in the Skill Information section as needed.
-
If you want to use screen pops
 A pop-up window with information about the contact that appears on an agent's screen after an event such as connecting to a contact. for this ACD skill, select the Use Screen Pops checkbox. Modify the optional settings in the Screen Pops section if you want to customize your screen pops. You can also do this later.
 -
If you want to test how contacts in this ACD skill change in priority over time compared to other skills, use the Priority Comparison tool. You can also do this later.
-
In the Skills to Compare section, click +.
-
Add Available skills until all skills you want to compare are in the Selected list. You don't need to add the skill you are currently editing; it appears in the graph automatically.
-
Click Done.
-
Use the Elapsed Time and Time Interval fields to define the period of time you want the graph to cover and the time interval
A period between points, limits, or events, such as dates or times. you want to mark a new point on the graph. -
Click Compare.
-
-
Click Create.

Create Proactive WhatsApp Variables
You can create your own variables to use in scripts. You can do this using either an Assign action or a Snippet action in the script.
Assign the Script to the ACD Skill
Required permissions: Skills Edit
Required permissions: Skills Edit

- Click the app selector and select ACD.
-
Go to Contact Settings > ACD Skills.
-
Click the ACD skill you want to edit.
- Click Call Suppression.
-
Click Edit and create a new Call Suppression script or select an already created call suppression script if one exists.
-
Click Save.
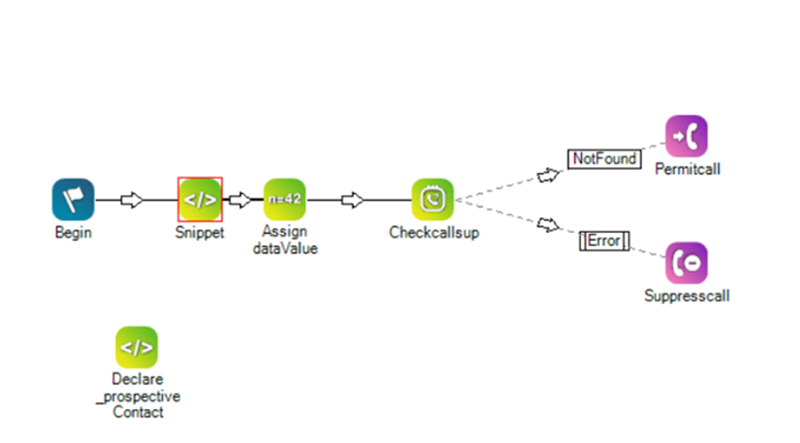
Add a Snippet Action to the Script
To use variables, a snippet needs to be created in the suppression script.
- Open Studio.
-
Add a Snippet action to the script.
-
Once the action is added, edit it to include dynamic variables. Add each variable according to your requirements.
Dynamic Variables:
vars[1] = _prospectiveContact.custominfo.first_name.$Value
vars[2] = "OR1212111"
vars[3] = "ZT121312TestTrack"
-
Assign global variable TemplateVars with the dynamic variables in JSON format:
ASSIGN global:TemplateVars = "{vars.asjson()}"
-
Increment the numbers (1, 2, 3) for each variable in the template as needed.