The Agent Configuration page is where you set up all scheduling settings for each agent you're responsible for. When generating the schedule, those agents are scheduled based on their defined settings.
All agents have default configurations that you can edit. Only agents with the Can be Scheduled attribute are listed on the Agent Configuration page. You can check an agent's attributes in their Employee account. If agents aren't listed on the Agent Configuration page, their schedule is generated based on the weekly rule they are assigned to.
Using Agent Configuration, you can define the agents':
-
Availability: The specific days and hours during which an agent is available to work.
-
Work rule: The parameters for an agent's work schedule, such as maximum work hours per week and required break time between shifts. You can also create a rule that can be active for a specific date range.
Conflict may occur between:
-
The agent's availability and work rule. In this case, agent availability takes precedence.
Let's say that some agents don't work on Wednesdays according to their availability. However, according to the work rule, the agents work five consecutive days. In this case, the agents can't be scheduled to work on Wednesday regardless of the consecutive days requirement.
-
Weekly rule parameters and the configuration. In this case, the parameter with the more limited settings takes precedence.
Let's say the shift length in weekly rule is 10 hours, and the agent's maximum schedule length in the configuration is 8.5 hours. The agent can be scheduled for up to 8.5 hours.
However, the agent can still be scheduled for up to 8.5 hours when parameters are reversed: when the shift length is 8.5 hours, and the maximum schedule length is 10 hours.
-
Maximum and minimum parameters in the weekly rule and the work rule. This applies to the range of consecutive days off, consecutive work days, and weekly hours. When generating the schedule, the most restricted range is used.
Examples:
-
The consecutive work days range is 2–5 in the weekly rule, and 3–6 in the work rule. The generated range is 3–5. This way there aren't conflicts with the parameters.
-
The consecutive work days range is 2–3 in the weekly rule, and 4–5 in the work rule. In this case, the ranges don't overlap. The generated range is 3–4.
-
The consecutive work days range is 2–3 in the weekly rule, and 3–5 in the work rule. The only overlapping value is 3. The agent's schedule includes 3 consecutive work days.
-
-
The length of parameters in the weekly rule and the work rule. In this case, the most restricted time is used.
For example, the Minimum time between schedules is 10 hours in the weekly rules and 8 hours in the work rule. The generated time between schedules can be up to 8 hours.
You must have these permissions to access the Agent Configuration page and the agent information on the page:
-
Admin > Roles and Permissions > (Role Name) > Permissions > Employees > View or Edit
-
Admin > Roles and Permissions > (Role Name) > Permissions > WFM> Agent Configuration> View or Manage
Depending on the permissions assigned to your role, you can either view or manage agent configuration on the page.
With the View permission, you can see all agent configurations on this page. You won't be able to edit their availability.
Work Rules
Work rules are parameters that define an agent’s working schedule, such as the number of hours they can work per week or the minimum time required between shifts. Each agent can have a unique work rule, which can be adjusted to accommodate their scheduling needs.
Work Rules Table
In the work rules table, you can:
-
Quickly edit all work rules: Click Edit and edit the work rule of any agent on the Agent Configuration page. When finished editing the work rules, click Save. You can edit quickly edit work rules for a single agent as well as multiple agents.
-
Edit a specific rule: Find the rule you want to edit in the table. Click Options
 and select Edit Row. When finished editing the work rule, click Save.
 -
Copy and paste any rule: Find the rule you want to copy in the table. Click Edit and then copy
. . Select the rows you need to copy over and click Paste. This overwrites all the fields except the agent name and the scheduling unit.
Edit an Agent's Work Rule
Instead of editing the agent's work rule in the table, you can open the configuration of an agent and edit it there.
To edit an agent's work rule:
-
Click the app selector
 and select WFM.
 -
Go to Setup > Agent Configuration.
-
In the table, find the agent you want to edit.
-
Click Options
and select Open Availability and Rule. -
In the Work Rule tab, select the settings you want to use. They are all optional:
-
Weekly Rule: Select the weekly rule you want to edit.
-
Weekly hours: Set the minimum and maximum hours an agent can work weekly.
-
Maximum schedule length: Determine the maximum length of an agent’s shift. For instance, if you set it to 10 hours, the agent won’t have a shift exceeding this duration.
-
Minimum time between schedules: Set the minimum time required between two shifts.
 See example
Agents are scheduled to finish their shifts at 8 PM, and the Minimum time between shifts is 12 hours. They cannot start a shift before 8 AM the following day.
-
Consecutive days off: Set the range of consecutive days the agent can have off.
-
Consecutive days to work: Set the range of consecutive days the agent can work.
-
-
Click Save.
Date-Range Specific Work Rules
In addition to an agent’s work rule, you can also create a rule that's active for a specific date range. With Date Ranges Specific Work Rules, you can create work rules for a certain time period.
For example, you have agents that are increasing their working hours during the summer months. You can set date range work rules for them with different parameters. Once the rules expire, agents are scheduled according to their default work rule.
To create a date-range specific work rule:
-
Click the app selector
and select WFM. -
Go to Setup > Agent Configuration.
-
Go to the Date Ranges Specific Rules tab.
-
Click Add Date Range.
-
Select the Agents to create a rule for.
-
Select the date range for the rule.
-
Click Add. Each agent gets a date-range specific rule that you can edit in the table.
Availability
Agent Availability is when the agent can work during the week. You define the days and hours that the agent can be scheduled. For example, you can define that the availability for some agents is between Monday and Friday, from 8:00 AM to 8:00 PM. Those agents can only be scheduled during those days and that time. They can’t be scheduled to work over the weekend or before 8:00 AM.
By default, agents are set as always available.
To edit an agent's availability:
-
Click the app selector
and select WFM. -
Go to Setup > Agent Configuration.
-
In the table, find the agent you want to edit.
-
Click Options
and select Open Availability and Rule. -
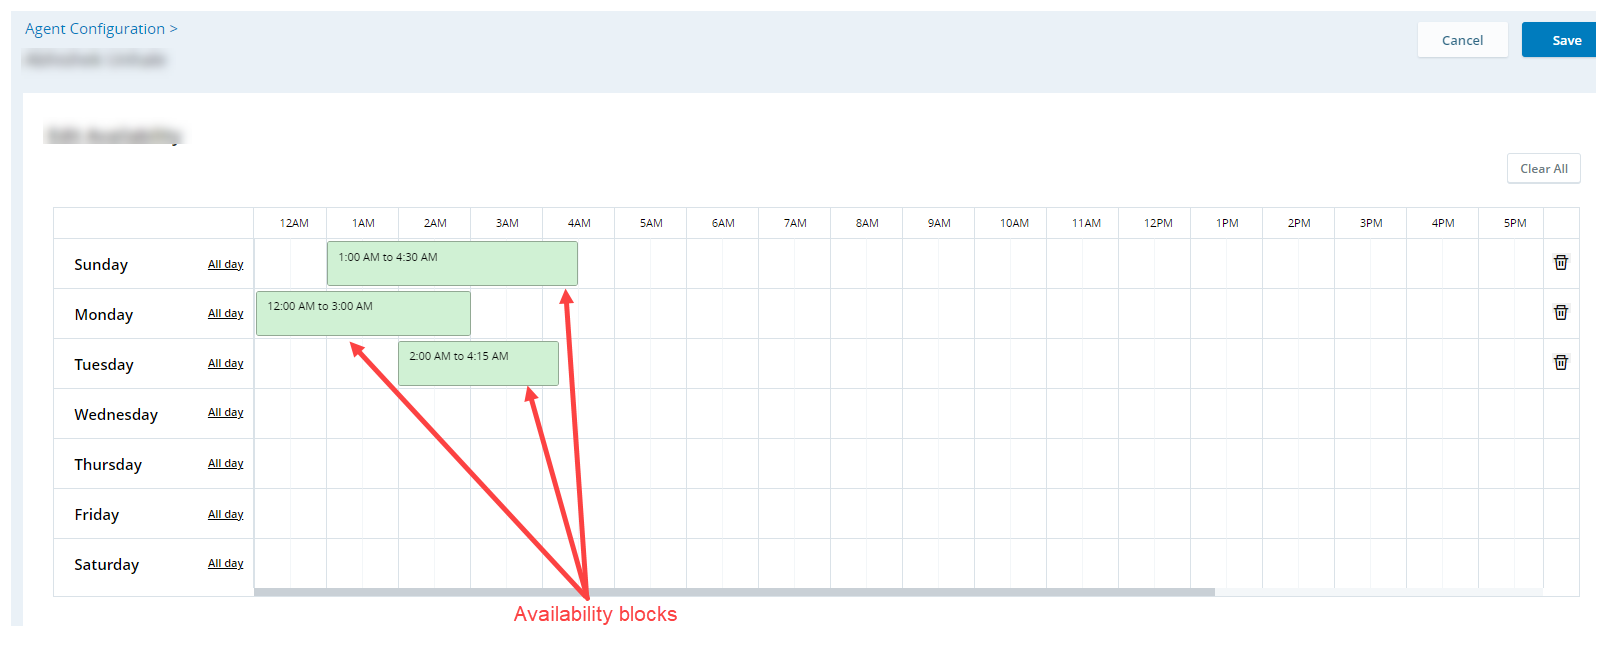
In the Availability tab, the agent's availability is represented as green blocks. You can hover over the blocks for more details.
-
Edit the default or existing availability blocks to match an agent’s available time frames.
You can clear default or existing blocks. If you want to clear:
-
All availability blocks and start from scratch, click Clear All.
-
The availability for an entire day, click Delete
 on the respective day row.
 -
A single block, hover over the block and click Delete
.
-
-
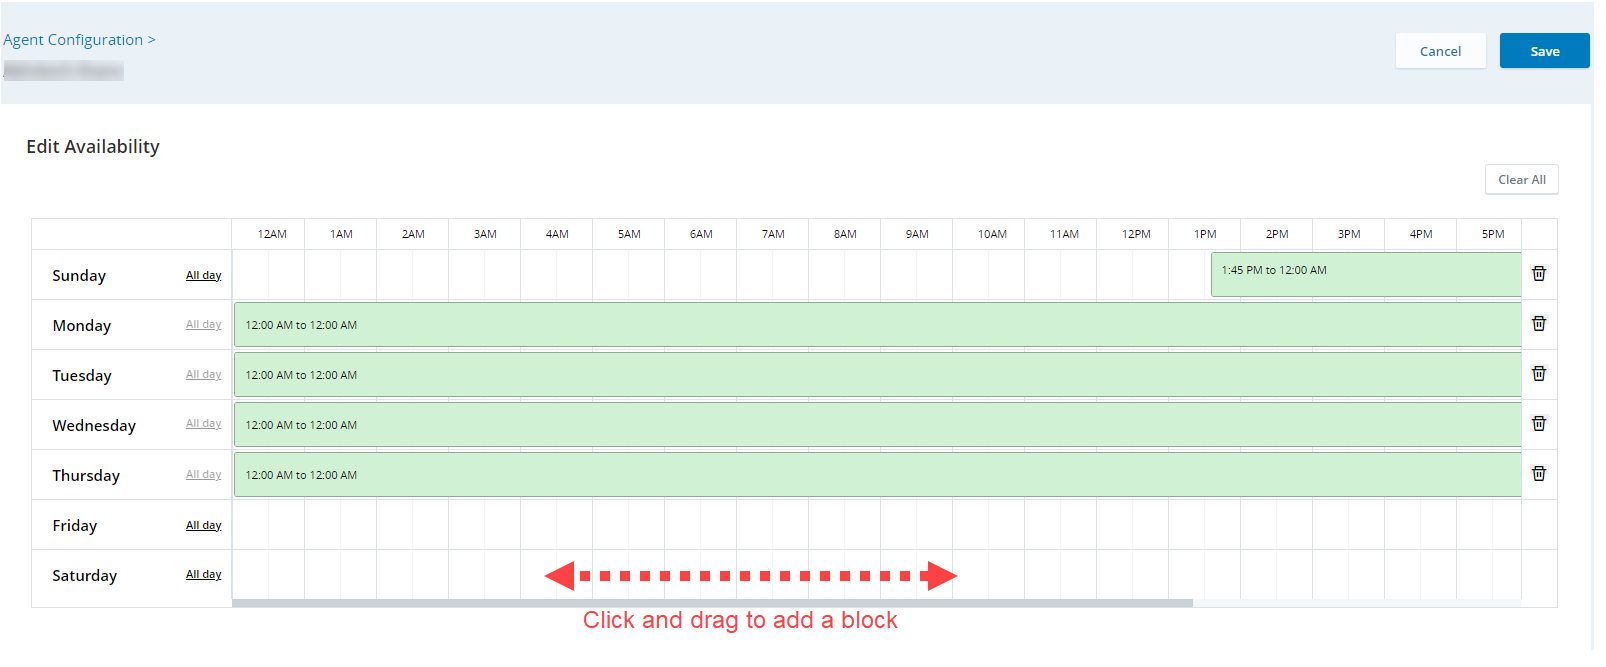
To add availability blocks, click and drag to create a new block. Each block can have a time frame between 15 minutes to 24 hours.
You can assign more than one availability block within a single day.
-
To make an agent available for an entire day, click All Day next to that day.
-
Click Save.