

To learn more about quality plans, see the CXone Mpower QM Quality Plans on this page.
Form Manager makes working with forms quick and easy. A form is a collection of questions used to evaluate agent interactions. This helps to check how well agents are doing their jobs.
Forms can be used for standard evaluations, self-assessments![]() Evaluation performed by the agent on their own interaction using an evaluation form. performed by the agents, and collaborative evaluations, performed by both an evaluator and the agent.
Evaluation performed by the agent on their own interaction using an evaluation form. performed by the agents, and collaborative evaluations, performed by both an evaluator and the agent.
As a QM manager, you can use the Form Manager to create new forms and manage your existing forms.
Create Forms
You can create a form by dragging and dropping elements into the form, and then defining questions and answers.
You can create a new form or clone an existing one and change the content.
In addition, you can assign scores to each question, make a dynamic form that changes based on different answers, and define critical questions that must be answered correctly or the evaluation will fail.
Remember, after creating a form, you'll still have to activate it before it can be used.
To create a new form:
- Click the app selector
 and select Quality Management.
 -
Click Manage Forms.
-
Click New Form.
-
Enter the title and subtitle for the form header.
It is best to enter the purpose of the form in the subtitle. This will help the evaluator or agent understand what the form is about.
You can also define the background color of the form and change the default logo. When you change the background color of a section, you cannot drag more elements into it. To add more elements, you need to duplicate the section, delete the old one, and then add the new elements.
-
Define the header fields. These will be filled in when the evaluator opens the form.
 More details about Header Fields
HEADER DESCRIPTION Skill The ACD skill needed for the evaluation. Agent Name The name of the agent being evaluated. Evaluation Start Date The date on which the evaluation began. Evaluator Name The name of the evaluator doing the review. Interaction Date The date of a full conversation with an agent through a channel, for example, a voice call, email, chat, or social media conversation. Interaction Duration The length of time a full conversation with an agent took. Contact The unique numerical identifier assigned to each contact. Master Contact The master or parent ID for one or more related contacts. Review Date The date on which a review was conducted. Segment ID The unique number of an interaction between two parties, such as a customer and an agent. Each segment represents a stage in the interaction, such as when a call is transferred to another agent, or when agents speak internally to consult. -
You can add up to five custom headers to a form.
Add custom headers and their use
-
Under Custom Header Fields, in the text input area, enter the name of the custom header and select +.
A header cannot be more than 50 characters. -
The second header will become available, this will continue up to header five.
-
To remove a header, click
 .
.
-
Click Save & Activate to activate the form or Save as Draft to save a draft version of the form.
Custom headers display at the top of the evaluation form and are used when an agent needs to capture data that is not provided in CXone Mpower relating to that interaction. For example, employee evaluations that must be documented with a specific case number.
Custom Headers will not be displayed in the reports.
-
-
Drag and drop a Section
 to your form and add elements to create questions and labels. Question options include: free-text, yes/no, radio button, checkbox, drop-down, and date/time questions.More details about these questions and form elements
Element What does the QM Manager do? What will the evaluator do? Short Text Add a short/single-line text input field to your form.
Type a short response. Free text.
Long Text Add a multi-line free text input field to your form.
Type a long response.
Free text.
Yes/No Define a question with Yes/No options for an evaluator to choose. You can assign score values to the answers to this question.
Example question: Did the agent have a great opening?
-
Yes
-
No
-
N/A
In this example, a score value would be assigned to Yes, and no score value would be assigned to No.
If the evaluator selects N/A, the question will be removed from the score calculation.
Select Yes/No.
Radio Define a question with a list of options for an evaluator to choose. You can assign score values to the answers to this question.
Example question: Did the agent have a great opening?
-
Great opening, complete
-
Hit most components, not all
-
Missed all but key elements
-
Missed key elements
-
No
In this example, different score values would be assigned to each radio button. No score would be assigned to No, and possibly to other radio buttons.
Leave the default or choose another option.
Checkbox Define a question with several options for evaluators to select. You can assign score values to the answers to this question.
Example question: Did the agent have a great opening?
-
Proper greeting
-
Used the caller's name immediately
-
Had a great tone
-
Correct branding
-
Acknowledged member through words and tone
In this example, different score values can be assigned to each checkbox. Each selection will add points to the total, and multiple checkboxes can be selected.
Select the responses that apply. Label Enter free text that can be used as a label (does not replace titles). Drop-down Define a question with a list box with one or more possible options to choose from. Select one or more options from the list. Date/Time Define a question with a date/time picker for evaluators to select.
Define the date/time and the display format.
Hyperlink Add a link to the form. Opens the hyperlink in a browser. Section Add a section to the form that contains groups of questions for specific needs. Keep in mind:
-
Form titles and sub-titles are limited to 512 characters.
-
Form data questions are limited to 2,048 characters.
-
Long text questions and answers are limited to 10,000 characters.
-
-
Define each element's properties in the Properties pane.
Common element properties
Element Property Description Label Type your text for the form, selection, or element. Question Type a question you want to ask. Instruction Text which provides instructions to the evaluator. This appears below the field. Hint Text that hints a question. The hint text appears inside a field before the user enters a value. Character Limit The number of characters that a user can enter. A counter appears below the response field. Required The question is marked as mandatory. If the evaluator leaves this field blank, a warning message is displayed and the evaluator will not be able to submit the form.
Default Value (choice) Default answer for the question. Use N/A N/A (not applicable) option can be provided to a question that is scorable. This option is added to the list of applicable responses, when none of the other responses are relevant to the question. Note that selecting the N/A option will exclude the response from score calculations.
The N/A option can also be enabled in a critical question. This helps evaluators to understand if the critical question is relevant to the evaluation.
-
If you want to add a critical question, select the Mark as Critical checkbox in the Properties pane, and define the questions and the answers that will pass or fail the form.
What are critical questions?
A critical question is a question that can immediately fail an entire evaluation, based on a specific answer given to that question. You can use critical questions to address the most important agent activities.
For example, you define that agent greeting is critical in a call and you create a question Did the agent greet the customer? You then define that if the evaluator chooses No, the form will fail.
The evaluator will see a flag
 if the form they opened contains a critical question.
 An agent who opens an evaluation with a Failed score understands that they failed a critical question.
-
Click Scoring
 to enable and define scoring or ranking on the form. See Enable Scoring and Ranking.
 -
Click Settings
 to define the evaluation flow for your form.What's an evaluation flow, and why do I need one?
You can send an evaluation form to the supervisor or the agent as per configurations.
In the form settings, you can choose from the following options to define your evaluation flow:
-
Evaluation Workflow
-
Send to Supervisor: If the Send to Supervisor option is selected, the evaluation will first be sent to the supervisor for review before reaching the agent. The supervisor must complete the review within 30 days. After that, the evaluation proceeds based on the remaining configuration settings. If a team leader is not assigned, and the Send to Agent option is selected, the evaluation will be sent directly to the agent. You can enter a value in the If score is below field only if scoring is enabled. This allows evaluations to be routed to the supervisor based on score thresholds. If ranking is enabled, agents will see their rank instead of the actual score.
-
Send to Agent: agents will see the completed evaluation in their My Zone application and can review the form. If you clear the Send to Agent checkbox, then agents will not be able to see the results of their evaluations, and are not able to appeal the evaluation. The options of Agent and Send Appeal to, will be disabled under Appeal. This option has several sub-options:
-
Agent can see score: an agent will be able to see the score of the evaluation.
-
Agent can acknowledge: after an agent opens the form, they must acknowledge that they have reviewed their evaluation by clicking the Acknowledge button.
-
-
Appeal
-
Appealer
-
Supervisor: a supervisor can appeal on behalf of an agent if Supervisor is selected. The supervisor must have Appeal permission.
-
Agent: the agent is allowed to appeal if they are dissatisfied with their score, by clicking Appeal. The agent can add comments. The evaluation will be re-evaluated with the same form.
-
-
Send Appeal to: is enabled, choose one of these options:
-
The assigned evaluator: the evaluation will be re-evaluated by the same evaluator.
-
A specific person: select an evaluator from the drop-down list if you want the re-evaluation to be completed by another evaluator.
-
-
If both Supervisor and Agent are selected, whoever raises the appeal first, will prevent the other from raising it.
An appeal can only be raised once. If the agent has appealed then the supervisor will not be able to appeal and vice versa.
Once Settings is saved, it cannot be edited.
-
Evaluator Access:
In the Evaluator Access tab of the form settings, you can select:
-
All Users: if you want the form to be used by all users. The users or group of users who have access to the evaluation form when they are performing the actions listed below:
-
The supervisor who is creating an on-the-fly evaluation.
-
The quality manager creating or updating a Quality Plan.
-
The evaluator who wants to change the evaluation form for the assigned evaluation.
-
-
Select Users & Groups: if you want the form to be used by specific groups and users.
-
If you select a group and then select a user who is part of the Group > then only named users in the group can access it.
-
If the Group is selected and users outside of the group are selected, then the Group and the non-group selected users can access it.
-
-
-
Access Overrides
-
When an evaluator is part of a Quality Plan where a form is selected but the evaluator lacks access to the form due to template permission settings.
-
When an evaluator is assigned an ad-hoc or employee evaluation that uses a specific form, but the evaluator lacks access to the form due to template permission settings.
-
When an evaluator is included in a calibration session that uses a specific form, but lacks access to the form due to template permission settings.
-
When an agent is assigned, a self-assessment using a specific form, but the evaluator lacks access to that form due to template permission settings.
-
-
-
Click Test Form to preview and validate the completed form.
-
Click Save.
-
In the Save Form window, enter a name for your form and click Save. The form you created will appear in the Form Manager grid.
Remember, once you've created your form, you still have to activate it before it can be used.
Add Dynamic Rules
Dynamic forms change based on the evaluator's responses to questions. Depending on their answer to one question, a follow-up question/section may or may not appear.
For example, if the evaluator chooses Excellent on a question regarding agent handling, then a question related to agent improvement will not appear.
- Create dynamic rules for yes/no, radio button, checkbox, drop-down, and date/time elements.
- Define several conditions for one rule.
- Choose AND to define that two or more conditions must be met to trigger the rule.
-
Choose OR to define that one condition or another can trigger the rule.
To add a dynamic rule:
-
Click Define Rules
 inside of the question you want to make dynamic.
Keep in mind, you cannot define the last question in a form as dynamic.
-
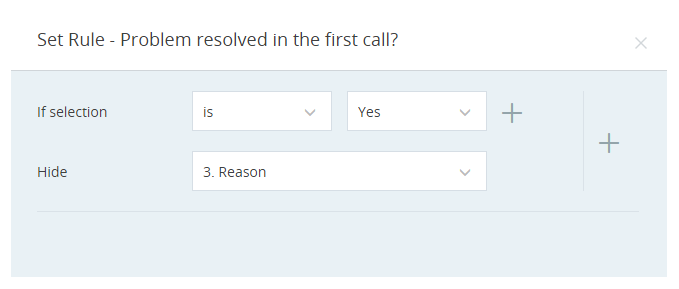
Define the condition that triggers the rule.
Here's an example
The question is Problem resolved in the first call?. The condition triggers a rule that hides the follow-up question when an evaluator answers Yes to the dynamic question.
-
From the drop-down list, choose the question or section you want to hide when the condition is met.
-
To add more conditions to this element, click Plus
 next to the condition row.
 Once you have two or more conditions, you must also choose the relationship between them (and/or).
-
To add more rules, click Plus
next to the rule. -
Click Set. The color of Define rules
 for the question changes to green.
Enable Scoring and Ranking
When you enable scoring on a form, a score will be generated in real-time based on the evaluator's responses. A total score will appear at the top of the form, and a section score will appear at the top of each section on the form.
After you update or set the scoring of a section, you can't drag more elements into it. To add more elements, you need to duplicate the section, delete the old one, and then add the new elements.
The score is displayed as a percentage.
- Add scoring to yes/no, radio button, and checkbox questions.
- Remove scoring for specific questions by clearing the Scorable checkbox for that question.
- You can change the default scoring value from 1 to anything between -999 to 999.
- Only questions that are answered by the evaluator will be scored. N/A does not count as a scorable answer.
- In multiple-choice questions, each available response can have its own score. If several responses are selected, the question score will be the total score of the responses.
- For at least one of the choices of a question, the score must be more than 0. You cannot configure 0 or negative scores for all the options of a question.
-
If a question on the form has a negative score and the critical marked option is selected, the negative score will take priority over any higher positive score. For example, if you have two multiple-choice questions. For the first question, you defined scoring as 0 for the Yes option and configured this option as Critical. For the second question, you defined the score as -90 for the Yes option and configured it as Critical. In this case, scoring for the second question is less than the first, and hence the second question will take priority while defining the failure of the form.
To define scoring:
-
Open the form and click Define Scoring
. -
In the Set Scoring tab, select Enable scoring.
-
Select Scorable for each question you want to score.
You will only be able to define scores for Yes/No, radio button, and checkbox question types.
-
Assign a number of points for each response.
At any point, you can restart your scoring from scratch by clicking Reset.
-
Click Save.
-
If you do not want agents to see the numerical score for their evaluations, then you can enable ranking. Ranking displays text (such as Excellent or Poor) in the evaluation instead of a score. Define a score range for each rank you want to display. For example, you define the ranges for a form from 40% to 100% as Excellent, from 9% to 40% as Very Good, and from -100% to 8% as Poor. If an agent scores 25% on an evaluation, their evaluation will be marked as Very Good.
-
Managers can still see the actual score along with the possible points per question.
-
You can define up to five ranks, but make sure the score ranges do not overlap.
-
Defined ranges must cover all the values between -100% to 100%.
-
If the score is below -100, it falls under the ranking range where -100 is covered. For example, if the score for a question is -198% and you have defined the -100 to -40 range as Poor, the -198 score will be considered Poor ranking.
-
For a Self-Assessment Evaluation type, the agent will be able to see the score of the evaluation sent to them for self-assessment.
To define ranking:
-
Define scoring for the form.
-
In the Set Ranking tab, select Enable Ranking.
-
Set the score range and display text for each rank. This will appear when the agent opens the evaluation.
-
To add additional ranges, click +Add.
-
Click Save.
The Question Bank
If you have questions that get reused from form to form, the question bank is a useful tool.
The question bank is a collection of ready questions that can be dragged and dropped directly into your form. You can edit these questions after you've added them into your form.
Keep in mind, only questions and answers will be saved in the bank, not the design or logic added to them.
To use the question bank:
-
Click Save
 next to a question to add it to the bank.
 You can view the question in the Question Bank tab.
-
Drag and drop a question from the Question Bank tab into your form to use it.
-
Edit the question if necessary.
You can save the edited question as a new question in the bank. The original question will remain in the bank, unchanged.
Manage Forms
The Form Manager grid lets you keep track of forms at a glance. You can edit a form directly from the grid by clicking on it. You organize the view by filtering the forms based on their status.
In addition to the form name and version, the following fields are also available in the grid:
|
Column |
Details |
|---|---|
| Status |
Possible form statuses:
|
| Actions |
These actions are available in the grid:
You can select several forms at once to delete, activate, or deactivate. Delete the form if you will never be using a form. This will help you keep the form list as clean as possible. |
Add Auto-Response Rules
The auto-response rules option in a form is only available for users with the QM Advanced license. Also, you need to have View permission to use Analytics Category Manager. In CXone Mpower, go to Admin > Security > Roles and Permissions, the permission is under QM Tools > Category Manager.
Auto-response rules are simple rules the quality manager configures for questions by selecting categories, sentiments, or agent behavior while setting up the form.
Based on your selection, QM automatically responds to the evaluation form questions matching the criteria associated with the interaction. This helps the evaluators to complete evaluations faster, as many of the questions in the form will already have answers filled in for them. Evaluators can review the responses and change them if needed.
What can I do with auto-response rules?
-
Create auto-response rules for yes/no, radio button, checkbox question types.
-
Select language for setting up rule. You can filter the category in your preferred language.
-
Select sentiments for the responses.
-
Select agent behaviors for the responses.
To add auto-response rules for categories:
-
Click Auto-Response Rules
 inside the question you want to be automatically evaluated by QM.
 -
Select Categories as a rule type.
-
Select Interaction Analytics (IA) Categories as a rule type. IA Categories let users create custom categories. You can use operators like OR, AND, and AND NOT to find interactions with specific words or phrases. These can be on the agent or customer side. You can also use timestamps to find words or phrases at the start or end of an interaction. For example, a “Greeting” category can look for greetings used in the first 30 seconds. You can see only Unified IA categories in this drop-down.
The IA Category Support in Quality Management feature is applicable only to tenants who possess both the IA and QMA/QMP licenses. Tenants with only the QMA/QMP licenses are not impacted by this feature.
IA category rules are not supported for CRM ticket evaluations.
OR
-
Select QM Categories as a rule type. QM Categories let users choose from pre-built options or create their own for QM Advanced/QM Premium features. These categories use words and phrases and act as an “OR” operator. This means the category will find interactions with any of the words or phrases in the transcript. This option is available only with Quality Management Advanced license.
-
-
Select the language to set up rules for categories. Depending on your subscription, languages will be displayed. Supported languages include Brazilian Portuguese, English, Canadian French, Dutch, European Spanish, French, German, and Spanish.
-
Select the categories that will help to trigger the rule. For each answer, you can select up to 10 categories.
For the yes/no and radio button questions, the categories selected for one answer will not be available for another one. For questions with a checkbox, all the categories will be available for all answers.
The form contains a Yes/No question: Did the agent greet the customer? If the answer is Yes, the QM manager may set the Welcome category. If the answer is No, the manager may configure the Impolite category. When an interaction is evaluated, QM responds to the evaluation form questions matching the categories. If the agent welcomed the customer during the interaction, QM answers the question as Yes. Later, evaluators can review the responses and change them, if needed.
-
Click Save.
You can edit the question, language and categories set in the auto-response rule.
To add auto-response rules for sentiments:
-
Click Auto-Response Rules
inside the question you want to be automatically evaluated by QM. -
Select Sentiments as a rule type. This option is available only with the Quality ManagementAdvanced license.
-
Select the sentiment for each answer choice.
For yes/no and radio button questions, the answer choices must be distinct.
The form contains a Yes/No question: Was the agent polite to the customer? If the answer is Yes, the QM manager may set the sentiment as Positive and Agent side. If the answer is No, the manager may configure the sentiment as Negative and Agent side.
-
Click Save.
You can edit the question and sentiments set in the auto-response rule.
To add auto-response rules for enlighten sentiments:
-
Click Auto-Response Rules
inside the question you want to be automatically evaluated by QM. -
Select Enlighten Sentiments as a rule type. This option is available only with the Quality Management Advanced license.
-
Select the sentiment for each answer choice.
For yes/no and radio button questions, the answer choices must be distinct.
-
Click Save.
You can edit the question and enlighten sentiments set in the auto-response rule.
To add auto-response rules for agent behaviors:
-
Click Auto-Response Rules
inside the question you want to be automatically evaluated by QM. -
Select Agent Behaviors as a rule type. This option is available only if you have the Agent Behavior model is selected under the CXone Mpower Behavior Models license.
-
Select the agent behavior for each answer choice.
For yes/no and radio button questions, the answer choices must be distinct.
The form contains a Yes/No question: Was the agent responsive? If the answer is Yes, the QM manager may set the agent behavior as Demonstrated ownership and Strongly positive. If the answer is No, the manager may configure the agent behavior as Demonstrated ownership and Strongly negative.
-
Click Save.
You can edit the question and agent behaviors set in the auto-response rule.
Edit Forms
Version
Save form without updating version only applies to forms that have been saved and activated. This feature only allows for cosmetic edits to be done on the form without changing the version number. On loading the form the feature is enabled, any non-cosmetic elements will be grayed out and cannot be changed. To ensure that the version number changes regardless of what is edited, then Save form without updating version must be turned off.
Non-cosmetic changes consist of:
-
Adding or removing a question
-
Adding or removing answer options
-
Drag and drop questions
-
Properties changes, for example, Mandatory, N/A, Critical
-
Setting changes
-
Formula changes
-
Scoring
Cosmetic changes consist of:
-
Font size and color
-
Color changes to the form
-
Question rephrasing
-
Spelling changes
-
Form Header additions or removals
Custom Header
-
Enter the new header name to replace the original header.
-
Click the + of the previous header and enter a name to add a header.
-
Click Delete
to remove a header. -
Click Save.
It is best to edit the form at the start of a calendar month so the trending is not impacted because of the different form versions.
John Smith, the manager at Classics, Inc., uses quality forms to track agent performance trends. He edits the forms at the start of each month. This prevents trend disruption due to form version changes.