

Stories are how you teach your bot to respond to intents in the context of the whole conversation.
| Concept | Definition | Example | What the Bot Does |
|---|---|---|---|

Utterance |
Anything a contact |
"I lost my password." "What is my balance?" "Are you a bot?" |
The bot uses Natural Language Understanding (NLU) to analyze each contact utterance to determine its meaning, or intent. |

Intent |
What the contact wants to communicate or accomplish. Every message the contact sends has an intent. |
"I lost my password" has the intent of "reset password". "Hello" has the intent of "greeting". |
The bot analyzes a contact's message using NLU |

Entity |
A defined piece of information in a contact's message. | Person or product name, phone number, account number, location, and so on. | The bot uses NLU to identify entities in a contact's message. Entities help the bot understand what the contact's message means. |

Slot |
An entity extracted from a contact's message and saved for use in bot responses. Similar to a variable. | Creating a slot for contact name lets the bot use that name in responses during an interaction, making it more personal. | When configured to do so, the bot extracts an entity from a contact message and saves it in a slot. You can have your bot use this information later in the conversation. |

Rule |
Defines bot responses to messages that don't change meaning with context. |
|
Rules are one of two ways you can configure how your bot responds to an intent. Rules are useful for certain kinds of intents, but not all intents. |

Story |
Trains a bot to handle an interaction based on message intent and conversational context. | In an interaction about a forgotten password, the bot would respond to "How do I do that?" in one way. If the interaction were about creating a new account, the response would be quite different even though in both cases the contact is using the same words with the same intent—to get more information. | Stories are the second of two ways you can configure how your bot responds to an intent. Stories teach the bot how to use the context of the conversation to respond appropriately. |

Bot Action |
Anything a bot says or does while handling an interaction. |
In an interaction about a forgotten password, the bot responds by sending the link to the password reset FAQ on the website. When a contact expresses frustration, such as "I don't understand! It's not working!!!" the bot responds with "I'm sorry. Would you like me to transfer you to a human agent?" When the contact says yes, the bot initiates the transfer. |
Bot actions are the options you have when defining how you want your bot to respond to each intent. They give you the flexibility to configure each response to achieve the outcome that meets the contact's needs. |
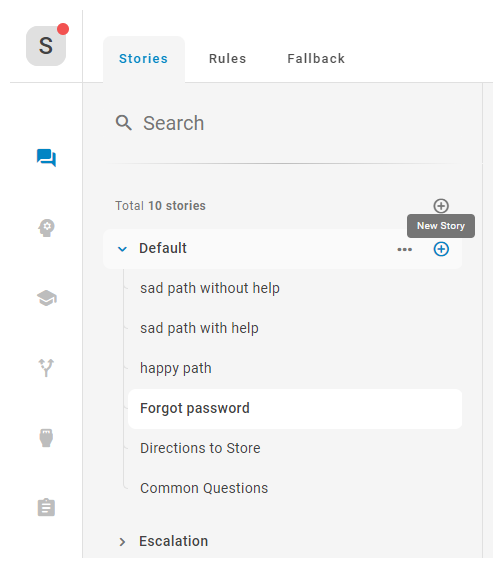
Create a Story
When you create a story, you are designing a scenario that you want your bot to learn how to handle. You start by adding something a contact might say. The bot attempts to predict an intent![]() The meaning or purpose behind what a contact says/types; what the contact wants to communicate or accomplish.. You can correct the intent if necessary, then add how you want the bot to respond.
The meaning or purpose behind what a contact says/types; what the contact wants to communicate or accomplish.. You can correct the intent if necessary, then add how you want the bot to respond.
While creating a story, you can view each intent used in the story. This allows you to see other examples of what the contact might say to trigger that intent. You can modify the intent without leaving the story page.
- In NiCE CXone, click the app selector
 and select Bot Builder.
 - Click the bot you want to work with.
- Click Dialogues
 in the left icon menu.
 -
 , enter a name, and press Enter.
 - Hover over the folder name and click the plus sign .
- Type a name for the story and press Enter.
- Add an example of what the contact
 The person interacting with an agent, IVR, or bot in your contact center. might say to trigger the intent you're creating a story for:
 - In the middle panel, click the plus sign + on the right. It turns into the contact icon
 .
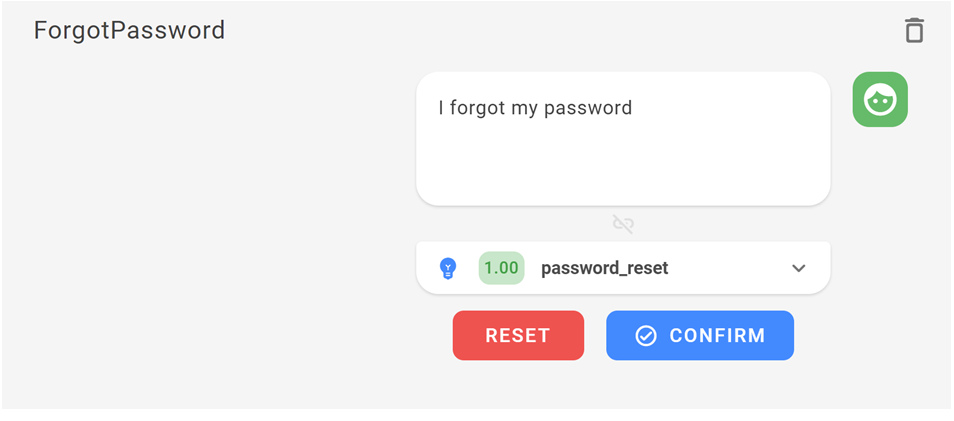
. - In the Customer may say field, enter a message a contact might send in the scenario you're creating, then press Enter. Bot Builder analyzes the message and offers a list of intents with a confidence level for each.
- If the predicted intent is correct, click Confirm. If it's not, click the predicted intent to expand the list, then select the correct intent and click Confirm.
- While you're working with the intent in this step, Bot Builder displays a list of the training examples the selected intent is configured with on the right side of the page. From this list, you can add examples, modify or delete existing examples
- In the middle panel, click the plus sign + on the right. It turns into the contact icon
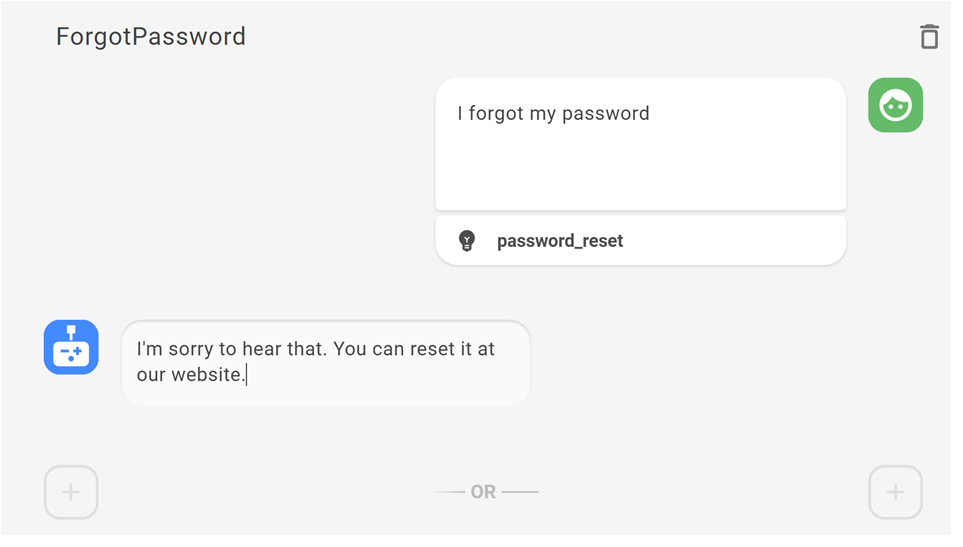
- Add the bot response:
- In the middle panel of the story page, hover over the plus sign until it changes to an bot icon
 .
. - Click the typing indicator
 to set or override the length of time a typing indicator displays for the action. If smart typing is turned on, the bot automatically determines this for you.
  to open a dialogue where you can add variations to the existing bot message. to open a dialogue where you can add variations to the bot message you just added.
- For rich message Elements in digital messaging such as buttons, images, menus, and option pickers. actions only, click Rich Message Fallback
 to customize the response if the message is being sent over a channel that doesn't support rich content. By default, the bot will use what is configured in Rich Messaging Fallback.
- In the middle panel of the story page, hover over the plus sign until it changes to an bot icon
- Repeat this process until you have completed the messages and actions for this story. If you need to edit intents, slots, or forms, you can do so right in the story builder. Click Intents, Slots, or Forms on the right side of the page.
- Click the crossed-out eye
 if you want to exclude this story from training. For example, if you cannot complete the story in one session, you can hide it until you're able to finish it.
 - When you're finished making changes, click Train and Stage to update your bot model Version of a bot that has been trained and staged to test this change.

Duplicate a Story
If you have an existing story that is similar to the one you want to create, you can copy it and edit as needed.
- In NiCE CXone, click the app selector and select Bot Builder.
- Click the bot you want to work with.
- Click Dialogues in the left icon menu.
- Hover over an existing story, click Options
 , then click Duplicate. The new story is created and displayed for editing.
 - To change the name of the duplicated story:
- Hover over the copy and click Options , then select Edit.
- Add a new name.
- Press Enter on your keyboard to apply the change.
- Hover over the copy and click Options
- Click on the duplicated story and make changes to the story content if needed.
- Click Train and Stage to update the bot model Version of a bot that has been trained and staged.
Convert a Conversation to a Story
You can convert an interaction from the Conversations tab in Insights to a story. You can then use it as training data to improve the bot's future responses. If needed, you can delete parts of the conversation, or add intents to make it better fit your situation.
Converting a conversation to a story can create conflicts in your bot. For example, if the conversation contains intents that are already used in other stories, it can cause intent confusion. After converting a conversation, review the new story and test it to ensure it doesn't cause a problem in your bot's configuration.
- In NiCE CXone, click the app selector and select Bot Builder.
- Click the bot you want to work with.
- Click Insights
 in the left icon menu.
 - Click Conversations.
-
Locate the conversation you want to review. You can search using natural language or write queries in a query language for more detailed results.
- Click the conversation in the list on the left side of the Conversations tab.
-
Click Convert to Story
 . Bot Builder converts the conversation and displays a success message at the top of the page.
 -
Click Show in the success message to jump to the new story. You can also navigate to the new story by clicking Dialogues
and select the new story on the Stories tab. Stories converted from conversations appear in the From Learning folder. -
Click the story and drag it to the folder where it belongs. You can also click the plus sign
, enter a name, and press Enter. Then you can move the converted story into your new folder. -
Go through the story and modify it as needed. Changes to the story are saved automatically. You can:
-
Click the intent shown under a contact message to assign a new intent to that message.
-
Hover your cursor over the contact icon next to a message in the conversation and click Delete to remove a message from the story.
-
Hover your cursor over the contact icon next to a message in the conversation, then click and hold the rearrange icon
 to move the message to a new location in the conversation.
 -
Click Typing Indicator
 next to a bot response to set a typing indicator or override the smart typing settings for a bot message.
 -
Click Variations
 next to a bot response to add a variation of this response message.
 -
Click Rich Messaging Fallback
 next to a bot response to configure the rich messaging Elements in digital messaging such as buttons, images, menus, and option pickers. fallback for this response.
 -
Click a rich messaging option beneath a bot response and modify it. This is an option only for responses that can include rich media
Elements in digital messaging such as buttons, images, menus, and option pickers., such as buttons. You can learn more about these options in the Rich Messaging help page. -
Click Intents
 on the right side of the page to modify or delete
 Click Slots
![A circle with a ] shape laying horizontally in it.](../images/inlineiconimages/slotsgrey.png) on the right side of the page and click the slot you want to modify from the list that appears. You can add a slot by clicking New Slot at the bottom of the list.
on the right side of the page and click the slot you want to modify from the list that appears. You can add a slot by clicking New Slot at the bottom of the list. -
Click Forms
 on the right side of the page and click the form you want to modify from the list that appears. You can add a slot by clicking New Form at the bottom of the list.
-
-
If the story is not finished and you don't want to add it to the bot training data, click Hide
in the toolbar at the top of the conversation. You can release it for training when it's ready. -
If the story is ready, click Train and Stage to train your bot on it.

Hide a Draft Story from Training
You can hide individual dialogues![]() Stories, rules, and flows in Bot Builder. . This excludes them from training until they're ready.
Stories, rules, and flows in Bot Builder. . This excludes them from training until they're ready.
When hidden, the data is visible to you for editing, but your bot does not learn from it. It is also displayed with the Hidden  icon.
icon.
- In NiCE CXone, click the app selector and select Bot Builder.
- Click the bot you want to work with.
-
in the left icon menu.
- On the , then click Hide.
-
When you're finished making changes, click Train and Stage to update your bot model
Version of a bot that has been trained and staged to test this change.
Release a Draft Story to Training
When you're ready to release a draft dialogues![]() Stories, rules, and flows in Bot Builder. , you can unhide it and train your bot to use it.
Stories, rules, and flows in Bot Builder. , you can unhide it and train your bot to use it.
- In NiCE CXone, click the app selector and select Bot Builder.
- Click the bot you want to work with.
-
in the left icon menu.
- On the , then click Show.
-
When you're finished making changes, click Train and Stage to update your bot model
Version of a bot that has been trained and staged to test this change.