

Templates determine how Guide displays selected entry points on your website. Template types include:
-
Single button: Use this to offer a single entry point in the Guide widget.
-
Multiple button menu: Use this to offer multiple entry points in the Guide widget.
-
Customer portal: Use this to offer a NiCE CXone Knowledge Management (Expert) knowledge base as a customer portal and additional entry points in the Guide widget.
Be sure you create the channel buttons and entry points before starting this task.
If you are using a multi-button template, you will need channel buttons and a menu button. Visitors click the menu button to display the channel buttons.
To create templates, you need the Guide Configuration permission.
Create a Single Button Template
Use a single button template when you want Guide to direct visitors to just one channel.
Myra, the Jungle Support manager, wants to offer the chat channel on the home page of the website. She creates a single button template that offers the chat button that appears at the bottom-left of the home page of the Jungle website:

If a visitor clicks the chat button, the chat channel appears in the Guide widget:
Watch a short video on setting up a single button template.
- Click the app selector
 and select Guide.
 - Click Templates.
- Click New Template.
- Enter a Template title.
- Set Template type to Single Button.
-
In the Design Editor tab, set the values to control the appearance of the template.
 Learn more about fields in this step
Field Details Set Position to Bottom right or Bottom left to determine where the Guide template appears on your website. If needed, enter a Theme color to use for the template. Leave this field blank to use the Theme color set in the branding. To override the branding, use the color picker to select a color or enter the hex code for the color.
If needed, enter a Font color to use for the template. Leave this field blank to use the Font color set in the branding. To override the branding, use the color picker to select a color or enter the hex code for the color. -
In the Template Channel tab, define the channel to use for template.
Learn more about fields in this step
Field Details Select the Entry point to use for the channel. For example, you might set it to a chat entry point to offer the chat channel. Depending on the type of channel selected, you may see additional fields to define. Select the Button to use for the channel. Leave this blank to use the button defined for the entry point.
Enter the Label to use with the button. The label appears to the right of the button. The label is limited to 18 characters. Including a label is optional. Note that the label is also used by screen readers. If omitted, the screen reader will read the text of the button. -
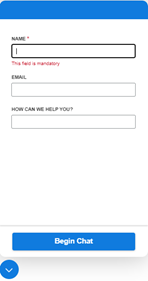
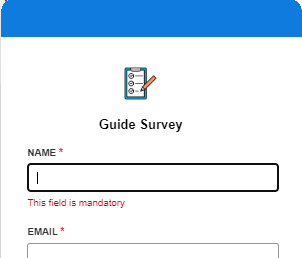
If you set Entry point to a chat or email channel, and if the entry point is configured with a precontact survey, additional optional fields appear. Click Choose File to select a Precontact survey icon and enter a Precontact survey label to define an icon and label that appear at the top of the Guide widget:
- If you set Entry point to an Knowledge Management (Expert) channel, specify the Popup Title. For example, you might title the pop-up Helpful Articles.
- Click Save.
- Check the appearance and behavior of the template.
Create a Multiple Button Menu Template
Use a multiple button menu template if you are using Guide to display multiple channels![]() Various voice and digital communication mediums that facilitate customer interactions in a contact center. at a time. You can include up to four channels.
Various voice and digital communication mediums that facilitate customer interactions in a contact center. at a time. You can include up to four channels.
Myra, the Jungle Support manager, wants to offer the chat and email channels on the home page of the website. She creates a multiple button template. The menu button that she set for the template appears at the bottom-left of the home page of the Jungle website:

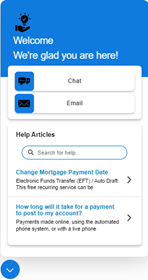
A website visitor can then click the menu button to display the menu of channel buttons:

For example, if the visitor wants to start a chat, the chat window appears:
Watch a short video on setting up a multi-button template.
- Click the app selector and select Guide.
- Click Templates.
- Click New Template.
- Enter a Template title.
- Set Template type to Multiple Button Menu.
-
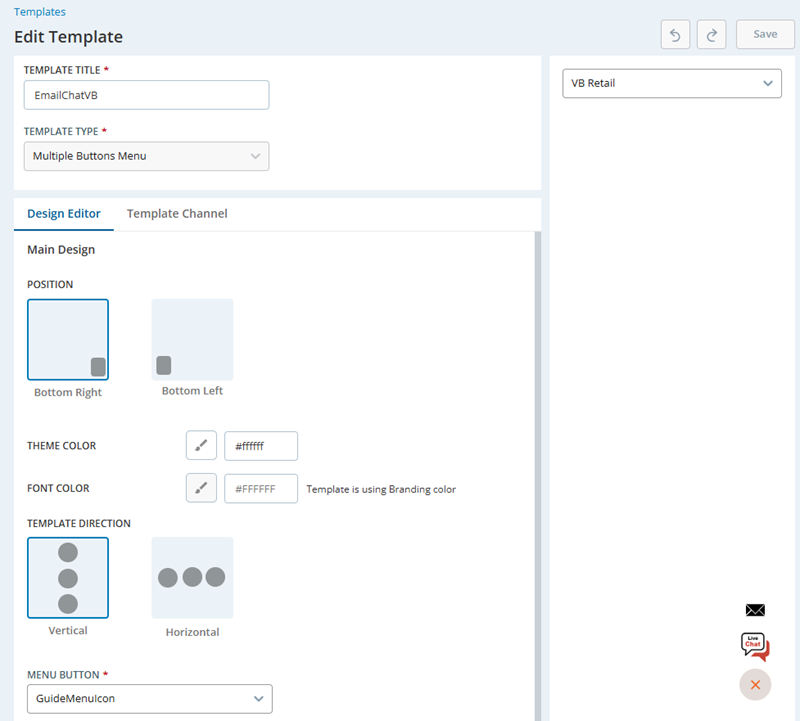
In the Design Editor tab, set the values to control the appearance of the template.
Learn more about fields in this step
Field Details Set Position to Bottom right or Bottom left to determine where the Guide template buttons appear on your website. If needed, enter a Theme color to use for the template. Leave this field blank to use the Theme color set in the branding. To override the branding, use the color picker to select a color or enter the hex code for the color.
If needed, enter a Font color to use for the template. Leave this field blank to use the Font color set in the branding. To override the branding, use the color picker to select a color or enter the hex code for the color. Set the Template direction for your channel buttons to expand when the menu is open. Options are Vertical or Horizontal. Select the Menu button that displays the menu of channel buttons available to the visitor. -
In the Template Channel tab, define up to four buttons, one for each channel to offer.
Learn more about fields in this step
Field Details Select an Entry point to use for the first channel.
-
If you set Entry point to a chat or email channel, and if the entry point is configured with a precontact survey, additional optional fields appear. Click Choose File to select a Precontact survey icon and enter a Precontact survey label to define an icon and label that appears at the top of the Guide widget:
-
If you set Entry point to a knowledge base, specify the Popup Title. For example, you might title the pop-up Helpful Articles.
Select the Button that displays the channel. Leave this blank to use the button defined for the entry point.
Enter the Label to use for screen readers. Click to define another channel to include in the template. You can add up to four channels.
Each template is limited to a single knowledge base channel and a single chat channel.
-
- Click Save.
- Check the appearance and behavior of the template.
Create a Customer Portal Template
Use a customer portal template to offer an Knowledge Management (Expert) portal and up to four channel![]() Various voice and digital communication mediums that facilitate customer interactions in a contact center. entry points at the same time. This requires an integration with Knowledge Management (Expert).
Various voice and digital communication mediums that facilitate customer interactions in a contact center. entry points at the same time. This requires an integration with Knowledge Management (Expert).
Myra decides to offer a customer portal that provides articles about the top 10 questions visitors ask Support. She also wants to offer some other channels, such as chat and email. She creates a customer portal template. The menu button that she set for the template appears at the bottom-left of the home page of the Jungle website:
A website visitor can then click the menu button to display the portal and the channels she configured:
Watch a short video on setting up a customer portal template.
- Click the app selector and select Guide.
- Click Templates.
- Click New Template.
- Enter a Template title.
- Set Template type to Customer Portal.
-
In the Design Editor tab, set the values to control the appearance of the template.
Learn more about fields in this step
Field Details Set Position to Bottom right or Bottom left to determine where the template appears on your website. If needed, enter a Theme color to use for the template. Leave this field blank to use the Theme color set in the branding. To override the branding, use the color picker to select a color or enter the hex code for the color.
If needed, enter a Font color to use for the template. Leave this field blank to use the Font color set in the branding. To override the branding, use the color picker to select a color or enter the hex code for the color. Upload a Main icon. This is an image, such as a logo, that appears in the top left corner of the customer portal template. Images must be smaller than 50 KB. This image is required. Enter a Heading. This is the text that appears at the top of the template. For example, you might set this to Welcome. The heading is required. Enter an optional Sub heading. The sub heading appears under the Heading. For example, you might set this to How can we help you?. This text appears in the font color specified for the brand. -
Set Template outline to determine the order in which the template content appears:
-
-
Knowledge base first to display the Knowledge Management (Expert) portal at the top of the template and buttons for other channels below.
-
Set the Menu Button. A button that displays the menu of channel buttons available to the visitor. Click Select item to select the button the visitor clicks to display the menu of channels. -
-
In the Template Channel tab, define up to four buttons, one for each channel to offer.
Learn more about fields in this step
Field Details Select the Entry point to use for the first channel. It can be any entry point expect a knowledge base entry point.
If you set Entry point to a chat or email channel, and if the entry point is configured with a precontact survey, additional optional fields appear. Click Choose File to select a Precontact survey icon and enter a Precontact survey label to define an icon and label that appears at the top of the Guide widget:
Select the Button to use for the channel. Leave this blank to use the button defined for the entry point.
Enter the Label to use for the button. This field is required. The label is limited to 18 characters. The label is also used by screen readers. Click to define another channel to offer in the customer portal. You can add up to four channels.
Each template is limited to a single chat channel.
-
In the Knowledge Base tab, define the content to appear in the customer portal.
Learn more about fields in this step
Field Details Select the knowledge base entry point to use for this template. The entry point must contain the articles that you want to offer to your website visitors when this template appears. Enter the heading to use for the knowledge base. For example, you might set this to Helpful articles.
- Click Save.
- Check the appearance and behavior of the template.
Check the Template Appearance and Behavior
Once you specify all of the required fields for a template, a preview appears in the lower right corner of the page.
If you continue making changes to the template, the preview is refreshed. Use the drop-down in the upper right corner to preview the template with different branding settings.
If the preview is not working as you expect, check the following:
-
Have you set a value for each required field? You may need to display multiple tabs to see all the required fields for a template. Template Title is also a required field.
-
Are the values you set valid? Although Guide has length limits for text fields, Guide does not enforce the limits when setting the value. You can use the Tab key to move around the page and make sure the required field values are valid. If they are not valid, an error message appears after you move to the next field.