Required permissions: Skills Create
You can upload multiple skills![]() Used to automate delivery of interactions based on agent skills, abilities, and knowledge at the same time either to create new skills or to modify existing ones. If you use the bulk upload tool to modify existing skills, use the Row Changed column in the file where you indicate which skills changed. Otherwise, the platform considers all rows updated and takes much longer to upload the file.
Used to automate delivery of interactions based on agent skills, abilities, and knowledge at the same time either to create new skills or to modify existing ones. If you use the bulk upload tool to modify existing skills, use the Row Changed column in the file where you indicate which skills changed. Otherwise, the platform considers all rows updated and takes much longer to upload the file.
Processing bulk record creation or change requests can impact the performance of your system. To reduce the impact, it is recommended that you:
-
Make your bulk upload updates outside of your normal business hours.
-
Reduce the amount of data to process by marking the rows that need processing in the Row Changed column in the CSV file. When you upload the file, select Changed Rows Only for Rows to Include.
-
Limit your uploads to 1,000 or fewer records per request. If this means uploading in batches, wait for one batch to finish processing before uploading the next.
-
Only click the submission button once, even if it takes time to respond.
-
Click the app selector
 and select ACD.
 -
Go to Contact Settings > ACD Skills.
-
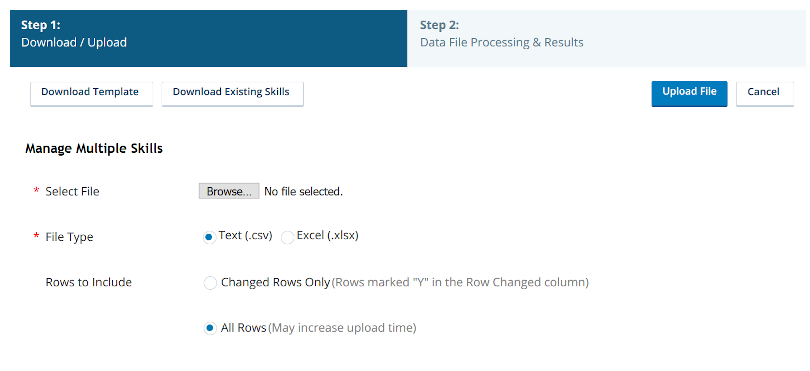
Click Create New > Manage Multiple Skills.
-
Click Download Existing Skills.
-
Open the file in Excel or a program like Notepad.
-
In the rows following the header and explanation rows, enter the information about each record. Don't change the column names, order, or data format.
 Learn more about fields in this step
Field
Details
Row Changed Whether the row has changed. If you put a Y in this column, the system processes the row. If you leave this column blank or put an N in it, the system doesn't process the row. Marking modified rows can significantly decrease processing time. Skill ID
If you're creating skills, leave this blank. If you're modifying skills, enter the unique ID of the skill. Don't use this column to change the ID.
Media Type The number associated with the media type
A medium, such as voice, email, and chat, through which a contact connects with an intended recipient. of the skill:- 1 — Email
- 3 — Chat
- 4 — Voice
- 5 — Voicemail
- 6 — Work Item Customizable method of delivering contacts to an agent via Studio scripts.
- 7 — SMS
- 9 — Digital
Skill Name The name of the skill.
Status Allows you to activate or deactivate skills. You can enter Active or Inactive. Inbound/Outbound Whether the skill is Inbound or Outbound. The default is Inbound. Campaign The campaign A grouping of skills used to run reports. assigned to the skill. Leave this cell blank to apply the default campaign.Email From-Address Required for email skills. The email address the contact sees as the sent-from address. Email BCC-Address Applicable only to email skills. Service Level Threshold The number of seconds an agent has to respond to meet the (SLA Commitment between a service provider and a customer with a defined service level threshold, including quality, availability, and responsibilities). The default is 30 seconds.Service Level Goal The percent of interactions you want to meet the Service Level Threshold. The default is 90%. Enable Blending Only applicable to PC skills. It's a boolean value that enables SLA Commitment between a service provider and a customer with a defined service level threshold, including quality, availability, and responsibilities blending. When True, it reassigns agents from outbound skills when the SLA falls below the configured Service Level Threshold.Enable Short Abandon Threshold Boolean. When True, it allows data collection and reporting on contacts that fall within the skill-specified Short Abandon Threshold. Short Abandon Threshold Required if Enable Short Abandon Threshold is True. If a contact ends before being connected to an agent within the specified number of seconds, it's considered a short abandon. For example, if the value is 10 and a contact ends after 7 seconds without being delivered to an agent, the contact is considered a short abandon. The default value is 15 seconds. Short Abandons Boolean. When True, short abandons count against the service level. The default is True. Use Screen Pops Boolean. When True, a screen pop with record information appears when an agent connects to a contact. The default is False. Use Custom Screen Pops Boolean. When True, enables you to configure custom contact center data to appear in the screen pops for this skill. The default is False. ApplicationWebpage When you set Use Custom Screen Pops to True, specifies whether the custom data you want to provide is available via an Application or Webpage. ApplicationWebpageText If Use Custom Screen Pops is True, specifies the path to the application or webpage Initial Priority Integer. It's the base level priority for all fresh records and retries, but not callbacks, for the skill. The default value is 0. Acceleration Integer. It's how quickly the priority of the skill increases. For PC, the best practice is to set this value to 0 because there is no queue of contacts. The default is 1. Maximum Priority Integer. The maximum priority a contact can have. If you choose not to use Acceleration, this value should match the Initial Priority. The default is 1000. Assigned Users A list of users assigned to the skill, including the user ID, proficiency level, and active/inactive state for each skill user assignment.
This field uses the format <AgentID>:<Proficiency>:<Active> and is separated from other skill user assignments by semicolons, see the example below.
The proficiency level is represented by a number between 1 and 20, with 1 being the highest proficiency and 20 being the lowest proficiency.
You can assign the skill as active by entering TRUE after the proficiency. Or, you can assign the skill as inactive by entering FALSE after the proficiency.
For example, 7023298:3:TRUE;7023468:3:FALSE;.
Assigned Points of Contact A list of the point of contact IDs assigned to the skill, separated by semicolons. Minimum Working Time Only applicable to email skills where Interruptible is True. It's the minimum number of seconds an agent can work on an email before a phone call may interrupt it. For example, if the value is 30 seconds, a higher priority call received 20 seconds after the email was delivered would not interrupt the email, but a call received 35 seconds after the email was delivered would. Email Parking Boolean. Only applicable to email skills. When True, an agent can set an email aside and work on other tasks, returning to the email later. Hours of Operation The name of the hours of operation profile assigned to this skill. Caller ID The phone number you want contacts to see on the caller ID. Legally this must be a number where they can reach your system. Custom Script The path and file name of the custom Studio script that runs when interactions occur in this skill. Workforce Intelligence Minimum Agents Integer. The minimum number of agents that must be assigned to this skill. This setting prevents automatic rule actions associated with Workforce Intelligence rules from removing too many agents from the skill. When the number of agents reaches this number or lower, all skill removal actions require approval, even the automatic ones. Workforce Intelligence Minimum Available Agents Integer. The minimum number of available agents that must be assigned to this skill. This setting prevents automatic rule actions associated with Workforce Intelligence rules from removing too many available agents from the skill. When the number of available agents reaches this number or lower, all skill removal actions require approval, even the automatic ones. Chat Warning Threshold Integer. It's only applicable to chat skills. The number of seconds an agent can be inactive in a chat window before the agent receives an inactivity warning. This is helpful for agents handling multiple chats. Agent Typing Indicator Boolean. It's only applicable to chat skills. When True, it enables chat contacts to see when agent is typing a response in the chat window. It only works when the agent is using MAX or Salesforce Agent. Patron Typing Preview Boolean. It's only applicable to chat skills. When True, it enables agents to see what the contact is typing before the contact sends the message. It only works when the agent is using MAX or Salesforce Agent. Notes Enable Chat Messaging Time out Boolean. It's only applicable to chat skills. When True, chats time out when the contact doesn't respond after a specific amount of time. Time to Inactive Chat Message Integer. It's only applicable to chat skills when Enable Chat Messaging Time out is True. It's the number of seconds until the inactive chat message displays to the contact. The Initial countdown begins when the agent accepts the chat. Inactive Chat Message Applicable to chat skills when Enable Chat Messaging Time out is True. It's the message the contact sees when the chat becomes inactive. Chat Termination Count Down Integer. It's only applicable to chat skills when Enable Chat Messaging Time out is True. It's the number of seconds until the chat terminates. This countdown begins from when the systems sends the inactive chat message. Chat Terminated Message Only applicable to chat skills when Enable Chat Messaging Time out is True. It's the message that displays to the contact once the chat terminates due to inactivity. Is Persistent Work Item You can enter True or False. Outbound Strategy Only applicable to outbound voice skills. It's whether the outbound phone skill is Manual or Personal Connection. Deliver Numbers Serially Boolean. It's only applicable to PC skills. When True, PC selects an available agent to handle a possible connection and attempts all destinations associated with a record in the order specified in the skill cadence. This can increase the odds of reaching the contact. The agent is tied to the connection attempts and, by default, is unable to take inbound contacts until the contact answers or all destinations in the record have been attempted. When destinations in the record are available for dialing again, the record is delivered to any available agent to attempt its destinations again. Cradle to Grave Option Boolean. It's only applicable to PC skills where Deliver Numbers Serially is True. When True, the agent who receives the first attempt on the record is assigned to that record until it retires. PC does not attempt to reach any destination in the record unless the agent who was first delivered the record is available. Priority Interrupt Only applicable to PC skills where Deliver Numbers Serially is True. It enables blending with serial dialing so that, when PC is attempting the destinations in a record, a high priority inbound call can interrupt the attempts. When the agent finishes handling the priority inbound interaction, PC resumes attempts on the record until it has tried them all or the contact answers. Agentless Boolean. It's only applicable to PC skills. When True, PC automatically dials phone numbers of contacts from a calling list and plays either a pre-recorded message or an IVR
Automated phone menu that allows callers to interact through voice commands, key inputs, or both, to obtain information, route an inbound voice call, or both. menu.Ports Used Integer. It's only applicable to PC skills where Agentless is True. The number of your ports this skill can use. Agentless Delivery Delay Seconds Allows you to manually pace the delivery of outbound agentless messages. Enter the number of seconds you want the system to wait before sending the next message. This field is empty by default. The maximum delay is 60 seconds. Calling List Leave this cell blank. This field is no longer in use. Telephone Number Column Leave this cell blank. This field is no longer in use. Unique Key Column Leave this cell blank. This field is no longer in use. Timeout Leave this cell blank. This field is no longer in use. Breather Leave this cell blank. This field is no longer in use. Message Template Only applicable to PC and email skills. The message template you want to use to send text messages in this skill. Copy Advanced Parameters From Leave this cell blank. This field is no longer in use. Transport Code Only applicable to PCSMS skills. The SMS code registered to your business unit that you want to send the SMS messages with this skill. Screen Pop Trigger Event Priority Initial Priority The base level setting for Personal Connection priority records, or hot records. A record is a priority record if you stored a boolean indicator in the record and mapped that field to the Priority system field to flag it as requiring priority Skill-based designation of the importance of contacts that determines delivery order. handling. Personal Connection pushes the record to the front of the queue so the next available agent can take it. The default value is 1500 to ensure that these records receive attention before normal records. Callback Initial Priority Optional. Priority-based blending The ability for agents to receive interactions from all eligible CXone Mpower ACD skills, Personal Connection dialer, and Digital Experience skills assigned to them, based on the relative skill priority. Personal Connection skills work the same way they normally would, no matter the dialing ratio.
Each skill you want to blend with others must be configured with priority-based blending. only.Minimum Retry Minutes The minimum callback minutes. You can enter a value between 1 and 50000. Maximum Attempts The maximum number of attempts a record will be dialed. You can enter a value between 1 and 300. Default Contact Expiration The time before a default contact expires in minutes. This field will use your Get Priority Contacts On Contact Insertion The system immediately queues priority contacts. The default value is True. Consecutive Attempts Without a Live-Connect Priority-based blending The ability for agents to receive interactions from all eligible CXone Mpower ACD skills, Personal Connection dialer, and Digital Experience skills assigned to them, based on the relative skill priority. Personal Connection skills work the same way they normally would, no matter the dialing ratio.
Each skill you want to blend with others must be configured with priority-based blending. only. The number of attempts that should be made to deliver a call for agent handling, before moving back to an inbound call. You can enter a value between 1 and 999.Inactive Blending Timer Only applicable to PC skills when Enable Blending is True. It's the minimum number of seconds an agent is retained for outbound activity before being released to handle other work. Load Callbacks The system will load records that are marked as callbacks or timed call requests. The default value is True. Load Fresh The system will load records that have never been dialed before. The default value is True. Load Non-Fresh The system will load records that have been called at least once. The default value is True. Override Business Unit Abandon Rate Allows for skill defined abandon rate calculations. The default value is False. Maximum Ringing Duration The number of seconds a call rings before automatically ending. The default maximum is 55 seconds. You can enter a value between 1 and 180.
This field is only supported for Personal Connection and manual outbound voice skills.
Begin Dampen Percentage When the system reaches the threshold set, the dialing ratio will start to be throttled. You can enter a value between 0 and 100. Abandon Rate Cutoff Subtracted from the Abandon Rate Threshold to determine when the system will dial 1:1. You can enter a value between 1 and 100. Abandon Rate Threshold The maximum percentage of allowed abandoned calls. You can enter a value between 0.0 and 9.9. Ratio The maximum number of dialed calls per agent. You can enter a value between 1 and the defined maximum dialing ratio set by your Aggressiveness This field determines the speed at which the system ramps up to maximum dialing ratio. You can enter Conservative, Moderate, or Aggressive. Enable Dialing By Proficiency When True, call distribution will be calculated based on the configuration of dialing algorithm to the highest scoring agents. The default value is False. Proficiency Factor The numeric value used to assign weight to Proficiency calculation for Dialing by Proficiency setting. You can enter a value between 0 and 999. Wait Time Factor The numeric value used to assign weight to Wait calculation for Dialing by Proficiency setting. You can enter a value between 0 and 999. Maximum Concurrent Calls Per Agent For Dialing by Proficiency setting. You can enter a value between 1 and 10. Maximum Wait Time The maximum wait time to consider. For Dialing by Proficiency setting. You can enter a value between 0 and 999. End-of-List Notification Delay The number of seconds the system will wait before sending a notification. You can enter a value between 0 and 3600. The default value is 120. Notify Agents When List is Empty When True, the message "Record inventory is running low" is shown to the agent when the list is empty. The default value is True. Percentage of Agents before Overdial The percentage of agents that must be waiting before the system will allow more than one call per agent. The default value is 25. Block Multiple Calls When True, this forces 1 to 1 dialing. The default value is False. Do Not Deliver Preview Required If True, the system will not call any record marked for "Preview Required". Preview Required Delivery Mode You can enter a value between 0 and 5.
0 — None.
1 — Click-to-Call.
2 — Manual Dial with Keypad.
3 — Manual Dial with Keypad Autocorrect.
4 — Dial Outside CXone Mpower Network.
5 — Progressive, No Preview.
Preview Required Initial Timeout The number of seconds the system will wait before executing default action. You can enter a value between 1 and 300. Preview Required Subsequent Timeout When using multiple number serial delivery, the number of seconds the agent will have on subsequent destinations to accept the call. You can enter a value between 1 and 300. Preview Required Default Action The default action to take when the timeout for Preview Required records expires. Process Contacts as Preview Required If True, the system will treat all records loaded to the skill as "Preview Required". The default value is False. Preview Button Option – Requeue The default value is False. Preview Button Option – Reschedule The default value is False. Preview Button Option – Snooze The default value is False. Preview Button Option – Disposition The default value is False. Do Not Call Compliance Required If True, the system will not call any destinations marked for "Compliance Required". Compliance Required Delivery Mode You can enter a value between 0 and 5.
0 — None.
1 — Click-to-Call.
2 — Manual Dial with Keypad.
3 — Manual Dial with Keypad Autocorrect.
4 — Dial Outside CXone Mpower Network.
5 — Progressive, No Preview.
Compliance Required Timeout The number of seconds the system will wait before executing default action. Compliance Records Subsequent Timeout When using multiple number serial delivery, the number of seconds the agent will have on subsequent destinations to accept the call. You can enter a value between 1 and 300. Compliance Required Default Action The default action to take when the timeout for Compliance Required records expires. Compliance Button Option – Requeue You can enter True or False. The default value is False. Compliance Button Option – Reschedule You can enter True or False. The default value is False. Compliance Button Option – Snooze You can enter True or False. The default value is False. Compliance Button Option – Disposition You can enter True or False. The default value is False. Abandon Timeout The number of seconds after the customer's initial utterance that a call will wait to be connected to an agent. You can enter a value between 0 and 60. Abandon Message Mode You can enter AbandonMsgPlayMessage to play the abandoned message or AbandonMsgExecuteCustomScriptWithAgent to execute a custom script. Abandon Message Path This field is required when AbandonMsgPlayMessage is entered in the Abandon Message Mode field. Answering Machine Detection Options You can enter the following values:
-
Classify
-
ClassifyWithAmdEndCallDispositionAutomatically
-
ClassifyWithAmdPlayMessage
-
ClassifyWithAmdExecuteCustomScriptWithAgent
-
ClassifyWithAmdExecuteCustomScriptNoAgent
Answering Machine Message Path This field is required when ClassifyWithAmdPlayMessage is entered in the Answering Machine Detection Options field. Attempt [1-6+] Answering Machine Detection Mode This field is optional. You can enter the following values:
-
ClassifyWithAmdEndCallDispositionAutomatically
-
ClassifyWithAmdPlayMessage
-
ClassifyWithAmdExecuteCustomScriptWithAgent
-
ClassifyWithAmdExecuteCustomScriptNoAgent
Attempt [1-6+] Answering Machine Message Path This field is required when ClassifyWithAmdPlayMessage is selected for the corresponding attempt. Treat Progress As Ringing Boolean. It's only applicable to PC skills. When True, it enables PC to treat the earlier SIP Protocol used for signaling and controlling multimedia communication sessions such as voice and video calls. progress messages as a sign of ringing. It can assist with delivering the ring to the agent so the agent is prepared to take the call when connected. This can negatively impact the agent's experience in some cases, so discuss this setting with your CXone Mpower Account Representative before enabling it.Pre-connect CPA Enabled Boolean. It's only applicable to PC skills. When True, it enables the system to hone the call progress analysis by delivering fast busy and voice intercept messages and ringing. You might consider this option if the SIP Protocol used for signaling and controlling multimedia communication sessions such as voice and video calls. and ISDN signaling is not sufficient to deliver the ring to an agent at the appropriate time. This setting can negatively impact the agent's experience in some cases, so discuss this setting with your CXone Mpower Account Representative before enabling it.Agent Override Fax Boolean. It's only applicable to PC skills. When True, it enables agents press a button to indicate a number is a fax machine. Agent Override Answering Machine Boolean. It's only applicable to PC skills. When True, it enables agents to press a button to indicate a number is an answering machine. Agent Override Bad Number Boolean. It's only applicable to PC skills where Treat Progress as Ringing and Pre-connect Enable CPA are True. When True, it enables agents to press a button to indicate a number is a bad number. Answering Machine Override Seconds The time in seconds that the Answering Machine Override button is displayed to agents in MAX. Utterance Minimum Minimum duration of time in seconds that PC must detect sound on the line for it to determine the source is the contact or the agent. PC defines a conversation as any agent utterance over the minimum value. If it does not detect a conversation, PC considers the destination to be an answering machine. The range of values is 0.1-0.5, with a default value of 0.2. Customer Live Silence Duration of customer silence in seconds required after Personal Connection has detected utterance to continue classifying the call. The value should be short so that the contact does not have the opportunity to say "hello?" a second time. The range of values is 0.5-2.0, with a default value of 1.1. Machine Minimum with Agent Duration of time in seconds that the contact must speak before PC determines whether the contact is live or an answering machine. The value should try to balance long messages like "Thank you for calling the ____. We are sorry we are unable to take your call. Please leave a message and we will return your call" and simple messages like "Hi, this is _____. Leave a message." The range of values is 2.0-10.0, with a default value of 3.0. Machine Minimum without Agent Duration of time in seconds that the contact has to say something before PC determines the call is an answering machine. Setting this value lower than Machine Minimum with Agent could reduce the possibility of abandonment. The range of values is 2.0-10.0, with a default value of 3.0. Machine End Silence If PC does not detect a beep tone, this is the duration of silence in seconds PC waits after a machine message finishes before playing the answering machine message. If it detects a beep tone, the system plays the message immediately. The range of values is 1.0-5.0, with a default value of 1.0. Machine End Timeout Duration of time in seconds the answering machine message can continue without finishing before classifying the call as an answering machine. If it exceeds this amount of time, PC may have reached an IVR. The range of values is 5.0-60.0, with a default value of 20.0.
Agent Response Minimum This value no longer applies. Use Utterance Minimum instead. Agent No Response Duration Minimum duration of time in seconds that the agent must be silent on the line to classify the call as an answering machine. When an agent speaks for at least the Utterance Minimum, PC will not classify the call as an answering machine. The number should be long enough to ensure that the agent can tell he is not connected to a live contact but short enough to reduce the number of answering machine calls being classified as live due to noise on the agent's line. The range of values is 0.5-4.0, with a default value of 1.4. Agent Voice Threshold Defines the threshold for detection of the agent's voice against background noise. The range of values is 100-100000, with a default value of 10000. Customer Voice Threshold Defines the threshold for detection of the contact's voice against background noise. The range of values is 100-100000, with a default value of 16000. Pre-Connect CPA Recording Captures voice patterns during the CPA process for further analysis. The default value is False. Enable CPA Logging Logs additional events for further analysis. The default value is False. Maximum Number of Answered Calls Maximum number of call attempts that are answered by a live contact. This is a separate counter of the number of times an agent handled the phone number; for example, you might allow 12 attempts but only three answered call outcomes not defined as answering machine. The range of values is 1-300. Finalize When Exhausted Specifies that when the record is exhausted based on maximum attempt settings, the record is finalized and listeners notified. When selected, PC does not recover previously exhausted records. When not selected, PC parks the records and, once increased, allows more attempts on the parked records. Restricted Calling Minutes The period of time to monitor the repeated effort to reach any one particular contact. It works with the Restricted Calling Max Attempts to control the number of repeated calls that PC can attempt in a defined period of time. For example, you could set it up so that, regardless of the outcome, PC cannot attempt more than three calls to record during a three-hour period. If you set up busy signals to retry in 20 minutes with up to 15 attempts, then after three attempts the system would take a three-hour rest before attempting another three times, assuming it continued to reach a busy signal. The range of values is 0-9999, with a default value of 0. Restricted Calling Max Attempts The maximum number of call attempts allowed for any one particular contact within the restricted call period defined in Restricted Calling Minutes. It helps control the number of repeated calls that can occur in a defined amount of time. The range of values is 0-10, with a default value of 0. General Stale Minutes The amount of time in minutes that a non-callback outbound contact can stay in the pacing queue before Personal Connection returns it to list management for reevaluation. The range of values is 10-1440. Callback Rest Minutes The amount of time in minutes after the Callback Stale Minutes have passed that the dialer must wait between callback attempts when it has not reached the right party. The range of values is 1-129600. Release Agent-Specific Calls Specifies what happens when the agent requested for an agent-specific callback no longer has the required skill when the callback time arrives. When selected, PC releases calls scheduled for the removed agent to the skill for general agent delivery. When not selected, PC finalizes calls scheduled for the removed agent. Maximum Number of Callbacks The number of times agents can mark a single record for callback before it becomes exhausted. The range of values is 1-300. Callback Stale Minutes The amount of time in minutes that a callback can stay in the pacing queue before the system returns it to list management for reevaluation. If you leave this blank, callbacks do not go stale. The default is 15 minutes, but you should adjust this according to your call length. If you have a longer call duration, increase it to give the system a chance to deliver the callback as the next record. If you have a shorter call duration, you should decrease it to prevent callbacks from stacking up in the queue, affecting cluster performance. The range of values is 10-1440. Schedule Running of this Outbound Skill When you select this checkbox, your Personal Connection (PC) skill runs on a schedule. When you do not select the checkbox, your PC skill only runs when you manually turn it on using skill control. Scheduler - DoNotRun [Day] When enabled, the skill start/stop schedule will turn off on the corresponding day of the week. Scheduler - StartTime [Day] Indicates the time at which the skill automatically begins to run on the corresponding day of the week.
Scheduler - EndTime [Day] Indicates the time at which the skill automatically stops running on the corresponding day of the week. XS Script Also known as the XS main script, it is the script you want to pull numbers from the external system. It controls the request for records and processes to create prospects in the list management system. XS Checkin Script The script you want to use when you send dispositioned numbers back to the external system. External Outbound Skill Number The external system unique ID for this skill. For example, if you are integrating with Salesforce, use the Salesforce ID for the campaign. XS Still Changed Event Active Sends a notification to script when any changes occur so it can push the settings to the external system. Get Contacts Event When enabled, the connection is active and you can pull records from the external system. Users can still pull records and consume them; this triggers the script to fire whenever the inventory hits one of the defined threshold values. Low Threshold of Fresh Contacts The number of contacts you have never called before that must remain in the Personal Connection (PC) calling list before the script attempts to pull more records from the external system. The range of values is 1-30000, with a default value of 50. Low Threshold of Available Contacts The number of contacts who have not met the maximum attempt threshold that must remain in the PC calling list before the script attempts to pull more records from the external system. The range of values is 1-30000, with a default value of 150. Low Threshold of Ready Contacts The number of contacts who have not met the maximum attempt threshold and are in an active time zone that must remain in the PC calling list before the script attempts to pull more records from the external system. The range of values is 1-30000, with a default value of 100. Number of Contacts to Request The number of contacts to request from the external system when you hit the low threshold for ready or available contacts. The range of values is 1-10000, with a default value of 50. Require Manual Agent Accept When enabled, agents on an active voice connection have to manually click Accept or Reject for any incoming contacts except callbacks. This is available in MAX. Evaluation Criteria -
Skill Proficiency: This is the default setting. Routing decisions prioritize the agent with the highest configured proficiency level for the skill.
-
Preferred Agent: Routing decisions prioritize the agent who last handled the same case or contact. If you select this option, you must configure these settings:
-
Fallback Time: The number of seconds to wait for the preferred agent to become available. For example, if you enter 900 seconds, the system will wait 15 minutes before routing the contact to another agent. If you choose to use Preferred Agent to route contacts, you must enter a value between 1 and 5,256,000. If you leave this field blank, you receive an error message.
Any interaction that enters the queue without an applicable contact or interaction history routes to an available agent based on skill proficiency.
-
-
Least Occupied: Contacts route to the agents with the lowest number of active contacts and who have not already met their total contact limit. This option helps to evenly distribute contacts among your agents.
-
Most Occupied: Contacts route to the agents with the highest number of active contacts and who have not already met their total contact limit. This option helps to maximize agent effectiveness.
-
Enlighten AI: Uses AI Routing modeling to determine the best agent based on improving a selected business outcome.
Focus Metric - Focus Metric: Specifies which agent is the preferred agent. Choose between:
- Per Case: The agent who most recently handled an interaction linked to the customer case.
- Per Customer: The agent who most recently worked on the interaction with the contact The person interacting with an agent, IVR, or bot in your contact center..
- In the Focus Metric drop-down, you can select your key metric from Average Handle Time Average Handle Time is the average amount of time an agent spent handling an interaction, Average Talk Time Average Talk Time. The average amount of time an agent spent talking during an interaction, and Sentiment Overall mood or result of the interaction as determined by analysis of words, phrases, and context of the transcript..
Focus Weight In the Focus Weight drop-down, select the weight the metric should have in routing decisions:
-
High: Routes to agents only based on predictions made for the selected KPI.
-
Medium-High: Routes 80% of interactions to agents with the best predicted KPI and the other 20% to agents with relatively low occupancy and high idle time.
-
Medium: Routes 60% of interactions to agents with the best predicted KPI and the other 40% to agents with relatively low occupancy and high idle time.
-
Medium-Low: Routes 25% of interactions to agents with the best predicted KPI and the other 75% to agents with relatively low occupancy and high idle time.
-
Low: Routes 10% of interactions to agents with the best predicted KPI and the other 90% to agents with relatively low occupancy and high idle time.
For example, if you select:
- Enlighten AI for the Evaluation Criteria
-
Average Talk Time - Medium Weight for the Focus Metric
-
Medium for the Focus Weight
When AI Routing is toggled on, the CXone MpowerACD routes 80% of all interactions to the agent best suited to meet your ATT goals. It routes the other 20% to agents who haven't been handling many interactions.
-
Save the file.
-
In the Select File field of the Manage Multiple Records page, click Choose File.
-
Browse for the file you created. Select it and click Open.
-
Select the File Type of the file you chose.
-
Select All Rows for Rows to Include if you made changes to all rows in the file. Select Changed Rows Only if you used the Row Changed column.
-
Click Upload File.
-
When the Data File Processing & Results page displays a note that you should receive the results of the upload via email, check your email to verify that no errors occurred during the upload. Resolve any errors that appear. To do so, fix the issue in the file you uploaded, then click Back and re-upload it. If you have no errors, click Close.
If the email indicates that the batch failed, you can find details about the processing of the batch files under the Schedule Run History Report.