

本頁面中的檔案適用於受控發佈 (CR) 版本中的產品或功能。 如果您不是 CR 群組成員,但希望獲得更多資訊,請聯絡 客戶代表。
先決條件
在設定 Salesforce Assist 與 CXone Mpower 一起使用之前,您必須擁有:
- 帶有Salesforce Einstein的Salesforce平台帳戶。
- CXone Mpower Continuous Stream Transcription 受支援的提供者之一。 如果您還沒有設定轉錄設定檔,可以在本頁面所述的設定處理序中建立一個。
- 您的客服專員正在使用 Agent for Service Cloud Voice 或 Salesforce Agent Lightning。
如果您使用情緒下一個最佳動作功能,則適用這些額外要求:
- 您必須與 Salesforce 客戶代表 合作,在Salesforce 平台 中啟用和配置情緒下一個最佳動作。
- 您必須擁有 Google Cloud 的 Google Contact Center AI 帳戶。
- 您的客服專員必須使用Agent for Service Cloud Voice。
建立指令碼
所需權限:
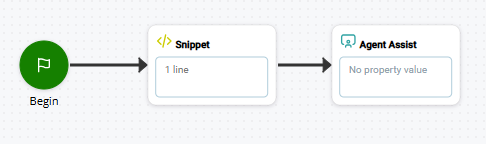
使用以下樣本為基礎,建立指令碼,將您的客服專員助理應用程式整合到CXone Mpower。 傳入和傳出的互動需要單獨的指令碼。 下圖所示為一個傳入指令碼的基本動作:

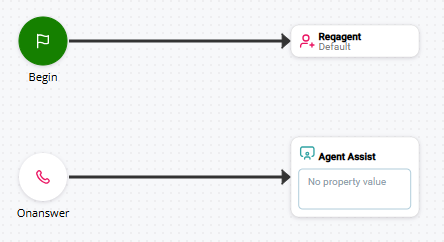
此圖所示為一個傳出指令碼的基本動作:
要完成指令碼的配置:
- 使用 Snippet actions 將初始化 snippet 新增至指令碼。 您可以藉此來自訂您的客服專員助理應用程式。
- 重新配置動作連接器以確保適當的聯絡流程並糾正任何潛在的錯誤。
- 完成任何額外的指令碼編寫並測試指令碼。
為Salesforce產生公鑰和私鑰
您需要一個公鑰才能用於 Salesforce Assist 整合。 當您在 Agent Assist Hub 中配置應用程式時,您需要一個私密金鑰。
產生公鑰
-
登入 Salesforce。
-
前往設定
 > 憑證和金鑰管理。
 -
點擊建立自我簽署憑證。
-
在標籤欄位中,輸入NICE_Cxone_Service_Cloud_Voice。 該值會自動出現在唯一名稱欄位中。
-
選擇可匯出私密金鑰方塊。
-
將金鑰大小設定為2048。
-
點擊儲存。
-
開啟NICE_Cxone_Service_Cloud_Voice憑證。
-
點擊下載憑證。
如果公鑰以其他值(例如 BEGIN ENCRYPTED CERTIFICATE 或 BEGIN CERTIFICATE REGISTER)開頭和結尾,則它不適用於整合。 如果您遇到此問題,請聯絡Salesforce以取得正確格式的公鑰:介於 -----BEGIN CERTIFICATE----- 和 -----END CERTIFICATE----- 之間。
產生私密金鑰
-
下載並安裝KeyStore Explorer
 。
。 -
在Salesforce中,前往設定
> 憑證和金鑰管理。 -
點擊匯出到金鑰存儲。
-
建立金鑰存放區密碼。 稍後,您將使用此密碼存取私鑰。
-
點擊匯出。
-
在
-
右鍵點擊nice_cxone_service_cloud_voice並選擇Export > Export Private Key。
-
選擇 PKCS #8。 這是正確的公開金鑰密碼編譯標準。
-
取消選擇Encrypt框並選擇PEM框。
-
點擊 Export。
在 Salesforce 中設定整合
- 在Salesforce中,前往設定 > 合作夥伴電話聯絡中心。
- 選擇NICE CXone for Service Cloud Voice聯絡中心。
- 點擊編輯。
- 驗證顯示名稱是否NICE CXone for Service Cloud Voice。
- 刪除公鑰欄位的所有內容。 貼上您產生的公開金鑰。 包括-----BEGIN CERTIFICATE-----和-----END CERTIFICATE-----。
- 點擊儲存。
新增應用程式到 Agent Assist Hub
所需權限:
您需要新增個人資料應用程式,以便Salesforce AssistAgent Assist Hub。
- 點擊應用程式選擇器
 並選擇 其他>連接集線器然後點擊Agent Assist Hub。
 -
點擊新增客服專員助理應用程式。
-
輸入客服專員助理應用程式名稱然後在客服專員助理提供者清單中點擊Salesforce Assist。
-
點擊下一步。
-
 詳細了解此步驟中涉及的欄位
欄位
詳細資訊
組織 ID 輸入您的Salesforce組織 ID。 您可以在Salesforce設定 > 公司資訊 > .com組織 IDSalesforce下的中找到此資訊。Base URL 輸入遠端 Salesforce 實例的基礎 URL。 您可以在Salesforce的設定 >
遠端網站設定的遠端網站 URL欄中找到此資訊。 如果您的遠端Salesforce執行個體顯示多個基本URL,或顯示帶有預留位置 (例如 MyDomainName 的URL,請聯絡Salesforce以取得確切的基本URL。私密金鑰 貼上您產生的私密金鑰。 聯絡中心內部名稱 輸入您的 Salesforce Einstein 聯絡中心內部名稱。 您可以在Salesforce的設定 > 合作夥伴電話聯絡中心下找到此資訊。 選擇NICE CXone for Service Cloud Voice聯絡中心。 在API名稱中找到內部名稱。Continuous Stream Transcription設定檔 選擇要與此客服專員助理應用程式一起使用的 Continuous Stream Transcription 設定檔。 點擊新增或編輯 Continuous Stream Transcription 設定檔以建立新設定檔或修改現有設定檔。 要求情緒 點擊啟用Google 轉錄以向Salesforce 傳送情緒資料,以使用情緒下一個最佳動作功能。 這些欄位的資訊來自您的 Google Cloud 專案中的 Google Contact Center AI 設定。
如果您使用 Google 轉錄,此選項不會出現,因為在Google 轉錄的轉錄設定檔中啟用了傳送情緒。 如果您使用任何其他轉錄服務,請點擊此選項,然後填寫顯示的欄位:
- JSON 服務帳戶:貼上您在Google Cloud控制台中建立的服務帳戶金鑰的全部內容。 金鑰是 JSON 物件。
- 對話提供 ID:輸入Google Contact Center AI中的對話設定檔的 ID。 使用 Google 設定 Google Contact Center AI 時,您必須建立對話設定檔。 其決定了互動期間對客服專員的建議。
- 區域:輸入託管Google Contact Center AI的區域。
- 語言:選擇您希望客服專員助理應用程式使用的語言。 這應該與客服專員處理互動時使用的語言一致。
參與者 選擇客服助理應用程式的轉錄選項:僅客戶、僅客服專員或客戶和客服專員。 此設定定義了客服專員看到的轉錄文字。
例如,如果您選擇僅客戶,Salesforce Assist 將僅會在對話中轉錄聯絡人。
-
點擊建立。
-
點擊關閉。
![用於新增 [MadCap:variable name="3rdPartyProductNames.SFAssist" ] 客服專員助理機器人到 Agent Assist Hub 的「配置」頁面。](images/loc-sfassistproperties.png)
建立轉錄設定檔
所需權限:
轉錄設定檔定義了您要使用的轉錄選項,包括要轉錄的語言。
- 在 Agent Assist Hub 中的「建立新客服專員助理」頁面上,點擊新增或編輯Continuous Stream Transcription設定檔。
- 執行以下操作之一:
- 點擊現有設定檔的名稱進行修改,然後跳至步驟 6。
- 點擊新增轉錄設定檔並繼續執行步驟 3。
- 輸入文字記錄設定檔名稱。 若要將此設定檔與您的其他設定檔區分,請使用能醒目提示此設定檔不同之處的名稱。 例如,您可以按照設定檔的預期用途、提供者或設定檔語言等命名。 若您使用多個轉錄提供者,請確保設定檔名稱包含提供者。
- 在選擇提供者下,點擊要使用的轉錄提供程式。 您可以從CXone MpowerTranscription、CXone MpowerTranscription for Copilot、Google Transcription或Microsoft轉錄中進行選擇。 其中一些選項必須由CXone Mpower 在系統 客戶代表 中啟用。
- 點擊下一步。
-
在「配置」頁面,填寫欄位以為此設定檔定義轉錄選項。
詳細了解 CXone Mpower Transcription 的配置
欄位 詳細資訊 語言代碼 選擇您希望此設定檔轉錄的語言。 目前唯一可用的語言是English。 詳細了解 CXone Mpower Transcription for Copilot 的配置
欄位 詳細資訊 API 金鑰 輸入Transcription for Copilot 的 API 金鑰。 您的客戶代表為您提供此密鑰。
語言代碼 選擇您希望此設定檔轉錄的語言。 模型 選擇轉錄音訊時要使用的轉錄服務的機器學習模型。 這些模型已被訓練為從特定的音訊類型和來源識別語音。 可用的模型取決於您選擇的Language Code。
您可以詳細了解可用模型
 。
。智慧格式 啟用此選項可自動格式化轉錄以提高可讀性。 此選項對轉錄套用格式。 這包括格式化,例如標點符號、段落分隔符、以及使用數字型數字來取代文字型數字,例如使用2取代二。
標點符號 當您啟用智慧格式時,此功能會自動啟用。 無法停用。 中期結果 如果希望轉錄顯示隨時間完善的臨時結果,請選擇此選項。 預設停用此選項。 尋找與取代 使用本部分定義您希望在最終轉錄中以不同文字取代的字詞或短語。 例如,您可以用另一個字詞取代典型粗話,例如 bleep。
要新增一個尋找並取代的配置:
- 點擊新增尋找並取代。
- 在名稱欄位中,輸入轉錄中出現的字詞。
- 在值欄位中,輸入要取代名稱中指定字詞的文字。
關鍵字 使用關鍵字來提升或抑制某些字詞或短語:
- 提升賦予字詞或短語更高的權重。 當音訊比對接近時,轉錄服務更可能選擇該字詞或短語。
- 抑制會降低字詞或短語的權重。 轉錄服務較不可能選擇該字詞或短語。
注意:抑制關鍵字只適用於基本模型。
要新增關鍵字提升或抑制:
- 點擊新增關鍵字。
- 在名稱欄位中,輸入一個字詞或短語。
- 在值欄位中,輸入 1 至 10 的正整數,以提升指定的字詞或短語,或輸入一個 -1 至 -10的負整數來將其抑制。
了解有關 Google Transcription 配置的更多資訊
欄位 詳細資訊 轉錄類型 選擇用於此設定檔的 Google Transcription 帳戶:
- 選擇 CXone 以使用 CXone Mpower 擁有的帳戶。
- 選擇您的帳戶以使用貴組織的帳戶。
JSON 服務帳戶
您正在使用的 Google Transcription 帳戶的服務帳戶金鑰:
- 如果您使用 CXone Mpower 帳戶,請使用 客戶代表 為您提供的金鑰。
- 如果您使用自己的帳戶,請使用從 Google Cloud Console 建立並下載的金鑰檔案。
將金鑰檔案的所有內容複製並貼上此欄位,包括金輪周圍的大括號。
服務帳戶金鑰時一個與下例相似的 JSON 對象:
{
"type": "service_account",
"project_id": "ic-demo2-aai-gcp",
"private_key_id": "sdv80sdf08ssd9sdf0sdf8sdfsdf90sdf8",
"private_key": "-----BEGIN PRIVATE KEY-----
nMIIEvgIBADANBgkqhkiG9w0BAQEFAASCBKgwggSkAgEAAoIBAQCzgrS8vp
<private key has been truncated for this example>
----END PRIVATE KEY-----\n",
"client_email": "your@client_email-gcp.iam.gserviceaccount.com",
"client_id": "123456789",
"auth_uri": "https://accounts.google.com/o/oauth2/auth",
"token_uri": "https://oauth2.googleapis.com/token",
"auth_provider_x509_cert_url": "https://www.googleapis.com/oauth2/v1/certs",
"client_x509_cert_url": "https://www.googleapis.com/robot/v1/metadata/x509/
dialogflow-dthjop%40ic-demo2-aai-gcp.iam.gserviceaccount.com"
}語言代碼 選擇您希望此設定檔轉錄的語言。 模型 選擇轉錄音訊時要使用的轉錄服務的機器學習模型。 這些模型已被訓練為從特定的音訊類型和來源識別語音。 並非所有語言都支援各個模型。 如需語言支援的相關資訊,請參閱 Google 文件。
可用選項包括:
- 命令和搜尋:用於轉錄較短的音訊片段,如命令或語音搜尋。 可以考慮使用最新短片段代替。
- 預設值:用於音訊不適用於其他模型時。 它可以轉錄任何類型的音訊,但對某些類型來說,結果品質較低。
- 最新長片段:用於長篇內容,如自發性語音或對話。
- 最新短片段:用於幾秒鐘話語,如命令。 考慮用這種模式代替命令和搜尋。
- 通話:用於轉錄通話音訊。
- 電話:在電話通話中使用更高品質的音訊。
- 簡短電話:在電話通話中使用簡短對話(長度少於十秒)。
所需情緒 如果您在 中使用情緒下一個最佳動作Salesforce Assist,請點擊此選項。 啟用後,請填寫以下顯示的欄位:
- 對話提供 ID:輸入Google Contact Center AI中的對話設定檔的 ID。 使用 Google 設定 Google Contact Center AI 時,您必須建立對話設定檔。 其決定了互動期間對客服專員的建議。
- 區域:輸入Google Cloud計劃的託管區域。
使用增強型 啟用此選項以使用所選模型的增強版本。 只有在使用電話呼叫模型時才顯示此選項。 這有助於提高轉錄的準確性。
預設停用此選項。 啟用此選項會增加轉錄成本。
中期結果 如果您希望轉錄顯示隨時間推移而優化的臨時結果,請啟用此選項。 預設停用此選項。 啟用自動標點符號 啟用此選項可使用Google Transcription自動標點符號選項。 啟用後,聽錄服務會自動推斷逗號、句點和問號等標點符號的位置,並將其添加到腳本中。 類別權杖 新增Google 類別權杖以提高轉錄的準確性:
-
在「類別權杖」下,輸入權杖名稱作為值。
-
在Boost欄位中,輸入介於 1 到 20 之間的數字為特定權杖指派加權值。 更高的數字提供了更多的推動力。
-
點擊新增類別權杖以新增另一個權杖並提升價值。
詳細了解Microsoft轉錄的配置
欄位 詳細資訊 訂閱金鑰 貼上Azure 人工智慧語音服務的訂閱金鑰。 此金鑰允許您使用語音服務訂閱進行驗證。
要尋找您的訂閱金鑰,請登入Azure 入口網站並蒐尋您的語音服務資源。 訂閱金鑰位於「金鑰和端點」標籤上。
此乃必填欄位。
服務區域 輸入託管語音服務資源的Azure 資料中心的區域。 例如,westus2。 該區域可確保您的轉錄請求被路由到正確的位置。 它還與訂閱金鑰一起用於驗證。
您可以在Azure 入口網站中找到該區域。
此乃必填欄位。
端點 ID 如果您使用的是透過 Azure Voice Studio 建立的自訂語音模型,請填寫此欄位。 將您的自訂模型的端點貼上此欄位。 您的自訂模型必須在AzureSpeech Studio中部署,然後才能將其新增到CXone Mpower中的轉錄設定檔。
如果此欄位留空,Microsoft 轉錄使用預設的基線語音識別模型。
語言代碼 從下拉式清單中選擇此轉錄設定檔將轉錄的語言。
此乃必填欄位。
中期結果 啟用此選項可讓轉錄顯示隨時間變化而完善的臨時結果。 預設停用此選項。 啟用自動標點符號 啟用此選項即可讓Microsoft 轉錄自動在轉錄中插入標點符號(如句號、逗號和問號)。 這有助於提高可讀性和清晰性。 預設停用此選項。 - 點擊新增。
將 Salesforce Assist 應用程式指派給一個動作
所需權限:
如果您尚未這樣做,則需要將Salesforce AssistCognigy Agent Assist應用程式分配給Agent Assist 操作Studio腳本中的。
- 在 Studio 中,開啟您要使用的指令碼。
-
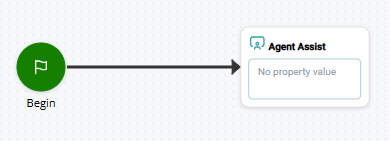
如果尚未完成,請將 Agent Assist 動作新增到指令碼中的正確位置。
-
 動作上的打開編輯器 Agent Assist。
 -
在左欄中,點擊要指派給此指令碼的客服專員助理
 或設定檔旁邊的複選標記應用程式。
使用複選標記的替代方法是在腳本中創建變數Studio。 使用變數將應用程式或設定檔名稱傳遞到操作的分配啟動配置名稱屬性AGENT ASSIST中。
- 點擊關閉。
情緒下一個最佳動作的其他配置
如果您與 Salesforce Assist 一起使用情緒下一個最佳動作,則必須在 Salesforce 中完成額外的配置。 您的 Salesforce 客戶代表 可以幫助您完成 Salesforce 平台 中的設定。
要在 Salesforce 中為客服專員顯示對話,您不需要完成其他設定步驟。