Fluxos são elementos de alto nível de design que permitem que você crie uma representação visual de uma conversa entre o seu bot![]() Um aplicativo de software que interage com os clientes no lugar de um agente humano ao vivo. e contatos
Um aplicativo de software que interage com os clientes no lugar de um agente humano ao vivo. e contatos![]() A pessoa que interage com um agente, RVI ou bot em seu centro de contato.. Fluxos são uma forma diferente de trabalhar com suas intenções. Como histórias e regras, fluxos permitem que você elabore conversas ligadas a intenções que ensinam ao seu bot como responder a tais intenções.
A pessoa que interage com um agente, RVI ou bot em seu centro de contato.. Fluxos são uma forma diferente de trabalhar com suas intenções. Como histórias e regras, fluxos permitem que você elabore conversas ligadas a intenções que ensinam ao seu bot como responder a tais intenções.
Os fluxos substituem as histórias![]() Usadas para treinar um bot para lidar com interações com base na intenção e no contexto. e regras
Usadas para treinar um bot para lidar com interações com base na intenção e no contexto. e regras![]() Usadas para definir a resposta de um bot a mensagens que não mudam com o contexto. nas configurações do bot, para que você não precise criar os três. A única vez que você precisaria criar uma história ou regra seria se você precisasse usar uma ação de bot que os fluxos ainda não suportam. Você ainda precisa configurar fallback além dos fluxos.
Usadas para definir a resposta de um bot a mensagens que não mudam com o contexto. nas configurações do bot, para que você não precise criar os três. A única vez que você precisaria criar uma história ou regra seria se você precisasse usar uma ação de bot que os fluxos ainda não suportam. Você ainda precisa configurar fallback além dos fluxos.
| Conceito | Definição | Exemplo | O que o bot faz |
|---|---|---|---|
|
Enunciado |
Qualquer coisa que um contato |
"Perdi minha senha." "Qual é o meu saldo?" "Você é um robô?" |
O bot usa Entendimento de linguagem natural (NLU) para analisar cada enunciado de contato para determinar seu significado ou intenção. |
|
Intenção |
O que o contato deseja comunicar ou realizar. Toda mensagem que o contato envia tem uma intenção. |
"Perdi minha senha" tem a intenção de "redefinir senha". "Olá" tem a intenção de "saudar". |
O bot analisa uma mensagem de contato usando NLU |
|
Entidade |
Uma parte de informação definida na mensagem de um contato. | Nome da pessoa ou produto, número de telefone, número da conta, localização e assim por diante. | O bot usa NLU para identificar entidades em uma mensagem de um contato. Entidades ajudam o bot a entender o que a significa a mensagem do contato. |
|
Slot |
Uma entidade extraída da mensagem de um contato e salva para uso em respostas de bot. Semelhante a uma variável. | Criar um slot para o nome do contato permite que o bot use esse nome nas respostas durante uma interação, tornando-o mais pessoal. | Quando configurado de tal forma, o bot extrai uma entidade de uma mensagem de contato e a salva em um slot. Você pode fazer com que seu bot use essas informações mais tarde na conversa. |
|
Regra |
Define as respostas do bot a mensagens que não mudam de significado com o contexto. |
|
Regras são uma das duas maneiras de configurar como seu bot responde a uma intenção. Regras são úteis para alguns tipos de intenções, mas não para todas. |
|
História |
Treina um bot para lidar com uma interação com base na intenção da mensagem e contexto de conversação. | Em uma interação sobre uma senha esquecida, o bot responderia a "Como faço isso?" de determinada maneira. Se a interação fosse sobre a criação de uma nova conta, a resposta seria bem diferente, embora em ambos os casos o contato esteja usando as mesmas palavras com a mesma intenção - obter mais informações. | As histórias são a segunda de duas maneiras de configurar como seu bot responde a uma intenção. Histórias ensinam ao bot como usar o contexto da conversa para responder adequadamente. |
|
Ação de bot |
Qualquer coisa que um bot diga ou faça enquanto lida com uma interação. |
Em uma interação sobre uma senha esquecida, o bot responderia enviando um link para um FAQ sobre redefinição de senha no site. Quando um contato expressa frustração, como ao dizer "Eu não entendo! Não está funcionando!!!" O bot responde com "Me desculpe. Gostaria de ser transferido para um agente humano?" Quando o contato diz sim, o bot inicia a transferência. |
Ações de bot são as opções que você tem ao definir como deseja que seu bot responda a cada intenção. Elas lhe dão flexibilidade para configurar cada resposta de forma a atingir o objetivo que atenda às necessidades do contato. |
Designer de fluxo
O designer de fluxo é um espaço de trabalho com uma tela de tabela de pontos, onde você pode adicionar contatos e mensagens de bot de maneira parecida com o que faz quando cria histórias![]() Usadas para treinar um bot para lidar com interações com base na intenção e no contexto. ou regras
Usadas para treinar um bot para lidar com interações com base na intenção e no contexto. ou regras![]() Usadas para definir a resposta de um bot a mensagens que não mudam com o contexto.. À medida que adiciona mensagens a um fluxo, elas se conectam automaticamente às linhas para mostrar o fluxo da conversa de mensagem a mensagem.
Usadas para definir a resposta de um bot a mensagens que não mudam com o contexto.. À medida que adiciona mensagens a um fluxo, elas se conectam automaticamente às linhas para mostrar o fluxo da conversa de mensagem a mensagem.
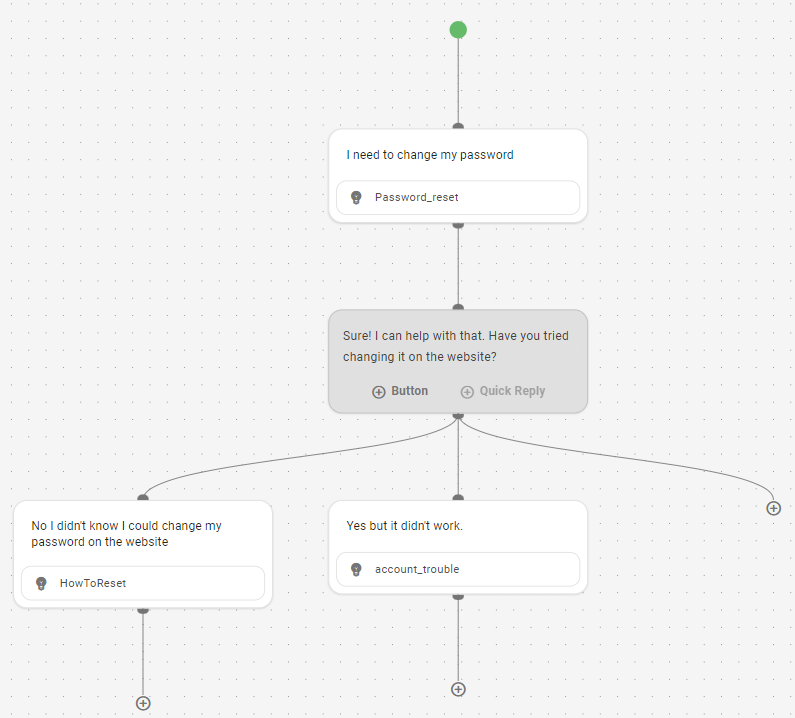
Após cada mensagem de bot, você pode criar ramais na conversa adicionando uma ou mais mensagens de contato. Cada ramal de mensagem de contato representa uma intenção que o contato pode introduzir àquela altura na conversa. Isto permite que você crie um fluxo que inclua os tipos diferentes de solicitações ou respostas que seus contatos enviam.
Por exemplo, se o fluxo começa com o contato pedindo para alterar a senha, o bot pode perguntar ao contato se ele tentou mudar a senha no site. Você pode adicionar mensagens de contato que ramificam a conversa com base na resposta do contato à pergunta do bot.
Em cada ramal no fluxo, você pode construir a conversa ao adicionar a resposta do bot e as mensagens seguintes do contato. Você somente deve adicionar à conversa em um fluxo se as mensagens que adicionar pertencerem ao contexto de tal fluxo. Saiba mais sobre contexto de bot na seção seguinte desta página.
O designer de fluxo inclui o Bot Builder Copilot que permite gerar rapidamente um novo fluxo com base na linguagem natural. Use uma linguagem como "Criar um fluxo que lide com uma solicitação de alteração de endereço". O Bot Builder Copilot cria um fluxo com mensagens (intenções) e scripts. Você simplesmente ajusta o fluxo gerado para seu uso. O Bot Builder Copilot está limitado a criar um novo fluxo neste momento.
Ensinando seu bot por meio de fluxos
Fluxos ensinam o seu bot sobre o contexto da conversa ou sobre como as intenções se relacionam umas às outras. Quando um fluxo começa com uma intenção, o bot aprende que as intenções seguintes podem ocorrer somente após a intenção inicial.
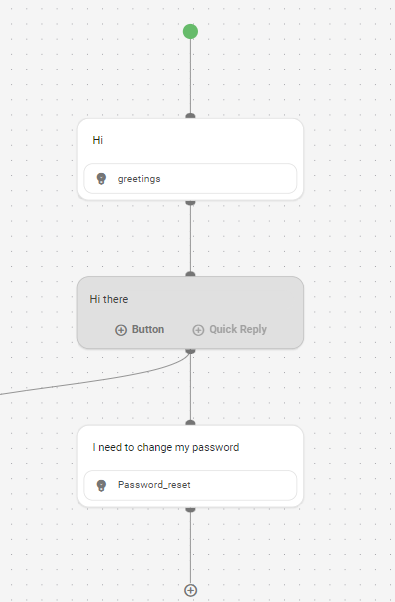
Por exemplo, um fluxo começa com a mensagem de contato Oi (intenção: saudações), que é seguida por uma resposta do bot e, em seguida, outra mensagem de contato. A segunda mensagem de contato introduz outra intenção no fluxo. Isso ensina ao bot que a segunda intenção está relacionada e depende da primeira. Se a segunda mensagem do contato for Preciso mudar minha senha, o bot aprende que o contato pode pedir para mudar senhas apenas imediatamente após a intenção de saudação.
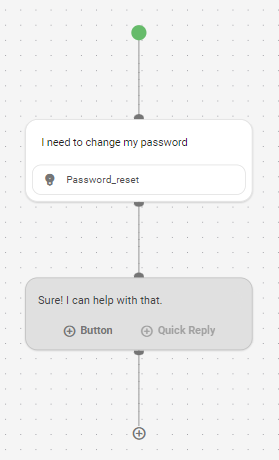
Se quiser que os seus contatos possam pedir para mudar senhas a qualquer momento na conversa, criar um fluxo separado para alterações de senha seria uma melhor abordagem. Isso é mostrado na imagem a seguir.
Seu bot pode pular de um contexto de conversa para outro, dependendo dos fluxos que você cria. Dentro de cada fluxo, inclua apenas intenções que dependem do contexto do fluxo. Se uma intenção não depende do contexto de outra intenção, ela deve ser um fluxo separado.
Intenções que dependem de contexto
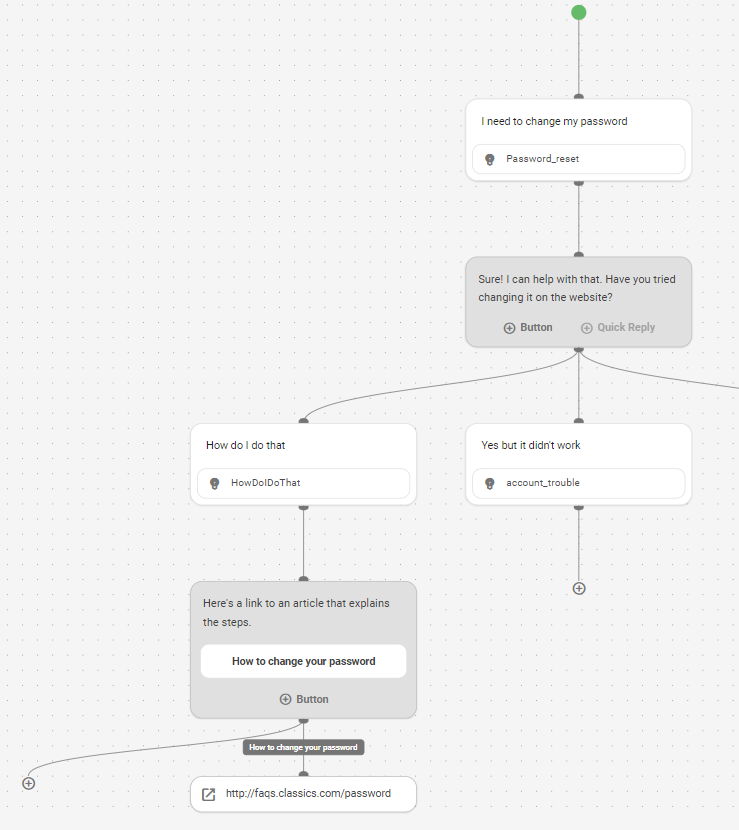
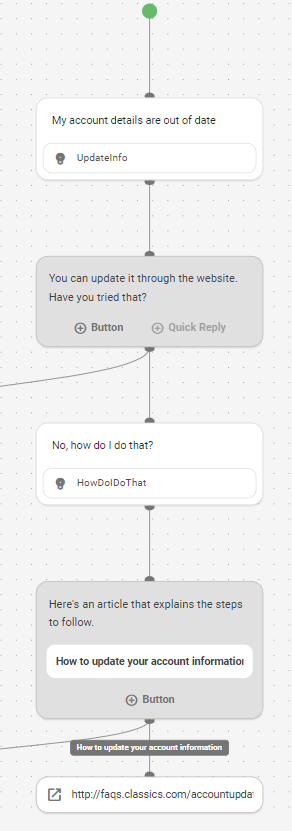
Algumas intenções podem depender de contexto para que o bot aprenda como responder corretamente. Por exemplo, para uma resposta de contato, como "como faço isso", o bot depende do contexto da conversa para entender como responder. As mensagens a seguir mostram a mesma intenção (intenção: ComoFaçoIsso) em dois contextos diferentes. O bot usa o contexto da conversa para determinar como deve responder.
Incluir a intenção HowDoIDoThat no mesmo fluxo da conversa sobre uma tarefa ajuda o bot a aprender como responder a HowDoIDoThat no contexto dessa intenção específica. Você pode ter várias intenções que incluem a intenção HowDoIDoThat em seu fluxo. A resposta do bot para cada intenção provavelmente é diferente.
O bot aprende a usar uma resposta diferente dependendo do contexto da conversa.
Conexões entre fluxos
Os fluxos podem ser acionados pelo contato![]() A pessoa que interage com um agente, RVI ou bot em seu centro de contato. a qualquer momento durante a conversa. Se o contato fizer uma solicitação no meio da conversa que não esteja relacionada à intenção
A pessoa que interage com um agente, RVI ou bot em seu centro de contato. a qualquer momento durante a conversa. Se o contato fizer uma solicitação no meio da conversa que não esteja relacionada à intenção![]() O significado ou propósito por trás do que um contato diz/digita; o que o contato quer comunicar ou alcançar. atual, o bot alternará para o fluxo da nova intenção. Os bots podem lidar com troca de contexto e retornar à intenção inacabada, mas você deve garantir que tenha os fluxos configurados para treiná-los para lidar com isso.
O significado ou propósito por trás do que um contato diz/digita; o que o contato quer comunicar ou alcançar. atual, o bot alternará para o fluxo da nova intenção. Os bots podem lidar com troca de contexto e retornar à intenção inacabada, mas você deve garantir que tenha os fluxos configurados para treiná-los para lidar com isso.
Você pode projetar fluxos para que eles disparem outros fluxos quando apropriado com base no contexto da conversa. Botões e respostas rápidas permitem que você especifique um salto para um fluxo diferente. Por exemplo, em um fluxo para lidar com a fase inicial de saudação de uma conversa, o bot solicita ao contato uma série de respostas rápidas para ajudar a restringir a intenção. Cada resposta rápida é configurada para acionar o fluxo para essa intenção. Quando o contato escolhe uma resposta rápida, o bot pula para esse fluxo.
Botões e respostas rápidas também podem acionar intenções. Quando você aciona uma intenção, a conversa continua dentro do mesmo fluxo. O acionamento de uma intenção só é apropriado quando a intenção depende do contexto da conversa. Se a intenção for independente do contexto da conversa, você deverá criá-la em um fluxo separado e acionar o fluxo.
Ramificações dentro de fluxos
Adicionar botões ou respostas rápidas a uma resposta de bot cria ramificações no fluxo. Quando um botão ou resposta rápida aciona uma intenção![]() O significado ou propósito por trás do que um contato diz/digita; o que o contato quer comunicar ou alcançar., o fluxo desse ramal deve ser concluído com respostas adicionais do bot, intenções ou ambos. Alguns ramos podem conter sub-ramos adicionais. Os branches que acionam outros fluxos ou URLs abertos terminam com essa ação e não podem ser adicionados.
O significado ou propósito por trás do que um contato diz/digita; o que o contato quer comunicar ou alcançar., o fluxo desse ramal deve ser concluído com respostas adicionais do bot, intenções ou ambos. Alguns ramos podem conter sub-ramos adicionais. Os branches que acionam outros fluxos ou URLs abertos terminam com essa ação e não podem ser adicionados.
Ao concluir ramificações, tenha cuidado ao introduzir intenções adicionais. Lembre-se de manter o fluxo de cada ramal dentro do contexto da intenção geral do fluxo.
Certifique-se de que todas as ramificações em seus fluxos estejam completas. Ramificações incompletas resultam em um bot que não sabe como responder a uma intenção. Ele seguirá fallback.


