

插槽是键/值对,用作机器人的![]() 代替现场人工坐席处理客户交互的软件应用程序。记忆。 它们保存可来自各种来源的数据,包括联系人话语
代替现场人工坐席处理客户交互的软件应用程序。记忆。 它们保存可来自各种来源的数据,包括联系人话语![]() 联系人所说或输入的内容。或您的 CRM
联系人所说或输入的内容。或您的 CRM![]() 管理联系人、销售信息、支持详细信息和案例历史记录等事项的第三方系统。。
管理联系人、销售信息、支持详细信息和案例历史记录等事项的第三方系统。。
| 概念 | 定义 | 示例 | 机器人做什么 |
|---|---|---|---|

话语 |
联系人 |
“我丢失了密码。” “我的余额是多少?” “你是机器人吗?” |
机器人使用自然语言理解 (NLU) 来分析每个联系人话语,以确定其含义或意图。 |

意图 |
联系人想要传达或完成的内容。 联系人发送的每条消息都有一个意图。 |
“我丢失了密码”具有“重置密码”的意图。 “你好”有“打招呼”的意思。 |
机器人使用 NLU |

实体 |
联系人消息中定义的一条信息。 | 个人或产品名称、电话号码、帐号、位置等。 | 机器人使用 NLU 来识别联系人消息中的实体。 实体帮助机器人理解联系人消息的含义。 |

插槽 |
从联系人的消息中提取并保存以用于机器人响应的实体。 类似于变量。 | 为联系人姓名创建一个时间段可以让机器人在交互期间在响应中使用该姓名,使其更加个性化。 | 当被配置成执行此操作时,机器人会从联系人消息中提取实体并将其保存在插槽中。 可以让机器人稍后在对话中使用此信息。 |

规则 |
定义机器人对不会随上下文改变含义的消息的响应。 |
|
规则是配置机器人如何响应意向的两种方法之一。 规则对于某些类型的意图有用,但不适用于所有意图。 |

故事 |
训练机器人处理基于消息意图和会话上下文的交互。 | 在关于忘记密码的交互中,机器人会回应“我该怎么做? “我该怎么做?”。 如果交互是关于创建新帐户,则响应会大不相同,即使在这两种情况下,联系人都使用相同的词语和相同的意图 - 获取更多信息。 | 情景是配置机器人如何响应意向的两种方法中的第二种。 故事教机器人如何利用对话的上下文来做出适当的响应。 |

机器人操作 |
机器人在处理交互时所说或所做的任何事情。 |
在有关忘记密码的交互中,机器人通过发送网站上的密码重置常见问题解答链接来进行响应。 当联系人表达沮丧时,例如“我不明白! 没用啊!!!”时, 机器人回复“对不起。 您想让我把您转给人工坐席吗?” 当联系人同意后,机器人启动此转移。 |
机器人作是定义您希望机器人如何响应每个意向时使用的选项。 它们可使您灵活地配置每个响应,以实现满足联系人需求的结果。 |
配置基于实体的插槽
当您添加实体时,Bot Builder 会创建相应的插槽。 如果要更改默认设置,则必须配置基于实体的插槽。
- 在 CXone Mpower 中单击应用程序选择器
 并选择Bot Builder。
 - 单击您要使用的机器人。
- 单击左侧图标菜单中的对话框
 。
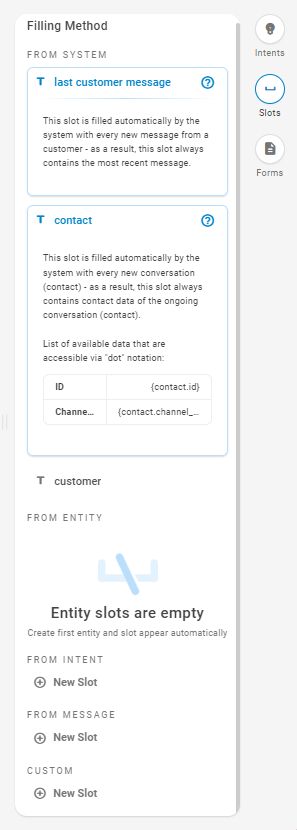
。 - 在右侧窗格中,单击插槽。
-
在“从实体”部分下,单击您要配置的插槽。
-
配置插槽类型,如果插槽类型支持它,则指示您是否希望此插槽影响对话。
 在此步骤中了解有关字段的更多信息
字段 详细信息 文本
如果您将影响对话设置为开,则根据该插槽的内容,机器人的行为可能不同。号码 如果将影响对话设置为开,那么机器人的行为可能会根据插槽中的值而发生变化:
- 低于最小值的值被视为最小值。
- 高于最大值的值被视为最大值。
分类 如果将影响对话设置为开,那么机器人的行为可能会根据插槽中的值而发生变化。 未在值字段中指定的所有值均被视为其他 。
布尔值 如果将影响对话设置为开,则机器人的行为可能会根据插槽设置为真 、假还是空而有所变化。 空槽不会自动充当假值。 您可以训练机器人识别“是”为真,“否”为假。
任何 与联络中心的坐席、IVR 或机器人交互的人员。收集数据,任何值插槽都可能是一个不错的选择。这种类型的插槽无法用于影响机器人的行为。
- 要限制该插槽,请为该插槽选择意图限制或表单限制。 系统将自动保存更改。在此步骤中了解有关字段的更多信息
字段 详细信息 意图限制 使用下拉列表选择一项或多项限制插槽填充的意图。 仅当识别了选定的意图时,该插槽才会被填充。
该字段仅适用于“从消息”填充方法。
表单限制 使用下拉列表选择应使用此插槽的一个或多个表单。 该插槽将仅从选定的表单填充。
该字段仅适用于“从意图”和“从消息”填充方法。
创建从意图填充的插槽
当机器人识别出指定的意图![]() 联系人所说/所输入内容背后的含义或目的;联系人想要传达或达成的事情。时,您可以创建用预定义值填充的插槽。 基于意图的插槽可具有多个预定义值,这些值根据交互期间发生的指定意图来填充插槽。 您可以将这些值映射到插槽配置中的相应意图。
联系人所说/所输入内容背后的含义或目的;联系人想要传达或达成的事情。时,您可以创建用预定义值填充的插槽。 基于意图的插槽可具有多个预定义值,这些值根据交互期间发生的指定意图来填充插槽。 您可以将这些值映射到插槽配置中的相应意图。
- 在 CXone Mpower 中单击应用程序选择器 并选择Bot Builder。
- 单击您要使用的机器人。
- 单击左侧图标菜单中的对话框 。
- 在右侧窗格中,单击插槽。
-
向下滚动到“从意图”部分,然后单击新建插槽来选择填充方法。
- 输入新插槽的名称,然后按 Enter。
-
单击插槽名称进行编辑。
-
选择插槽类型,如果插槽类型支持它,则指示您是否希望此插槽影响对话。
在此步骤中了解有关字段的更多信息
字段 详细信息 文本
如果您将影响对话设置为开,则根据该插槽的内容,机器人的行为可能不同。号码 如果将影响对话设置为开,那么机器人的行为可能会根据插槽中的值而发生变化:
- 低于最小值的值被视为最小值。
- 高于最大值的值被视为最大值。
分类 如果将影响对话设置为开,那么机器人的行为可能会根据插槽中的值而发生变化。 未在值字段中指定的所有值均被视为其他 。
布尔值 如果将影响对话设置为开,则机器人的行为可能会根据插槽设置为真 、假还是空而有所变化。 空槽不会自动充当假值。 您可以训练机器人识别“是”为真,“否”为假。
任何 与联络中心的坐席、IVR 或机器人交互的人员。收集数据,任何值插槽都可能是一个不错的选择。这种类型的插槽无法用于影响机器人的行为。
-
单击添加值映射。
-
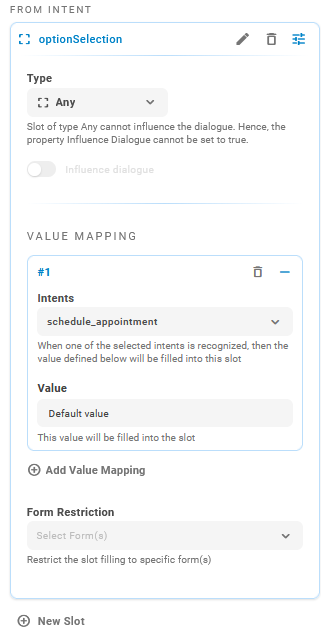
单击无意图 - 默认值可配置新值映射。
-
选择意图并指定要映射的值。 系统将自动保存更改。
在此步骤中了解有关字段的更多信息
字段 详细信息 意图 使用下拉列表选择与此插槽相关联的一个或多个意图。 当在对话中识别出所选意图之一时,您定义的值被填入插槽中。
该字段仅适用于“从意图”填充方法。
值 输入您想要在识别意图时填充到插槽中的值。
-
如果您希望在识别其他意图时用值填充插槽,请添加更多值映射。
-
如果您希望将此插槽限制于仅在对话中使用所选表单时才填充,请从表单限制下拉列表中选择一个或多个表单。
- 完成更改后,单击训练和暂存,以更新您的机器人模型 经过训练和上演的机器人版本,以便测试您的更改。
创建从消息填充的插槽
您可以创建一个槽来保存联系人下一个话语![]() 联系人所说或输入的内容。的文本。 有一个系统消息插槽可保存联系人的最新消息。 您可以在对话中使用该插槽。 但是,您无法更改其配置。 如果您想自定义该插槽的工作方式,您可以创建自己的基于消息的插槽。
联系人所说或输入的内容。的文本。 有一个系统消息插槽可保存联系人的最新消息。 您可以在对话中使用该插槽。 但是,您无法更改其配置。 如果您想自定义该插槽的工作方式,您可以创建自己的基于消息的插槽。
- 在 CXone Mpower 中单击应用程序选择器 并选择Bot Builder。
- 单击您要使用的机器人。
- 单击左侧图标菜单中的对话框 。
- 在右侧窗格中,单击插槽。
-
向下滚动到“从消息”部分,然后单击新建插槽来选择填充方法。
- 输入新插槽的名称,然后按 Enter。
-
单击插槽名称进行编辑。
-
选择插槽类型,如果插槽类型支持它,则指示您是否希望此插槽影响对话。
在此步骤中了解有关字段的更多信息
字段 详细信息 文本
如果您将影响对话设置为开,则根据该插槽的内容,机器人的行为可能不同。任何 与联络中心的坐席、IVR 或机器人交互的人员。收集数据,任何值插槽都可能是一个不错的选择。这种类型的插槽无法用于影响机器人的行为。
- 要限制何时可以填充此插槽,请为该插槽设置意图限制或表单限制。 系统将自动保存更改。在此步骤中了解有关字段的更多信息
字段 详细信息 意图限制 使用下拉列表选择一项或多项限制插槽填充的意图。 仅当识别了选定的意图时,该插槽才会被填充。
该字段仅适用于“从消息”填充方法。
表单限制 使用下拉列表选择应使用此插槽的一个或多个表单。 该插槽将仅从选定的表单填充。
该字段仅适用于“从意图”和“从消息”填充方法。
-
完成更改后,单击训练和暂存,以更新您的机器人模型
经过训练和上演的机器人版本,以便测试您的更改。
创建自定义插槽
自定义插槽一般保存基于业务逻辑的信息。 例如,通过 API 调用您的 CRM 或其他第三方应用程序检索到的数据。 在故事、规则或回退![]() 指机器人在对话轮次中可执行的操作,例如发送消息或填充信息槽位。或流中,将自定义槽与“填充槽”机器人作结合使用。
指机器人在对话轮次中可执行的操作,例如发送消息或填充信息槽位。或流中,将自定义槽与“填充槽”机器人作结合使用。
您不能将意图或表单限制分配给自定义插槽。
- 在 CXone Mpower 中单击应用程序选择器 并选择Bot Builder。
- 单击您要使用的机器人。
- 单击左侧图标菜单中的对话框 。
- 在右侧窗格中,单击插槽。
-
向下滚动到“自定义”部分,然后单击新建插槽来选择填充方法。
-
配置插槽类型,如果插槽类型支持它,则指示您是否希望此插槽影响对话。 系统将自动保存更改。
在此步骤中了解有关字段的更多信息
字段 详细信息 文本
如果您将影响对话设置为开,则根据该插槽的内容,机器人的行为可能不同。号码 如果将影响对话设置为开,那么机器人的行为可能会根据插槽中的值而发生变化:
- 低于最小值的值被视为最小值。
- 高于最大值的值被视为最大值。
分类 如果将影响对话设置为开,那么机器人的行为可能会根据插槽中的值而发生变化。 未在值字段中指定的所有值均被视为其他 。
布尔值 如果将影响对话设置为开,则机器人的行为可能会根据插槽设置为真 、假还是空而有所变化。 空槽不会自动充当假值。 您可以训练机器人识别“是”为真,“否”为假。
任何 与联络中心的坐席、IVR 或机器人交互的人员。收集数据,任何值插槽都可能是一个不错的选择。这种类型的插槽无法用于影响机器人的行为。
-
完成更改后,单击训练和暂存,以更新您的机器人模型
经过训练和上演的机器人版本,以便测试您的更改。