

The sections on this page describe how to configure and enable NiCE CXone Agent Workspace (Agent) features for agents. You can also set up desktop profiles to enable and disable basic Agent Workspace (Agent) features for teams of agents.
Configure Agent Login Options
- In NiCE CXone, click the app selector
 and select Admin.
 - Go to Security Settings > Roles and Permissions.
- Select the role assigned to your agents who use Agent Workspace (Agent).
- Click the Permissions tab.
- Click ACD.
- Enable at least one of these permissions to specify the options agents see when logging in:
- Set Phone Number: Prompts agents to enter a phone number to log in to Agent Workspace (Agent). Found in the Agent section.
- Set Station ID: Prompts agents to enter a station ID to log in to Agent Workspace (Agent). Found in the Agent section.
- Integrated Softphone: Allows agents to use Integrated Softphone to handle contacts in Agent Workspace (Agent). Found in the
- Click Save at the top.
When training your agents, teach them to always log out from the application when they're done working. Closing the browser window does not automatically log them out.
Configure Conference
There are three options for what happens when a third, fourth, and so on party is added to a conference:
-
The new party is automatically added to the conference.
-
The new party is added to a consult
 Allows you to speak privately to a new party before adding them to a conference. and the existing parties in the conference are put on hold. The agent can then add the new party to the conference.
 -
The new party is added to a consult and the existing parties in the conference can keep talking. The agent can then add the new party to the conference.
To configure this, contact your account representative. They can configure a system setting to change the default conference behavior.
Configure Digital Queues
You can select which Digital Experience (DX) queues![]() Digital Experience (DX) equivalent of a skill; routes each contact to an agent assigned to handle that type of contact. are available to which agents.
Digital Experience (DX) equivalent of a skill; routes each contact to an agent assigned to handle that type of contact. are available to which agents.
- Click the app selector and select ACD.
- Go to Digital > Roles.
- Click Edit
 for the role assigned to your agents who use Agent Workspace (Agent).
 -
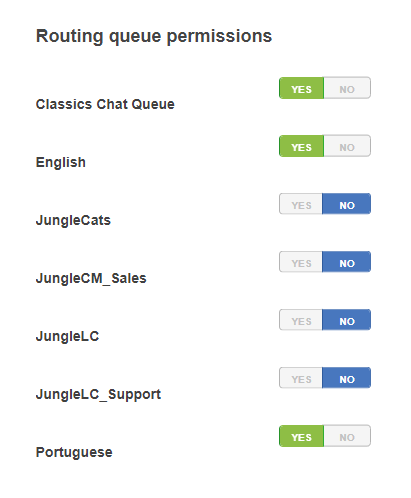
Scroll down to the Routing queue permissions section. Click Yes for each queue you want to enable. Click No for the queues you want to disable.
- Scroll down to the bottom and click Save.
Configure Inactivity Timeout
You can end an agent's session in Agent Workspace (Agent) when the app has been inactive for a certain amount of time.
The agent application is inactive if NiCE CXone loses its connection to it. This can happen if internet connection is lost or the agent closes the app. Inactive does not mean that the agent hasn't interacted with the app.
- In NiCE CXone, click the app selector and select ACD.
- Go to ACD Configuration > Business Units.
- In the Details tab, click Edit.
- Scroll down to the Browser Inactivity Timeout section.
- Enable Permit Logout Agent with Browser Inactivity.
- In the Browser Inactivity Timeout field, enter the number of seconds, 150 to 7200, that Agent Workspace (Agent) can be inactive before the session ends. Numbers outside this range produce an error and you can't save your business unit profile.
- Click Done at the top.
Configure WebHID Policy for Jabra Headsets
You can set up a WebHID browser administrator policy to connect Jabra headsets to Agent Workspace (Agent). This removes the need for agents to do it manually. You can do this in Google Chrome or Microsoft Edge. For technical details, see this Jabra documentation ![]() .
.
Enable Agents to Choose Their Location
Content in this section is for a product or feature in controlled release (CR). If you are not part of the CR group and would like more information, contact your account representative.
Agents can select their location when they log in to Agent Workspace (Agent). A drop-down list of locations appears in the Voice Preferences screen. You can configure the locations in this list in Location Definitions in Admin. Your account representative must enable this for your system.
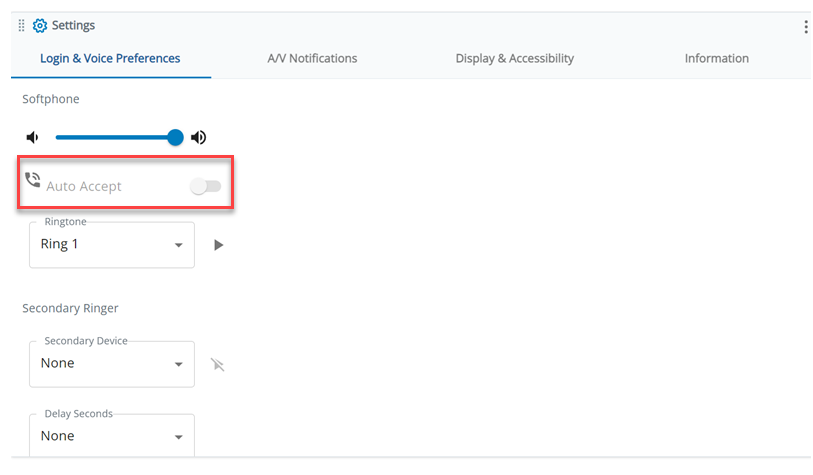
Enable Auto Accept
If your agents use Integrated Softphone, you can enable auto accept so that inbound calls are automatically accepted. You can also enable agents to use a setting in Agent Workspace (Agent) called Auto Accept. That setting allows them to turn auto accept on and off.
However, if Require Manual Agent Accept is enabled for the inbound voice skill, it overrides Auto Accept when the agent leg![]() Your audio connection to NiCE CXone for calls and voicemails. is connected.
Your audio connection to NiCE CXone for calls and voicemails. is connected.
- In NiCE CXone, click the app selector and select Admin.
-
Go to Security Settings > Roles and Permissions.
-
Open the agent's role.
-
Click the Permissions tab, then click ACD.
-
Scroll down to the app section.
-
To force auto-accept, enable the Integrated SoftPhone Auto-AcceptEnable permission. Do not enable the Agent Config permission.
-
To enable agents to toggle auto-accept on and off, enable the Integrated SoftPhone Auto-AcceptEnable and Agent Config permissions.
-
-
Click Save at the top.
Enable Co-Browse
Follow these steps to enable co-browse for voice or digital skills.
Enable Customer Card
You can enable customer cards to provide agents with information to help them handle contacts.
-
Make sure Digital Engagement and dynamic delivery are enabled for your business unit.
-
If you want to enable customer cards for calls, add a CC CREATE Studio action to your voice script.
-
Click the app selector
and select Admin. -
Click Employees. Select an employee profile to open it.
-
On the General tab, click the drop-down under Attributes. Scroll down to the end of the list and select the checkbox for Customer Card.
-
Click Save at the top.
Enable CRM Records in Customer Card
You can show agents CRM![]() Third-party systems that manage such things as contacts, sales information, support details, and case histories. records related to the contact they're handling. These records appear in the customer card.
Third-party systems that manage such things as contacts, sales information, support details, and case histories. records related to the contact they're handling. These records appear in the customer card.
-
Make sure Digital Engagement and dynamic delivery are enabled for your organization.
-
Click the app selector
and select Admin. -
Click Employees. Select an employee profile to open it.
-
On the General tab, click the drop-down under Attributes. Scroll down to the end of the list and select the checkboxes for Agent Integrations and Customer Card.
-
Click Save at the top.
Enable Delete Commitments
You can enable agents to delete scheduled commitments![]() Reminders created by agents to make a follow-up call to a contact..
Reminders created by agents to make a follow-up call to a contact..
- In NiCE CXone, click the app selector and select ACD.
- Go to ACD Configuration > Business Units.
- In the Details tab, click Edit.
- Scroll down to the Agent Settings section.
- In the drop-down next to Delete Commitments, choose one of the following:
- Can Remove - With Notes: The agent can delete the commitment, but only if they enter notes explaining why they deleted it.
- Can Remove - Without Notes: The agent can delete the commitment without entering any notes.
- Click Done at the top.
Enable Delete Message Content and Author Name
You can enable agents to delete the content of inbound and outbound messages. You can also enable them to delete the name of the author of inbound messages. Like masking a call, this allows them to hide sensitive information, such as account numbers and personal ID numbers.
This is supported for all digital channels![]() Any channel, contact, or skill associated with Digital Experience (DX).. For chat, message content and author names are deleted for both the agent and the contact
Any channel, contact, or skill associated with Digital Experience (DX).. For chat, message content and author names are deleted for both the agent and the contact![]() The person interacting with an agent, IVR, or bot in your contact center.. They are deleted on the contact's side when the contact refreshes the chat. For all other channels, content and author names are only deleted on the agent's side.
The person interacting with an agent, IVR, or bot in your contact center.. They are deleted on the contact's side when the contact refreshes the chat. For all other channels, content and author names are only deleted on the agent's side.
- Click the app selector and select ACD.
- Go to Digital > Roles.
- Click Edit for the role assigned to your agents who use Agent Workspace (Agent).
- Under Care Module detail permissions, enable Can erase message content and user name.
- Scroll down to the bottom and click Save.
Enable Integrated Softphone
-
Click the app selector
and select Admin. -
Go to Security Settings > Roles and Permissions.
-
Select the role assigned to your agents who use Agent Workspace (Agent).
-
Click the Permissions tab, then click ACD.
-
Scroll down to
-
Set Integrated Softphone as On.
-
Set the Integrated Softphone Auto-Accept setting to specify whether Integrated Softphone answers calls for your agents.
-
Enable is not selected: Auto-accept is off.
-
Enable is selected and Agent Config is not selected: Auto-accept is on.
-
Enable and Agent Config are both selected: Auto-accept is enabled by default, but the agent can toggle it on and off in the agent application.
-
-
Click Save.
Enable Launch from NiCE CXone App Selector
You can enable agents to launch Agent Workspace (Agent) from the app selector ![]() inside NiCE CXone.
inside NiCE CXone.
- In NiCE CXone, click the app selector and select Admin.
-
Go to Security Settings > Roles and Permissions.
-
Open the agent's role.
-
Click the Permissions tab, then click ACD.
-
Scroll down to the app section. Enable the Launch Agent Workspace (Agent) permission.
-
Click Save at the top.
Enable Mask
- In NiCE CXone, click the app selector and select Admin.
-
Go to Security Settings > Roles and Permissions.
-
Open the role assigned to your agents who use Agent Workspace (Agent).
-
Click the Permissions tab, then click ACD.
-
Scroll down to the app section. Enable the Masking permission.
-
Click Save at the top.
Enable Multiparty Conferencing
You can enable agents to conference with more than two additional parties.
- In NiCE CXone, click the app selector and select Admin.
-
Go to Security Settings > Roles and Permissions.
-
Open the role assigned to your agents who use Agent Workspace (Agent).
-
Click the Permissions tab, then click ACD.
-
Scroll down to the app section, and select the Multiparty Conferencing View permission.
-
Click Save.
You can set a limit for the number of parties that can be in a conference call. This is configured in the Details tab of your Business Unit settings (ACD > ACD Configuration > Business Units > Maximum Number of Conference Parties (including Agent)).
Enable Mute
-
In NiCE CXone, click the app selector
and select Admin. -
Go to Security Settings > Roles and Permissions.
-
Open the role assigned to your agents who use Agent Workspace (Agent).
-
Click the Permissions tab, then click ACD.
-
Scroll down to the app section. Enable the Mute permission.
-
Click Save.
Enable AI Noise Cancellation
Follow these steps to enable AI Noise Cancellation for your system.
Enable Quick Responses
Enable Digital Quick Responses
If you haven't already, create Digital quick responses before following these steps. Agent Workspace (Agent)
-
In NiCE CXone, click the app selector
and select ACD. -
Go to Digital > Quick Responses.
-
From the options on the right, click Channels for the quick reply you want to edit.
-
In the All Channels section, click Add next to the channels you want to add to the quick reply. You can search for a channel by entering its name in the field at the top and clicking Search.
-
The channels you add appear in the Selected Channels section, and your changes are saved automatically.
Enable Unified Quick Responses
Content in this section is for a product or feature in controlled release (CR). If you are not part of the CR group and would like more information, contact your account representative.
There are multiple places in the ACD application where you can configure quick responses for different channels![]() Various voice and digital communication mediums that facilitate customer interactions in a contact center.. If enabled for your system, you can configure quick responses for all channels in a single location: ACD > ACD Settings > Quick Responses. The quick responses you create here appear in Agent Workspace (Agent). Agent Workspace (Agent) can display more than 1000 of these quick responses. You can migrate digital quick responses and rich messages to this location. You cannot migrate ACD quick replies. When you transition to unified quick responses, agents' favorite quick responses reset.
Various voice and digital communication mediums that facilitate customer interactions in a contact center.. If enabled for your system, you can configure quick responses for all channels in a single location: ACD > ACD Settings > Quick Responses. The quick responses you create here appear in Agent Workspace (Agent). Agent Workspace (Agent) can display more than 1000 of these quick responses. You can migrate digital quick responses and rich messages to this location. You cannot migrate ACD quick replies. When you transition to unified quick responses, agents' favorite quick responses reset.
-
In NiCE CXone, click the app selector
and select ACD. -
Go to ACD Settings > Quick Responses.
-
Click New Quick Response.
-
Select the type of quick response you want to create, then click Create.
-
Fill in the fields according to the type of quick response you're creating.
-
Click Finish.
Enable Record
-
In NiCE CXone, click the app selector
and select Admin. -
Go to Security Settings > Roles and Permissions.
-
Select the role assigned to your agents who use Agent Workspace (Agent).
-
Click the Permissions tab, then click ACD.
-
Scroll down to the app section. Enable the Record Contact permission.
-
To allow agents to stop recording, enable the Stop Recording permission. This feature is licensed separately.
-
Click Save.
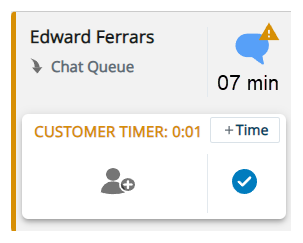
Enable Response Timers
You can enable response timers for digital![]() Any channel, contact, or skill associated with Digital Experience (DX). skills
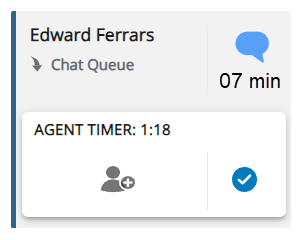
Any channel, contact, or skill associated with Digital Experience (DX). skills![]() Used to automate delivery of interactions based on agent skills, abilities, and knowledge.. For each interaction, these timers show agents the amount of time that has passed since the agent or contact sent a message. There are two types of response timers:
Used to automate delivery of interactions based on agent skills, abilities, and knowledge.. For each interaction, these timers show agents the amount of time that has passed since the agent or contact sent a message. There are two types of response timers:
-
Agent Response: Indicates how long the contact has been waiting for the agent to respond. When fifty percent of the agent's allotted time to respond is left, the alert icon
 appears in yellow. When the timer runs out, the alert icon
  appears in red.
 -
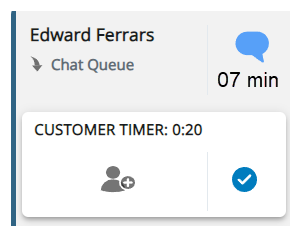
Customer Response: Indicates how long the agent has been waiting for the contact to respond.
When fifty percent of the contact's allotted time to respond is left, the alert icon
appears in yellow. The agent can give the contact more time to respond by clicking +Time, if you enable this for them. When the timer runs out, the interaction is removed from the agent's inbox. If the contact responds after this, the interaction is re-assigned to an agent.
-
In NiCE CXone, click the app selector
and select ACD. -
Go to Contact Settings > ACD Skills.
-
Select the digital skill you want to edit.
-
In the Details tab, click Edit.
-
To configure Agent Response timers, complete the fields in the Agent Response section:
-
Select the Enabled checkbox.
-
Enter an amount of time in the Agent First Response field. The timer will count down from this value when the interaction is first assigned to the agent.
-
Enter an amount of time in the Follow On Response field. The timer will count down from this value after each time the contact responds to the agent.
-
-
To configure Customer Response timers, complete the fields in the Customer Response section:
-
Click Done at the top.
Hide Caller Phone Number
You can hide contacts'![]() The person interacting with an agent, IVR, or bot in your contact center. phone numbers from agents and supervisors. Instead of seeing the contact's ANI
The person interacting with an agent, IVR, or bot in your contact center. phone numbers from agents and supervisors. Instead of seeing the contact's ANI![]() Also known as caller ID. Listed phone number of an incoming voice call., they see the label "Restricted." This only applies to the interactions menu.
Also known as caller ID. Listed phone number of an incoming voice call., they see the label "Restricted." This only applies to the interactions menu.
- In NiCE CXone, click the app selector and select Admin.
-
Go to Security Settings > Roles and Permissions.
-
Open the agent's role.
-
Click the Permissions tab, then click ACD.
-
Scroll down to the app section. Enable the Hide Caller Phone Number permission.
-
Click Save at the top.
Hide Inbound Hangup
You can hide the Hang Up  option from agents' voice control panels. This only applies to inbound calls. In Agent Workspace (Agent), that includes agent-to-agent calls, consults, conferences, and transfers.
- In NiCE CXone, click the app selector and select Admin.
-
Go to Security Settings > Roles and Permissions.
-
Open the agent's role.
-
Click the Permissions tab, then click ACD.
-
Scroll down to the app section. Enable the Hide Inbound Hangup permission.
-
Click Save at the top.
Require Manual Accept
You can require agents to manually Accept or Reject inbound calls and digital![]() Any channel, contact, or skill associated with Digital Experience (DX). interactions.
Any channel, contact, or skill associated with Digital Experience (DX). interactions.
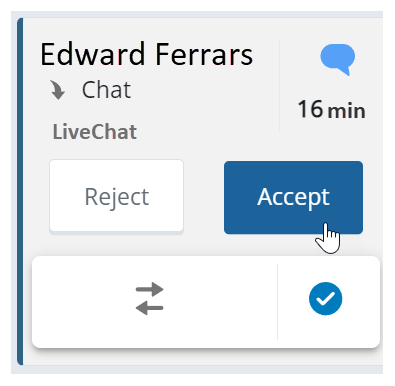
Require Manual Accept for Calls
You can enable a skill![]() Used to automate delivery of interactions based on agent skills, abilities, and knowledge. setting for inbound voice skills called Require Manual Agent Accept. When that setting is enabled, agents see options to Accept or Reject inbound calls when their agent leg
Used to automate delivery of interactions based on agent skills, abilities, and knowledge. setting for inbound voice skills called Require Manual Agent Accept. When that setting is enabled, agents see options to Accept or Reject inbound calls when their agent leg![]() Your audio connection to NiCE CXone for calls and voicemails. is connected.
Your audio connection to NiCE CXone for calls and voicemails. is connected.
-
In NiCE CXone, click the app selector
and select ACD. -
Go to Contact Settings > ACD Skills.
-
Select the inbound voice skill you want to edit.
-
In the Details tab, click Edit.
-
Enable Require Manual Agent Accept.
-
Click Done at the top.
If your agents use Integrated Softphone, you can enable them to use a setting in Agent Workspace (Agent) called Auto Accept. When agents turn on Auto Accept, inbound calls are automatically accepted. However, Require Manual Agent Accept overrides Auto Accept when the agent leg is connected.
| Auto Accept | Require Manual Agent Accept | Inbound Call Behavior |
|---|---|---|
| Enabled | Enabled |
When the agent leg is connected and Require Manual Agent Accept is enabled, Agent Workspace (Agent) shows options to Accept or Reject the call. When the agent leg is disconnected and Auto Accept is enabled, calls are automatically accepted. |
|
Enabled |
Disabled |
All calls are automatically accepted. |
| Disabled | Enabled |
When the agent leg is connected, Agent Workspace (Agent) shows options to Accept or Reject the call. If the agent leg is disconnected, the agent must connect it to answer the call. |
| Disabled | Disabled |
When the agent leg is connected, calls are automatically accepted. If the agent leg is disconnected, the agent must connect it to answer the call. |
Require Manual Accept for Digital Interactions
By default, digital![]() Any channel, contact, or skill associated with Digital Experience (DX). interactions are automatically accepted. You can change this by enabling a skill setting.
Any channel, contact, or skill associated with Digital Experience (DX). interactions are automatically accepted. You can change this by enabling a skill setting.
-
In NiCE CXone, click the app selector
and select ACD. -
Go to Contact Settings > ACD Skills.
-
Select the digital skill you want to edit.
-
In the Details tab, click Edit.
-
Enable Accept / Reject.
-
Click Done at the top.
Restrict Access to ACD Skills
You can restrict which ACD skills![]() Used to automate delivery of interactions based on agent skills, abilities, and knowledge. appear to agents in the Agent Workspace (Agent) Directory
Used to automate delivery of interactions based on agent skills, abilities, and knowledge. appear to agents in the Agent Workspace (Agent) Directory ![]() .
.
-
Assign skills to a campaign. These are the skills you want agents to see.
-
Follow these steps to restrict agents' access to the skills in that campaign only. Be sure to use the Custom setting.