

ScreenAgent ![]() NiCE ScreenAgent is a service that runs on agent desktops that require screen recording. is available if you have these licenses:
NiCE ScreenAgent is a service that runs on agent desktops that require screen recording. is available if you have these licenses:
Install ScreenAgent on computers to record or monitor activity on an agent's screen during an interaction. ScreenAgent runs in the background and automatically records according to the recording policies (see Recording Management (CXone)). Supervisors and evaluators can also monitor an agent’s activity during an interaction.
You can install ScreenAgent on agents' computers, or in a virtual desktop infrastructure (VDI) environment.
To ensure that Recording Management (CXone) Workforce Engagement (WEM) delivers a seamless customer experience that utilizes the most up-to-date technology, make sure you are using the supported ScreenAgent versions:
-
ScreenAgent for Windows versions 3.0.22 or later
-
ScreenAgent for MAC versions 3.0.1 or later
If you are using older ScreenAgent versions, you will need to upgrade all your users to ScreenAgent 3.0.x versions. Older versions are not supported and might not record your agents' screens.
You can find the latest version of ScreenAgent in the downloads page.
You can Check ScreenAgent Connectivity before or after installation.
For tenants configured with 100% screen recording, the screen recording starts up to 25 seconds after the agent logs in. Screen recording does not work properly during these 25 seconds.
You can watch a video that gives an overview of the installation of ScreenAgent on an agent's computer. The video includes the prerequisites and installation steps.
For more information, see FAQs for ScreenAgent.
For a list of features added to previous ScreenAgent releases, see ScreenAgent: Cumulative Release Notes.
Supported VDIs
For virtual desktop infrastructure (VDI) environment, supported VDIs include:
-
VMware Horizon
-
Citrix Virtual Desktops (formerly XenDesktop)
-
Citrix Virtual Apps (formerly XenApp) - Supported in on-premises environments only
-
Non-persistent VDI environments
-
Multi-session environments
-
Terminal-server type VDI environments
-
AVD Remote Apps (requires the VDI Remote Apps Workaround)
VMware Horizon doesn’t require any special configuration. For other VDI environments, see prerequisites.
Prerequisites
Before installing ScreenAgent, make sure to:
-
Check the connectivity requirements for your region with the connectivity wizard.
- HTTPS (TCP) Port 443 (Screen Recording & Monitoring APIs)
- UDP Port 443 or 3478 (Screen Monitoring Coturn Server)
- Localhost Port 31322 (ScreenAgent)
- cxone.niceincontact.com (Screen Recording & Monitoring APIs)
- na1.nice-incontact.com (Screen Recording & Monitoring APIs)
- na1-ws.nice-incontact.com (Screen Recording & Monitoring APIs)
- turn.nice-incontact.com (Screen Monitoring Coturn Server)
- production-us-west-2-screen-recording-bucket.s3.us-west-2.amazonaws.com (Screen Recording Media S3 Bucket)
- production-us-west-2-mcr-screen-agent-log-files-bucket.s3.us-west-2.amazonaws.com (ScreenAgent Logs S3 Bucket)
- 34.211.171.75 (Screen Monitoring Coturn Server)
- 52.11.151.34 (Screen Monitoring Coturn Server)
- 34.223.78.22 (Screen Monitoring Coturn Server)
- 34.223.78.23 (Screen Monitoring Coturn Server)
- 54.71.31.58 (Screen Monitoring Coturn Server)
- 54.148.252.141 (Screen Monitoring Coturn Server)
- 100.20.210.76 (Screen Monitoring Coturn Server)
- HTTPS (TCP) Port 443 (Screen Recording & Monitoring APIs)
- UDP Port 443 or 3478 (Screen Monitoring Coturn Server)
- Localhost Port 31322 (ScreenAgent)
- cxone-gov.niceincontact.com (Screen Recording & Monitoring APIs)
- na2.niceincontact.com (Screen Recording & Monitoring APIs)
- na2-ws.niceincontact.com (Screen Recording & Monitoring APIs)
- turnna2.niceincontact.com (Screen Monitoring Coturn Server)
- production-fedramp-us-east-1-screen-recording-bucket.s3.us-east-1.amazonaws.com (Screen Recording Media S3 Bucket)
- production-fedramp-us-east-1-mcr-screen-agent-log-files-bucket.s3.us-east-1.amazonaws.com (ScreenAgent Logs S3 Bucket)
- 54.91.143.245 (Screen Monitoring Coturn Server)
- 18.210.65.12 (Screen Monitoring Coturn Server)
- 35.172.47.250 (Screen Monitoring Coturn Server)
- Ports (Inbound & Outbound):
- HTTPS (TCP) Port 443 (Screen Recording & Monitoring APIs)
- UDP Port 443 or 3478 (Screen Monitoring Coturn Server)
- Localhost Port 31322 (ScreenAgent)
- cxone.niceincontact.com (Screen Recording & Monitoring APIs)
- ca1.niceincontact.com (Screen Recording & Monitoring APIs)
- ca1-ws.niceincontact.com (Screen Recording & Monitoring APIs)
- turnca1.niceincontact.com (Screen Monitoring Coturn Server)
- production-ca-ca-central-1-screen-recording-bucket.s3.ca-central-1.amazonaws.com (Screen Recording Media S3 Bucket)
- production-ca-ca-central-1-mcr-screen-agent-log-files-bucket.s3.ca-central-1.amazonaws.com (ScreenAgent Logs S3 Bucket)
- 15.222.191.215 (Screen Monitoring Coturn Server)
- 3.97.241.68 (Screen Monitoring Coturn Server)
- 15.223.143.203 (Screen Monitoring Coturn Server)
- HTTPS (TCP) Port 443 (Screen Recording & Monitoring APIs)
- UDP Port 443 or 3478 (Screen Monitoring Coturn Server)
- Localhost Port 31322 (ScreenAgent)
-
cxone.niceincontact.com (Screen Recording & Monitoring APIs)
-
ae1.nicecxone.com (Screen Recording & Monitoring APIs)
-
ae1-ws.nicecxone.com (Screen Recording & Monitoring APIs)
-
turnae1.nicecxone.com (Screen Monitoring Coturn Server)
-
production-ae-me-central-1-screen-recording-bucket.s3.me-central-1.amazonaws.com (Screen Recording Media S3 Bucket)
-
production-ae-me-central-1-mcr-screen-agent-log-files-bucket.s3.me-central-1.amazonaws.com (ScreenAgent Logs S3 Bucket)
- 40.172.0.83 (Screen Monitoring Coturn Server)
- 3.29.52.132 (Screen Monitoring Coturn Server)
- 3.29.82.25 (Screen Monitoring Coturn Server)
-
HTTPS (TCP) Port 443 (Screen Recording & Monitoring APIs)
-
UDP Port 443 or 3478 (Screen Monitoring Coturn Server)
-
Localhost Port 31322 (ScreenAgent)
-
cxone.niceincontact.com (Screen Recording & Monitoring APIs)
-
kr1.nicecxone.com (Screen Recording & Monitoring APIs)
-
kr1-ws.nicecxone.com (Screen Recording & Monitoring APIs)
-
turnkr1.nicecxone.com (Screen Monitoring Coturn Server)
-
production-kr-ap-northeast-2-screen-recording-bucket.s3.ap-northeast-2.amazonaws.com (Screen Recording Media S3 Bucket)
-
production-kc-ap-northeast-2-mcr-screen-agent-log-files-bucket.s3.ap-northeast-2.amazonaws.com (ScreenAgent Logs S3 Bucket)
-
3.34.240.0 (Screen Monitoring Coturn Server)
-
43.203.96.250 (Screen Monitoring Coturn Server)
-
43.200.43.214 (Screen Monitoring Coturn Server)
- HTTPS (TCP) Port 443 (Screen Recording & Monitoring APIs)
- UDP Port 443 or 3478 (Screen Monitoring Coturn Server)
- Localhost Port 31322 (ScreenAgent)
- cxone.niceincontact.com (Screen Recording & Monitoring APIs)
- jp1.niceincontact.com (Screen Recording & Monitoring APIs)
- jp1-ws.niceincontact.com (Screen Recording & Monitoring APIs)
- turnjp1.niceincontact.com (Screen Monitoring Coturn Server)
- production-jp-ap-northeast-1-screen-recording-bucket.s3.ap-northeast-1.amazonaws.com (Screen Recording Media S3 Bucket)
- production-jp-ap-northeast-1-mcr-screen-agent-log-files-bucket.s3.ap-northeast-1.amazonaws.com (ScreenAgent Logs S3 Bucket)
- 54.64.233.114 (Screen Monitoring Coturn Server)
- 35.75.249.83 (Screen Monitoring Coturn Server)
- 52.198.87.44 (Screen Monitoring Coturn Server)
- HTTPS (TCP) Port 443 (Screen Recording & Monitoring APIs)
- UDP Port 443 or 3478 (Screen Monitoring Coturn Server)
- Localhost Port 31322 (ScreenAgent)
- cxone.niceincontact.com (Screen Recording & Monitoring APIs)
- jo1.nicecxone.com (Screen Recording & Monitoring APIs)
- jo1-ws.nicecxone.com (Screen Recording & Monitoring APIs)
- turnjo1.nicecxone.com (Screen Monitoring Coturn Server)
- production-jo-ap-northeast-3-screen-recording-bucket.s3.ap-northeast-3.amazonaws.com/ (Screen Recording Media S3 Bucket)
- production-jo-ap-northeast-3-mcr-screen-agent-log-files-bucket.s3.ap-northeast-3.amazonaws.com (ScreenAgent Logs S3 Bucket)
- 15.152.4.104 (Screen Monitoring Coturn Server)
- 15.152.57.137 (Screen Monitoring Coturn Server)
- 13.208.73.118 (Screen Monitoring Coturn Server)
- HTTPS (TCP) Port 443 (Screen Recording & Monitoring APIs)
- UDP Port 443 or 3478 (Screen Monitoring Coturn Server)
- Localhost Port 31322 (ScreenAgent)
- cxone.niceincontact.com (Screen Recording & Monitoring APIs) au1.nice-incontact.com (Screen Recording & Monitoring APIs)
- au1-ws.nice-incontact.com (Screen Recording & Monitoring APIs) turnau.nice-incontact.com (Screen Monitoring Coturn Server)
- production-au-ap-southeast-2-screen-recording-bucket.s3.ap-southeast-2.amazonaws.com (Screen Recording Media S3 Bucket)
- production-au-ap-southeast-2-mcr-screen-agent-log-files-bucket.s3.ap-southeast-2.amazonaws.com (ScreenAgent Logs S3 Bucket)
- 13.54.117.130 (Screen Monitoring Coturn Server)
- 52.64.197.155 (Screen Monitoring Coturn Server)
- 52.64.148.178 (Screen Monitoring Coturn Server)
- HTTPS (TCP) Port 443 (Screen Recording & Monitoring APIs)
- UDP Port 443 or 3478 (Screen Monitoring Coturn Server)
- Localhost Port 31322 (ScreenAgent)
- nicecxone-sov1.au (Screen Recording & Monitoring APIs)
- au2.nicecxone-sov1.au (Screen Recording & Monitoring APIs)
- au2-ws.nicecxone-sov1.au (Screen Recording & Monitoring APIs)
- turnausov1.nicecxone-sov1.au (Screen Monitoring Coturn Server)
- production-ausov1-ap-southeast-2-screen-recording-bucket.s3.ap-southeast-2.amazonaws.com (Screen Recording Media S3 Bucket)
- production-ausov1-mcr-screen-agent-log-files-bucket.s3.ap-southeast-2.amazonaws.com (ScreenAgent Logs S3 Bucket)
- 13.55.156.71 (Screen Monitoring Coturn Server)
- 54.79.89.166 (Screen Monitoring Coturn Server)
- 52.62.132.250 (Screen Monitoring Coturn Server)
- HTTPS (TCP) Port 443 (Screen Recording & Monitoring APIs)
- UDP Port 443 or 3478 (Screen Monitoring Coturn Server)
- Localhost Port 31322 (ScreenAgent)
- cxone.niceincontact.com (Screen Recording & Monitoring APIs)
- eu1.niceincontact.com (Screen Recording & Monitoring APIs)
- eu1-ws.niceincontact.com (Screen Recording & Monitoring APIs)
- turneu.niceincontact.com (Screen Monitoring Coturn Server)
- production-de-eu-central-1-screen-recording-bucket.s3.eu-central-1.amazonaws.com (Screen Recording Media S3 Bucket)
- production-de-eu-central-1-mcr-screen-agent-log-files-bucket.s3.eu-central-1.amazonaws.com (ScreenAgent Logs S3 Bucket)
- 52.29.162.77 (Screen Monitoring Coturn Server)
- 3.120.92.220 (Screen Monitoring Coturn Server)
- 18.198.214.168 (Screen Monitoring Coturn Server)
- HTTPS (TCP) Port 443 (Screen Recording & Monitoring APIs)
- UDP Port 443 or 3478 (Screen Monitoring Coturn Server)
- Localhost Port 31322 (ScreenAgent)
- nicecxone-sov1.eu (Screen Recording & Monitoring APIs)
- eu2.nicecxone-sov1.eu (Screen Recording & Monitoring APIs)
- eu2-ws.nicecxone-sov1.eu (Screen Recording & Monitoring APIs)
- turneusov1.nicecxone-sov1.eu (Screen Monitoring Coturn Server)
- production-eusov1-eu-central-1-screen-recording-bucket.s3.eu-central-1.amazonaws.com (Screen Recording Media S3 Bucket)
- production-eusov1-mcr-screen-agent-log-files-bucket.s3.eu-central-1.amazonaws.com (ScreenAgent Logs S3 Bucket)
- 52.29.203.25 (Screen Monitoring Coturn Server)
- 52.28.224.228 (Screen Monitoring Coturn Server)
- 18.184.214.61 (Screen Monitoring Coturn Server)
- HTTPS (TCP) Port 443 (Screen Recording & Monitoring APIs)
- UDP Port 443 or 3478 (Screen Monitoring Coturn Server)
- Localhost Port 31322 (ScreenAgent)
- cxone.niceincontact.com (Screen Recording & Monitoring APIs)
- uk1.niceincontact.com (Screen Recording & Monitoring APIs)
- uk1-ws.niceincontact.com (Screen Recording & Monitoring APIs) turnuk1.niceincontact.com (Screen Monitoring Coturn Server)
- production-uk-eu-west-2-screen-recording-bucket.s3.eu-west-2.amazonaws.com (Screen Recording Media S3 Bucket)
- production-uk-eu-west-2-mcr-screen-agent-log-files-bucket.s3.eu-west-2.amazonaws.com (ScreenAgent Logs S3 Bucket)
- 3.11.179.145 (Screen Monitoring Coturn Server)
- 18.132.91.21 (Screen Monitoring Coturn Server)
- 35.179.206.132 (Screen Monitoring Coturn Server)
- HTTPS (TCP) Port 443 (Screen Recording & Monitoring APIs)
- UDP Port 443 or 3478 (Screen Monitoring Coturn Server)
- Localhost Port 31322 (ScreenAgent)
- nicecxone-sov1.uk (Screen Recording & Monitoring APIs)
- uk2.nicecxone-sov1.uk (Screen Recording & Monitoring APIs)
- uk2-ws.nicecxone-sov1.uk (Screen Recording & Monitoring APIs)
- turnuksov1.nicecxone-sov1.uk (Screen Monitoring Coturn Server)
- production-uksov1-eu-west-2-screen-recording-bucket.s3.eu-west-2.amazonaws.com (Screen Recording Media S3 Bucket)
- production-uksov1-mcr-screen-agent-log-files-bucket.s3.eu-west-2.amazonaws.com (ScreenAgent Logs S3 Bucket)
- 35.177.144.5 (Screen Monitoring Coturn Server)
- 3.11.73.118 (Screen Monitoring Coturn Server)
- 13.43.238.77 (Screen Monitoring Coturn Server)
-
If your site uses VDIs, make sure:
-
You're using ScreenAgent V3.x.x and up.
-
For Citrix virtual apps mode:
Citrix does not support the configuration of virtual IP loopback on cloud-hosted machines. This feature is essential for ScreenAgent's operation as a remote application, so it is only supported when Citrix is operating on an on-premise machine.
For more information, refer to the Citrix documentation.
-
Enable a Virtual IP Loopback policy. Add ScreenAgent.exe and Chrome.exe to the Virtual IP virtual loopback programs list. Keep in mind that each program must be listed on a separate line.
-
Install ScreenAgent on the Citrix Virtual Apps server.
-
-
-
In a non-persistent VDI environment:
-
Use ScreenAgent version 3.0.22 or higher.
-
Install ScreenAgent on the base image of the VDI.
-
Take a snapshot of the base image.
-
Distribute to all VDI instances.
-
-
For multi-session environments and terminal-server type VDI environments:
-
Use ScreenAgent version 3.0.22 or higher.
-
Configure ScreenAgent to work in OS Login mode.
-
Users need to log in to ScreenAgent with OS Login credentials.
The OS Login value for each employee profile must be unique. The OS Login value cannot be used for multiple employee profiles, even if some of the duplicate employee profiles are inactive. If multiple employee profiles have the same OS Login value, ScreenAgent will not run for any agent using that OS Login value.
-
If you are working in a multi-session or non-persistent VDI environments, and you encounter issues, contact NICE support to check whether your specific environment is supported.
VMware Horizon and Citrix virtual desktop mode don't require any special configuration.
-
-
Check the agent's computer configuration.
 Agent computer requirements
-
Microsoft .NET 4 or higher installed on the agent's computer.
-
One of the softphone solutions for agents:
-
CXone Agent
- Salesforce Agent
- MAX
- ChromeOS Agent
- Oracle Agent
- Microsoft Dynamics Agent
- ServiceNow
- Oracle Fusion
- Kustomer
- Zendesk
- Chrome browser extension
-
All certified CXone client solutions support Screen Recording for Voice.
-
Relevant computer specifications in Platform Requirements.
Keep in mind, if the computer configuration is set to full HD or 4K and the CPU usage is high, then a more powerful CPU (such as i5) may be required.
-
Port 31322 open. This port is only used for internal communication between ScreenAgent and MAX/Agent Workspace (Agent)/Salesforce Agent softphone on the agent's computer. Not required when using OS Login.
-
-
Make sure the user who is installing ScreenAgent (for example, the admin) has Admin privileges on the agent's computer.
-
Make sure the user who is installing ScreenAgent (for example, the admin) has these NiCE CXone permissions:
-
Can access support downloads: On, this allows you to access the Supports - Downloads page.
-
Access Key: Create, this is to manage access keys for your organization.
-
-
Generate an access key for ScreenAgent.
You can use the same access key for installing ScreenAgent on all agents' computers in your tenant.
The access key receives all of the permissions of the NiCE CXone user who generates it. If this user is an administrator, then anyone with the access key would have administrator privileges. So for security reasons, first create a NiCE CXone user and role for ScreenAgent, and then generate the key with the ScreenAgent user.
-
Create a role for the ScreenAgent service:
- Click the app selector
 and select Admin.
 -
Go to Security > Roles and Permissions.
-
Click New Role.
-
Give a name for the role, such as ScreenAgent access key.
-
Remove all permissions for the role, except Access Key and My Access Key.
-
Save & Activate the profile.
- Click the app selector
-
Create an employee for the ScreenAgent service:
- Click the app selector and select Admin.
-
Click Employees.
-
Click New Employee.
-
Give a name for the employee, such as ScreenAgent.
-
From the Primary Role drop-down list, select the ScreenAgent access key role you just created.
-
On the General tab, clear all the attributes.
-
Create the ScreenAgent employee. You can generate access keys only after you create the account.
- Click the app selector
-
Open the ScreenAgent employee again and go to the Security tab. Click Add access key to generate an access key.
-
Copy both the Access Key ID and Secret Access Key and save them somewhere safe. If you don't copy the Secret Access Key or if you lose it, you'll need to create a new one. Use this access key ID and secret access key when installing ScreenAgent on all agents' computers.
-
Activate the ScreenAgent employee account by clicking the Activate Account button in the activation email.
-
-
Download the ScreenAgent MSI:
-
Go to NiCE CXone, and log in as a user with the Can access support downloads permission.
-
Click your Username and select Support and Downloads.
-
Download the required MSI. Note where you download the MSI to, you'll need the file location later.
-
-
ScreenAgent supports five proxy authentication methods for screen recording—Basic, Digest, Kerberos, NTLM, and Negotiate. When using the proxy authentication method:
-
Make sure to set the proxy at the operating system level in the Proxy settings.
-
For Basic and Digest authentication method, you must set credentials in Windows Credential Manager.
-
There's no change in installation. However, if you want to use proxy for ScreenAgent without changing proxy at the operating system, you can use the direct proxy in the ScreenAgent installation.
-
Keep in mind, these authentication methods are only for screen recording and not for screen monitoring.
-
Ports (Inbound and Outbound)
FQDNS (Outbound)
IPs (Inbound and Outbound)
Ports (Inbound and Outbound)
FQDNS (Outbound)
IPs (Inbound and Outbound)
Ports (Inbound & Outbound)
FQDNS (outbound)
IPs (Inbound and Outbound)
Ports (Inbound and Outbound)
FQDNS (Outbound)
IPs (Inbound and Outbound)
Ports (Inbound and Outbound)
FQDNS (Outbound)
IPs (Inbound and Outbound)
Ports (Inbound and Outbound)
FQDNS (Outbound)
IPs (Inbound and Outbound)
Ports (Inbound and Outbound)
FQDNS (Outbound)
IPs (Inbound and Outbound)
Ports (Inbound and Outbound)
FQDNS (Outbound)
IPs (Inbound and Outbound)
Ports (Inbound and Outbound)
FQDNS (Outbound)
IPs (Inbound and Outbound)
Ports (Inbound and Outbound)
FQDNS (Outbound)
IPs (Inbound and Outbound)
Ports (Inbound and Outbound)
FQDNS (Outbound)
IPs (Inbound and Outbound)
Ports (Inbound and Outbound)
FQDNS (Outbound)
IPs (Inbound and Outbound)
Ports (Inbound and Outbound)
FQDNS (Outbound)
IPs (Inbound and Outbound)
Install ScreenAgent for Windows
You can install ScreenAgent using a deployment tool or install manually on each agent's computer.
If you're using a deployment tool, configure the installation to one of the following:
-
Run with user's rights (user mode/user context)—You don't have to restart the agent's computer.
-
Run with administrative rights—You must restart all agents' computers.
You can specify installation location:
-
By default, ScreenAgent is installed on the C drive under the \NICE-InContact\ScreenAgent folder. You can specify a different installation path in the installation command.
-
When upgrading to a later version, you can define a different installation path. The previous version is removed and the later version is installed in the specified location.
-
Reinstalling the same ScreenAgent version replaces the existing installation in the same location. To change the installation path, uninstall the existing instance and specify the required location on reinstallation.
Some ScreenAgent parameters can be changed after installation. See Change ScreenAgent Configuration. To update other installation parameters, reinstall the ScreenAgent client.
To upgrade ScreenAgent to a later version, install the ScreenAgent client. You do not need to uninstall the previous version. For details on what remains on the system after uninstalling ScreenAgent, see Post-Uninstallation Information.
When you upgrade or reinstall ScreenAgent, the installation automatically uses the existing configuration unless you specify different parameter settings. See Reinstall or upgrade with the current configuration. When you uninstall ScreenAgent, the configuration is not saved and you need to specify installation parameters when you upgrade or reinstall.
Upgrade or reinstall ScreenAgent when agents aren't being recorded. If an agent is on a call during the installation, screen recording stops for that call. After the installation completes, calls will record according to the recording policies and Studio scripts.
To install ScreenAgent:
-
Make sure all prerequisites are in place.
-
Open the command prompt as Administrator. In the command line, navigate to where you downloaded the MSI and enter the installation command with the relevant parameters:
Step-by-step instructions
-
Go to the folder where you downloaded the MSI, and copy the path to the folder. This is typically the %UserProfile%\downloads folder.
-
Run the command prompt as Administrator:
-
In Windows, click the Windows button and type cmd.
-
Right-click the Command Prompt tile and click Run as administrator.
-
-
Type cd/ and press Enter.
-
Type cd and paste your file location, then press Enter.
For example, cd %UserProfile%\downloads.
-
Copy and paste the command into the Command Prompt, and edit the installation parameters.
-
If you don't have a web proxy or the proxy is defined at OS level, use this command:
-
If you are using proxy authentication, and the proxy is not defined at OS level, use this command:
Example installation command (for no web proxy or when proxy is defined at the OS level):
msiexec /i ScreenAgent-64bit-3.0.37.msiINSTALL_PATH=d:\newdirACCESS_KEY_ID=ABCDEF12345==== ACCESS_KEY_SECRET=12345ABCDEF REGION_TYPE=na1RESOLVE_USER=osloginFRAME_PER_SECOND=5 RESOLUTION_LEVEL=high LOAD_CERTIFICATES=true STATISTICS=true /log install.log /quiet -
Reinstall or upgrade with the current configuration
Use this command:
msiexec /i ScreenAgent-<32|64>bit-<MSI version>.msi KEEP_CURRENT_CONFIG= true
-
If you are uninstalling before reinstalling, see Post-Uninstallation Information for details on residual files.
-
If all configurations were set in the previous installation, ScreenAgent is installed with all the existing configurations.
-
If some configurations were missing or not set in the previous installation, ScreenAgent is installed with the existing configurations and default values for missing parameters.
-
The installation path is not saved after installation; if it is not provided in the installation command, ScreenAgent is installed in the default location even when
To keep some parameter settings and change others, use the command above and add other parameters as required. For example, to change only the frame per second and resolution level, use the following (
msiexec /i ScreenAgent-64bit-2.2.18.msi KEEP_CURRENT_CONFIG=true FRAME_PER_SECOND=5 RESOLUTION_LEVEL=high -
-
Verify installation success from the log file. The install.log file is in the folder you installed the MSI from, this is typically the
-
Verify that the installer has admin privileges.
-
If the agent's computer doesn't have Microsoft .NET Framework 4.0 or higher, then install it.
The config file, configFile.ini, is automatically hidden after installation. To view and open the file, enable Hidden items in the Windows File Explorer.
-
-
Make sure the agent has the Can be Recorded (Screen) attribute (in NiCE CXone, go to Admin > Employees, and then click on the agent). This attribute is necessary for enabling screen recording, screen monitoring, or both.
-
Record a call and check the ScreenAgent log file. The ScreenAgent.log file is located at: %appdata%\ScreenAgent\logs\ScreenAgent.log.
Your ScreenAgent logs are also automatically uploaded to the cloud where the NiCE CXone Support team can access them, if needed.
If there are any errors, see Troubleshooting Recordings and FAQs.
You can watch a video that gives an overview of how to improve agent interactions with real-time screen monitoring using ScreenAgent.
Install Advanced ScreenAgent
When you install the Advanced ScreenAgent:
-
You get automatic upgrades and updates to all ScreenAgent instances.
-
There is no need to use third-party infrastructure (FFmpeg) to shorten issue resolution time.
-
Fewer resources (CPU, RAM) are required to maximize VDI and physical desktop resources.
-
If you use Advanced ScreenAgent with real‑time screen monitoring, you can enable Screen Assist so supervisors can place contextual notes on agents’ screens during a monitoring session.
Advanced ScreenAgent requires the Screen Recording Advanced license.
To install Advanced ScreenAgent:
-
Make sure all Prerequisites are in place.
-
Open the command prompt as Administrator. In the command line, navigate to where you downloaded the MSI and enter the installation command with the relevant parameters:
Step-by-step instructions
-
Go to the folder where you downloaded the MSI, and copy the path to the folder. This is typically the %UserProfile%\downloads folder.
-
Run the command prompt as Administrator:
-
In Windows, click the Windows button and type cmd.
-
Right-click the Command Prompt tile and click Run as administrator.
-
-
Type cd/ and press Enter.
-
Type cd and paste your file location, then press Enter.
For example, cd %UserProfile%\downloads.
-
Copy and paste the command into the Command Prompt, and edit the installation parameters.
Use this command:
msiexec /i AdvancedScreenAgent-64bit-<MSI version>.msi INSTALL_PATH=<optional: installation path> INSTALL_PARAMS=[ACCESS_KEY_ID=<access key ID>,ACCESS_KEY_SECRET=<secret access key>,BASE_URL=< CXone Mpower URL>,RESOLVE_USER=<optional: auto|oslogin>,FRAME_PER_SECOND=<optional: 1, 2, 3, 4, or 5>,RESOLUTION_LEVEL=<optional: low, medium, or high>] /log install.log /quiet
Make sure you do not have space inside INSTALL_PARAMS, parameters are separated by comma.
Example of an installation command:
msiexec /i AdvancedScreenAgent-64bit-5.0.1.msi INSTALL_PARAMS=[ACCESS_KEY_ID=XXXXXXXX,ACCESS_KEY_SECRET=YYYYYYYYY,BASE_URL=https://na1.nice-incontact.com] /log install.log
-
Google Chrome Registry Key Configuration for the Deny List
When using the Google Chrome browsers on the agent's machine, if the UiAutomationProviderEnabled value is not present in the Google Chrome Registry Key, the URLs specified in the Deny list might not be excluded from recording. See Manage a Screen Recording Deny List.
To add the value to the registry key:
-
Make sure that the agent's machine is using Chrome browser 126 or later.
-
Make sure you have Windows Administrator privileges.
-
Verify that that the HKLM:\SOFTWARE\Policies\Google\Chrome registry path exists.
-
Run the following Powershell script line to add the value to the Google Chrome registry:
Set-ItemProperty -Path "HKLM:\SOFTWARE\Policies\Google\Chrome" -Name "UiAutomationProviderEnabled" -Value 1 -Type DWord
Potential VDI Remote Apps Workaround
When agents are using VDI Remote Apps and the ScreenAgentWatchDog.exe process doesn't start:
-
Publish ScreenAgent.exe to RemoteApps. Ensure this is accessible only to administrators (not the agents).
-
Create and publish a shortcut to RemoteApps. Use a script, like one of those shown below, to open the browser and run ScreenAgentWatchDog.exe. Agents must use this shortcut to open the browser, or the ScreenAgent won’t run.
In the following example, replace
@echo Off

cd " C:\Program Files (x86)\Microsoft\Edge\Application"
start msedge.exe https://account.activedirectory.windowsazure.com/applications/signin/<USER_ID>?tenantId=<TENANT_ID>

REM Check if ScreenAgentWatchDog is already running for the current user profile
tasklist /FI "USERNAME eq %USERNAME%" /FI "IMAGENAME eq ScreenAgentWatchDog.exe" | find /I "ScreenAgentWatchDog.exe" > nul
if "%errorlevel%" neq "0" (
    cd "%ProgramFiles%\NICE-InContact\ScreenAgent"
    start ScreenAgentWatchDog.exe
)

ExitIn the following example, replace <USER_ID> and <TENANT_ID> with the relevant information. In addition, the URL shown in this example can be replaced with any other URL that you would like to use.
WorkaroundChrome
@echo Off

cd "C:\Program Files (x86)\Google\Chrome\Application"
start chrome.exe https://account.activedirectory.windowsazure.com/applications/signin/<USER_ID>?tenantId=<TENANT_ID>

REM Check if ScreenAgentWatchDog is already running for the current user profile
tasklist /FI "USERNAME eq %USERNAME%" /FI "IMAGENAME eq ScreenAgentWatchDog.exe" | find /I "ScreenAgentWatchDog.exe" > nul
if "%errorlevel%" neq "0" (
    cd "%ProgramFiles%\NICE-InContact\ScreenAgent"
    start ScreenAgentWatchDog.exe
)

Exit
ScreenAgent for Engagement Hub (Multi-ACD/Open) Environments
Engagement Hub (Multi-ACD/Open) is supported by ScreenAgent in virtual or physical environments. In these environments, the RESOLVE_USER parameter must be configured with the value oslogin. See the Installation command parameters for information about the parameter.
Change ScreenAgent Configuration
After installation, you can change some ScreenAgent configurations.
The config file, configFile.ini, is automatically hidden after installation. To view and open the file, enable Hidden items in the Windows File Explorer.
-
Open the configFile.ini file in the ScreenAgent install folder, typically under
-
Edit parameter values:
-
Change the framePerSecond value under the [recordingParameters] section. By default, this value is 5.
Allowed values are 1, 2, 3, 4, or 5.
Lowering the number of frames per second reduces the file size, CPU, and RAM.
Frames Per Second Reduction in Frames Impact on File Size/Bandwidth, CPU, & RAM (Estimated) 5
Default (maximum)
None
4
20% less
~15% reduction
3
40% less
~30% reduction
2
60% less
~45% reduction
1
80% less
~60% reduction
-
Change the resolutionLevel value under the [recordingParameters] section. By default this value is null, the current screen resolution.
Allowed values are null, low, medium, or high (case insensitive).
Lowering the resolution reduces the file size, CPU, and RAM.
Resolution Level Reduction in RESOLUTION Impact on File Size/Bandwidth, CPU & RAM (Estimated) Null
Default (current screen resolution)
None
High
Screen resolution / 1.5
~20% reduction
Medium
Screen resolution / 2
~40% reduction
Low
Screen resolution / 4
~60% reduction (recommended only for 4K screens)
To reset to the screen's resolution, change the resolutionLevel value to null.
-
Change the loadCertificates value under the [others] section. By default, this value is true.
Allowed values are true or false.
-
-
Save the configFile.ini file.
-
To apply changes, restart the ScreenAgent application:
-
In the Windows Task Manager, end the current ScreenAgentWatchDog.exe task and then end the ScreenAgent.exe processes.
-
From the ScreenAgent install folder, run ScreenAgentWatchdog.exe.
-
Change Advanced ScreenAgent Configuration
After installation, you can change some Advanced ScreenAgent configurations.
-
Open the configFile.ini file in the ScreenAgent install folder, typically under
-
Edit parameter values:
-
Change the FRAME_PER_SECOND property value. By default, this value is 5.
Allowed values are 1, 2, 3, 4, or 5.
Lowering the number of frames per second reduces the file size, CPU, and RAM.
Frames Per Second Reduction in Frames Impact on File Size/Bandwidth, CPU, & RAM (Estimated) 5
Default (maximum)
None
4
20% less
~15% reduction
3
40% less
~30% reduction
2
60% less
~45% reduction
1
80% less
~60% reduction
-
Change or add the RESOLUTION_LEVEL property value. By default this value is null, the current screen resolution.
Allowed values are null, low, medium, or high (case insensitive).
Lowering the resolution reduces the file size, CPU, and RAM.
Resolution Level Reduction in RESOLUTION Impact on File Size/Bandwidth, CPU & RAM (Estimated) Null
Default (current screen resolution)
None
High
Screen resolution / 1.5
~20% reduction
Medium
Screen resolution / 2
~40% reduction
Low
Screen resolution / 4
~60% reduction (recommended only for 4K screens)
To reset to the screen's resolution, change the RESOLUTION_LEVEL value to null.
-
Change the loadCertificates value under the [others] section. By default, this value is true.
Allowed values are true or false.
-
-
Save the configFile.ini file.
-
To apply changes, restart the Advanced ScreenAgent application:
-
In the Windows Task Manager, end the current ScreenAgentWatchDog.exe task and then end the ScreenAgent.exe processes.
-
From the ScreenAgent install folder, run ScreenAgentWatchdog.exe.
-
Permissions
Required ScreenAgent requires the following permissions while running:
-
File Access
-
Read/write access to
-
Read/execute access to the installation folder (default: C:\Program Files\NICE-InContact\ScreenAgent) (This path is configurable.)
-
-
Conditional Access (based on RESOLVE_USER setting)
-
If RESOLVE_USER=auto (default):
-
Ability to listen on local port 31322 (used for auto-connect)
If you are using Chrome version 142 or later, review Resolve Chrome Local Network Access Issues.
-
-
If RESOLVE_USER=oslogin:
-
Read environment variables (required for OS Login)
-
-
-
Additional Permissions (if using a deny list)
-
Retrieve information about other visible running processes
-
Interact with window elements of other processes (to capture URLs)
-
Registry keys are accessed only during installation or uninstallation. No registry access is required during normal operation.
Check ScreenAgent Connectivity
Use the ScreenAgent Connectivity Check tool run a sequence of tests to check network access and ensure that ScreenAgent will work correctly.
-
You can use the tool before or after installing ScreenAgent.
-
You can download the latest version of the Connectivity Check tool from the Downloads page.
-
It is recommended to use this tool when an agent’s network configuration has changed or is different from the regular configuration. You do not need to run the tool for every agent.
-
You can run the Connectivity Check tool multiple times using the same command.
-
After each test runs, a success or fail notification is displayed. At the end of the run a summary displays the status of each test.
-
After completing the tests, the Connectivity Check tool creates a log file.
-
The Connectivity Check tool does not currently include tests to check networking for real-time screen monitoring.
-
Download the Connectivity Check tool EXE file:
-
Go to NiCE CXone, and log in as a user with the Can access support downloads permission.
-
Click your Username and select Support and Downloads.
-
Download the required EXE file. Note where you download the EXE file to, you'll need the file location later.
-
-
Run the Connectivity Check tool.
-
Run the command prompt as Administrator.
-
Copy and paste the command into the Command Prompt, and edit the parameters listed in the table.
<path to exe file>
Connectivity tool command parameters
Parameter
Description
Example
path to exe file
File location of the downloaded EXE file.
C:%UserProfile%\downloads
ACCESS_KEY_ID
Paste the access key ID created in the Employee account. To generate an access key, see Generate an access key for ScreenAgent.
ACCESS_KEY_ID=ABCDEF12345====
ACCESS_KEY_SECRET
Paste the secret access key created in the Employee account.
ACCESS_KEY_SECRET=12345ABCDEF
REGION_TYPE
Enter the subdomain (first 3 characters) of your NiCE CXone URL (for example: na1, na2, au1, eu1)
REGION_TYPE=na1
WEB_PROXY
Only include this parameter if you’re using a proxy server to connect to the internet.
-
Host can be hostname or IP
-
Use http or https according to your proxy settings
-
Use username and password of the server if it’s set in your proxy settings
WEB_PROXY=http://admin:pwd@168.63.76.32:3128
WEB_PROXY=https://proxyserver:8088
-
Example command:
C:%UserProfile%\downloads ACCESS_KEY_ID=ABCDEF12345==== ACCESS_KEY_SECRET=12345ABCDEF REGION_TYPE=na1 WEB_PROXY=https://proxyserver:8088 -
-
The connectivity check tool starts to run the tests. After each test runs, a success or fail notification is displayed. If a test fails, the reason for failure is displayed. At the end of the run a summary displays whether each test passed, failed, or did not need to run (N/A). For example, if ScreenAgent was not running in the background when the connectivity check tool started, the tests to close ScreenAgent and restart it do not need to run.
After completing the tests, the connectivity check tool creates a log file (SA_Connectivity_tool_log_<runUniqueUUID>) in the same folder as the connectivity check tool installation file. The log file includes all the information that was displayed at the command prompt.
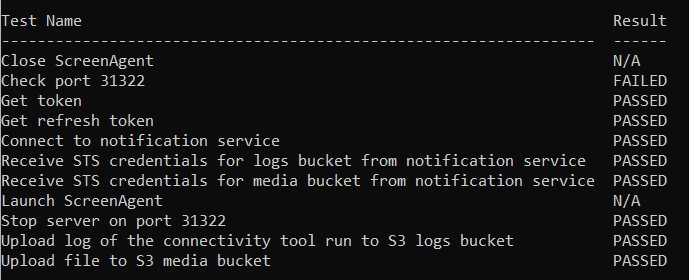
Connectivity Tests
|
Test |
Description |
|---|---|
| Close ScreenAgent | Close ScreenAgent (ScreenAgent.exe and ScreenAgentWatchdog.exe) if it is running in the background. This ensures it does not interrupt the connectivity tool tests. |
| Check port 31322 | Test communication with port 31322. |
| Get token | Test to get token. |
| Get refresh token | Test to get refresh token. |
| Receive STS credentials for logs bucket from notification service | Test to send and receive message from notification service web socket. |
| Receive STS credentials for media bucket from notification service | Test to send and receive message from notification service web socket. |
| Upload log of the connectivity tool run to S3 logs bucket | Test to upload to S3 logs bucket. |
| Upload file to S3 media bucket | Test to upload to S3 media bucket. |
| Launch ScreenAgent | Restart ScreenAgent (ScreenAgent.exe and ScreenAgentWatchdog.exe) if it was previously closed. |
| Stop server on port 31322 | Stop the test server that was used to test communication with port 31322. |
Configure ScreenAgent in a Multi-Tenant Environment
In a multi-tenant environment, each agent has their own
This procedure uses Microsoft Active Directory, and the configuration may be different for other directory service solutions.
To configure Active Directory for multiple tenants:
-
Create a JSON file for each tenant that you manage:
-
Each file must include the accessKey ID and AccessKey Secret for the tenant.
For example, if you manage Tenant A and Tenant B, you could name them TenantA_connection.json and TenantB_connection.json (or any names that are meaningful for your specific needs).
-
The members of each tenant must have access to the relevant file. For example, all users in Tenant A mentioned previously must have access to the TenantA_connection.json.
Use the following structure for each file. The parameter values must be unique for each tenant.
var(--codeSnippetCopyLabel){
"accessKeyId": "{{ACCESS_KEY}}",
"accessKeySecret": "{{SECRET_KEY}}"
} -
-
Place these files somewhere in your network where all tenant users can access them. For example, create a folder on a file server (such as \\fileserver\shared\files\).
Each tenant can be provided with its own shared folder.
-
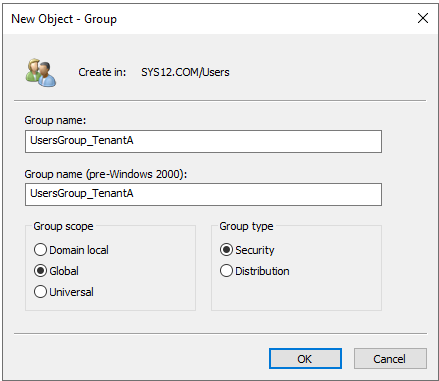
Create a Security group for each tenant's users in Active Directory using the following steps:
-
On the Domain Controller machine, open the Active Directory Users and Computers console.
-
Right-click the Organizational Unit (OU) where you want to create the groups (Users by default) and select New > Group.
-
Specify the group name. For example, UsersGroup_TenantA.
-
Select Global scope and Security options.
-
Click OK.
-
Right-click on the newly created security group and select Properties.
-
On the Members tab add all users corresponding to this tenant.
-
Click OK to complete the changes.
-
Repeat the previous steps to create a Security group for each tenant.
-
-
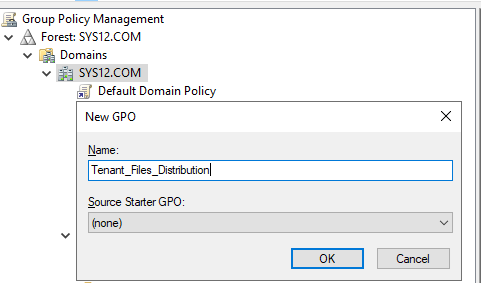
Create one Group Policy Objects (GPO) with policies for Files distribution which will cover all tenants:
-
Open the GPO Console.
-
Right-click on the Domain or the OU where the users are located and select Create a GPO.
-
Specify a name for the GPO (for example, Tenant_Files_Distribution) and click OK.
-
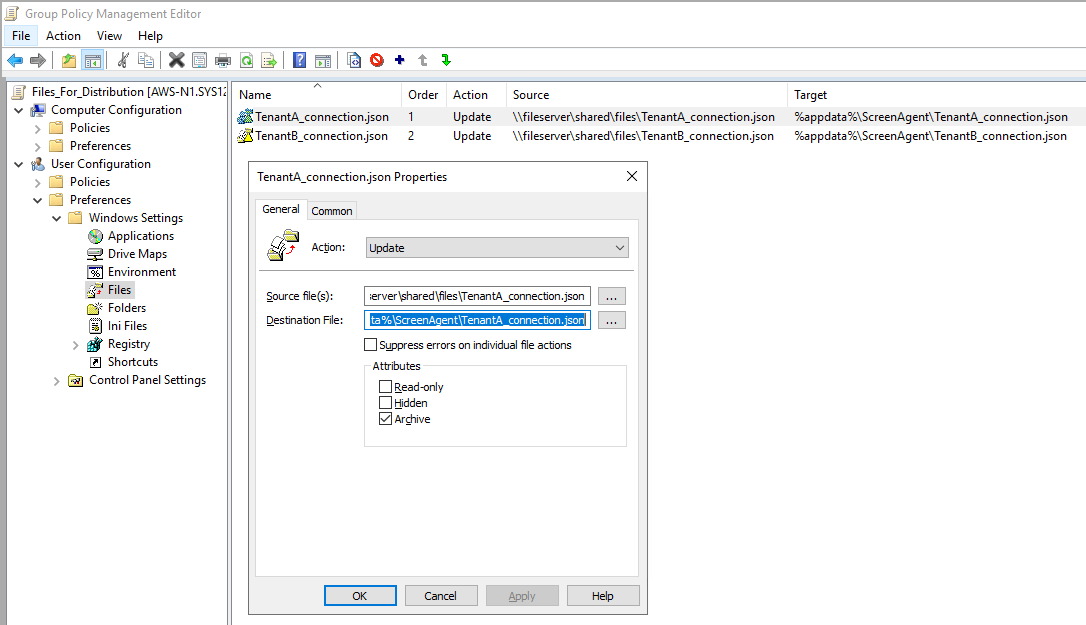
Right-click on the GPO you just created and select Edit to open the Group Policy Management Editor.
-
Go to User Configuration > Preferences > Windows Settings > Files.
-
Create a new File action for each separate tenant by Right clicking Files and select New > File.
-
Configure the following File settings:
-
Under Action, select Update.
-
Under Source file(s), enter the network path to the specific JSON file created for the tenant at the beginning of this procedure (for example, \\fileserver\shared\files\TenantA_connection.json).
-
Under Destination File, enter:
-
-
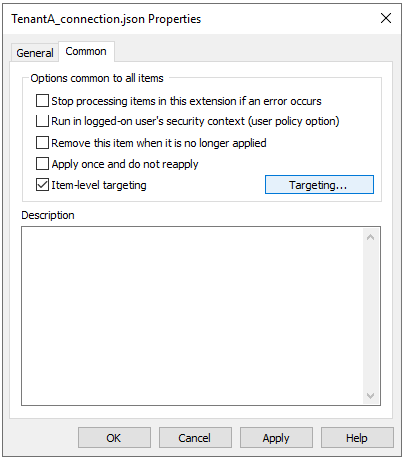
On the Common tab, select Item-level targeting and click Targeting….
-
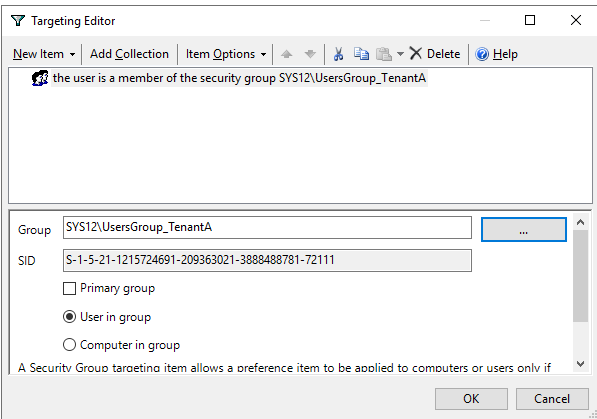
In the Targeting Editor window click New Item and select Security Group.
-
In the Group field specify the Users Group created earlier for the appropriate Tenant (for example, UsersGroup_TenantA).
-
Click OK to complete the configuration.
-
Repeat the steps to create a File action for each separate tenant with its own JSON file.
-
-
To apply and refresh the group policy, run gpupdate/force on the server or wait for the next Group Policy refresh cycle.
-
Each user must log out of their current session and then log back into their user account on their machine to ensure all changes take effect.

Installation command parameters
|
Parameter |
Description |
Example |
|---|---|---|
|
|
32bit or 64bit If you’re installing on a computer with:
MSI version Enter the MSI version of the installation file you downloaded from the Support and Downloads page. For example, 3.0.22. |
msiexec /i ScreenAgent-64bit-3.0.22.msi
msiexec /i ScreenAgent-32bit-3.0.22.msi |
|
KEEP_CURRENT_CONFIG |
(Optional) By default, the installation uses the current configuration when you reinstall or upgrade ScreenAgent. See Reinstall or upgrade with the current configuration. When set to false, the ScreenAgent installation does not use the existing configuration. The installation uses all specified parameters and default values for parameters with no configuration. The default value is true. For a clean installation, default values are used for parameters with no configuration. |
KEEP_CURRENT_CONFIG=true |
|
INSTALL_PATH |
(Optional) You can specify the installation path. The installation files will be saved in the \NICE-InContact\ScreenAgent folder under the specified installation path. When you do not add this parameter, ScreenAgent installs with the default installation path on drive C, even when KEEP_CURRENT_CONFIG= true. |
INSTALL_PATH=d:\newdir |
|
ACCESS_KEY_ID |
Paste the access key ID created in the Employee account. To generate an access key, see Generate an access key for ScreenAgent. |
ACCESS_KEY_ID=ABCDEF12345==== |
|
ACCESS_KEY_SECRET |
Paste the secret access key created in the Employee account. |
ACCESS_KEY_SECRET=12345ABCDEF |
|
REGION_TYPE |
Enter the subdomain (first 3 characters) of your NiCE CXone URL (for example: na1, na2, au1, eu1) |
REGION_TYPE=na1 |
|
|
(Optional) By default, this value is set to true and allows the ScreenAgent to collect data on the user machines (RAM, CPU). If you do not want ScreenAgent to collect data, it is possible to change this value to false. Allowed values are true and false. You can change this configuration after installation. |
|
|
WEB_PROXY |
Only include this parameter if you’re using a proxy server to connect to the internet. Keep in mind:
For example:
When you are using a proxy URL that works with a proxy pac file, add the prefix pac+ in front of the proxy URL, for example, if the proxy URL is https://<proxy server>.pac, use: WEB_PROXY=pac+https://<proxy server>.pac |
WEB_PROXY=http://admin:pwd@168.63.76.32:3128
WEB_PROXY=https://proxyserver:8088
|
|
|
(Optional) Configure If you do not add this parameter, ScreenAgent installs with the default value, auto, and relies on the NiCE CXone clients (MAX, Agent Workspace (Agent), and so on) to connect to the server. In this mode, ScreenAgent uses port 31322 to connect to the NiCE CXone client. The agent's OS Login is defined in the General tab of the Employee setup in the format Domain\Username.
|
RESOLVE_USER=oslogin |
|
|
(Optional) You can set the number of recorded frames per second for the output MP4 file. If you do not add this parameter, ScreenAgent installs with the default value, 5 frames per second. Allowed values are 1, 2, 3, 4, or 5. Lowering the number of frames per second reduces the file size, bandwidth, CPU and RAM. You can change this configuration after installation. |
FRAME_PER_SECOND=3 |
|
|
(Optional) You can set the resolution of the recorded MP4 file to optimize RAM and CPU consumption. If you do not add this parameter, ScreenAgent installs with the default resolution setting, null, the current screen resolution. Allowed values are null, low, medium, or high (case insensitive). Lowering the resolution reduces the file size, CPU, and RAM. You can change this configuration after installation. |
RESOLUTION_LEVEL=low |
|
LOAD_CERTIFICATES |
(Optional) Set this parameter to false if ScreenAgent should not access and load self-signed certificates from the Windows certificates store. Allowed values are true or false. If you do not add this parameter, ScreenAgent accesses self-signed certificates from the Windows certificates store. You can change this configuration after installation. |
LOAD_CERTIFICATES=false |
|
/log install.log |
Prints the installation results in the log file. |
/log install.log |
|
/quiet |
(Optional) Include if you want to suppress popups during installation. You’ll be able to view the installation results in the log file. |
/quiet |
Post-Uninstallation Information
When you uninstall ScreenAgent from a client machine, items on the system:
-
AppData folder content: The entire
-
installation folder: The folder at
These residual files and folders:
-
Do not interfere with a new or updated installation of ScreenAgent.
-
Can be manually deleted if needed, if a complete clean environment is required.
If you want to remove all traces of ScreenAgent, ensure these folders are manually deleted after uninstallation.