

Content on this page is for a product or feature in a public preview program. If you are not part of the preview and would like more information, contact your account representative.
Prerequisites
Before you can set up Salesforce Assist to work with NiCE CXone, you must have:
- A Salesforce platform account with Salesforce Einstein.
- One of the supported providers for NiCE CXone Continuous Stream Transcription. If you don't have a transcription profile set up yet, you can create one during the setup process described on this page.
- Your agents using Agent Workspace for Salesforce Voice (Agent for Service Cloud Voice) or Salesforce Agent Lightning.
If you use the sentiment next best action feature, these additional requirements apply:
- You must work with your Salesforce account representative to enable and configure sentiment next-best action in your Salesforce platform.
- You must have a Google Cloud account with Google Contact Center AI.
- Your agents must use Agent Workspace for Salesforce Voice (Agent for Service Cloud Voice).
Create a Script
Required permissions:
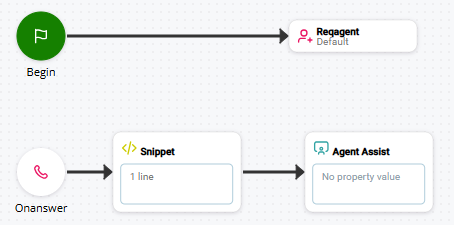
Use the following samples as a foundation to create the scripts to integrate your agent assist application into NiCE CXone. Inbound and outbound interactions require separate scripts. The following image shows the essential actions for an inbound script:
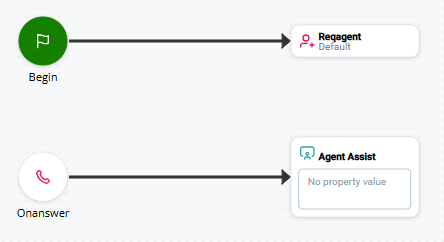
This image shows the essential actions for an outbound script:
To complete the configuration of your script:
- Add initialization snippets to the script using Snippet actions. You can do this to customize your agent assist application.
- Reconfigure the action connectors to ensure proper contact flow and correct any potential errors.
- Complete any additional scripting and test the script.
Generate Public and Private Key for Salesforce
You need a public key to use with your Salesforce Assist integration. When you configure the app in Agent Assist Hub, you need a private key.
Generate Public Key
-
Log in to Salesforce.
-
Go to Setup
 > Certificate and Key Management.
 -
Click Create Self-Signed Certificate.
-
In the Label field, enter NICE_Cxone_Service_Cloud_Voice. That value automatically appears in the Unique Name field.
-
Select the Exportable Private Key box.
-
Set the Key Size to 2048.
-
Click Save.
-
Open the NICE_Cxone_Service_Cloud_Voice certificate.
-
Click Download Certificate. A
If the public key begins and ends with other values, such as BEGIN ENCRYPTED CERTIFICATE or BEGIN CERTIFICATE REGISTER, it will not work for integration. If you encounter this problem, contact Salesforce for the public key in the correct format: between -----BEGIN CERTIFICATE----- and -----END CERTIFICATE-----.
Generate Private Key
-
Download and install KeyStore Explorer
 .
. -
In Salesforce, go to Setup
> Certificate and Key Management. -
Click Export to Keystore.
-
Create a Keystore Password. Later, you will use this password to access the private key.
-
Click Export. A
-
In
-
Right click nice_cxone_service_cloud_voice and select Export > Export Private Key.
-
Select PKCS #8. This is the correct public key cryptography standard.
-
Deselect the Encrypt box and select the PEM box.
-
Click Export. A
Set Up the Integration in Salesforce
- In Salesforce, go to Setup > Partner Telephony Contact Centers.
- Select the NICE CXone for Service Cloud Voice contact center.
- Click Edit.
- Verify that the Display Name is NICE CXone for Service Cloud Voice.
- Delete all the contents of the Public Key field. Paste the public key you generated. Include -----BEGIN CERTIFICATE----- and -----END CERTIFICATE-----.
- Click Save.
Add an App to Agent Assist Hub
Required permissions:
You need to add a profile app for Salesforce Assist to Agent Assist Hub.
- Click the app selector
 and select Other > Connections Hub and then click Agent Assist Hub.
 -
Click Add Agent Assist App.
-
Enter an Agent Assist App Name and click Salesforce Assist in the list of agent assist providers.
-
Click Next.
-
Complete the Configuration page using the information in the following drop-down.
 Learn more about the fields in this step
Field
Details
Org ID Enter your Salesforce organization ID. You can find this information in Salesforce under Setup > Company Information > Salesforce.com Organization ID.Base URL Enter the base URL for your remote Salesforce instance. You can find this information in Salesforce under Setup >
Remote Site Settings in the Remote Site URL column. If your remote Salesforce instance shows multiple base URLs, or a URL with a placeholder such as MyDomainName, contact Salesforce for exact base URL.Private Key Paste the private key you generated. Contact Center Internal Name Enter your Salesforce Einstein contact center internal name. You can find this information in Salesforce under Setup > Partner Telephony Contact Centers. Select the NICE CXone for Service Cloud Voice contact center. Locate the internal name in API Name.Continuous Stream Transcription Profile Select the Continuous Stream Transcription profile you want to use with this agent assist application. Click Add or Edit Continuous Stream Transcription Profile to create a new profile or modify an existing one. Sentiment Required Click to enable Google Transcription to send sentiment data to Salesforce for the sentiment next best action feature. The information for these fields come from your Google Contact Center AI settings in your Google Cloud Project.
This option does not appear if you use Google Transcription, because sending sentiment is enabled in the transcription profile for Google Transcription. If you use any other transcription service, click this option, then complete the fields that appear:
- JSON Service Account: Paste in the entire contents of the service account key that you created in the Google Cloud Console. The key is a JSON object.
- Conversation Provide ID: Enter the ID of the conversation profile from Google Contact Center AI. You must create a conversation profile while setting up Google Contact Center AI with Google. It determines the suggestions made to agents during interactions.
- Region: Enter the region where Google Contact Center AI is hosted.
- Language: Select the language you want the agent assist app to use. This should match the language that your agents use when handling interactions.
Participants Select whether you want the agent assist app to transcribe the Patron Only, the Agent Only, or Both. This setting defines the transcribed text that the agent sees.
For example, if you select Patron Only, Salesforce Assist only transcribes the contact's side of the conversation.
-
Click Create.
-
Click Close.
![The Configuration page for adding a [MadCap:variable name="3rdPartyProductNames.SFAssist" ] agent assist bot to Agent Assist Hub.](images/loc-sfassistproperties.png)
Create a Transcription Profile
Required permissions:
A transcription profile defines the transcription options you want to use, including the language to transcribe.
- On the Create New Agent Assistant page in Agent Assist Hub, click Add or Edit Continuous Stream Transcription Profile.
- Do one of the following:
- Click the name of an existing profile to modify it and skip to step 6.
- Click Add Transcription Profile and continue with step 3.
- Enter a Transcription Profile Name. To differentiate this profile from your other profiles, use a name that highlights what makes this profile different. For example, you could name the profile for its intended use, the provider, or the language of the profile. If you use more than one transcription provider, make sure the profile name includes the provider.
- Under Select Provider, click the transcription provider you want to use. You can choose from NiCE CXone Transcription, NiCE CXone Transcription for Copilot, Google Transcription, or Microsoft Transcription. Some of these options must be enabled in your NiCE CXone system by your account representative.
- Click Next.
-
On the Configuration page, complete the fields to define the transcription options for this profile.
Learn more about configurations for NiCE CXone Transcription
Field Details Language Code Select the language that you want this profile to transcribe. Currently the only available language is English. Learn more about configurations for NiCE CXone Transcription for Copilot
Field Details API Key Enter the API key for Transcription for Copilot. Your account representative provides this key for you.
Language Code Select the language that you want this profile to transcribe. Model Select the machine learning model that you want the transcription service to use when transcribing the audio. These models have been trained to recognize speech from specific audio types and sources. The available models depend on the Language Code you selected.
You can learn more about the available models
 .
.Smart Format Enable this option to have transcripts automatically formatted for improved readability. This option applies formatting to the transcripts. This includes formatting such as punctuation, paragraph breaks, and using numerals in place of the text versions of the number, for example using 2 instead of two.
Punctuate This automatically enables when you enable Smart Format. It cannot be disabled. Interim Results Select this option if you want the transcript to show temporary results that are refined over time. The default is for this option to be disabled. Find and Replace Use this section to define words or phrases that you want replaced with different text in the final transcripts. For example, you could replace examples of foul language with a different word, such as bleep.
To add a find and replace configuration:
- Click Add Find and Replace.
- In the Name field, enter the word as it appears in the transcript.
- In the Value field, enter the text you want to replace the word specified in Name.
Keywords Use keywords to boost or suppress certain words or phrases:
- Boosting assigns more weight to the word or phrase. The transcription service is more likely to choose that word or phrase when the audio match is close.
- Suppressing assigns less weight to the word or phrase. The transcription service is less likely to choose the word or phrase.
Note: Suppressing keywords is only available for base Models.
To add keyword boosting or suppression:
- Click Add Keywords.
- In the Name field, enter a word or phrase.
- In the Value field, enter a positive integer from 1 to 10 to boost the specified word or phrase, or a negative integer from -1 to -10 to suppress it.
Learn more about configurations for Google Transcription
Field Details Transcription Type Choose the Google Transcription account to use with this profile:
- Select CXone to use the account owned by NiCE CXone.
- Select Your Account to use your organization's account.
JSON Service Account
The service account key for the Google Transcription account you're using:
- If you're using the NiCE CXone account, use the key provided for you by your account representative.
- If you're using your own account, use the key file you created and downloaded from your Google Cloud Console.
Copy and paste the entire contents of the key file into this field, including the curly braces surrounding the key.
The service account key is a JSON object similar to the following example:
{
"type": "service_account",
"project_id": "ic-demo2-aai-gcp",
"private_key_id": "sdv80sdf08ssd9sdf0sdf8sdfsdf90sdf8",
"private_key": "-----BEGIN PRIVATE KEY-----
nMIIEvgIBADANBgkqhkiG9w0BAQEFAASCBKgwggSkAgEAAoIBAQCzgrS8vp
<private key has been truncated for this example>
----END PRIVATE KEY-----\n",
"client_email": "your@client_email-gcp.iam.gserviceaccount.com",
"client_id": "123456789",
"auth_uri": "https://accounts.google.com/o/oauth2/auth",
"token_uri": "https://oauth2.googleapis.com/token",
"auth_provider_x509_cert_url": "https://www.googleapis.com/oauth2/v1/certs",
"client_x509_cert_url": "https://www.googleapis.com/robot/v1/metadata/x509/
dialogflow-dthjop%40ic-demo2-aai-gcp.iam.gserviceaccount.com"
}Language Code Select the language that you want this profile to transcribe. Model Select the machine learning model that you want the transcription service to use when transcribing the audio. These models have been trained to recognize speech from specific audio types and sources. Not all languages support every model. Refer to the Google documentation for information about language support.
Available options are:
- Command and Search: Use when transcribing shorter audio clips, such as commands or voice search. Consider using Latest Short instead.
- Default: Use when the audio doesn't fit the other models. It can transcribe any type of audio, but results may be lower quality for some types.
- Latest Long: Use with long-form content such as spontaneous speech or conversations.
- Latest Short: Use when the utterances are a few seconds long, such as commands. Consider using this model instead of Command and Search.
- Phone Call: Use for transcribing the audio from a phone call.
- Telephony: Use for higher quality audio in a phone call.
- Telephony Short: Use for short conversations (less than ten seconds long) in a phone call.
Sentiment Required Click this option if you're using sentiment next best actions in Salesforce Assist. When enabled, complete the following fields that appear:
- Conversation Provide ID: Enter the ID of the conversation profile from Google Contact Center AI. You must create a conversation profile while setting up Google Contact Center AI with Google. It determines the suggestions made to agents during interactions.
- Region: Enter the region where your Google Cloud Project is hosted.
Use Enhanced Enable this option to use the enhanced version of your selected Model. This is only an option if you are using the Phone Callmodel. This can help increase the accuracy of transcription.
The default is for this option to be disabled. Enabling this option increases the cost of transcription.
Interim Results Enable this option if you want the transcript to show temporary results that are refined over time. The default is for this option to be disabled. Enable Automatic Punctuation Enable this option to use the Google Transcription automatic punctuation option. When enabled, the transcription service automatically infers where punctuation such as commas, periods, and question marks should go and adds them to the transcript. Class Token Add Google class tokens to improve the accuracy of transcription:
-
Under Class Token, enter the token name as the Value.
-
In the Boost field, enter a number between 1 and 20 to assign a weighted value to the specific token. Higher numbers provide more of a boost.
-
Click Add Class Token to add another token and boost value.
Learn more about configurations for Microsoft Transcription
Field Details Subscription Key Paste in the subscription key for your Azure AI Speech Service. This key allows you to authentication with your Speech Service subscription.
To find your subscription key, log in to the Azure portal and search for your speech service resource. The subscription key is located on the Keys and Endpoint tab.
This field is required.
Service Region Enter the region of the Azure data center that hosts your speech service resource. For example, westus2. The region ensures your transcription requests are routed to the correct location. It's also used for authentication along with the subscription key.
You can find the region in the Azure portal.
This field is required.
Endpoint ID Complete this field if you're using a custom speech model created using Azure Speech Studio. Paste the endpoint of your custom model in this field. Your custom model must be deployed in Azure Speech Studio before you add it to a transcription profile in NiCE CXone.
If this field is left blank, Microsoft Transcription uses the default baseline speech recognition model.
Language Code Select the language that this transcription profile will transcribe from the drop-down list.
This field is required.
Interim Results Enable this option to have the transcript show temporary results that are refined over time. The default is for this option to be disabled. Enable Automatic Punctuation Enable this option to have Microsoft Transcription automatically insert punctuation marks such as periods, commas, and question marks into the transcription. This helps improve readability and clarity. The default is for this option to be disabled. - Click Add.
Assign the Salesforce Assist App to an Action
Required permissions:
If you haven't done so already, you need to assign the Salesforce AssistCognigy Agent Assist app to the Agent Assist action![]() Performs a process within a Studio script, such as collecting customer data or playing music. in your Studio script.
Performs a process within a Studio script, such as collecting customer data or playing music. in your Studio script.
- In Studio, open the script you want to use.
-
If you haven't done so already, add the Agent Assist action to the correct location in your script.
-
 on the Agent Assist action.
 -
In the left column, click the checkmark
 next to the agent assist application or profile you want to assign to this script.
An alternative to using the checkmark is to create a variable in your Studio script. Use the variable to pass the app or profile name into the Assign Launch Config Name property of the AGENT ASSIST action.
- Click Close.
Additional Configuration for Sentiment Next Best Actions
If you're using sentiment next best actions with Salesforce Assist, you must complete additional configuration in Salesforce. Your Salesforce account representative can help you complete the setup in the Salesforce platform.
You don't need to complete additional setup steps to have conversation transcripts displayed for the agent in Salesforce.