

You can handle calls in NiCE CXone Agent Workspace for Microsoft Teams (Agent for Microsoft Teams) if your administrator has enabled them for you. Any calls assigned to you appear in the Interactions Menu, marked by ![]() . If you are logged in with Integrated Softphone, make sure you are using the Agent WebRTC Extension. It prevents connection issues, including calls dropping.
. If you are logged in with Integrated Softphone, make sure you are using the Agent WebRTC Extension. It prevents connection issues, including calls dropping.
When handling calls using the Integrated Softphone, it is recommended that you pop out the agent application to a separate window. To do this, click Pop Out  in the top right corner of Microsoft Teams. This will prevent connection issues during the call. These possible connection issues will be resolved in the future.
NiCE CXone supports these kinds of callbacks:
-
Scheduled Callbacks:
-
Commitments: You can schedule a callback for yourself or a skill
 Used to automate delivery of interactions based on agent skills, abilities, and knowledge. by creating a commitment in Schedule
  .
.
-
-
Queue Hold Callbacks: Your IVR
Interactive Voice Response. Automated phone menu contacts use via voice or key inputs to obtain information, route an inbound voice call, or both. can offer contacts The person interacting with an agent, IVR, or bot in your contact center. the option to hold their place in the queue and hang up. The system calls them back when it's their turn. These callbacks appear as inbound calls. If you reject the call, it goes to the next available agent. If you accept the call, the system calls the contact. You may not hear anyone immediately. If you're not sure whether your organization uses this type of callback, ask your supervisor.Agent Workspace for Microsoft Teams (Agent for Microsoft Teams) does not notify you that these inbound calls are callbacks.
Use Voice Controls
The voice control panel in Agent Workspace for Microsoft Teams (Agent for Microsoft Teams) appears when you're handling an active call. The panel displays the contact name, phone number, and the skill. It also shows these call controls:
| Icon | Details |
|---|---|
| Hold |
Place the contact |
| Resume |
Take the contact off hold. |
| Mute |
Mute your microphone so that the contact cannot hear you. |
| Unmute |
Unmute your microphone so that the contact can hear you. |
|
Mask |
Play white noise over the call recording. This is useful for hiding sensitive information. You cannot end a call while masking. |
| Unmask |
Stop playing white noise over the call recording. |
| Record |
Record the call. This icon turns red When finished, the recording appears in the Interactions app in NiCE CXone. |
| Consult / Transfer |
Conference with up to eight parties or transfer the contact to another agent, skill |
| Keypad |
Open the keypad. This is useful if you need to press a number while making an outbound call. |
| Launch |
View a list of available indicators If you're an administrator, see these details about how to configure indicators. |
| Hang Up |
End the call. If the hang up icon is missing, you may have the Hide Inbound Hangup permission enabled. Contact your administrator. |
| Outcome |
Assign a disposition |
Connect Agent Leg
The status of your agent leg![]() Your audio connection to NiCE CXone for calls and voicemails. appears at the top. It automatically connects when you receive an inbound call. You can also connect your agent leg manually by clicking Disconnected
Your audio connection to NiCE CXone for calls and voicemails. appears at the top. It automatically connects when you receive an inbound call. You can also connect your agent leg manually by clicking Disconnected ![]() . Your agent leg then appears as Connected
. Your agent leg then appears as Connected ![]() .
.
Make Outbound Calls
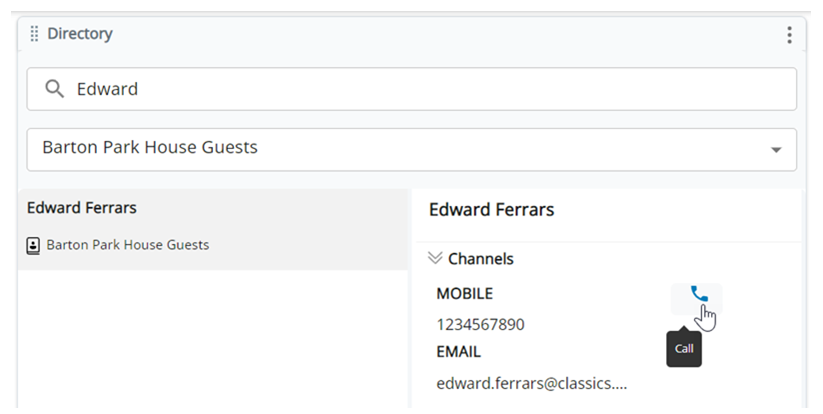
When placing an outbound call, you can search for people in the Directory ![]() by name or enter a phone number to dial.
by name or enter a phone number to dial.
To make an outbound call, you must have an outbound voice skill![]() Used to automate delivery of interactions based on agent skills, abilities, and knowledge. assigned to you.
Used to automate delivery of interactions based on agent skills, abilities, and knowledge. assigned to you.
If you have a digital![]() Any channel, contact, or skill associated with Digital Experience (DX). interaction in your inbox, such as a chat, and want to place an outbound call to a specific voice skill, you must click New Outbound
Any channel, contact, or skill associated with Digital Experience (DX). interaction in your inbox, such as a chat, and want to place an outbound call to a specific voice skill, you must click New Outbound ![]() . Then, search for the skill in the Directory
. Then, search for the skill in the Directory ![]() . If you open the Directory
. If you open the Directory ![]() without clicking New Outbound
without clicking New Outbound ![]() first, voice skills do not appear. This is because you cannot transfer a digital interaction to a voice skill.
first, voice skills do not appear. This is because you cannot transfer a digital interaction to a voice skill.
-
Launch Agent Workspace for Microsoft Teams (Agent for Microsoft Teams) and sign in.
- In the Interactions Menu, click New Outbound
 .
. -
In the search bar in the Directory, enter the name or phone number of the contact
The person interacting with an agent, IVR, or bot in your contact center. you want to call. Phone numbers should be in this format: + [country code] [phone number including area code]. They can be a maximum of 15 digits. If you're dialing an extension, they can be 17 digits.
You can use the drop-down below the search bar to switch between directories.
-
Click the contact's name in the search results. Under Channels, click Call
 .
. - If prompted, select a skill Used to automate delivery of interactions based on agent skills, abilities, and knowledge. from the drop-down and click Call.
If the call fails or you see an error, your phone number may be blocked, marked as spam, or the number you dialed may have been disconnected.
Consult and Conference Calls
You can conference with other people, such as other agents, to resolve a contact's issue. The maximum number of people you can have on a call is eight. However, your administrator may have set a lower limit.
- While handling a call, click Consult / Transfer
 in the voice controls.
 - In the Directory, search for the person or phone number you want to consult Allows you to speak privately to a new party before adding them to a conference.. You can use the drop-down below the search bar to switch between directories.
-
If you searched for a person, hover over their name in the search results and click Call
 .
.If you searched for an external phone number, click Consult
. If you have more than one outbound voice skill Used to automate delivery of interactions based on agent skills, abilities, and knowledge. assigned to you, select a skill from the drop-down, then click Call. -
The call appears in a consult in the Multi-party
 space. The original party is placed on hold.
Here, you can:
-
Click Transfer
 to transfer the new party to another agent or skill.
 -
Click Hang Up
 to end the consult and go back to the original party.
 -
Click Conference
 to merge the parties into a conference in the Multi-party space.
Here, you can Mask
 , Mute
  , and Record
  the conference.
 -
- To transfer the conference to another agent, skill, or team, click Consult / Transfer
 .
.- Search for the agent, skill, or team you want to transfer the conference to. You can use the drop-down below the search bar to switch between directories.
- Find the agent, skill, or team in the search results and click Transfer
 .
.
- To add more parties to the conference, click Consult / Transfer . Conferences can have up to eight parties.
- Search for the person or phone number you want to add to the conference. You can use the drop-down below the search bar to switch between directories.
If you searched for a person, click their name in the search results, then click Call
 > Consult.
If you searched for an external phone number, click Consult
. If you have more than one outbound voice skill Used to automate delivery of interactions based on agent skills, abilities, and knowledge. assigned to you, select a skill from the drop-down, then click Call.- Depending on how your administrator has configured this, one of the following happens:
- The new party is added to the conference.
The parties in the conference are placed on hold while you're in a consult with the new party. To switch who's on hold, click Swap caller
 . If you Hang Up on the new party, click Rejoin to take the conference off hold. To merge the new party into the conference, click Merge
  .
.The parties in the conference keep talking while you're in a consult with the new party. To merge the new party into the conference, click Merge
.
- To hang up on one party, click Hang Up in the row for their name.
- To leave the conference but allow it to continue for the other parties, click Leave
 .
. - To end the conference for everyone, click the drop-down arrow next to Leave and select End Call.


Transfer Calls
You can transfer calls to other agents. You can also transfer calls to external directory contacts, such as those in a Microsoft Teams or RingCentral directory. If you don't know who to transfer the call to, you can transfer it to a skill![]() Used to automate delivery of interactions based on agent skills, abilities, and knowledge.. The call is then assigned to an agent with that skill.
Used to automate delivery of interactions based on agent skills, abilities, and knowledge.. The call is then assigned to an agent with that skill.
- While handling a call, click Consult / Transfer in the voice controls.
- In the Directory, search for the agent, phone number, team, or skill you want to transfer the call to. You can use the drop-down below the search bar to switch between directories.
-
Follow the instructions in the table below for the type of transfer you want to do.
Type of transfer Instructions Transfer to agent Hover over the agent's name in the search results and click Transfer
. You are then placed in a consult Allows you to speak privately to a new party before adding them to a conference. with the agent. The contact The person interacting with an agent, IVR, or bot in your contact center. is put on hold. Click Transfer to complete the transfer.Transfer to phone number
Click Transfer
in the search results under the phone number you searched. You are then placed in a consult Allows you to speak privately to a new party before adding them to a conference. with the phone number. The contact The person interacting with an agent, IVR, or bot in your contact center. is put on hold. Click Transfer to complete the transfer.Transfer to team Select the team in the search results. A list of agents assigned to that team appears. Hover over an agent and click Transfer . You are then placed in a consult Allows you to speak privately to a new party before adding them to a conference. with the agent. The contact The person interacting with an agent, IVR, or bot in your contact center. is put on hold. Click Transfer to complete the transfer.Transfer to skill Find the skill in the search results and click Call
. The contact The person interacting with an agent, IVR, or bot in your contact center. is put on hold and the new call is placed in the queue for the skill you selected.From here, you can:
-
Click Transfer
to complete the transfer. -
Wait for an agent assigned to the skill to pick up the call. This allows you to give the agent context about the interaction. You can then click Conference
to merge the calls together. Finally, click Leave to leave the call.
-
Limitations for Transferring Calls
Note that you cannot:
-
Manually transfer a call to another agent if you're already on a call with an agent. However, you can conference with another agent, then leave the call.
-
Transfer a call to a party who is in an unavailable state because they're already handling a voice call.
Elevate Calls
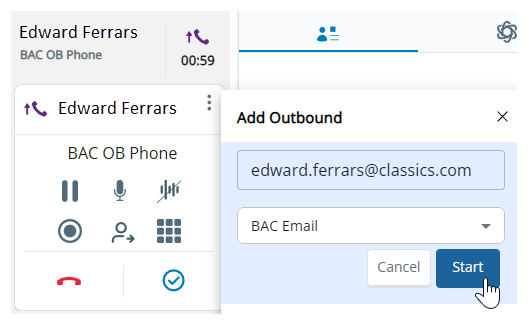
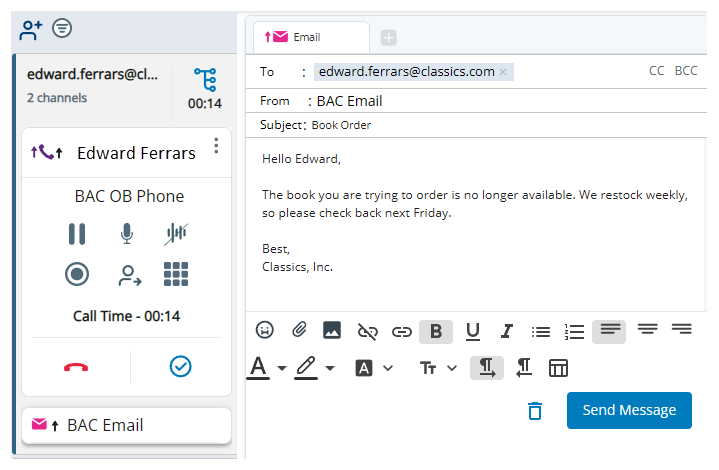
You can elevate a call to another channel![]() Various voice and digital communication mediums that facilitate customer interactions in a contact center.. This allows you to select the best channel for handling the contact. For example, if you're on a call with a contact and need to send them information in an email, you can elevate the call to email. You can elevate to these channels:
Various voice and digital communication mediums that facilitate customer interactions in a contact center.. This allows you to select the best channel for handling the contact. For example, if you're on a call with a contact and need to send them information in an email, you can elevate the call to email. You can elevate to these channels:
| Current interaction channel | Can elevate to | |||
|---|---|---|---|---|
| Voice | SMS | |||
| Chat | Voice | SMS | ||
| Voice | SMS | |||
| SMS | Voice | SMS | ||
| Private Social | Voice | SMS | ||
| Public Social | Voice | SMS | ||
| Voice | SMS | |||
You cannot elevate calls after you complete after contact work![]() State that allows an agent to complete work requirements after finishing an interaction..
State that allows an agent to complete work requirements after finishing an interaction..
-
Click More

-
Enter the contact's ID for the channel
Various voice and digital communication mediums that facilitate customer interactions in a contact center. you want to elevate to. For example, if you're elevating the call to email, enter the contact's email address. -
Select the channel you want to elevate to.
-
Select a skill
Used to automate delivery of interactions based on agent skills, abilities, and knowledge. from the drop-down if it appears. -
Click Start. The elevation starts. A new interaction with the contact appears in the Interactions Menu underneath the call. The call icon
is replaced by the elevated icon  .
.
If your administrator has required you to assign a disposition to the call, you must do so before you can make another call.
View Real-Time Transcription
Required permission: Voice Transcript
If your administrator has enabled this for you, you can see real-time transcriptions of calls in Agent Workspace for Microsoft Teams (Agent for Microsoft Teams). ![]() The person interacting with an agent, IVR, or bot in your contact center.. They are not available for agent-to-agent calls, consults, conferences, or transfers.
The person interacting with an agent, IVR, or bot in your contact center.. They are not available for agent-to-agent calls, consults, conferences, or transfers.
To hide the real-time transcription of a call, click More ![]() above the voice controls, then select Hide Transcript. To show it again, click More
above the voice controls, then select Hide Transcript. To show it again, click More ![]() > Show Transcript.
> Show Transcript.
Use the Customer Card
If your administrator has enabled it for you, the customer card provides information to help you handle contacts.
Use Screen Pops
Screen pops are links to other websites or apps that can help you handle a call. Your administrator configures the screen pops you can choose from.
- While handling a call, click Screen Pops

- Select the page you want from the drop-down.
- To open the page in a new tab in your browser, click Pop Out
 .
. - To pop the page back in to
 . This will close the tab.
You cannot pop out Real-Time Interaction Guidance (RTIG) screen pops.
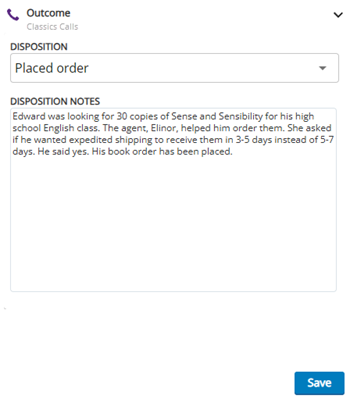
Assign Dispositions to Calls
When a call ends, the Outcome panel appears at the bottom of Agent Workspace for Microsoft Teams (Agent for Microsoft Teams). Here, you can assign a disposition![]() Result assigned by the agent or system at the end of a voice (disposition) or digital (status) interaction. to a call. Dispositions indicate the result of the interaction. For example, if you answered a contact's question, you could mark the call as Resolved.
Result assigned by the agent or system at the end of a voice (disposition) or digital (status) interaction. to a call. Dispositions indicate the result of the interaction. For example, if you answered a contact's question, you could mark the call as Resolved.
- Click Outcome
 in the voice control panel.
 - Select a Disposition from the drop-down. If the call was an Outbound Engagement (SmartReach) call, expand a category, then select a disposition.
- You can enter Disposition Notes about the call. If your administrator has enabled Automated Summary (AutoSummary), a call summary automatically appears in the Disposition Notes field. You can edit the summary. You can also add Tags to help you find the call later. An Amount field may also appear if the call was a Personal Connection call.
-
Click Save & Close. If a disposition is required for the call, or the after call work
State that allows an agent to complete work requirements after finishing an interaction. timer runs out, your state The availability status of an agent. automatically changes to Available. You can also manually change your state.To redial the contact
-
Click Save & Redial.
-
Select a skill
Used to automate delivery of interactions based on agent skills, abilities, and knowledge.. If the skill you want doesn't appear, search for it. -
Click Save & Redial.
-