

You can use a digital Live Chat![]() Agents and contacts interact on a real-time basis. channel with any supported text virtual agent. A full implementation of a Live Chat channel includes some features that may not be needed when testing a text virtual agent or for a simplified Digital Experience (DX) implementation. The instructions on this page allow you to set up a Live Chat channel without these features. This results in a simplified digital Live Chat experience.
Agents and contacts interact on a real-time basis. channel with any supported text virtual agent. A full implementation of a Live Chat channel includes some features that may not be needed when testing a text virtual agent or for a simplified Digital Experience (DX) implementation. The instructions on this page allow you to set up a Live Chat channel without these features. This results in a simplified digital Live Chat experience.
You can use the simplified Live Chat setup with virtual agent implementations or for testing implementations that will be used with live agents. However, it's not a complete setup and some functionality is lost through the simplification. If the channel will be used by both virtual and live agents and you need a full implementation of the Live Chat channel, contact your NiCE CXone account representative.
Differences in the Simplified Setup
A complete setup of the Live Chat window that appears on your website has two features that you may want to change or disable when using it with a virtual agent. The features are necessary when using Live Chat with live agents. However, when using Live Chat with virtual agents, they're not needed because the virtual agent is always available and ready to respond immediately. The features are:
-
A dot showing online (green) or offline (red) status to indicate agent availability. You can configure this to always show green.
-
An overlay that can be used to display messages to contacts. Often, this is used to let contacts know that an agent will respond soon. You can disable this if you don't need to display messages to contacts who are interacting with virtual agents.

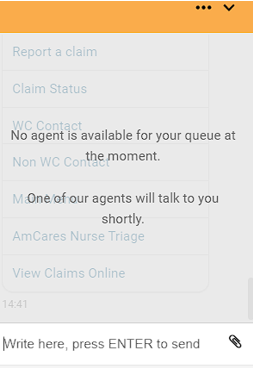
If conversations on this channel will be escalated to live agents, these features are recommended. They cannot be disabled during the virtual agent portion of the interaction and later dynamically re-enabled for the live agent. They must be on or off for the entire interaction.
In addition to the two features already mentioned, the simplified setup affects reporting on the Live Chat channel. A complete Live Chat setup includes the creation of a pseudo agent employee account in NiCE CXone. The account is associated with the channel but not with a live agent. It allows NiCE CXone to track Digital Experience (DX) information associated with the pseudo agent account for reporting purposes. The simplified Live Channel setup does not include a pseudo agent account by default, so the reporting information won't be available. You can set up a pseudo agent account if you need this information.
Complete the steps on this page in addition to setting up the integration of your text virtual agent in Virtual Agent Hub.
Prerequisites
Before you can set up a digital Live Chat channel, you must:
- Have Digital Experience (DX) set up and configured in your tenant
 High-level organizational grouping used to manage technical support, billing, and global settings for your NiCE CXone system..
 - Use a NiCE CXone employee profile with the Digital Engagement attribute.
- Have a digital Studio script created and ready to use with the new channel. This could be the same script that's configured to work with your virtual agent integration.
Set Up a Live Chat Channel
After confirming that the prerequisites have been met, you can set up the Live Chat channel. You can do this in the NiCE CXone ACD application. You need to:
- Add the live chat channel.
- Create a digital ACD skill to use for this channel. NiCE CXone requires ACD skills for all points of contact, including those for use with virtual agents.
- Configure the digital point of contact for the Live Chat channel to use the existing digital script and the digital skill you created.
- Customize the appearance of the channel's chat pop-up window.
Make a Live Chat Channel Available 24/7
Removing the online indicator dot from one channel does not impact the availability of the dot in other Live Chat channels![]() Various voice and digital communication mediums that facilitate customer interactions in a contact center.. After you disable the online indicator dot for this channel, it cannot be dynamically re-enabled. To re-enable the feature, you must remove the line of code that you add in the following steps.
Various voice and digital communication mediums that facilitate customer interactions in a contact center.. After you disable the online indicator dot for this channel, it cannot be dynamically re-enabled. To re-enable the feature, you must remove the line of code that you add in the following steps.
These steps require that you modify the web page where the chat window will be located. Do not complete these steps on your live website if your virtual agent integration is not ready for release into your production environment. Use a web page in a test environment instead. When your virtual agent is ready to go live, complete these steps for your live website.
- In NiCE CXone, click the app selector
 and select ACD.
 - Go to Digital > Points of Contact Digital.
- Click Chat in the list of channel types at the top of the page.
-
On the My Channels page, click Initialization & Test for the Live Chat channel you want to modify.
- Copy the JavaScript code from the Initialization & Test page.
-
Add the copied JavaScript code to your website. On any page where you want this chat channel to be available, paste the copied JavaScript code into the page header. Keep the web page open in your website editor.
-
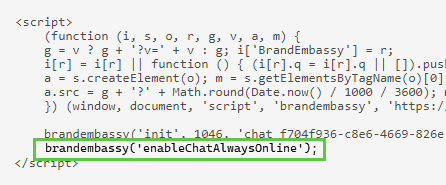
Copy the following line of JavaScript from the help page:
brandembassy('enableChatAlwaysOnline');
-
In your website editor, paste the line of JavaScript you copied in the preceding step just above the
Learn more about this feature and other ways you can customize your digital chat channels on the Customize Chat Channels Using JavaScript page.
- Save your changes.
- Open the modified web page in a browser window. Verify that the online indicator dot is always green. You can also verify that the message to contacts does not appear in the chat window.

Disable the Message Overlay
Disabling the message overlay removes the ability to display messages to a customer after they're in queue. The overlay can be used to display messages to the contact for things such as estimated wait time, their current position in the queue, and so on.
Removing the message overlay from this channel![]() Various voice and digital communication mediums that facilitate customer interactions in a contact center. does not impact the availability of the message overlay in other Live Chat channels. After you disable the message overlay for this channel
Various voice and digital communication mediums that facilitate customer interactions in a contact center. does not impact the availability of the message overlay in other Live Chat channels. After you disable the message overlay for this channel![]() Various voice and digital communication mediums that facilitate customer interactions in a contact center., it cannot be dynamically re-enabled. To re-enable the message overlay, you must remove the line of code that you add in the following steps.
Various voice and digital communication mediums that facilitate customer interactions in a contact center., it cannot be dynamically re-enabled. To re-enable the message overlay, you must remove the line of code that you add in the following steps.
- In NiCE CXone, click the app selector and select ACD.
- Go to Digital > Points of Contact Digital.
- Click Chat in the list of channel types at the top of the page.
- On the My Channels page, click Customization for the Live Chat channel you want to modify.
-
Copy the following line of code:
[data-selector="ACTIVITY_BAR"] {display: none !important}
- Paste the copied code into the Custom CSS field under Customization (CSS and JS).
- Click Save.
Verify JSON with the Digital Experience (DX) Mirror Tool
The JSON mirror tool allows you to verify the JSON for digital chat-based channels, such as Live Chat![]() Agents and contacts interact on a real-time basis.. It does this by processing JSON you paste into the tool's window. If the JSON is properly formatted and contains all the required parameters, the script displays the output based on your JSON.
Agents and contacts interact on a real-time basis.. It does this by processing JSON you paste into the tool's window. If the JSON is properly formatted and contains all the required parameters, the script displays the output based on your JSON.
The JSON mirror tool consists of a custom script and a digital chat-based channel that's created specifically to use with the tool. The script is designed only to verify JSON that's pasted into the chat window. It doesn't support interactions with contacts.
You can use the JSON mirror tool in one of two ways:
-
Use the tool set up by NiCE CXone. This tool uses a digital Live Chat channel, but it can verify JSON for any digital channel. You can find the tool at the following URL:
https://vah-client-app.s3.us-west-2.amazonaws.com/dfo/dfo-mirror.html

- Set up a mirror tool on your own system. You can use your own Live Chat or other digital channel and the JSON mirror tool custom script that NiCE CXone provides.
You can use JSON schemas for some rich media types with digital Live Chat. Those schemas are available in the online help. This includes media such as images, quick replies, and URLs.
Set Up the JSON Mirror Tool
- Download the Digital Experience (DX) mirror tool script and import it into Studio.
- Add a digital Live Chat channel in NiCE CXone. You don't need to configure routing or queues for the channel.
- Configure the channel to use the mirror tool script and a digital ACD skill Used to automate delivery of interactions based on agent skills, abilities, and knowledge.. You can use any digital ACD skill with the mirror tool, but ensure that the one you choose doesn't affect your organization's reporting.
- Create a webpage to use with the tool. This is the page that will hold the chat window used with the mirror tool. It doesn't have to have any other content.
- Enable and initialize the channel. You don't need to customize the JavaScript code that you add to the webpage. You may be able to do this on your local computer or you may need to upload the page to a web server.
- Open the webpage in a browser.
- If prompted, enter a name into the Your name field on the chat window and click Begin Conversation.
-
Paste the following sample JSON into the message field, then press Enter to send a test message.
{ "prompts": [{ "mediaSpecificObject": { "dfoMessage": { "messageContent": { "type": "PLUGIN", "payload": { "elements": [{ "id": "bf2521f4-5e85-413f-b6ed-815d1c3905f0", "type": "TEXT", "fallbackText": "Text sent as fallback if external platform can't accept rich messages.", "text": "This is a successfully created outbound message." "mimeType": "text/html" }] "postback": "postback-value" "fallbackText": "Text sent as fallback if external platform can't accept rich messages." } } } } }] } -
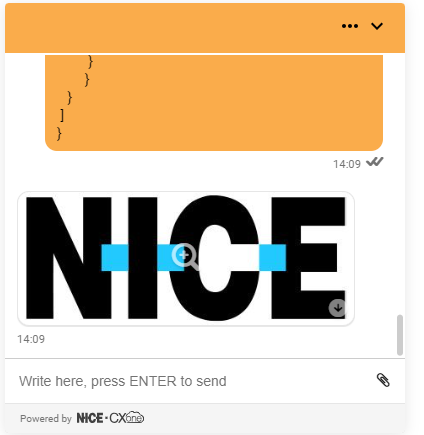
After the message sends, you should receive the NiCE company logo as a response in the chat window, as shown in the following image.
Use the JSON Mirror Tool
- In a web browser, go to the URL of the page that holds the Live Chat window for the mirror tool.
- Click the Live Chat window.
- If prompted, enter a name and click Send.
-
Paste a JSON string into the message field in the chat window and press Enter to send it. The Digital Experience (DX) mirror script connected to the chat window sends the JSON to Digital Experience (DX), which validates the JSON and replies. The reply indicates the results of the validation:
- Valid: The reply is output that looks as you expected it to.
- Invalid: The reply is an error message or output that doesn't look as you expected it to.