You can customize live chat![]() Agents and contacts interact on a real-time basis. and chat messaging
Agents and contacts interact on a real-time basis. and chat messaging![]() Asynchronous chat in which contacts send a chat message anytime and wait for a reply. with JavaScript. CXone Mpower provides default customizations and their correlating JavaScript API calls. You must include these API calls with the script tag that adds the chat to your website. To add these features, you need access to your website's code. This page explains where to add the JavaScript and the exact lines of code to include. You should also have familiarity with JavaScript or web development to confidently use the information on this page.
Asynchronous chat in which contacts send a chat message anytime and wait for a reply. with JavaScript. CXone Mpower provides default customizations and their correlating JavaScript API calls. You must include these API calls with the script tag that adds the chat to your website. To add these features, you need access to your website's code. This page explains where to add the JavaScript and the exact lines of code to include. You should also have familiarity with JavaScript or web development to confidently use the information on this page.
The Jungle, a subsidiary of Classics, Inc., runs a gift store as part of its website. The administrator, Mowgli Kipling, has set up the following API calls to help his chat agents work with gift store customers:
- Custom visitor variables collect information about the colors of items the contact views while on the gift store pages. This information is then available to the agent when the contact initiates a chat.
- Custom visitor events are recorded for each product a contact clicks on. After five product clicks and no clicks of the Buy button, a proactive "Having Trouble Deciding?" pop-up offers the contact a chat.
You can customize the following aspects of your chat channels![]() Various voice and digital communication mediums that facilitate customer interactions in a contact center.:
Various voice and digital communication mediums that facilitate customer interactions in a contact center.:
- Chat behavior: Customize how the chat window behaves. This includes opening and closing the chat window or enabling game mode. Game mode lets customers play the game Snake while waiting for an agent.
- Chat information: Customize the information displayed in the chat window. This includes things like the customer's name, agent image, or activity status.
- Custom fields, labels, and phrases: Define custom fields or customize field labels. You can also configure alternate text for the automated messages shown to contacts.
- Chat window appearance: Customize the appearance of the chat window. You can change things like the size and position of the window on the webpage.
- Custom CSS: Define custom CSS for the chat window.
- Proactive actions: Customize the experience with proactive actions based on customer behavior.
- Other functions: Other things you can configure include:
- Having the host environment listen for certain events.
- Integrating digital chat channels into iOS or Android apps.
- Enabling OAuth authentication.
Currently, all JavaScript APIs support a Brand Embassy loader for each call. If you use standalone CXone Mpower chat on your website, all of these calls also support a new CXone Mpower loader. Eventually all JavaScript APIs for chat will use the CXone Mpower loader instead of Brand Embassy.
The structure of the JavaScript call is different depending on which loader you use. You cannot use both structures at the same time. Only use one or the other depending on which loader you use.
If you use CXone Mpower Guide to implement chat on your website, use the CXone Mpower loader. Not all of the calls on this page are supported in Guide, but the Guide documentation lists all supported JavaScript calls.
If you use the CXone Mpower loader, either through digital chat or Guide, structure calls like this:
cxone('chat','enableChatAlwaysOnline');If you use Guide to implement chat, you must also structure default launch snippets like this:
cxone('guide','init',);If you use the Brand Embassy loader, structure calls like this:
brandembassy('chat','enableChatAlwaysOnline');Add JavaScript Calls to a Chat Channel
If you haven't yet done so, set up a live chat or chat messaging channel. Test the channel to ensure that it works with the default settings before you add customizations. Set up chat customizations in a test environment before releasing them into your production environment. This will help minimize disruptions to your website visitors. It will also help ensure that your customizations work as intended.
Copy the script and API calls exactly as shown. Any unexpected changes could cause your channel to malfunction.
- Click the app selector
 and select ACD.
 -
Go to Digital > Points of Contact Digital.
- Under Your Channels, click Website Script.
- Copy the JavaScript code from the page and paste it into a text editing program like Notepad++. Be sure to include the opening and closing <script> tags.
-
In Notepad++, just above the closing </script> tag of the code you pasted in, add the JavaScript calls you want to use. In the following example image, the comment indicates where to add calls. The supported calls you can use are described in the rest of this page.
-
Copy and paste the entire script, including the opening and closing <script> tags, into the header of a page of your website.
-
Visit the modified page and send test chat messages to make sure your customizations work as intended.
-
When it is fully tested and works as expected, copy the final script into the header of each page that should have the chat widget.
Chat Behavior JavaScript Calls
The calls in this section allow you to change how chat windows behave.
Open Chat Window
Opens a chat window automatically. The default behavior is for chat windows to open when a contact clicks on the chat icon.
cxone('chat', 'openChatWindow');Close Chat Window
Closes a chat window automatically. The default behavior is for chat windows to close when a contact clicks on the chat icon.
cxone('chat', 'hideChatWindow');Chat Always Online
Displays the chat window as if there are agents available, even when no agents are online.
cxone('chat', 'chat','enableChatAlwaysOnline');Persist Custom Fields from Previous Chat
You can choose if you want custom fields to persist or be purged from local storage after the interaction has been initiated. This lets you select which custom fields continue to appear across all interactions with a contact. The 'field_id' refers to the value of the Ident field when creating a custom field.
cxone('chat','enablePrecontactSurveyFieldAutoFill'('field id');Send Postback Data from Adaptive Card
Studio actions and bots can send Adaptive Cards to contacts via chat. In order for digital chat to send postback data to Studio or a bot, you must enable a handler. An Adaptive Card handler functions within the bot or Studio action to manage and respond to engagements with Adaptive Cards. The handler activates when a user interacts with components of an Adaptive Card, such as clicking a button or selecting an option from a drop-down menu. The handler deciphers the user's input and determines the appropriate response or action to take. Add the default handler command and the send message command, so that Studio or bots can respond accordingly or store the Adaptive Card data for reporting purposes. You can also override the default handler with a custom handler command.
<script>
	(function (i, s, o, r, g, v, a, m) {
	g = v ? g + '?v=' + v : g; i['CXoneDfo'] = r;
	i[r] = i[r] || function () {(i[r].q = i[r].q || []).push(arguments)}; i[r].l = +new Date(); i[r].u = g;
	a = s.createElement(o); m = s.getElementsByTagName(o)[0]; a.async = true;
	a.src = g + '?' + Math.round(Date.now() / 1000 / 3600); m.parentNode.insertBefore(a, m);
	})(window, document, 'script', 'cxone', 'https://web-modules-de-na1.staging.niceincontact.com/loader/1/loader.js');

	cxone('guide', 'init',  '1032');
	cxone('guide', 'init', 1032, 'chat_5184dc2e-0c75-4265-8a2b-4221c5aebfe1');

	cxone('chat', ‘adaptiveCardOnExecuteAction’, 'button1Submit', (action, chatSdkInstance) => {
		let messageContent = {
			type: "TEXT",
			payload: {
				text: action.title
			},
			postback: action.id
		}

		chatSdkInstance.sendMessage(messageContent)
	});
</script>
Add default Adaptive Card handler command:
adaptiveCardOnExecuteAction(actionId: string, callback: (action: node_modules/adaptivecards/src/card-elements.ts::Action) => void)Send message command:
sendMessage(messageContent: MessageContent)Create custom handler command:
{
	"acType": "Action.Execute", // type of action Action.Execute or Action.Submit
	"acVerb": "null|string", // only if `verb` is provided in the Action
	"acActionId": "null|string" // only if id is provided in the Action
	"acData": { // `data` are provided in Action
		"firstName": "Ichabod",
		"lastName": "Crane",
		"_messageText": "Did you fall asleep again?"
	}
}
{
	...,
	"messageContent": {
		"type": "TEXT",
		"payload": {
			"text": "Submitted something for you", // use Action.Title if _messageText is not provided (in case Action.Title is not provided, send Action.type)
		},
		"postback": "{\"acType\":\"Action.Execute\",\"acData\":{\"firstName\":\"John\",\"lastName\":\"Doe\",\"_messageText\":\"Submitted something for you\"}}"
	}
							}
}
{
	"thread": {
		"idOnExternalPlatform": "788a67af-263d-48b1-b67e-8675309"
	},
	"messageContent": {
		"type": "ADAPTIVE_CARD",
		"payload": {
			"$schema": "http://adaptivecards.io/schemas/adaptive-card.json",
			"type": "AdaptiveCard",
			"version": "1.4",
			"body": [
				{
					"type": "TextBlock",
					"text": "Present a form and submit it back to the originator"
				},
				{
					"type": "Input.Text",
					"id": "firstName",
					"label": "What is your first name?"
				},
				{
					"type": "Input.Text",
					"id": "lastName",
					"label": "What is your last name?"
				}
			],
			"actions": [
				{
					"type": "Action.Execute",
					"title": "Fire!",
					"data": {
						"_messageText": "Submitted something for you"
					}
				}
			]
		}
	}
}
Set Authorization Code
Sets an authorization code for an OAuth flow. OAuth is an authentication protocol. It allows you to let one application interact with another on your behalf without exposing passwords. This must be called before chat initialization.
cxone('chat', 'setAuthorizationCode', 'authorization_code');Set Precontact Survey Prefilled Fields
Allows previously-entered custom field values to appear as an auto-fill option in later fields or interactions. Specific IDs inform the chat window which custom field values to save. When a contact begins a new conversation, these custom fields from previous conversations are automatically available. This helps save time if a contact needs to enter the same information in a new chat session that they've entered in a previous chat session, such as an email address. If there are multiple fields you want to appear as autofill options, include them all in the same API call.
cxone('chat', setPrecontactSurveyPrefilledFields', ['fieldIdent1', 'fieldIdent2']);Auto-Start a New Chat Session
Creates a new chat messaging![]() Asynchronous chat in which contacts send a chat message anytime and wait for a reply. or live chat
Asynchronous chat in which contacts send a chat message anytime and wait for a reply. or live chat![]() Agents and contacts interact on a real-time basis. session if one is not currently in progress. Use this call on lower-traffic pages of your website to avoid overwhelming your agents with contacts.
Agents and contacts interact on a real-time basis. session if one is not currently in progress. Use this call on lower-traffic pages of your website to avoid overwhelming your agents with contacts.
Digital Experience creates a new case and adds it to the queue when the first message of the chat session is sent. A hidden, automated message is sent on the customer's behalf when the chat session starts. This decreases the amount of time contacts wait for an agent by starting the process sooner. Chat sessions start when a contact clicks the chat icon to begin a conversation or when the chat window opens for auto-started chat sessions. Although the initial message is hidden from the customer, the agent can see it.
You can customize the text of the initial, hidden message.Auto-starting a chat session skips the precontact survey form. Because of this, you need to use other methods to collect information about contacts. For example, you can have agents enter the information manually into the customer card. You can also configure customer authentication using an OAuth integration.
Routing for auto-started cases occurs according to the routing queues![]() Determine which agents to route digital cases to, using criteria such as the agent having expertise in that type of case. configured in Digital Experience. For live chat sessions, if no agents are available, the chat window displays a Waiting for available agent message.
Determine which agents to route digital cases to, using criteria such as the agent having expertise in that type of case. configured in Digital Experience. For live chat sessions, if no agents are available, the chat window displays a Waiting for available agent message.
To auto-start a chat session, use these calls in the order shown:
cxone('chat', 'openChatWindow');

cxone('chat', 'autoStartSession');
If you add additional calls to the script, autoStartSession must always be the last call in the script. For example:
// set customer name (as this is required field)
cxone('chat', 'setCustomerName', 'Elizabeth');

// open chat window so user can start to chat
cxone('chat', 'openChatWindow');

// and finally start the new chat session (without the pre-chat form)
cxone('chat', 'autoStartSession');
Enable Concurrent Chat Sessions
You can let contacts start multiple chat sessions in the same browser. If a contact is already in an active chat in one browser tab, they can start a second chat in a new browser tab or window.
Specify how the chat data is stored by using one of the following options:
local: Data persists in the browser after the tab or window closes. This is the default storage method. If multiple chat sessions are open in different tabs at the same time, they are all considered the same interaction. The chat conversation and experience are the same across all tabs.
session: Data is stored for each individual tab or window and clears when the tab or window closes. This allows users to start multiple chat sessions across different tabs or windows. Each chat session is treated as a separate interaction.
inMemory: The sessionId and customerId are only used in the memory of the chat application. Data does not persist in the browser. Refreshing the browser deletes all history. This enables multiple concurrent chat sessions when opened in multiple browser tabs or browser windows.
To enable concurrent chat sessions, add the storageType key with a value of session or inMemory.
If you use storageType: 'local' and still want to purge the conversation history, you can create an event listener that removes the customerId after the chat ends.
>
cxone('chat',
	'init',
	'MY_BRAND_ID_123',
	'MY_CHANNEL_ID_321',
	undefined,
	{
		storageType: 'session',
	},
);
Purge Conversation History
Removes conversation history after a chat conversation ends. This may be useful if you use the default storage option of the chat, local storage. This storage option stores data even after the browser instances close. In this case, you can specifically remove the conversation history by clearing the customerID from the local storage. The following example creates an event listener to listen for the caseStatusChanged event from the chat. This indicates that a chat session ended. Afterward, the removeItem command is called, which removes the customerID from the browser's local storage.
cxone('chat', 'onPushUpdate', ['CaseStatusChanged'], pushUpdatePayload => {
	if (typeof pushUpdatePayload === 'undefined' || typeof pushUpdatePayload.data === 'undefined') {
		return;
	}
	const { status } = pushUpdatePayload.data.case || {};
	if (typeof status === 'undefined') {
		return;
	}
	// When a previous case has been closed, this will set the custom fields again.
	if (status === 'closed') {
		localStorage.removeItem('_BECustomerID')
		);
	}
});
Customize the Initial Automated Contact Message
Digital Experience creates a new case and adds it to the queue when the first message of the chat session is sent. A hidden, automated message is sent on the customer's behalf when the chat session starts. This decreases the amount of time contacts wait for an agent by starting the process sooner. Chat sessions start when a contact clicks the chat icon to begin a conversation or when the chat window opens for auto-started chat sessions. Although the initial message is hidden from the customer, the agent can see it.
The default message is the text on the button that the customer clicks to start the conversation. You can customize the text of the initial, automated message in three ways:
- Override the default button text.
cxone('chat', 'sendFirstMessageAutomatically', 'Hello');
cxone('chat', 'setFirstAutomatedMessageContent', 'Hello, I have a question');
- Change the message text on the Translations page.
Make the Initial Automated Message Visible to Contacts
If you want the contact to be able to see the initial automated message, add this call to your script:
cxone('chat', 'hideFirstSentMessage', false);
Delay Case Creation
Digital Experience creates a new case and adds it to the queue when the first message of the chat session is sent. A hidden, automated message is sent on the customer's behalf when the chat session starts. This decreases the amount of time contacts wait for an agent by starting the process sooner. Chat sessions start when a contact clicks the chat icon to begin a conversation or when the chat window opens for auto-started chat sessions. Although the initial message is hidden from the customer, the agent can see it.
You can configure Digital Experience to wait for the contact's actual first message before creating a case using this call:
cxone('chat', 'sendFirstMessageAutomatically', false);
Enable Game Mode
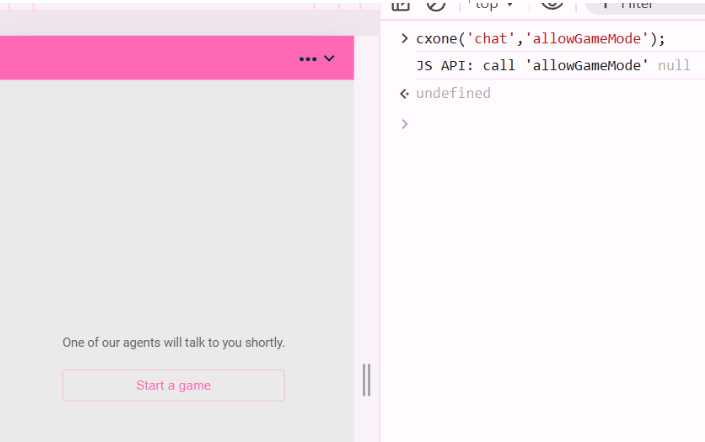
Allows contacts to play the game Snake while waiting for an agent.
cxone('chat', 'allowGameMode');Automated Satisfaction Survey
A satisfaction survey can be automatically detected and displayed in a pop-up. This enables or disables them to be detected and displayed or not.
cxone('chat', 'automatedSatisfactionSurveyModal', 'true');
cxone('chat', 'automatedSatisfactionSurveyModal', 'false');
//if not defined, the default is 'true'
Chat Information JavaScript Calls
These calls allow you to customize the information that's available to contacts during a chat session.
Get Customer Identity ID
Returns the unique identifier of the customer in the chat.
cxone('chat', 'getCustomerIdentityId');Hide Precontact Survey Form
The precontact survey form appears at the start of a chat messaging![]() Asynchronous chat in which contacts send a chat message anytime and wait for a reply. session. It collects information about the contact, such as their name. If you want, you can hide the precontact survey form and have the chat window appear as soon as a contact starts a chat messaging session.
Asynchronous chat in which contacts send a chat message anytime and wait for a reply. session. It collects information about the contact, such as their name. If you want, you can hide the precontact survey form and have the chat window appear as soon as a contact starts a chat messaging session.
cxone('chat', 'hidePreSurvey');Hide Queue Counter
The queue counter lets a contact know how soon an agent will be able to help them based on where they are in the agent's queue. You can hide the queue counter after the contact has been successfully routed to an agent. This allows agents to remove customer cards from their inbox without contacts noticing.
cxone('chat', 'hideQueueCounterAfterAssignment');
cxone('chat', 'hideAssignedAgent');
cxone('chat', 'hideSystemMessages');
Mute Chat Notification Audio
Allows you to turn the chat notification sound off. The chat notification sound is on by default. This needs to be configured regardless of other chat sound settings. You can change the value to 'false', to turn the chat notification audio back on.
cxone('chat', 'muteAudioNotification', 'true');
// OR
cxone('chat', 'muteAudioNotification');
Override Browser Language Translations
Overrides the user's browser language settings or a customized locale to a set translation. For example, you can ensure that certain text always appears in English regardless of a contact's browser language settings.
cxone('guide', 'init', 'brandId', 123, 'locale');Set Activity Status
Changes the message in the activity bar. For example, you could use it to communicate your response time for a chat messaging session. This could be helpful because chat messaging is an asynchronous form of chat, so contacts could have to wait to hear from an agent.
cxone('chat', 'setStatusMessage', 'We typically reply within 3 hours.');Set Agent's Image
Dynamically changes the agent image displayed in the chat window. By default, Digital Experience uses the image in the agent's profile. When you include this call in your script, it uses the image specified by the URL in the code snippet. Replace the example URL with the URL of the image you want the chat to use.
cxone('chat', 'setAgentImage', 'http://classics.com/images/agents/elizabeth_bennet.png');Set Customer ID
Sets a unique identifier for the customer in the chat.
cxone('chat', 'setCustomerId', 'customer_id');Set Customer Name
Customer Name is a field on the precontact survey form, which contacts are required to fill in prior to chatting with an agent on a chat messaging![]() Asynchronous chat in which contacts send a chat message anytime and wait for a reply. channel. This call dynamically fills the field.
Asynchronous chat in which contacts send a chat message anytime and wait for a reply. channel. This call dynamically fills the field.
cxone('chat', 'setCustomerName', 'Elizabeth');Set Date Format
Can be set to use absolute date format (12/03/2035) or relative date format (today, Monday).
cxone('chat', 'setDateFormat', 'date_format');
// date_format can be 'absolute' or 'relative'Set Locale
Sets the locale for translations in the chat window.
cxone('chat', 'setLocale', 'locale');Show Case Information
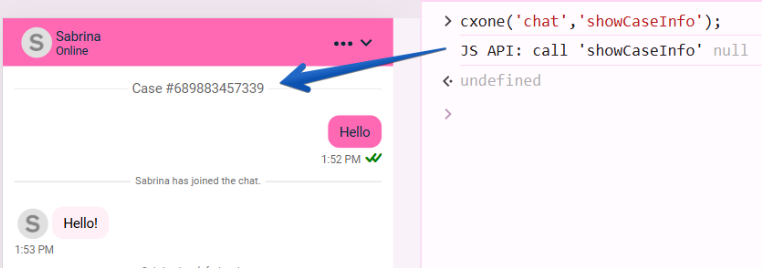
Only for chat messaging![]() Asynchronous chat in which contacts send a chat message anytime and wait for a reply. channels. Shows case information to the contact.
Asynchronous chat in which contacts send a chat message anytime and wait for a reply. channels. Shows case information to the contact.
cxone('chat', 'showCaseInfo');Show/Hide the Send Transcript Button
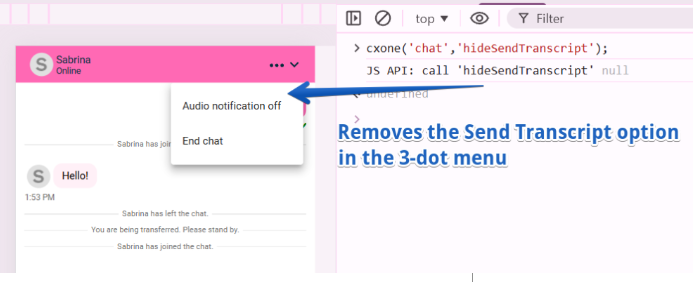
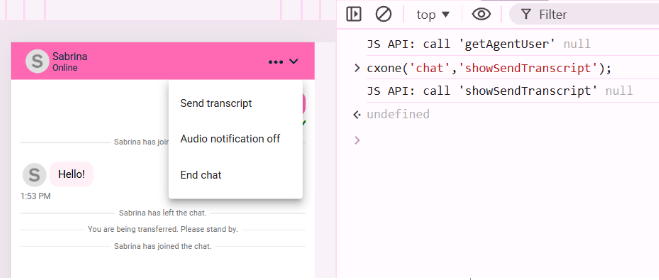
If you make the Send Transcript button visible, you must configure the chat channel to allow contacts to send the chat transcript to themselves. Configure this option for chat messaging or live chat.
cxone('chat', 'hideSendTranscript');
cxone('chat', 'showSendTranscript');hideSendTranscript:
showSendTranscript:
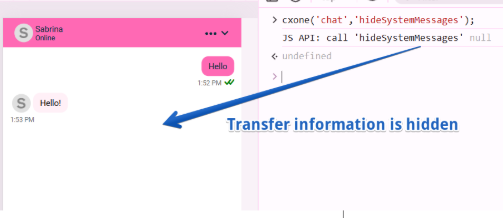
Show/Hide System Messages
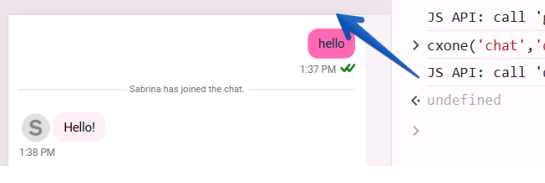
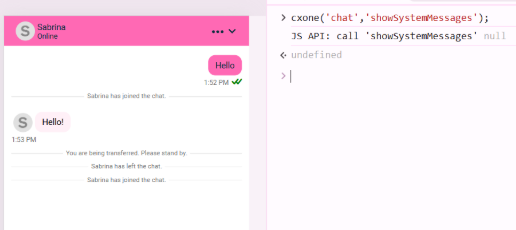
Shows or hides system messages like agent assignment history.
cxone('chat', 'chat','hideSystemMessages');
cxone('chat', 'showSystemMessages');showSystemMessages:
hideSystemMessages:
Terms of Use
You can make a terms of use document available to contacts from within the chat window. This function adds a button to the window. You can customize the button's label and style, and what happens when contacts click it. The on-click action can show the terms of use as:
- An internal window
- An external link
// Internal Modal Window
cxone('chat', 'showTermsOfUse', 'Show terms of Use', 'modal' , 'Our terms of use are ...');

// External Link
cxone('chat', 'showTermsOfUse', 'Show terms of Use', 'externalLink' , 'http://yourdomain.com/terms-of-use');

// If you want to explicitely disable this feature, you can use
cxone('chat', 'hideTermsOfUse');
To customize the appearance of the button or the internal window, use the CSS API calls described on this page.
Custom Fields, Labels, and Phrases
Create and Populate Custom Fields
The custom fields you can use with this call are the same as the ones you can use in Customer card. If you use these calls before opening a chat window, the fields in the precontact form are populated with the data you include in the JavaScript call.
To define the value of a single case custom field:
cxone('chat', 'setCaseCustomField', 'ident_of_custom_field', 'value_of_custom_field');
To define the value of more than one case custom field:
cxone('chat', 'setContactCustomFields', { customFieldIndent: 'value', secondCustomFieldIdent: 'value' });
To define the value of a customer card custom field:
cxone('chat', 'setCustomerCustomField', 'ident_of_custom_field', 'value_of_custom_field');
Custom fields are limited to 1024 characters.
Customize Chat Labels and Phrases
You can customize many of the labels and phrases that digital chat channels use, as well as define the customizations. If you need to dynamically change the phrases or screen labels, use these JavaScript calls.
To change a single message or label:
cxone('chat', 'setTranslation', 'key', 'your translation');
To change multiple messages or labels:
cxone('chat', 'setTranslations', {
   key1: 'your custom label',
   key2: 'your custom message'
});
Curly braces indicate variables that the system replaces with actual data. For example, {caseNumber} is replaced with the case number of the contact's chat session.
| Key | Default label/Message |
|---|---|
| allAgentsForQueueAreBusy | All our agents dedicated to your queue are currently busy. There {queue, plural, one {is} other {are}} <strong>{queue, number}</strong> {queue, plural, one {person} other {people}} ahead of you in the queue. |
beginButton | Begin chat! |
| cancel | Cancel |
| caseNumber | Case #{caseNumber} |
| change | Change |
| chattedWith | You just had a chat with |
| commonErrorText | There was an unexpected error. Please try again later. |
| done | Done |
| dragAndDropDropzone | Drag & drop files here, to send them |
| dragAndDropDropzoneRejected | Impossible to upload file :( |
| EmailLabel | |
| endChat | End chat |
| endChatTitle | Are you sure you want to end this conversation? |
| endGame | End game |
| ending | Ending chat... |
| fileSendingFailed | File sending failed |
| getTranscriptDescription | Send transcript of this conversation to the following email address: |
| getTranscriptLink | Get chat transcript |
| invalidToken | Invalid token |
| ipAddressBlocked | IP address is blocked |
| loading | Loading ... |
| loadPreviousButton | Load previous conversations |
| messageLabel | Message |
| networkErrorText | There was a network error. Please try again. |
| newCase | New case |
| noAgentOnlineForQueue | No agent is available for your queue at the moment. |
| offline | Offline |
| offlineFormDesc | We are not available at the moment |
| offlineFormSuccessMsgHead | Thank you! |
| offlineFormSuccessMsgSub | Your email was successfully sent. We'll get back to you soon. |
| online | Online |
| onlineFormText | To start a chat, please tell us your name. One of our agents will start helping you immediately. |
| pleaseSelect | Please select... |
| poweredBy | Powered by |
| preparingSession | Preparing session... |
| replyBoxPlaceholder | Write here, press<enter> to send |
| retry | Retry |
| sendFileTextSize | Please upload files smaller than {filesize} |
| sendFileTextSupportedFormat | supported formats. |
| sendFileTextSupportedFormatDesc | Images, Videos, {fileFormats} |
| sendMessageButton | Send message |
| sendNewEmail | Send new email |
| sendTranscript | Send transcript |
| snakeWaiting | You're {queue} in queue. |
| startChatInPopup | Ask us! |
| startNewChat | Start a new chat |
| statusReconnecting | Trying to connect… |
| surveySuccesfullySent | Thanks for your feedback! |
| systemChattingWith | You are now chatting with {name} |
| topic | Topic |
| transciptSentFailed | Send failed. |
| transciptSuccesfullySent | Transcript successfully sent! |
| tryAgainButton | Try again |
| unexpectedError | Unexpected error. |
| validationInvalidEmail | E-mail address is not valid |
| validationMandatory | This field is mandatory |
| validationShorterName | Please use shorter name |
| validationShortMessage | Your message is too short |
| waiting | Waiting... |
| waitingDescription | One of our agents will talk to you shortly. |
| waitingFooter | Hit <spacebar> to shorten the waiting. |
| waitingForAgent | Waiting for agent... |
| waitingInQueue | Waiting for agent. You're {queue} in queue. |
| yourNameLabel | Your name |
Translate Custom Fields
You can translate custom fields displayed in the chat window.
cxone('chat', 'chat', 'setCustomTranslations', {
    myCustomFieldATranslationKey: "Custom field value A",
    myCustomFieldBTranslationKey: "Custom field value B",
});
Chat Window Appearance Calls
You can modify the appearance of the chat window.
Close Chat Icon
When set to true, an X icon is displayed on the window instead of the End Chat option in the settings menu.
cxone('chat', 'enableCloseIcon', true);
Hide Assigned Agent
cxone('chat', 'hideAssignedAgent');
Hide Header
cxone('chat', 'hideHeader');
Hide Pop-Ups
cxone('chat', 'hidePopups');
Show Customer Avatar
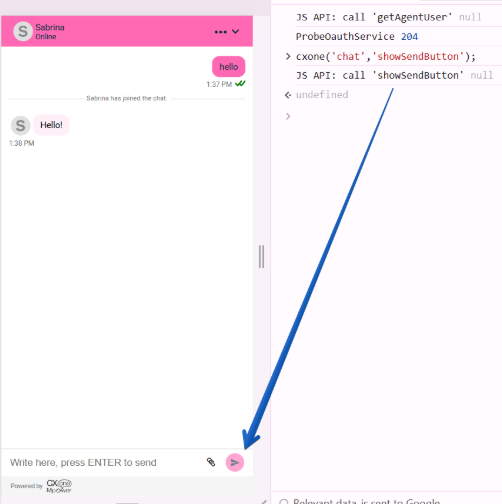
cxone('chat', 'showCustomerAvatar');Show the Send Button
cxone('chat', 'chat','showSendButton');Size
Customizes the width and height of the chat window. You can use absolute or relative units supported by CSS specification.
cxone('chat', 'setWindowWidth', '100%');
cxone('chat', 'setWindowHeight', '100%');
Full Display Mode
cxone('chat', 'setFullDisplay');
// OR
cxone('chat', 'chat','setWindowWidth', '100%');
cxone('chat', 'chat','setWindowHeight', '100%');
Position and Offset
The setPositionX call defines the left or right side of the screen as the starting position. The setOffsetX and setOffsetY calls define how many pixels the chat window is offset horizontally and vertically from the starting point, respectively.
// set horizontal starting position
cxone('chat', 'setPositionX', 'right');

// set horizontal and vertical offset
cxone('chat', 'setOffsetX', '40'); // default = 20
cxone('chat', 'setOffsetY', '40'); // default = 20
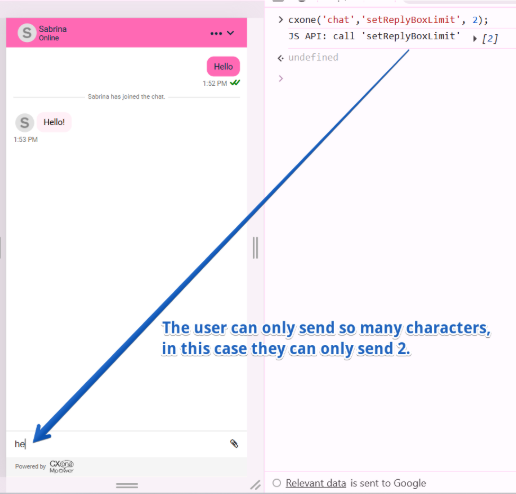
Set Character Limit for Reply Box
cxone('chat', 'setReplyBoxLimit', '280'); // default = null
Custom CSS with Data Selectors
You can customize the chat window appearance by adding your own CSS. Specify the part of the chat window you want to style with a data-selector attribute. The drop-down below contains a list of all the components that you can select with the data-selector attribute. Data selectors allow you to specify the part of the chat window you want to apply the custom CSS to. After the data-selector, add your styling inside curly braces. If you want to style multiple elements, you must add all your CSS in a single JavaScript call. If you use the same JavaScript call multiple times, the last JavaScript call will override all previous CSS. You can also customize CSS for chat directly in CXone Mpower.
To add custom CSS with data selectors, use this JavaScript call as a reference:
cxone('chat', 'setCustomCss', '[data-selector="CUSTOMER_MESSAGE_BUBBLE"] {color: white !important; background: black !important}
[data-selector="CONTENT"] {background: green !important}`);Core Containers & Layout
- MESSENGER
- WINDOW
- WINDOW_QUEUE
- CONTENT
- SCROLL_BOX_WRAPPER
- SCROLL_BOX_CONTENT
- SCROLL_DOWN_BUTTON
- SCROLL_DOWN_UNREAD_BADGE
Header & Navigation
- HEADER
- GROUP_CHAT_HEADER_ICON
- HEADER_ACTION_MENU_BUTTON
- HEADER_MINIMIZE_WINDOW
- DROPDOWN_MENU
- BACK_TO_CONVERSATION
Messages
- CUSTOMER_MESSAGE
- AGENT_MESSAGE
- CUSTOMER_MESSAGE_BUBBLE
- AGENT_MESSAGE_BUBBLE
- MESSAGE_TOOLTIP
- MESSAGE_STATUS_LINE
- MESSAGE_TIMESTAMP
- IS_TYPING
- DELIMITER
- LOAD_MORE_MESSAGES
- LOAD_MORE_MESSAGES_BUTTON
User & Agent Info
- USER_PROFILE
- USER_NAME
- USER_STATUS
- USER_STATUS_DOT
- AVATAR
- DEFAULT_AVATAR
- END_SESSION
- END_SESSION_AGENT_NAME
- END_SESSION_AGENT_PROFILE
- END_SESSION_BODY
- END_SESSION_FOOTER
Input & Reply
- REPLY_BOX
- INPUT
- INPUT_ERROR
- TEXTAREA
- TEXT_BUTTON
- PRIMARY_BUTTON
- SECONDARY_BUTTON
- BUTTON_LABEL
- CANCEL_BUTTON
- SEND_BUTTON
- UPLOAD_ATTACHMENT_BUTTON_CONTAINER
- UPLOAD_ATTACHMENT_BUTTON
- SEND_TRANSCRIPT
- START_NEW_CHAT
- END_CHAT_SESSION_BUTTON
Forms & Surveys
- FORM_FIELD_CONTAINER
- FORM_FIELD_LABEL
- FORM_FIELD_ERROR_MESSAGE
- PRECONTACT_SURVEY
- PRECONTACT_SURVEY_DESCRIPTION
- PRECONTACT_SURVEY_FOOTER
- PRECONTACT_SURVEY_MAIN_CONTAINER
- SATISFACTION_SURVEY
Proactive & Modal Pop-ups
- PROACTIVE_CHAT_POPUP
- PROACTIVE_CHAT_FULL_IMAGE
- PROACTIVE_CHAT_IMAGE
- PROACTIVE_CHAT_CONTENT
- PROACTIVE_CHAT_HEADING
- PROACTIVE_CHAT_SUBHEADING
- PROACTIVE_CHAT_BODY
- PROACTIVE_CHAT_ACTION_BUTTON
- PROACTIVE_CHAT_CLOSE_BUTTON
- PROACTIVE_CHAT_HTML_POPUP
- INACTIVITY_POPUP
- INACTIVITY_POPUP_HEADING
- INACTIVITY_POPUP_BODY
- INACTIVITY_POPUP_CALL_TO_ACTION
- INACTIVITY_POPUP_TIMER
- INACTIVITY_STATUS
- ENDCHAT_INACTIVITY_STATUS
- TERMS_OF_USE_MODAL
- TERMS_OF_USE
- END_CHAT_MODAL
- MODAL_MAIN_CONTENT
- MODAL_ACTIONS
- POPUP
Status & Connection
- CONNECTION_STATUS
- OFFLINE
- OFFLINE_ICON
- OFFLINE_TEXT
- SKELETON_LOADER
Miscellaneous
- DROPZONE_WRAPPER
- TRANSCRIPT
Apply custom CSS components using the data-selector attribute only. Don't apply it to class selectors or other parts of the JavaScript code, such as in this example:
.Widget__Widget___1qQCf { background: red; }
cxone('chat', 'setCustomCss', '[data-selector="CUSTOMER_MESSAGE_BUBBLE"] {color: white !important; background: black !important};');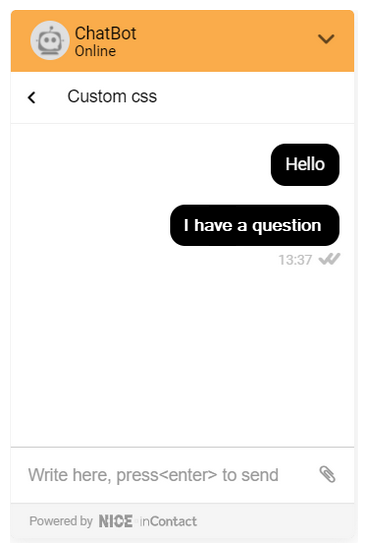
Window components can consist of multiple nested blocks. The component selectors listed in this section name the root of each component. If you want to apply CSS to one of the nested blocks of a component, use the developer's console to inspect the component so you can select the correct block.
Proactive Actions
The calls in this section allow you to proactively engage customers in a chat based on their behavior.
Execute Trigger
Starts the Workflow Automation trigger defined by the trigger_id.
cxone('chat', 'executeTrigger', 'trigger_id');Set Visitor Event
Stores the defined customer behavior (the event) for reporting purposes. When this call is used with the Mobile SDK, event_type is changed to custom_event_type.
cxone('chat', 'setVisitorEvent', 'event_type', 'custom_event_data');Set Visitor Variable
Stores the defined customer information for reporting purposes.
cxone('chat', 'setVisitorVariable', 'variable_identifier', 'variable_value');Store Conversion
Stores the customer behavior as a conversion for reporting purposes.
cxone('chat', 'storeConversion', 'conversion_type', 'conversion_value', 'conversion_date');
// conversion_date is optional, default is now
Web Visitor Tags
Content in this section is for a product or feature in controlled release (CR). If you are not part of the CR group and would like more information, contact your Account Representative.
You can tag contacts that exhibit certain behaviors on your website. This feature uses tags from Digital Experience and requires Guide.
To add a tag to a contact:
cxone('chat', 'assignTag', 'tagID');To remove a tag from a contact:
cxone('chat', 'removeTag', 'tagID');Integrate with Third-Party Applications
The calls in this section allow you to receive push notifications when certain chat events occur.
Recognize Active Threads in the Chat Window
cxone('chat', 'getOngoingThreads');Recognize Ongoing Contact in the Chat Window
cxone('chat', 'getOngoingContact')
Receive Push Notification for Specific Chat Events
Use any of the following inputs to replace 'event' in the examples below.
CaseToRoutingQueueAssignmentChanged
PageViewCreated
MessageCreated
MessageDeliveredToUser
MessageDeliveredToEndUser
MessageSeenByUser
MessageSeenByEndUser
MessageReadChanged
MessageAddedIntoCase
CaseInboxAssigneeChanged
CaseCreated
CaseStatusChanged
SenderTypingStarted
SenderTypingEnded
MessageNoteCreated
ContactRecipientsChanged
To receive a notification for one chat event:
cxone('chat', 'onPushUpdate', 'event', callback);To receive a notification for more than one chat event:
cxone('chat', 'onPushUpdate', ['event', 'event', 'event'], callback);To receive a notification for all chat events:
cxone('chat', 'onAnyPushUpdate', callback);Integrate to Android or iOS Applications
You can integrate digital chat into Android or iOS apps. The native application must use WebView where the JavaScript initialization code is added. This example code uses the JavaScript from this page to modify the look and behavior of the chat function:
<script async type=”text/javascript”>
  (function(i,s,o,r,g,v,a,m){g=v?g+'?v='+v:g;i['BrandEmbassy']=r;
    i[r]=i[r]||function(){(i[r].q=i[r].q||[]).push(arguments)};i[r].l=+new Date();
    a=s.createElement(o);m=s.getElementsByTagName(o)[0];a.async=1;
    a.src=g+'?'+Math.round(Date.now()/1000/3600);m.parentNode.insertBefore(a,m)
  })(window,document,'script','brandembassy','https://livechat-static.brandembassy.com/3/chat.js');

  //init of Livechat
  cxone('chat', ‘init’, BRAND_HASH);

  // hiding unwanted UI elements
  cxone('chat', 'hideHeader');
  cxone('chat', 'hidePopups');

  // stretching livechat to full width and height
  cxone('chat', 'setFullDisplay');

  // Customer's name
  cxone('chat', 'setCustomerName', 'CUSTOMER_NAME');

  // Other optional Custom Fields
  cxone('chat', 'setCustomField', 'CUSTOM_FIELD_IDENT', 'CUSTOM_FIELD_VALUE');

  // Start Chat
  cxone('chat', 'openChatWindow');
  cxone('chat', 'autoStartSession');

</script>

