

NiCE CXone Bot Builder supports using Adaptive Cards in bot responses. You can use them in stories![]() Used to train a bot for interaction handling based on intent and context., rules
Used to train a bot for interaction handling based on intent and context., rules![]() Used to define a bot response to messages that don't change with context., and fallback
Used to define a bot response to messages that don't change with context., and fallback![]() A plain text alternative sent when the destination doesn't support rich media..
A plain text alternative sent when the destination doesn't support rich media..
Developed by Microsoft, Adaptive Cards ![]() are a method of creating rich messaging
are a method of creating rich messaging![]() Elements in digital messaging such as buttons, images, menus, and option pickers. content. They're an open card exchange format that allows you to send UI content in a common and consistent way. With Adaptive Cards, you can send interactive messages that are more complex and helpful than those containing only standard rich media elements.
Elements in digital messaging such as buttons, images, menus, and option pickers. content. They're an open card exchange format that allows you to send UI content in a common and consistent way. With Adaptive Cards, you can send interactive messages that are more complex and helpful than those containing only standard rich media elements.
Currently, only digital chat supports Adaptive Cards. Live chat channels currently support adaptive cards in MAX, but not in Agent. If messages with Adaptive Cards are sent on other channels, the designated fallback![]() A plain text alternative sent when the destination doesn't support rich media. text is used instead.
A plain text alternative sent when the destination doesn't support rich media. text is used instead.
Bot Builder doesn't have any Adaptive Cards available by default. You must design your own using the Microsoft Adaptive Card designer, which is embedded in Bot Builder.
Using the Adaptive Card designer, you can create Adaptive Card templates to use with Bot Builder. When a bot executes a response that includes an Adaptive Card template, the template is dynamically completed with the information appropriate to that interaction and sent to the contact![]() The person interacting with an agent, IVR, or bot in your contact center..
The person interacting with an agent, IVR, or bot in your contact center..
| Concept | Definition | Example | What the Bot Does |
|---|---|---|---|

Utterance |
Anything a contact |
"I lost my password." "What is my balance?" "Are you a bot?" |
The bot uses Natural Language Understanding (NLU) to analyze each contact utterance to determine its meaning, or intent. |

Intent |
What the contact wants to communicate or accomplish. Every message the contact sends has an intent. |
"I lost my password" has the intent of "reset password". "Hello" has the intent of "greeting". |
The bot analyzes a contact's message using NLU |

Entity |
A defined piece of information in a contact's message. | Person or product name, phone number, account number, location, and so on. | The bot uses NLU to identify entities in a contact's message. Entities help the bot understand what the contact's message means. |

Slot |
An entity extracted from a contact's message and saved for use in bot responses. Similar to a variable. | Creating a slot for contact name lets the bot use that name in responses during an interaction, making it more personal. | When configured to do so, the bot extracts an entity from a contact message and saves it in a slot. You can have your bot use this information later in the conversation. |

Rule |
Defines bot responses to messages that don't change meaning with context. |
|
Rules are one of two ways you can configure how your bot responds to an intent. Rules are useful for certain kinds of intents, but not all intents. |

Story |
Trains a bot to handle an interaction based on message intent and conversational context. | In an interaction about a forgotten password, the bot would respond to "How do I do that?" in one way. If the interaction were about creating a new account, the response would be quite different even though in both cases the contact is using the same words with the same intent—to get more information. | Stories are the second of two ways you can configure how your bot responds to an intent. Stories teach the bot how to use the context of the conversation to respond appropriately. |

Bot Action |
Anything a bot says or does while handling an interaction. |
In an interaction about a forgotten password, the bot responds by sending the link to the password reset FAQ on the website. When a contact expresses frustration, such as "I don't understand! It's not working!!!" the bot responds with "I'm sorry. Would you like me to transfer you to a human agent?" When the contact says yes, the bot initiates the transfer. |
Bot actions are the options you have when defining how you want your bot to respond to each intent. They give you the flexibility to configure each response to achieve the outcome that meets the contact's needs. |
Adaptive Card Support by Channel
Adaptive Cards can only be used on channels that support them. Currently, it supports only Digital chat channel.
If your bot sends messages on channels that support Adaptive Cards as well as channels that don't, you must configure rich messaging fallback![]() A plain text alternative sent when the destination doesn't support rich media.. The fallback is sent in place of the Adaptive Card on channels that don't support them. You can configure rich messaging fallback for each bot response that uses Adaptive Cards.
A plain text alternative sent when the destination doesn't support rich media.. The fallback is sent in place of the Adaptive Card on channels that don't support them. You can configure rich messaging fallback for each bot response that uses Adaptive Cards.
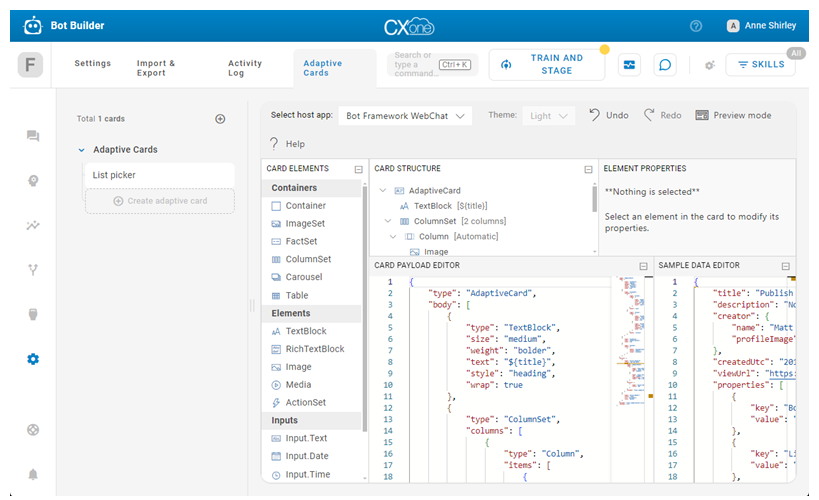
Adaptive Card Designer
The Adaptive Card designer allows you to create Adaptive Card templates to use with Bot Builder. When you create a story, rule, or fallback, you can add the Adaptive Card bot action, then choose one of the Adaptive Cards you created.
The Adaptive Card designer is a Microsoft product that's embedded in Bot Builder. Detailed documentation about using the designer is available on the Microsoft Adaptive Card website![]() .
.
You can use any available Adaptive Card elements in the cards you develop. To dynamically customize an Adaptive Card, you can use slot![]() Entity extracted from contact's message and saved for use in bot responses. Similar to a variable. variables . If you want to return data to your bot, you can include postback data in the configurations of an element such as a button. For example, this allows you to return the intent associated with the contact's choice back to the bot.
Entity extracted from contact's message and saved for use in bot responses. Similar to a variable. variables . If you want to return data to your bot, you can include postback data in the configurations of an element such as a button. For example, this allows you to return the intent associated with the contact's choice back to the bot.
Customize Adaptive Cards with Slot Variables
You can include slot variables in your Adaptive Cards. This allows you to display the entity![]() A piece of information gathered from the contact's messages during conversations with a bot. associated with the slot
A piece of information gathered from the contact's messages during conversations with a bot. associated with the slot![]() Entity extracted from contact's message and saved for use in bot responses. Similar to a variable. on the card when the card is sent to a contact.
Entity extracted from contact's message and saved for use in bot responses. Similar to a variable. on the card when the card is sent to a contact.
A slot variable is constructed using the name of the entity associated with the slot enclosed in curly brackets. For example, {phone_number}. You can use slot variables in the properties of an element in the Adaptive Card designer. You can also locate the element in the Card Payload Editor section of the Adaptive Card designer and add the slot variable to the element. For example, "text": "Phone Number: {phone_number}".
Interactive Buttons
You can include interactive buttons in your Adaptive Card. You can add them to any element with an Actions section in its properties. There are several types of buttons in the Adaptive Card designer that you can use. The following button types are particularly helpful with Bot Builder:
-
URL button: The button opens a URL. The JSON for this type of button looks like the following example:
{ "type": "Action.OpenUrl", "title": "View", "url": "http://www.nice.com" } -
Postback button: The button sends postback data to the bot when the customer clicks or taps the button. You can use this to send an intent
 The meaning or purpose behind what a contact says/types; what the contact wants to communicate or accomplish. back to the bot. The JSON for this type of button looks like the following example:
{
 "type": "Action.Submit",
 "title": "Connect with agent",
 "data": {
	"text": "/[intentName]"
 }
Create an Adaptive Card
New Adaptive Cards start with an example set of elements by default. You can modify the example elements or delete them all to start building a card from scratch.
After you create an Adaptive Card, you can use it in a bot response.
- In NiCE CXone, click the app selector
 and select Others > Bot Builder.
 - Click the bot you want to work with.
- Click Preferences > Adaptive Cards.
- To create a folder, click the plus sign
 and enter a name, then press Enter.
 - In the folder you want to add an Adaptive Card to, click the plus sign .
- Enter a name for the card and press Enter.
- Add elements to your card:
- Double-click an option under Card Elements to add it to.
- Drag and drop an element from the Card Elements section into the card preview.
- Click an element's compass
 in the card preview and drag the element to a new location.
- Configure your element's properties:
- Select an element in the preview or in the Card Structure section. The Element Properties section displays the selected element's properties. Modify them as needed. Each element has a different set of properties.
- Use the Card Payload Editor to view, configure, or modify the properties of an element.
- Click the X in the upper right corner of the preview to delete an element.
- Use a slot in an element by entering the entity name in an element property field. Enclose the name in curly brackets. For example, {phone_number}.
- To add an interactive button to the card, configure an action in your card as follows:
- Open a URL: Select Action.OpenURL as the Action type and enter the URL.
- Send postback data: Select Action.Submit as the Action type and enter the intent name in the Data field using the format {"text":"/[intentName]"}.
- To test the appearance of your card in the preview section, replace the default data in the Sample Data Editor section with example data for your card.
- Changes are saved automatically.