

The pop-up functions described on this page are no longer supported for chat. To continue using these functions, you must use Guide to implement Digital chat. Guide allows you to create engagement rules to interact with the visitors of your website.
Customizable pop-ups for Proactive Chat offer more flexibility and options than basic pop-ups. These pop-up options are available for Live Chat![]() Agents and contacts interact on a real-time basis. and Chat Messaging
Agents and contacts interact on a real-time basis. and Chat Messaging![]() Asynchronous chat in which contacts send a chat message anytime and wait for a reply. channels
Asynchronous chat in which contacts send a chat message anytime and wait for a reply. channels![]() Various voice and digital communication mediums that facilitate customer interactions in a contact center.. You can specify:
Various voice and digital communication mediums that facilitate customer interactions in a contact center.. You can specify:
- What page on your website the pop-up appears on.
- When the pop-up appears. You can configure certain events that trigger a pop-up to appear. Events can include things like a webpage visitor spending a certain amount of time on a page, or having a certain number of items in their shopping cart.
- What the pop-up looks like. There are many options for customizing the appearance of advanced pop-ups, including text color, border color, border images, and pop-up location.
Tag Manager Applications
To use customizable pop-ups, your website must have a tag![]() A snippet of code placed in the HTML code for a website and used by tag manager apps. Different from HTML code tags or tags in social media contexts. manager application. Tag managers are applications that can "watch" website visitors and trigger an action to happen in response. In the case of Digital Experience (DX), the tag manager application triggers a pop-up to appear for a visitor. You can use Google Tag Manager or another tag manager, such as Tealium.
A snippet of code placed in the HTML code for a website and used by tag manager apps. Different from HTML code tags or tags in social media contexts. manager application. Tag managers are applications that can "watch" website visitors and trigger an action to happen in response. In the case of Digital Experience (DX), the tag manager application triggers a pop-up to appear for a visitor. You can use Google Tag Manager or another tag manager, such as Tealium.
In the tag manager, you define the events and conditions that you want to cause pop-ups to appear to website visitors. The conditions allow you to be very specific about when the pop-up appears. For example, if you define the event as the visitor scrolling down a page, you might not want the pop-up to appear to every visitor that scrolls on the page. You might want the pop-up to appear only to visitors who scroll more than halfway down the page. You can set that as the condition for the page scrolling event.
In Digital Experience (DX), you create a Workflow Automation job with a trigger that links the job to the tag manager event you defined. The job is where you can customize the pop-up appearance.
This is what happens when a website visitor is on a webpage where you've configured a pop-up to appear:
- A website visitor performs an action that meets the conditions you established in the tag manager.
- The tag manager contacts Digital Experience (DX) via API
 Application Programming Interface. Allows you to automate certain functionality by connecting your NiCE CXone system with other software..
 - The workflow automation job linked to the tag manager event that was triggered runs and displays the pop-up to the visitor on the webpage they're visiting.
Advanced Pop-Up Requirements
To use advanced Proactive Chat pop-ups, you must have:
- A website for your organization: The website needs to have a script for your tag A snippet of code placed in the HTML code for a website and used by tag manager apps. Different from HTML code tags or tags in social media contexts. manager application and a digital chat widget script.
- An account for your tag manager application: You can use Google Tag Manager or another tag manager application, such as Tealium.
- Digital routing Determine which agents to route digital cases to, using criteria such as the agent having expertise in that type of case.: Routing in Digital Experience (DX) needs to be configured for Live Chat or Chat Messaging as necessary.
- Advanced Pop-Ups enabled: Contact your account representative to have this feature enabled for your organization.
Tag Manager Preparation
You need to set up your tag![]() A snippet of code placed in the HTML code for a website and used by tag manager apps. Different from HTML code tags or tags in social media contexts. manager application to watch for the events and conditions that you want to cause digital pop-ups to appear on your website. In the tag manager, you need to configure:
A snippet of code placed in the HTML code for a website and used by tag manager apps. Different from HTML code tags or tags in social media contexts. manager application to watch for the events and conditions that you want to cause digital pop-ups to appear on your website. In the tag manager, you need to configure:
- Trigger Event: The occurrence that the trigger "watches" for as people browser your website. Tag managers offer a wide variety of options for events that a trigger can watch for. For example, you can choose viewing a certain webpage, clicking certain links, scrolling to certain parts of a page, or the amount of time spent on a page.
- Trigger Conditions: The specific details about the trigger event. These details help the tag manager decide which occurrences it needs to act on. For example, you can specify how far down the page someone must scroll, the specific links a visitor must click, or how much time they must spend on the page.
- Tag: The tag contains information about what the tag manager should do when the trigger event happens and the conditions are met. For Digital Experience (DX) Proactive Chat pop-ups, you will use a Custom HTML tag that contains a snippet of script code that allows the tag manager application to communicate with Digital Experience (DX). The code to use in the custom HTML is:
where [TRIGGER ID] is the ID number of the workflow automation trigger you create. You can find the ID in the URL of the trigger when you're viewing it in edit mode in Digital Experience (DX).
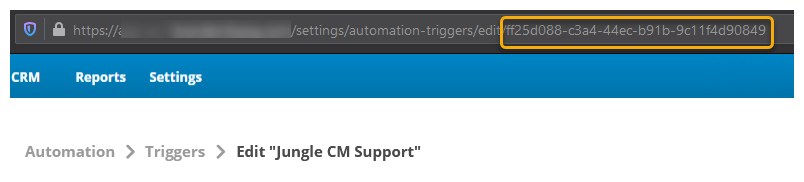
For the trigger in the example image, the script code looks like this:
<script>
brandembassy(‘executeTrigger’, ‘ff25d088-c3a4-44ec-b91b-9c11f4d90849’)
</script>
You may need to coordinate with a person in your organization who is proficient with the tag manager application. Every tag manager is a little different, so the format for the custom HTML script may need to be adjusted.
Create a Workflow Automation Pop-Up Job
Following the steps for this job allows you to customize a chat pop-up based on a template.
- Click the app selector
 and select ACD.
 -
Go to Digital > Automation Jobs.
- Click Add.
- Enter a Name that describes what the job does.
- From the Action drop-down, select Chat Popup Box.
- Enter a Popup box name.
- Select the Template that you want to use for the layout of the pop-up box. Examples of each template appear beneath the Template drop-down list.
-
In the Content section, configure the text and image used in the pop-up. In the text fields, you can enter plain text or you can enter input formatted to use custom fields. Using custom fields can help personalize the experience for your customer.
Plain Text Input Example
Dear customer, we would like to offer you a special discount of 5%.
Custom Field Input Example
Dear {{customer.firstName}}, we would like to offer you a special discount of {{customer.customField.discountValue}}.
If you use custom fields, it is a good idea to include a fallback value in case the custom field fails. To do this, add an extra line to the text in the following format:
{{fallbackMessage|Dear customer, we would like to offer you a special discount of 5%.}}
Any text behind the | is considered the fallback message.
- In the Call to Action section, Select Enable from the Show call to action drop-down if the template you selected supports a call to action and you want to include one in this pop-up. Enter the Call to action text.
- In the Design Customization section, configure the appearance of the pop-up's size, background, borders, and text. If you include colors, you don't need to include CSS tags, such as background-color. You only need to include the color name, HEX number (including the number sign (#)). RGB setting, or other CSS-supported method of defining colors.
- In the Position section, select the location on the page from the Position drop-down. You can further modify the location of the pop-up by entering a number of pixels in the Offset X and Offset Y text boxes.
- In the Handover section, select up to three custom fields.
- Click Save.
Create a Job for HTML Pop-Up
Following the steps for this job allows you to create your own pop-up without being restricted to a template. You can add more customized elements such as buttons, forms, links, and more.
- Click the app selector and select ACD.
-
Go to Digital > Automation Jobs.
- Click Add.
- Enter a Name that describes what the job does.
- From the Action drop-down, select Chat Popup Box Html.
- Enter a Popup box name, Custom design, and Custom JS.
- In the Position section, select the location on the page from the Positiondrop-down. You can further modify the location of the pop-up by entering a number of pixels in the Offset X and Offset Y text boxes.
- Click Save.
Create a Job for Welcome Message with Pop-Up
This job functions slightly different than the others. With this job, rather than just a pop-up, a chat window opens and displays a welcome message.
- Click the app selector and select ACD.
-
Go to Digital > Automation Jobs.
- Click Add.
- Enter a Name that describes what the job does.
- From the Action drop-down, select Chat Welcome Message.
- Enter a Welcome Message name and the Main body text. Select up to three custom fields.
- Click Save.
Create a Workflow Automation Trigger
- Click the app selector and select ACD.
-
Go to Digital > Automation Triggers.
- Click Add Trigger.
- Enter a Name for the trigger.
- Select Triggered by API as the Event.
- From the Data type drop-down list, select Chat Window.
- In the Delayed execution field, enter the number of seconds that Digital Engagement should wait after the selected event occurs before firing the trigger. If you want it to happen immediately, enter 0.
- If you have folders that organize your triggers, you can select which folder to put this trigger in from the drop-down.
- Click Save.
Add Conditions
If you entered a value in the Delayed execution field when you created a trigger, make sure your condition configurations do not exceed that time. For example, if you set the Delayed execution time to 86400 seconds, or 24 hours, you cannot add a Contact status update time condition with a time period greater than 1 day.
If you entered a value in the Delayed execution field when you created a trigger, configure conditions under both the Conditions and Delayed conditions sections or just the regular Conditions section. If you only configure Delayed conditions, the system may duplicate events.
- From the detail page, click Add Condition.
- Use the drop-down to select the condition you want. Refer to the table below for a list of conditions available for what you just created.
- Click Select.
- Some conditions require additional configuration. Refer to the table below for instructions.
| Condition Type | Details and Instructions |
|---|---|
| Chat Is Active |
Execute jobs if the chat window displays an online status.
|
| Custom script |
Execute jobs based on the script you write in Primi language. This condition works for contact center triggers, proactive triggers, and schedulers. |
| Date and time |
Executes jobs during or outside of specified time frames.
Jobs can process up to 500 contacts at a time. If you need to process more, have the job run more than once per day at different times. |
| Excluded visitor tags condition |
Executes jobs based on tags on contacts. Any contact that does not have the tags you specify triggers the job.
|
| Included channels condition |
Checks whether the chat window that is on the website belongs to specific channel. This trigger works for both contact center triggers and proactive triggers.
|
| Included visitor tags condition |
Executes jobs based on tags on visitors. Any visitor that has the tags you specify triggers the job.
|
| Proactive action grace period |
Executes jobs based on the last time a proactive action was used. Any jobs in this workflow that would be run during this time frame are skipped. The maximum grace period for proactive actions is 30 days.
|
| Probability of Execution |
Executes jobs based on a probability percentage. This condition works for contact center triggers, proactive triggers, and schedulers.
|
Add a Job
- From this trigger's detail page, click Add existing job.
- Use the drop-down to select this job. The drop-down displays the Name you gave the job, not the Action of the job.
- Click Add.
- Click Activate.
When your Trigger is fully configured with Conditions and Jobs, click Activate. Then, ensure that you have fully configured your tag manager, including adding the script to the Custom HTML tag.