

Required permissions:
Turn-by-Turn Transcription provides transcription of conversation audio. It sends the transcription in segments based on each turn in the conversation.
Add a Transcription Profile
A transcription profile defines the language you want to transcribe.
- In NiCE CXone, click the app selector
 and select Other > Automation & AI and select Transcription Profiles.
 -
Click Add Transcription Profile.
- Enter a Transcription Profile Name. To differentiate this profile from your other profiles, use a name that highlights what makes this profile different. For example, you could name the profile for its intended use, the provider, or the language of the profile.
- Under Select Provider, click the transcription provider you want to use.
- Click Next.
- Select the Language for this profile. Certain languages have an option to use Google's model for enhanced speech recognition. If the language you select has this option and you want to use it, click the Use Enhanced toggle that appears under the drop-down.
- Click Add.
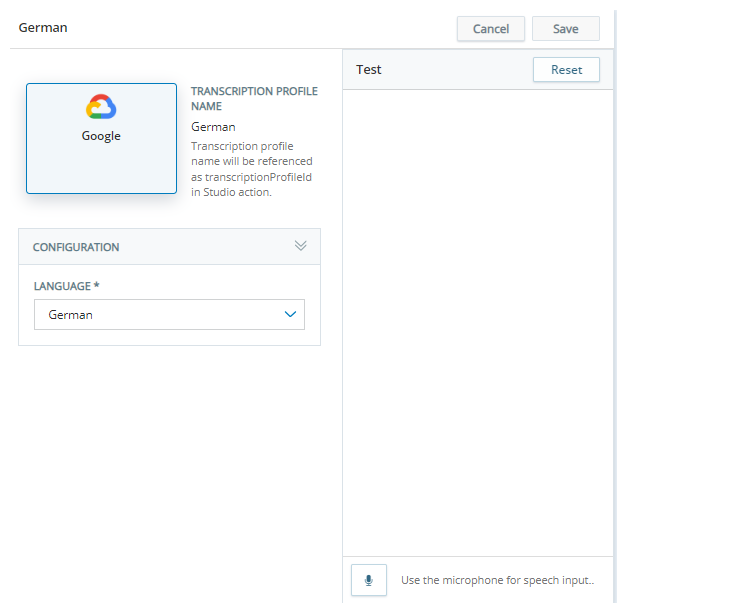
Test a Transcription Profile
You can test a transcription profile to verify your selections. To test a profile, you must use a computer with a microphone.
- In NiCE CXone, click the app selector and select Other > Automation & AI and select Transcription Profiles.
- Select the transcription profile to test.
-
Under Test, click the Microphone icon
 and speak in the language you're testing. When you are done speaking, click the Stop icon
  . Turn-by-Turn Transcription automatically transcribes the words you spoke and displays the results under Test.
 - Repeat the test as often as you need to. You can change languages if you want to. When you are finished, ensure that the Language selected is the one you want the profile to use.
- Click Save.
Configure the Studio Script to Use Transcription
Permissions Required: Studio Scripts View, Create/Edit
If you're using Turn-by-Turn Transcription with a voice virtual agent, you don't need to follow these steps. The virtual agent integration process handles transcription data automatically. You don't need to include the Cloud Transcribe action in scripts for virtual agent integrations.
If you're using Turn-by-Turn Transcription to enable a text-only virtual agent to handle voice interactions, you must follow these steps. Your script must include the Cloud Transcribe action.
To use Turn-by-Turn Transcription for non-virtual agent applications, your script must have the Cloud Transcribe action. If you're transcribing multiple languages in the same script, you need to add one Cloud Transcribe action for each language. You also need a transcription profile for each language.
- In Studio, open the script you're working with.
- If the Cloud Transcribe action isn't already in the script, add it to the correct location.
- Assign a transcription profile to the action:
- Double-click Cloud Transcribe to open the Transcription Profiles page.
- Click the Selection icon
 next to the profile you want this action to use.
 - Click Yes.
- Add a
- Double-click
DYNAMIC nextPromptBehaviors <add behaviors as needed> ASSIGN nextPromptBehaviorsJson="{nextPromptBehaviors.asjson()}" - In the
-
To configure
- Double-click
-
Add the following code to the snippet:
DYNAMIC nextPromptSequence
ASSIGN nextPromptSequenceJSONout = "nextPromptSequence.asJSON()"
The object defined here holds the transcription returned from the STT provider. Your script must be designed to pass this data to your voice-enabled text virtual agent.
-
Right-click
- Double-click
- Right-click
nextPromptBehavior: Configure with the name of the variable that holds the next prompt behaviors in JSON format. For example: nextPromptBehaviorsJson.
transcriptVarName (out): Configure with the name of the object that you defined in step 5. For example, transcriptVarName. This variable holds the returned transcript. Your script must be configured to handle the transcript.
- Save your script.
Test the Connection to Your Transcription Provider
You can test the connection between your transcription provider and NiCE CXone. This allows you to verify that the transcription profile is correctly set up. You can also use it during troubleshooting. It can help you when your transcription provider and NiCE CXone aren't connecting.
To test transcription, you must use a computer with a microphone.
- Click the app selector and select Other > Automation & AI and then click Transcription Hub.
- Click Turn-by-Turn Transcription and select the transcription profile you want to test.
-
Under Test on the right side of the page, click the microphone
. If prompted, give permission for this webpage to access your microphone. -
Speak into the microphone and click stop
when you're finished. The captured audio is sent to the transcription service. It also appears under Test as an audio recording you can play back. After a brief pause, the transcription of your test audio appears on the page. If no transcription appears, or if an error message appears, check that -
To send another test, click the microphone
. -
To clear the audio files and displayed transcriptions, click Reset.