

This page guides you, step-by-step, in setting up authentication for your NiCE CXone system using an external identity provider (IdP).
If you use one of the following external IdPs, specific steps are provided for setting up authentication using that IdP:
Complete each of these tasks in the order given.
Before You Begin
- Gain a basic understanding of authentication and authorization concepts and terminology if you've never set up a process like this before.
- Review the NiCE CXone-specific process if this is the first time you've worked with authentication in NiCE CXone.
- Consider your human users and the levels of access they need. Decide whether people with greater access should have greater levels of security.
- Decide whether you will use custom password requirements, multi-factor authentication (MFA), or both to enforce.
- Based on your decisions, make a list of login authenticators. The list should include the password requirements and MFA status you want to use for each login authenticator. You don't have to create custom login authenticators if the default login authenticator meets your password management needs.
- Consider whether you need to include authentication and authorization for applications like bots or intelligent virtual assistants (IVAs). If so, you will need to create access keys.
- Identify your external IdP. NiCE CXone supports both hosted and cloud service IdPs. If necessary, involve your company's authentication experts in this process. There may already be established processes for integrating systems like NiCE CXone with your external IdP. Following these processes and meeting your specific security needs is ultimately your responsibility.
- Define your authentication protocol. NiCE CXone supports SAML 2.0 and OpenID Connect.
- Evaluate the combination of IdP and protocol to ensure your use cases and user flows are supported, and to identify potential issues. This should include actual testing.
-
If you use IdP-initiated authentication, use the following table to determine if your NiCE CXone applications support it:
NiCE CXone application IdP-Initiated SP-Initiated *Notes MAX Yes Yes
app
*Yes
Yes IdP-initiated is only supported when users access Agent Workspace (Agent) from the app selector
 in the NiCE CXone product.
 Accessing Agent Workspace (Agent) using the direct URLs requires SP-initiated authentication.
Agent Workspace (Embedded) (Agent Embedded), Agent Workspace (Browser Extension) (Agent Integrated), Agent Workspace for Microsoft Teams (Agent for Microsoft Teams), Agent Workspace for Salesforce Voice (Agent for Service Cloud Voice) No Yes Salesforce Agent *No Yes Standalone applications don’t support IdP-initiated. Studio Yes Yes Desktop Studio *No Yes Standalone applications don’t support IdP-initiated. Developer Portal No Yes All existing and future NiCE CXone products support SP-initiated authentication.
Your NiCE CXone team can support and guide you in this planning process. Good planning makes for a smoother implementation. Implementing authentication and authorization as immediate needs come up is more likely to lead to issues.
Set Up a Location
Required permissions: Location Management Create
If you want to require that users log in from a certain IP address, create a location with the IP addresses, IP address ranges, or IP address subnets you want to allow. When you require a configured location for a user, that user must have both the correct credentials and IP address to log in. Otherwise, their login attempt fails and they receive an error. You can have up to 20 locations at a time and up to 10 rules per location.
- Click the app selector and select Admin.
- Go to Locations > Location Definitions.
- Click New Location.
- Give the location a descriptive Name. If you want to add more details about the location, enter a Description.
- You can select the Set as Default Location or Remote Location to indicate the type of location. You can only have one default location. These fields don't currently affect any functionality and selecting them is for your own reference.
-
Add any other information you would like using the remaining fields, including the physical address, country, GPS coordinates, time zone, or assigned groups. These fields don't currently affect anything, and the information entered there would be only for your own reference.
If you add groups to the Assigned Groups field, the users belonging to those groups appear on the Assigned Users tab. However, the location settings won't apply to them. If you assign a location to a login authenticator, the location applies to users who are assigned to that login authenticator and restricts their ability to log in based on their IP address. However, those users will not appear on the Assigned Users tab.
-
Click Save.
-
Back on the Location Definitions page, click the location you just created to open it.
-
Click the Auto-Detection Rules tab.
-
Create a new rule. To do so:
-
Click New Rule.
-
Give the rule a descriptive Name.
-
Select the Rule Type from the following:
-
List: A list of specific IP addresses allowed for this location. For example, 100.0.1.100, 100.0.1.101, and 100.0.1.102.
-
Range: An IP address range allowed for this location. For example, 100.0.1.100-100.0.1.125.
-
Subnet: A subnet allowed for this location. For example, 100.0.0.1/32.
-
-
Specify the IP Version as one of the following:
-
IPV4: A 32-bit IP address
-
IPV6: A 128-bit hexadecimal address.
-
-
Enter the actual IP addresses, range, or subnet in the Rule Definition field, following the formats of the examples in the preceding steps. If you selected List, you can enter up to 100 IP addresses. If you selected Range or Subnet, you can only enter one value.
-
Click Confirm.
-
-
Add more rules as needed. You can have up to 10.
-
Click Save.
Create External Login Authenticators with SAML 2.0
Required permissions: Login Authenticator Create
To create external login authenticators with OpenID Connect, skip this section. Login authenticators are used to manage password criteria. You can create different login authenticators for different
You can use external authentication when you want a user's password to be managed by another system or identity provider. NiCE CXone currently supports SAML 2.0 and OpenID Connect federation protocols.
You can set up IdP-initiated authentication or SP-initiated authentication with the steps in this section.
IdP-Initiated Authentication: IdP stands for identity provider. IdP-initiated authentication means that the external identity provider starts the login process.
SP-Initiated Authentication: SP stands for service provider. SP-initiated authentication means that NiCE CXone starts the login process.
If you are using Salesforce Agent, then the external identity provider (IdP) must be configured for SP-initiated authentication.
- Ensure that you have access to the external identity provider. You will need to create an integration specific to NiCE CXone.
- Create the integration in the external identity provider. Different systems use different names for these integrations, see specific instructions for Okta or Azure.
- You will need to provide an Entity ID which you don't know at this point. Use https://need_to_change as a placeholder.
- You will need to provide an ACS URL which you don't know at this point. Use https://need_to_change as a placeholder.
- The identity provider will generate a specific URL where SAML requests must be sent. Copy and save this URL to a place where you can find it. You will need to enter this value in later steps.
- The identity provider will generate a public signing certificate for the integration. Download the certificate. You will need to use it in later steps.
- If you want to enable SP-initiated login, complete this step. Copy the URL used to log in to the external identity provider with an SP-initiated login flow.
- Create an external login authenticator in NiCE CXone.
- Click the app selector and select Admin.
- Click Security > Login Authenticator.
- Enter the Name and Description of the login authenticator.
- Select SAML as the Authentication Type.
If you want to require that users log in from a certain IP address, select the Location you set up in the preceding section.
- If you select FICAM, the SAML response must have a single AuthnContextClassRef entry. Also, the NamespaceURI of the assertion subject must be: urn:oasis:names:tc:SAML:2.0:assertion. The AuthnContextClassRef and NamespaceURI fields are controlled by the identity provider.
- Enter the SAML request Endpoint you received from your provider above as the Endpoint URL.
- Click Choose File and select the public signing certificate you received from your provider. This file must be a PEM file. It will be a text file and the first line will contain BEGIN CERTIFICATE with some other text.
- If you want to enable service provider (SP)-initiated login for this login authenticator, complete this step. In the Endpoint URL field, paste the Login URL value you copied from your external identity provider.
Select the Assigned Users tab. Select the users that you want to assign to the login authenticator you are creating. You can also assign users directly to the login authenticator in their employee profile.
- Click Save and Activate.
- Open the login authenticator.
Note the Entity ID and ACS URL. You will need them when updating your IdP settings.
- Click the app selector
-
Update your identity provider settings, replacing the placeholders used above with the values you just noted.
-
Ensure that the External Identity for each user that uses the login authenticator is set to the correct value.
Your identity provider determines the value that must be used. The value must match exactly what you put in the External Identity field in NiCE CXone.
-
Have the user log in. They must use the latest login URL. After entering their username they will be directed to the external identity provider if needed.
Create External Login Authenticators with OpenID Connect
Required permissions: Login Authenticator Create
You can use external authentication when you want a user's password to be managed by another system or identity provider. NiCE CXone currently supports SAML 2.0 and OpenID Connect federation protocols.
You can set up SP-initiated authentication with the steps in this section. SP-initiated authentication means that NiCE CXone (the service provider) starts the login process.
If you are using Salesforce Agent, then the external identity provider (IdP) must be configured for SP-initiated authentication.
Front-End Authentication with Client Secret or PKCE
OpenID Connect offers two options for front-end authentication:
- Client secret: A client secret is included in the token exchange. This presents a security risk, as it requires coding the secret into the web application.
- PKCE (Proof Key for Code Exchange): Creates a unique, temporary secret for every login request. This increases the security of the authentication flow because attackers won't be able to obtain the one-time key that the application creates.
NiCE CXone supports both options. The end-user experience is the same no matter which option you use. However, PKCE is more secure. Using a PKCE authorization flow requires a custom API integration. The client secret-based authorization flow is the default.
Linking New Users with Claim-based OpenID Connect
NiCE CXone can use a different claim value, like an email address, to establish the user's identity at their first login. NiCE CXone then automatically switches to the unique OpenID Connect subject identifier. This allows you to pre-configure a user's federated identity.
Create an External Login Authenticator
- Ensure that you have access to the external identity provider. You will need to create an integration specific to NiCE CXone.
- Create the integration in the external identity provider.
- You will need to provide a Sign-in Redirect URI which you don't know at this point. Use https://cxone.niceincontact.com/need_to_change as a placeholder.
- You may need to provide a Sign-out Redirect URI which you don't know at this point. Use https://cxone.niceincontact.com/need_to_change as a placeholder.
- The identity provider will generate a Client ID and a Client Secret. Copy and save these values where you can find them. You will need to enter them in later steps.
- Create an external login authenticator in NiCE CXone.
Click the app selector
and select Admin.Go to Security Settings > Login Authenticator.
- Click New Login Authenticator or select the login authenticator you want to edit.
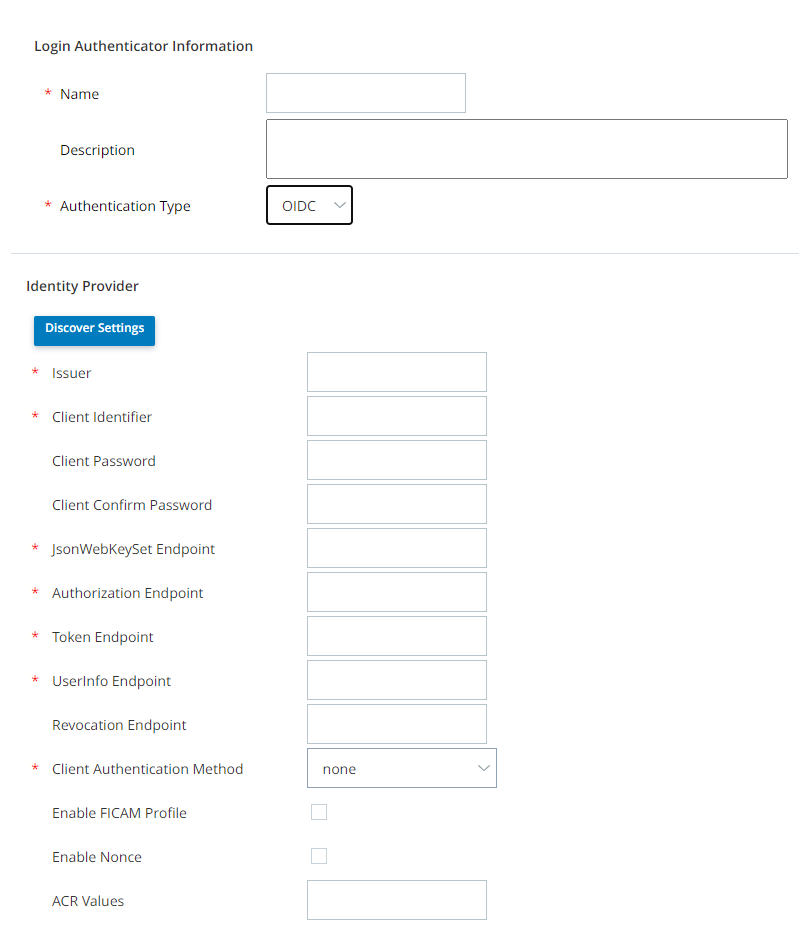
- Enter the Name and a Description of the login authenticator.
- Select OIDC as the Authentication Type.
If you want to require that users log in from a certain IP address, select the Location you set up in the preceding section.
- If you have a discovery endpoint for your IdP, click Discover Settings. Enter your discovery endpoint and click Discover. The remaining fields are populated for you. Discover Settings does not work with Salesforce discovery endpoints.
- Enter your Client Identifier and Client Password. Re-type the password in Client Confirm Password. The Client Identifier is the login ID assigned to your account by your IdP.
If you don't have a discovery endpoint for your IdP, enter your IdP-provided Issuer, JsonWebKeySet Endpoint, Authorization Endpoint, Token Endpoint, UserInfo Endpoint, Revocation Endpoint, and End Session Endpoint.
 Learn more about fields in this step
Field
Details
Issuer The URL of your IdP without any parameter.
JsonWebKeySet Endpoint The URL of your IdP's JWK Set. Authorization Endpoint The URL of your IdP's OAuth 2.0 Authorization Endpoint. Token Endpoint The URL of your IdP's OAuth 2.0 Token Endpoint. UserInfo Endpoint The URL of your IdP's UserInfo Endpoint. Revocation Endpoint The URL of your IdP's Revocation Endpoint. End Session Endpoint The URL of your IdP's End Session Endpoint. This field allows you to create a single logout experience for your users. If configured, when they log out of NiCE CXone, they will also be logged out of their IdP account. For single logout to work, you must whitelist the Sign-out Redirect URI in your IdP. - Select a Client Authentication Method. The method you select must be an authentication method that your IdP supports. If you select private_key_jwt, you must
- You can select Enable FICAM Profile to turn on U.S. government-specific settings.
Select the Assigned Users tab. Select the users that you want to assign to the login authenticator you are creating. You can also assign users directly to the login authenticator in their employee profile.
- Click Save & Activate to validate the provided information and to link your NiCE CXone account to your IdP account.
- Open the login authenticator.
Note the Sign-in Redirect URI and Sign-out Redirect URI. You will need them when updating your IdP settings.
-
Update your identity provider settings, replacing the placeholders used above with the values you just noted.
-
Ensure that the External Identity for each user that uses the login authenticator is set to the correct value.
Your identity provider determines the value that must be used. The value must match exactly what you put in the External Identity field in NiCE CXone. The value for this field must be in this format: claim(email):{email configured by your IdP}. For example, if the user's email in the IdP is nick.carraway@classics.com, you would enter claim(email):nickcarraway@classics.com.
-
Have the user log in. They must use the latest login URL. After entering their username they will be directed to the external identity provider, if needed.
- When your IdP asks you to authenticate, do so as the user on the IdP you want associated with your currently logged in NiCE CXone account.
- If your OpenID Connect settings in NiCE CXone don't show as validated, use your IdP logs to diagnose the problem.
Create or Edit Employees
Required permissions: Employees Create
If you are setting up authentication with an external IdP for an existing NiCE CXone business unit, you do not have to create new user accounts. However, you will need to edit user accounts and configure the External Identity Type and Federated Identity fields. This must be done for each user who will authenticate via the external IdP. The fields are explained in step 8 of this task.
You can add an employee account by using:
-
Create Employee—Create an individual account using the Create Employee window.
-
Import Employees—Import multiple employee accounts.
The instructions here are for creating a single employee account in the application. If your company is using ACD, you'll also need to configure ACD user settings for this employee.
NiCE CXone offers many options and settings to customize employees. Read through this entire task. Make sure you know the settings you need to configure before you begin.

To add an employee:
-
Click the app selector
and select Admin. -
Click Employees > Create Employee.
-
Enter the employee's First Name and Last Name. The Middle Name is optional.
-
Enter a valid Email Address. NiCE CXone sends emails like activation invitations and password verification codes here. You can use the same email address for multiple employees. When you edit an employee's email address, a verification email is sent to the new email address.
-
Enter the Username you want to assign to an employee. The username must be in the form of an email address. The field is auto filled from the Email Address field. You can edit it if you want to.
-
Assign a Primary Role to an employee from the drop-down.
-
Complete the fields on the General tab.
Learn more about fields on the General tab
Field
Details
Display Name Enter a Display Name you want to assign to an employee. Users from other teams can view the display name. They cannot view other information about the employee unless they have the View Employee permission enabled. Type Use Type to organize an employee outside of their assigned Role and Team. The type is not tied to permissions or unavailable codes. This makes reporting easier. You can select previously created types from the drop-down. You can also create new types by entering text in the search bar, and clicking Create. Hire Date The date you hired an employee. This field is for your records only. NiCE CXone doesn't use this information. Time Zone The employee is automatically assigned to the tenant High-level organizational grouping used to manage technical support, billing, and global settings for your NiCE CXone system. time zone unless you change it. OS Login The operating system the employee uses. The Recording Management (CXone) application requires this information for screen recording. The field accepts free text and may contain a text string related to an operating system such as Windows 10. Rank
This field is visible only if you have WFM in your environment. It determines priority when creating a schedule.
Assigned to Team Assign the employee to a team by selecting a team from the drop-down menu. If you haven't created teams yet, or if the employee will belong to a new team, you can just accept the Default Team setting and then change it later.
Assigned To Groups Assign the employee to one or more groups by selecting groups from the drop-down menu. Assigned To Scheduling Unit This field is visible only if your system includes WFM. It specifies the scheduling unit for the employee. Mobile Number The employee's mobile or cell phone number. This field is for your records only. NiCE CXone doesn't use this information. Attributes Under this drop-down select attributes related to the employee:
-
Can be Evaluated/Coached: This attribute appears only if your system includes QM. It enables the employee to be evaluated, and you will be billed for QM for this employee.
The default value is selected for new employees. If you add QM to a system that has existing users, you must manually enable this setting for those users.
-
Can Be Recorded (Screen): This attribute appears only if your system includes Recording Management (CXone) Advanced. It enables the employee's screen to be recorded, and you will be billed for screen recording for this employee.
The default value is selected for new employees. If you add Recording Management (CXone) Advanced to a system that has existing users, you must manually enable this setting for those users.
-
Can be Recorded (Voice): This attribute is visible only if your system includes Recording Management (CXone)/Recording Management (CXone) Advanced. It enables the employee's voice to be recorded. You will be billed for voice recording for this employee.
The default value is selected for a new employees. If you add Recording Management (CXone)/Recording Management (CXone) Advanced to a system that has existing users, you must manually enable this setting for those users.
-
Can be Scheduled: This attribute is visible only if your system includes WFM. It enables the employee to be scheduled. You will be billed for WFM for this employee.
The default value is selected for new employees. If you add WFM to a system that has existing users, you must manually enable this setting for those users. Users who don't have this attribute selected won't appear in employee lists when creating weekly rules or shift templates. Removing this attribute from a user deletes that user from any weekly rules or shift templates to which the user is assigned.
-
Can be Analyzed: This attribute appears only if your system includes Interaction Analytics (CXone). When this attribute is selected, the employee's recorded interactions are analyzed by Interaction Analytics (CXone). You will be billed for Interaction Analytics (CXone) for this employee.
The default value is cleared for new employees.
-
Can Edit BI Reports: Employees with this attribute selected can edit any of the BI reports in the Reporting application as long as they also have the correct permissions.
The default value is cleared for all employees, both existing and new.
-
Can View BI Reports: Employees will be able to open any BI reports with this attribute. Reports are in the Reporting application, but employees should have permissions to view the reports there. BI reports have no usage fee for up to 10% of either your concurrent or configured users, depending on your pricing model. Once the 10% threshold is passed, you will be billed for each additional employee with this checkbox selected.
The default value is cleared for all employees, both for existing and new.
-
Customer Card: This attribute allows employees who don't work with digital contacts to access available customer cards for omnichannel-routed voice, chat, email, and SMS Messaging contacts.
The default value is cleared for new employees.
-
Digital Engagement: This attribute appears only if your system includes Digital Experience (DX). When this attribute is selected, the employee's record is synced to Digital Experience (DX), and they can work on digital contacts. You will be billed for Digital Experience (DX) for this employee. The default value is cleared for new employees.
If your organization uses Outbound Engagement (SmartReach), select one of the following:
-
, which contains the configuration pages for Outbound Engagement (SmartReach), Agent Workspace Premium (Desk), and Agent Workspace Advanced (Enhanced Customer Card).
-
-
-
Click Create to create the employee profile and continue setting it up. Click Create & Invite if you're ready for the user to activate their account and set up their password.
Authenticate Applications
Users and applications are authenticated in very similar ways. The main difference is that applications are authenticated with an access key while users are authenticated with a username and password. Unlike users, applications are not required to interact through a browser. Applications typically are either back-office functionality or intelligent virtual agents![]() Chatbot or similar application that interacts with a user based on artificial intelligence. (IVAs).
Chatbot or similar application that interacts with a user based on artificial intelligence. (IVAs).
To set up an application to interact with NiCE CXone, create
Required permissions: Employees Edit

- Click the app selector and select Admin.
- Click Employees and then click the employee profile you're editing to open it.
-
Click the Security tab.
- Click Add access key.
- Copy the Access Key ID to a secure location.
- Click Show Secret Key and copy the secret key to a secure location.
- Click Save.
Authorization in NiCE CXone
Authorization is the process of verifying what resources a user is allowed to access. Resources can include applications, files, and data. You can define users' access to resources with role-based access control. NiCE CXone manages authorization automatically during authentication. When a user is authenticated they are given access only to the resources they're authorized for.
A user's authentication method doesn't impact authorization. NiCE CXone uses the same authorization process for all users. It doesn't matter whether they are authenticated with access keys or passwords.