You can create your own script actions in Bot Builder. This allows you to customize how your bot responds in conversations. Script actions are custom bot actions you can use in dialogues![]() Stories, rules, and flows in Bot Builder. to define the bot's responses during conversations.
Stories, rules, and flows in Bot Builder. to define the bot's responses during conversations.
Script actions are created in script integrations in Bot Builder. Script integrations support JavaScript. Each script integration can have more than one action. When an action is enabled, it's available on the bot actions menu when you add a bot response to a story![]() Used to train a bot for interaction handling based on intent and context., rule
Used to train a bot for interaction handling based on intent and context., rule![]() Used to define a bot response to messages that don't change with context., or fallback
Used to define a bot response to messages that don't change with context., or fallback![]() A plain text alternative sent when the destination doesn't support rich media..
A plain text alternative sent when the destination doesn't support rich media..
The following list offers examples of some ways you can use script actions:
- Write code to design a bot action to meet your organization's unique needs.
- Call your own external API as a script action.
- Add scripts to bot skills and publish them in the Skill Store.
Bot Builder scripts operate on the server, so there are some limitations to consider while building your scripts.
| Concept | Definition | Example | What the Bot Does |
|---|---|---|---|
|
Utterance |
Anything a contact |
"I lost my password." "What is my balance?" "Are you a bot?" |
The bot uses Natural Language Understanding (NLU) to analyze each contact utterance to determine its meaning, or intent. |
|
Intent |
What the contact wants to communicate or accomplish. Every message the contact sends has an intent. |
"I lost my password" has the intent of "reset password". "Hello" has the intent of "greeting". |
The bot analyzes a contact's message using NLU |
|
Entity |
A defined piece of information in a contact's message. | Person or product name, phone number, account number, location, and so on. | The bot uses NLU to identify entities in a contact's message. Entities help the bot understand what the contact's message means. |
|
Slot |
An entity extracted from a contact's message and saved for use in bot responses. Similar to a variable. | Creating a slot for contact name lets the bot use that name in responses during an interaction, making it more personal. | When configured to do so, the bot extracts an entity from a contact message and saves it in a slot. You can have your bot use this information later in the conversation. |
|
Rule |
Defines bot responses to messages that don't change meaning with context. |
|
Rules are one of two ways you can configure how your bot responds to an intent. Rules are useful for certain kinds of intents, but not all intents. |
|
Story |
Trains a bot to handle an interaction based on message intent and conversational context. | In an interaction about a forgotten password, the bot would respond to "How do I do that?" in one way. If the interaction were about creating a new account, the response would be quite different even though in both cases the contact is using the same words with the same intent—to get more information. | Stories are the second of two ways you can configure how your bot responds to an intent. Stories teach the bot how to use the context of the conversation to respond appropriately. |
|
Bot Action |
Anything a bot says or does while handling an interaction. |
In an interaction about a forgotten password, the bot responds by sending the link to the password reset FAQ on the website. When a contact expresses frustration, such as "I don't understand! It's not working!!!" the bot responds with "I'm sorry. Would you like me to transfer you to a human agent?" When the contact says yes, the bot initiates the transfer. |
Bot actions are the options you have when defining how you want your bot to respond to each intent. They give you the flexibility to configure each response to achieve the outcome that meets the contact's needs. |
Script Editor
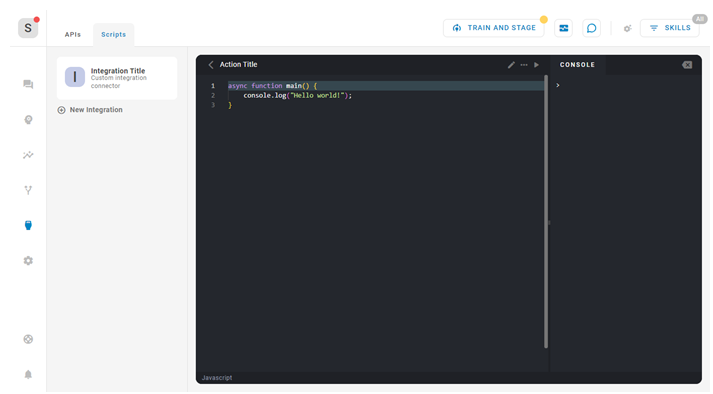
A script integration can have more than one action. Each action has its own script. You can access the script editor from each action's properties.
In the editor, you can enter code on the left, then click the execute triangle ![]() to view the results in the Console pane.
to view the results in the Console pane.
Use AI to Create or Edit a Script
Content in this section is for a product or feature in controlled release (CR). If you are not part of the CR group and would like more information, contact your Account Representative.
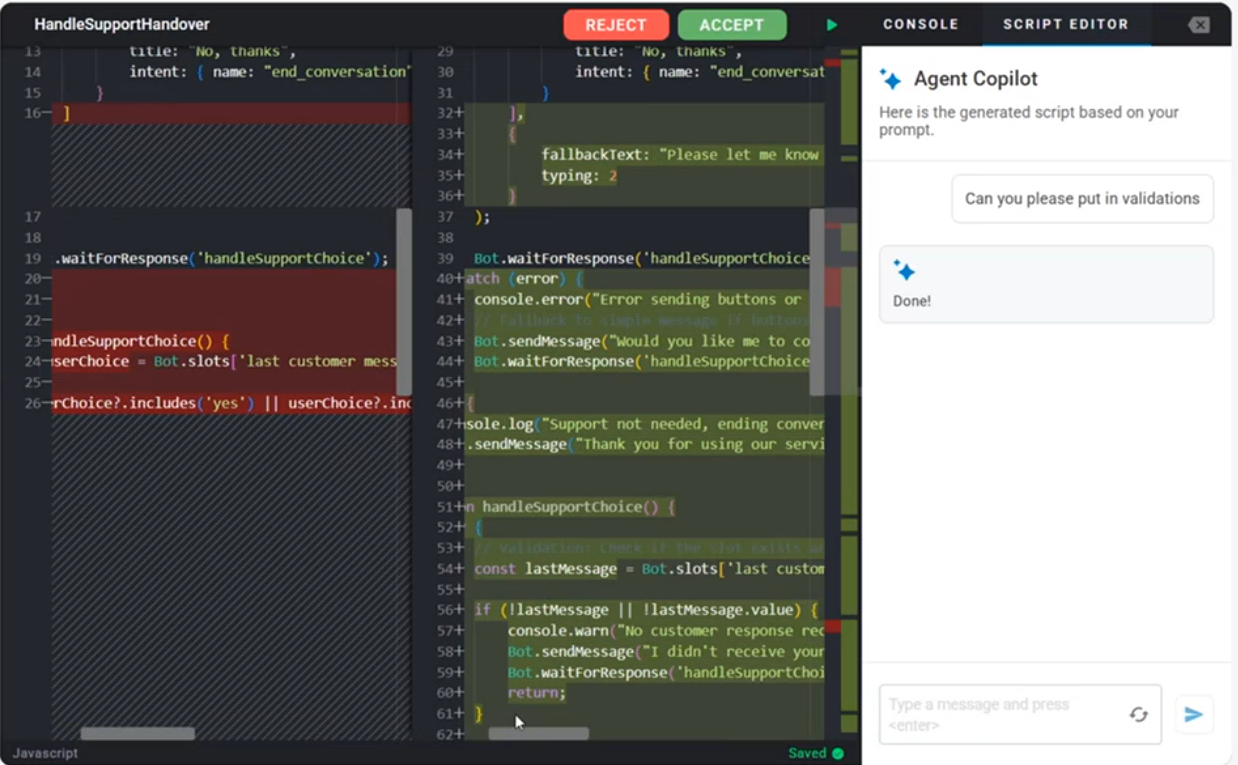
Use the Script Editortab to display the Agent Copilot, where you can interact using natural language to create, understand, and modify scripts more efficiently. With the Agent Copilot in the Script Editor, you can:
-
Generate new scripts using natural language prompts.
-
Edit existing scripts by asking Agent Copilot to add validations, conditions, or logic.
-
Compare code suggestions, view side-by-side comparisons of your original and Agent Copilot-generated code.
-
Accept or Reject Copilot’s suggestions with a single click.
-
When Agent Copilot generates scripts that reference new variables (slots), these are automatically created and reflected in the Slots section.
-
Multi-turn prompting, where you can ask follow-up questions or refine your prompt to iteratively improve the script.
-
Collapse the Agent Copilot panel for a cleaner editing view.
A bot developer is creating a script to validate a user’s input for an account number. Instead of manually writing the validation logic, the developer uses Agent Copilot in the Script Editor.
The developer types a prompt: “Can you add validation to check if the account number is 10 digits?”
Agent Copilot generates a script with the appropriate validation logic.
The developer reviews the suggested changes, compares them with the original code, and clicks Accept to apply the update.
Agent Copilot also detects that a new slot accountNumber is referenced and automatically adds it to the Slots section.
The developer continues refining the script by asking follow-up questions like:
“Add an error message if the input is invalid.”
Script Variables
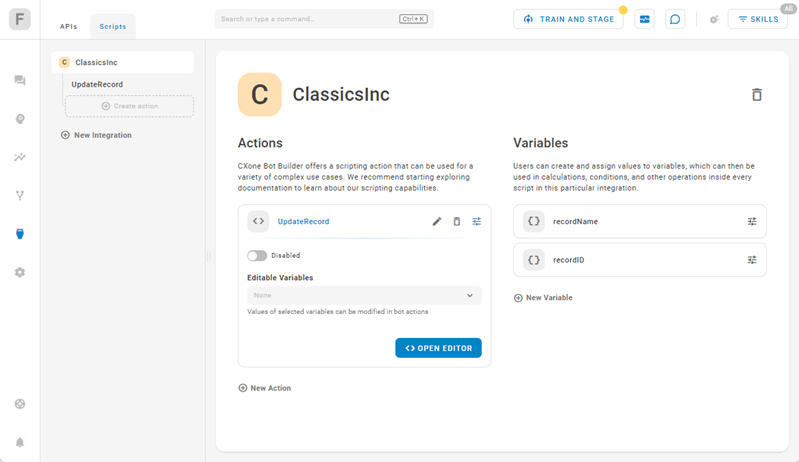
You can create variables to use in Bot Builder scripts. Variables can store a value to be used elsewhere in the script. They can only be used in the script integration where you create them, but you can use them in any of the scripts in that integration.
Variable values cannot be changed in the script. They can only be modified on the script integration page or when an action that refers to the variable is used in a bot response in a story![]() Used to train a bot for interaction handling based on intent and context. , rule
Used to train a bot for interaction handling based on intent and context. , rule![]() Used to define a bot response to messages that don't change with context., or fallback
Used to define a bot response to messages that don't change with context., or fallback![]() A plain text alternative sent when the destination doesn't support rich media..
A plain text alternative sent when the destination doesn't support rich media..
To use a variable in an action:
- The action's script must reference the variable.
- It must be made editable in that action, if you want to be able to change the value.
Bot Builder scripts support four types of variables:
- Text: Text variables hold simple string values. An editable text variable becomes a field in the script action UI where you can enter text in the field to assign a value to the variable.
- Number: Number variables hold numeric values. An editable number variable becomes a field in the script action UI where you can enter a number in the field to assign a value to the variable.
- Select: Use select variables when you want to define multiple possible values for the variable. A select variable becomes a drop-down list on the script action UI. The options in the drop-down list are defined in the Values field in the variable definition on the Scripts tab.
- Secret: Use secret variables to hold private data, such as tokens or API credentials. After entering the value, Bot Builder masks all but the first five characters with asterisks ( * ). The value is read-only and cannot be overwritten or changed by the script or via the script action. If you need to change it, you must update the value on the Variable page in the script. Secret variables cannot be made editable.
You can define a default value for text, number, and select variables. When the variable is editable, the default value can be overwritten by selecting or entering a different value when you add the action to a bot response. When the variable is not editable but referenced in an action's script, the default value is used, if it has one. If no default is assigned, the variable has no value in the script.
The variables you create are added to the Variables object in the script integration.
Standard Objects and Functions
In addition to standard JavaScript functionalities, Bot Builder has the following bot-specific framework:
- The Bot object provides an alternative way to craft how your bot responds in conversations.
- The Store object lets you keep the context information for one script run.
- The Variables object holds all variables that you add to the script integration.
- The fetch function is an implementation of the standard JavaScript fetch.
- The console allows for debugging.
Because Bot Builder scripts operate on the server, there are some limitations to consider while building your scripts.
Bot Object
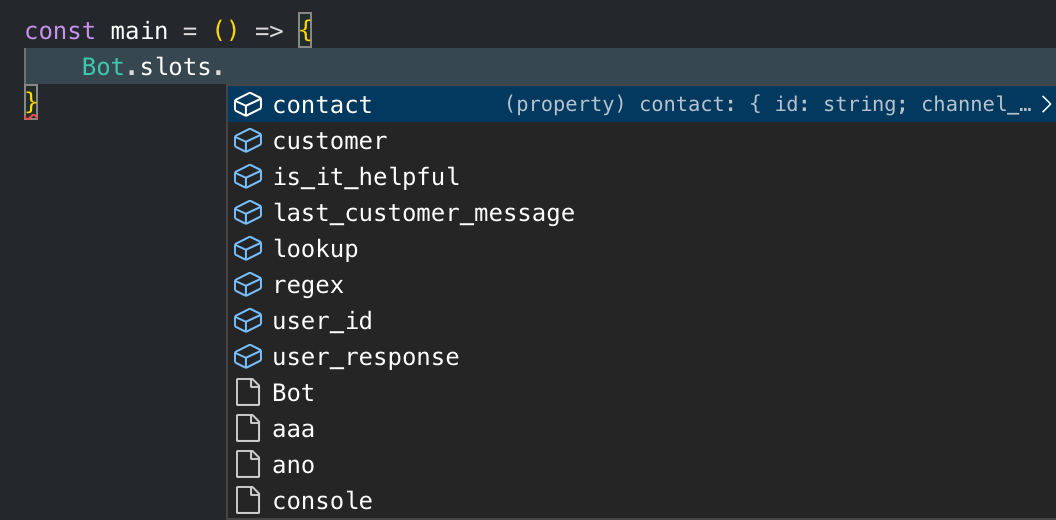
The Bot object contains methods that trigger script actions. When writing a script, the web editor prompts you with all available methods including their arguments and types. The following methods are available when using the Bot object:
- sendMessage
- sendAdaptiveCard
- sendButtons
- sendQuickReplies
- sendCards
- sendMultimedia
- sendRichLink
- sendListPicker
- handover
- addTags
- waitForResponse
- fillSlot
- slots
- sendAsCustomer
Many methods in the Bot object can be optionally customized with an options parameter. Options can be fallbackText (fallback) or typing (smart typing). Possible values for typing are 1, 2, or 3.
Options = {
	"fallbackText": "this is the fallback text",
	"typing": 2,
}
sendMessage
Enter a plain text message for the bot to send. Use the format .sendMessage(text: string, options: Options): void. The
Bot.sendMessage('This is message written by bot')sendAdaptiveCard
Enter the payload for the Adaptive Card you want to send. Use the format .sendAdaptiveCard(adaptiveCard: AdaptiveCardPayload, options: Options): void. The
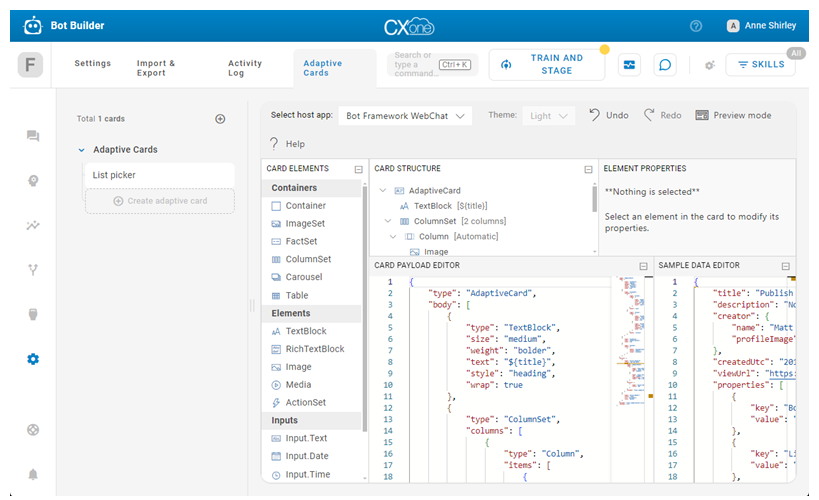
You can find the payload for your adaptive card in the Adaptive Card designer. In Bot Builder, go to Preferences > Adaptive Cards, then copy the contents of the Card Payload Editor pane. You can learn about working withAdaptive Cards in Bot Builder.
Bot.sendAdaptiveCard(<Valid_Adaptive Card_JSON_Payload>)
sendButtons
Configure and send up to three buttons. All button settings can be arranged by setting attributes. Use the example below to compare the button settings in the dialog with the attributes in the script. Use the format .sendButtons(text: string, buttons: ButtonPayload[], options: Options): void. The
Bot.sendButtons('This is message written by bot', [
{
	title: 'Button 1',
	intent: {
		name: 'mood'
	}
}
])You can also trigger
Combining these attributes can result in an error or unexpected behavior.
// triggers intent
{
	title: 'Title',
	intent: 'mood'
}

// triggers intent with entity value
{
	title: 'Title',
	intent: {
		name: 'mood',
		entity: 'myEntity',
		value: 'entity value'
	}
}

// url
{
	title: 'Title',
	url: 'https://www.nice.com'
}

// text
{
	title: 'Title',
	text: 'This is a text'
}
sendQuickReplies
Configure and send up to three quick replies. All quick reply settings can be arranged by setting attributes. The options for quick replies are the same as the options for buttons. Use the format .sendQuickReplies(text: string, quickReplies: QuickReplyPayload[], options: Options): void. The
Bot.sendQuickReplies('This is message written by bot', [
{
	title: 'Quick reply 1',
	intent: {
		name: 'mood'
	}
}
])
You can also trigger entity
Combining these attributes can result in an error or unexpected behavior.
// triggers intent
{
	title: 'Title',
	intent: 'mood'
}

// triggers intent with entity value
{
	title: 'Title',
	intent: {
		name: 'mood',
		entity: 'myEntity',
		value: 'entity value'
	}
}

// url
{
	title: 'Title',
	url: 'https://www.nice.com'
}

// text
{
	title: 'Title',
	text: 'This is a text'
}
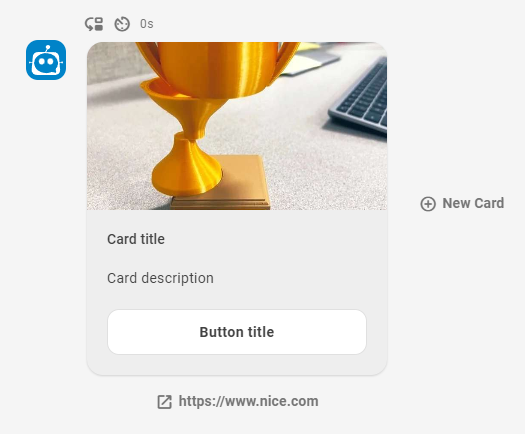
sendCards
Configure and send up to 10 cards. Use the format .sendCards(cards: CardPayload[], options: Options): void. The
Bot.sendCards([{
	title: 'Card title',
	description: 'Card description',
	image: 'https://picsum.photos/200/300',
	mimetype: 'image/jpeg',
	button: {
		title: 'Button title',
		url: 'https://www.nice.com/'
	}
}])
sendMultimedia
Multimedia is not validated by Bot Builder, but can be validated in other integrations. The content on the url must be available for the entire time the script is used. It must also be publicly accessible, as it will be downloaded repeatedly when the script is run. The media type and size restrictions are the same as when you use a multimedia bot action. Use the format .sendMultimedia(url: string, mimetype: string, options: Options): void. The
Bot.sendMultimedia('https://picsum.photos/200/300', 'image/jpeg')
sendRichLink
Configure and send a rich link. Use the format .sendRichLink(richlink: RichLinkPayload): void.
Bot.sendRichLink({
	title: 'Title',
	url: 'https://www.nice.com',
	image: 'https://picsum.photos/200/300',
	mimetype: 'image/jpeg'
})
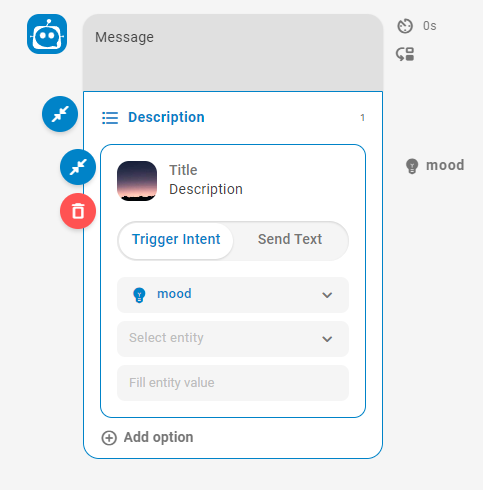
sendListPicker
Configure and send up to 12 list picker options. All list picker options can be arranged by setting attributes. The options for list picker are the same as the options for buttons. Use the format .sendListPicker(message: string, description: string, actions: ListPickerPayload[], options: Options): void. The
Bot.sendListPicker('Message', 'Description', [{
	title: 'Title',
	description: 'Description',
	image: {
		url: 'https://picsum.photos/200/300',
		mimetype: 'image/jpeg'
	}
	intent: {
		name: 'mood'
	}
}])
handover
Configure where the handover![]() The transfer of a contact from a virtual agent to a live agent. goes by using a
The transfer of a contact from a virtual agent to a live agent. goes by using a
To locate a queueId:
-
In CXone Mpower, click the app selector
 and select ACD.
 -
Go to Digital Experience > Routing Queues.
-
Locate the queue you need the id for and click Edit.
-
On the edit page for the queue, look at the URL in your browser. The number after /edit/ is the queueId. It should look like five sets of numbers and letters divided by dashes. For example, 67bf5865-4556-40db-ba44-6c0cc3f88ffa.
Bot.handover(null)
// or
Bot.handover('queueId')
addTags
Configure which tags should be applied. Any tags used in the script must already exist in Bot Builder. If a tag is called in the script but doesn't exist, the action will be ignored. Use the format .addTags(tags: string[]): void.
Bot.addTags(['Tag 1', 'Tag 2'])
waitForResponse
In some cases, you need to wait for a customer response and continue with your script execution. Since communication with customer is asynchronous, waiting for response is also asynchronous. The Bot.waitForResponse method takes one parameter: the name of the function that will be executed after a response is received. Use the format .waitForResponse(functionName: string): void.
This function has a postponed behavior. This means the outcome doesn't take effect immediately when executed. Instead, a current script execution must finish first. If you want the script to end with postponed behavior function, you must explicitly stop the script execution using a return statement or conditions.
function main() {
	console.log('Testing wait for response')
	Bot.waitForResponse('response') //The script continues to run and the next line executes while listening for a customer response
	console.log('This is still going to be executed')
}

function response() {
	console.log('Customer responded', Bot.slots['last customer message'].value)
}
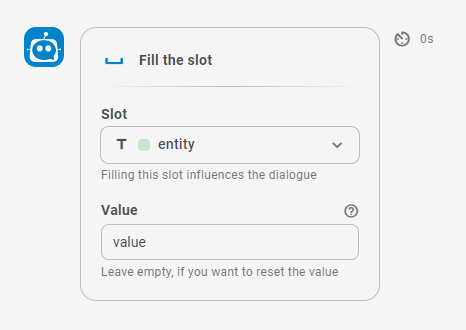
fillSlot
Configure which slot![]() Entity extracted from contact's message and saved for use in bot responses. Similar to a variable. should be applied. Any slots used in the script must already exist in Bot Builder. If a slot is called in the script but doesn't exist, the action will be ignored.
Entity extracted from contact's message and saved for use in bot responses. Similar to a variable. should be applied. Any slots used in the script must already exist in Bot Builder. If a slot is called in the script but doesn't exist, the action will be ignored.
If you just want to store the value for script run, use a local variable or use the Store object. Use the format .fillSlot(name: string, value: any[]): void.
To access the actual slot value, you must access the .value attribute.
function main() {
	Bot.fillSlot('slotName', 'slotValue');
	console.log(Bot.slots.slotName.value);
}
slots
In the dot notation, the editor can prompt available slots![]() Entity extracted from contact's message and saved for use in bot responses. Similar to a variable., but this is only applicable when slot names do not contain spaces or special characters. In cases where slot names include spaces or special characters, the bracket notation must be used instead.
Entity extracted from contact's message and saved for use in bot responses. Similar to a variable., but this is only applicable when slot names do not contain spaces or special characters. In cases where slot names include spaces or special characters, the bracket notation must be used instead.
console.log(Bot.slots)

// example
let contactId = Bot.slots['contact.id'].value
let lastCustomerMessage = Bot.slots['last customer message'].value
sendAsCustomer
This function allows you to add what the contact![]() The person interacting with an agent, IVR, or bot in your contact center. might say in your stories
The person interacting with an agent, IVR, or bot in your contact center. might say in your stories![]() Used to train a bot for interaction handling based on intent and context. and rules
Used to train a bot for interaction handling based on intent and context. and rules![]() Used to define a bot response to messages that don't change with context.. Use the format .sendAsCustomer(text: string): void.
Used to define a bot response to messages that don't change with context.. Use the format .sendAsCustomer(text: string): void.
This function has a postponed behavior. This means the outcome doesn't take effect immediately when executed. Instead, a current script execution must finish first. If you want the script to end with postponed behavior function, you must explicitly stop the script execution using a return statement or conditions.
Bot.sendAsCustomer('Hello bot')Store Object
Store is an object created to store data during script execution. Compared to a local variable, it has the advantage that it can be used across multiple .waitForResponse functions.
set , get
Store.set(name: string, value: any[]): void
Store.get(name: string): any[]
function main() {
	Store.set('token', 'my-secret-token')
	Bot.waitForResponse('response')
}

async function response() {
	console.log(Store.get('token')) // my-secret-token is logged
}
Variables Object
The Variables object holds the variables you create in the script integration. Each variable is a property of Variables. Each variable has a set of subproperties that hold information about it. The following example shows a select variable called colorChoice:
"colorChoice": {
  "defaultValue": "red",
  "options": [
	"red",
	"green",
	"blue"
	],
  "type": "select",
  "value": "red",
  "name": "colorChoice"
}
In the example, the list of values assigned to the variable are contained in the options property.
The defaultValue and value properties hold the same value initially. If you don't specify a default value for a select variable, the default is null. Variable values cannot be changed in the script, but they can be made editable, then changed when the action is used in a story or rule.
Refer to Variables in a Script
Refer to a variable value using dot notation: Variables.varName.value
Refer to the list of options in a select variable: Variables.varName.options
View Existing Variables in a Script Integration
You can see a list of the existing variables and their properties in the script by adding the following line to your code, then executing the script. The list appears in the console. The code is: console.log(Variables). Similarly, you can view the contents of a single variable by adding console.log(Variables.varName.value) or console.log(Variables.varName.options)to your script.
fetch Functions
fetch(url: string, ?options), where possible options are:
- method - 'GET', 'POST', 'PUT', 'DELETE'
- headers
- form_params
- json
- body
Use fetch for communicating with APIs. These can be any of the CXone Mpower APIs or your own.
const URL = 'https://nice.com'

async function main() {
	// 1. using async/await
	try {
		const response1 = await fetch(URL, { 'method': 'GET' })

		console.log(
			'response 1',
			response1.ok,
			response1.status,
			response1.statusText,
			response1.url,
			response1.headers
		)
		console.log('response 1', await response1.text())
	} catch (exception) {
		console.log('Error occured', exception)
	}

	// 2. using Promises
	fetch(URL, { 'method': 'GET' })
		.then(response => {
			console.log(
				'response 2',
				response.ok,
				response.status,
				response.statusText,
				response.url,
				response.headers
			)

			return response.text()
		})
		.then(response => {
			console.log('response 2', response)
		})
		.catch(exception => {
			console.log('Error occured', exception)
		})

	// 3. using fetchSync
	try {
		const response3 = fetchSync(URL, { 'method': 'GET' })
		console.log('response 3', response3)
	} catch (exception) {
		console.log('Error occured', exception)
	}
}
fetchSync
The fetch function is a standard implementation of JavaScript fetch, which returns Promise and also implements .json() or .text() functions on response.
There is also a synchronous variant fetchSync, which returns the response directly, not the Promise. If you want to stay consistent with the asynchronous world of JavaScript, use a standard fetch function.
console Function
![]() The person interacting with an agent, IVR, or bot in your contact center..
The person interacting with an agent, IVR, or bot in your contact center..
log
Use the format console.log(…output: any[]): void.
console.log('my log', 123, {pi: 3.14})
warn
Use the format console.warn(…output: any[]): void.
console.warn('my warn', 123, {pi: 3.14})
info
Use the format console.info(…output: any[]): void.
console.info('my info output', 123, {pi: 3.14})
debug
Use the format console.debug(…output: any[]): void.
console.debug('my debug output', 123, {pi: 3.14})
error
Use the format console.error(…output: any[]): void.
console.error('my error output', 123, {pi: 3.14})Error Handling
onError
You can handle errors from unexpected exceptions by defining your onError function.
let onError = (e) => console.log('my handler', e.message)

function main() {
	Bot.nonExistentMethod()
}
Hashing Functions
You can use the CryptoJS library in your scripting in Bot Builder. For example:
const cryptojs = require('crypto-js');x
var hash = CryptoJS.SHA256("TOKEN");
You can learn more about working with this library on the CryptoJS documentation ![]() website.
website.


