

Content on this page is for a product or feature in controlled release (CR). If you are not part of the CR group and would like more information, contact your account representative.
The NiCE CXone Voice Biometrics agent assist application allows you to use voice biometric authentication in interactions![]() State that allows an agent to complete work requirements after finishing an interaction. with live agents. You can learn more about using voice biometric authentication for live agents or about NiCE CXone Voice Biometrics.
State that allows an agent to complete work requirements after finishing an interaction. with live agents. You can learn more about using voice biometric authentication for live agents or about NiCE CXone Voice Biometrics.
Add a Voice Biometrics Profile App in Voice Biometrics Hub
Required permissions:
You need to add a profile app to Voice Biometrics Hub . This establishes a connection between NiCE CXone and the voice biometrics service. You can test this connection after adding the profile app.
- Click the app selector
 and select Other > Connections Hub and then click Voice Biometrics Hub.
 -
Click Add Voice Biometric App.
-
Enter a Voice Biometrics Hub Config Name and click
-
Click Next.
-
Complete the Configuration page using the information in the following drop-down.
 Learn more about the fields in this step
Field Details Integration Version Select the version of Voice Biometrics Hub that you want to use. Currently, version 1.0.0 is the only available version.
Base URL Enter the base URL for your instance of Voice Biometrics. This is provided by the NiCE CXone team during implementation.
The NiCE CXone ACD connects to Voice Biometrics via this WebSocket URL. NiCE CXone sends the audio of the customer's voice over the WebSocket so Voice Biometrics can access it.
VB Profile Enter the ID of the Voice Biometrics voice biometrics profile you want to use. This is provided by the NiCE CXone team during implementation.
This field is case-sensitive.
API Bearer Token Enter the API bearer token that's used to authenticate communication with Voice Biometrics. This is provided by the NiCE CXone team during implementation.
Participants Voice Biometrics only verifies contact voices. The only option that's available for this setting is Patron Only and it cannot be changed.
Integration Type Indicates the type of voice biometric integration you're setting up.
- Click Create.
Add a Profile App to Agent Assist Hub
Required permissions:
You need to add a profile app for Voice Biometrics to Agent Assist Hub.
- Click the app selector and select Other > Connections Hub and then click Agent Assist Hub.
-
Click Add Agent Assist App.
-
Enter an Agent Assist App Name and click
-
Click Next.
-
Complete the Configuration page using the information in the following drop-down.
Learn more about the fields in this step
Field Details Voice Biometric Profile Select the voice biometrics profile you created in the preceding task from the drop-down list.
Click Add or Edit Voice Biometric Profile if necessary. A panel slides out from the right and displays Voice Biometrics Hub so you can create or modify a voice biometric profile.
Customer Authentication Method Select the method of authentication you are using from the drop-down. Currently, the only option is Manual Customer ID Based Authentication. This means your agents must manually verify the identity of contacts with each interaction. Your organization is responsible for determining the criteria agents use to authenticate contact identity.
-
Click Create.
-
Click Close.
Customize a Script
Required permissions:
This section describes how to set up the customizations your script requires for a voice biometrics integration. Examples are provided for inbound and outbound voice scripts. You can download a ZIP file that contains XML versions of the scripts that you can import into Desktop Studio and JSON versions that you can import into Studio.
The following images shows the example scripts. Inbound Script:
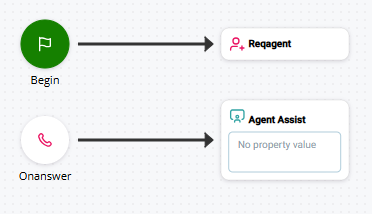
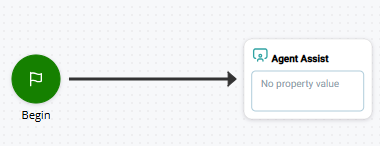
Outbound Script:
Assign the Voice Biometrics Profile App to an Action
Required permissions:
If you haven't done so already, you need to assign the Voice Biometrics app to the Agent Assist action![]() Performs a process within a Studio script, such as collecting customer data or playing music. in your Studio script.
Performs a process within a Studio script, such as collecting customer data or playing music. in your Studio script.
- In Studio, open the script you want to use.
-
If you haven't done so already, add the Agent Assist action to the correct location in your script.
-
 on the Agent Assist action.
 -
In the left column, click the checkmark
 next to the agent assist application or profile you want to assign to this script.
An alternative to using the checkmark is to create a variable in your Studio script. Use the variable to pass the app or profile name into the Assign Launch Config Name property of the AGENT ASSIST action.
- Click Close.
Test the Connection to Voice Biometrics
You can test the connection between NiCE CXone and . This allows you to verify that the Voice Biometrics Hub profile is correctly set up. You can also use it during troubleshooting. It can help you when your voice biometric provider and NiCE CXone aren't connecting.
When you run a test, Voice Biometrics Hub checks to see if the text you enter is a customer ID enrolled with the provider. You can use a real customer ID or random text. The test does not perform any authentication. It only checks for the enrollment status of the text you entered. The Test page displays the JSON response from the provider. If you see JSON, the connection is properly set up.
The test can fail due to incorrect credentials in the Voice Biometrics Hub profile or because the voice biometric provider's service is experiencing a problem. If the connection doesn't work for either reason, a toast![]() Small, temporary pop-up messages on the bottom of the screen indicating things like errors and successes. message appears in the lower right corner of the page indicating a failure.
Small, temporary pop-up messages on the bottom of the screen indicating things like errors and successes. message appears in the lower right corner of the page indicating a failure.
- Click the app selector and select Other > Connections Hub and then click Voice Biometrics Hub.
- Select the Voice Biometrics Hub profile you want to test.
- Click Test on the top right of the profile page.
-
On the Test page, enter a customer ID into the Type CustomerId field and press Enter. Voice Biometrics Hub sends the request to the voice biometric provider, then displays the results.