

Use the
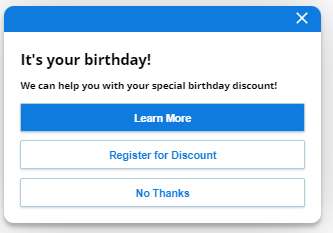
Each proactive offer includes some introductory information and then up to three call to action buttons. Use these buttons to let customers access agents, helpful articles, website links, or other entry points.
To use this feature, you must license Guide with Offers and have the Advanced (paid) conditions permission.
-
Click the app selector
 and select Guide.
 -
Click New Rule or click on an existing rule to edit it.
-
Click Action to display a list of actions and select the Display Proactive Offer action.
-
On the right side of the page, in the Content tab, define the proactive offer.
-
Upload an Icon to appear in the proactive offer pop up window. Select a .svg image. The image is optional.
-
Set the Heading for the proactive offer. Specify up to 60 characters. This field is optional.
-
Set the Body Text of the proactive offer. Specify up to 250 characters. This field is required.
-
If you included visitor variables in the Heading or Body Text fields, you might want to define a Fallback Message.
-
-
Define the first call to action button in the CTA 1 tab:
- Set this to either Primary or Secondary. Only one call-to-action button can be set to primary. It is the default, preselected button.
- Set Call to Action Button 1 to the text that appears on the call-to-action button.
- Set Reporting Name to the name of the button that will appear in reports.
-
Set Select CTA Type to one of the following:
-
Chat conversation: Use this to chat with an agent. Set Select entry point to the chat entry point to use. Set Context to an optional value to pass to the chat window. For example, to pass an intent to Bot Builder, precede the value with a / slash. For example: /sales_offer
-
Link: Use this to link to a web page.
-
Expert article: Use this to link to a specific article you select in a knowledge base.
-
Guide entrypoint: Use this to access any entry point you have created.
-
Decline: Use this to offer the visitor a way to dismiss the proactive offer. If you do not offer a decline button, the visitor can close the proactive offer widget by clicking a close icon in the upper right corner.
-
-
Define the CTA 2 and CTA 3 buttons if needed. Otherwise, leave the fields blank.
-
Click Preview to preview the proactive offer. To see how it looks with other branding, select a brand from the drop-down.
-
Add one or more conditions to the rule.
-
Click Save Rule.
Defining a Chat Call to Action Button
If you configure a chat call to action, you can optionally define up to three custom fields. Use these fields to pre-populate fields in a chat. For example, assume you have a custom field called Campaign. You can set Campaign to a value such as FALL23. If a visitor clicks on the proactive offer for chat, the Campaign custom field is set to FALL23. You can also use the custom field to route the chat.
Using Visitor Variable Text in Proactive Offers
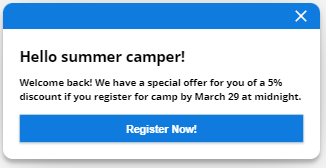
You can include visitor variable text in the Heading or Body Text fields. For example, you might define these fields as follows:
-
Heading: Hello {{visitorVariable.firstName|summer camper}}!
-
Body Text: Welcome back! We have a special offer for you of a {{visitorVariable.discount|5%}} discount if you register for camp by March 29 at midnight.
If no variables are set, the proactive offer uses the default values.
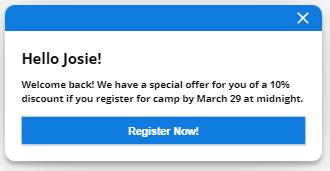
To set visitor variables, use the setVisitorVariable API. For example, the following variables might be set upon customer log in:
cxone('analytics', 'setVisitorVariable', 'firstName', 'Josie');
cxone('analytics', 'setVisitorVariable', 'discount', '10%');
Using a Fallback Message
If you use rich messaging for your proactive offer text, you may want to define a Fallback Message. For example, you might use:
Welcome to our website! Enjoy a 5% discount.