

Prior to setting up Proactive WhatsApp, your system must be enabled for Personal Connection (PC).
Create Digital Point of Contact
Required permissions: Settings Module On and Channels Settings On
If you don't already have a WhatsApp Business account, you can easily set up an account as you create your point of contact![]() The entry point that an inbound contact uses to initiate an interaction, such as a phone number or email address. for Proactive WhatsApp. This task includes the steps to set up both a new WhatsApp Business account and a profile for use with Proactive WhatsApp.
The entry point that an inbound contact uses to initiate an interaction, such as a phone number or email address. for Proactive WhatsApp. This task includes the steps to set up both a new WhatsApp Business account and a profile for use with Proactive WhatsApp.
- Click the app selector
 and select ACD.
 -
Go to Digital > Points of Contact Digital.
-
Click WhatsApp (Cloud API).
-
Click Create Channel.
-
Click Login with Facebook. This redirects you to Facebook.
-
Enter your login information. If you are already logged in with the correct account, click Continue as [your name]. If you are logged in to an incorrect account, click Log into another account.
-
Click Get Started.
-
Click Continue to connect your account and accept the sharing permissions.
-
Your existing WhatsApp Business Account should be automatically filled in. Verify this and then move to the next step. If you need to create a new business account:
-
Enter your Business name.
-
Enter your Business website or profile page.
-
Enter a Country for your business. You may also add an address.
-
Click Next.
-
-
Create or select the WhatsApp Business profile and click Next. If you are selecting an existing profile, continue to step 12.
-
If you are creating a new profile, enter the display name and click Next.
-
Select a Category for your business and enter a Business Description.
-
You can add a Website to your profile.
-
Click Next.
-
-
To verify the phone number for use with your WhatsApp Business account and profile:
-
Enter the phone number and click Next.
-
Select either Text Message or Phone Call for your verification method and click Next.
-
Enter the six-digit verification code you received and click Next.
-
-
Click Finish to return to the WhatsApp channel page in CXone Mpower.
- From the Phone number drop-down, select the number you used in a previous step.
-
Click Create. A green bar at the top of the screen displays [Channel Name] was created.
If you want to view the approval status for the new phone number, log in to your WhatsApp Business Manager.
Create a Message Template
You must create at least a default template because you cannot create a Proactive WhatsApp skill![]() Used to automate delivery of interactions based on agent skills, abilities, and knowledge. without specifying a template. You can create additional templates as needed.
Used to automate delivery of interactions based on agent skills, abilities, and knowledge. without specifying a template. You can create additional templates as needed.
Multimedia Support
You can include text and multimedia such as images, documents, audio, and video. These limitations apply:
- Templates cannot contain more than 1,024 overall characters. Captions for non-text elements cannot exceed 20 characters. Quick reply payloads cannot exceed 256 characters. This includes variables.
- Images cannot exceed 5 MB in size. Only JPG, JPEG, and PNG formats are accepted.
- Documents must be in one of these supported formats: PDF, DOC, DOCX, PPTX, or XLSX. Documents are subject to overall message size limits.
- Audio files must be in one of these supported formats: OGG, AMR, 3GP, AAC, or MPEG. Audio files are subject to overall message size limits.
- Video files must be in MP4 format and compressed using the H.264 video codec and AAC audio codec. Video files cannot exceed 16 MB in size.
- Go to Business Manager
 and select your business.
 -
Click the menu icon.
-
Click WhatsApp Manager.
-
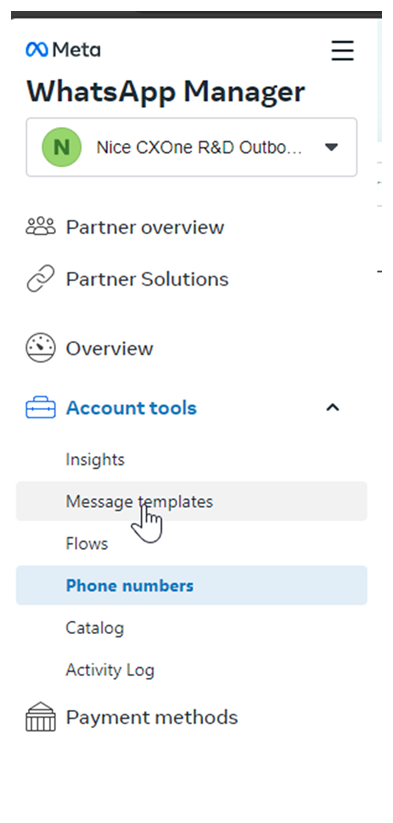
Go to Account tools > Message Templates
-
Click Create message template.
-
Choose your category, name, and languages.
-
Click Continue.
-
Header: (Optional) Add a title or choose which type of media you'll use for this header.
-
Body: Enter the text for your message in the language you've selected. You can edit text formats, add emojis, or include variables. You can also include multimedia files. Some limitations apply.
-
Sample for body content: If you want to include variables, you must add example for each variable in your body text. Make sure these are representative examples and do not include any actual customer information.
-
-
When completed, click Submit.
Your template will be sent for review. The status of your template is viewable under Message Templates in WhatsApp Business Manager. After your template has been approved, you can begin sending messages with that template.
Create a Campaign
Required permissions: Campaigns Create
If you've already created a campaign![]() A grouping of skills used to run reports. that you plan to use, you can skip this step. For example, you may have a campaign that you intend to use across several channels.
A grouping of skills used to run reports. that you plan to use, you can skip this step. For example, you may have a campaign that you intend to use across several channels.
- Click the app selector and select ACD.
- Go to Contact Settings > Campaigns.
- Click Create New.
- Enter a value in the Campaign Name field.
- Click Create Campaign.
Create a Proactive WhatsApp Skill
Required permissions: Skills Create
-
Click the app selector
and select ACD. -
Go to Contact Settings > ACD Skills.
-
Click Create New > Single Skill.
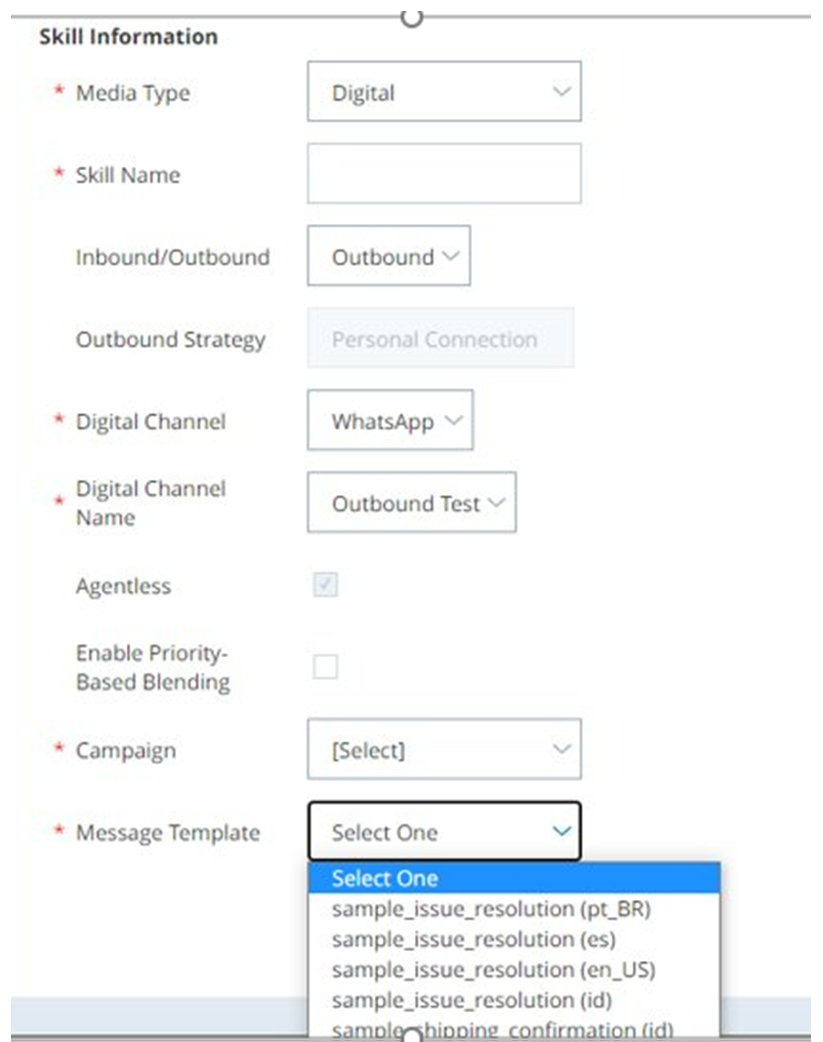
- For Media Type select Digital from the drop-down.
- Enter a Skill Name.
- For Inbound/Outbound, select Outbound from the drop-down. The Outbound Strategy field is automatically set to Personal Connection and cannot be changed.
- For Digital Channel, select WhatsApp from the drop-down.
- For Digital Channel Name, select Outbound.
- For Campaign, select from the drop-down of your existing campaigns.
- For Message Template, select from the drop-down of your existing message templates.
-
Configure the remaining optional fields in the Skill Information section as needed.
-
Click Create.
Assign a Script to Your Proactive WhatsApp Skill
Required permissions: Skills Edit
You must have a Studio script to route your Proactive WhatsApp messages. Proactive WhatsApp requires only a very basic call suppression script. You can create this script at the same time you add it to your skill. You can even use dynamic variables in your script to personalize it.
If this script does not meet your needs, talk to your CXone Mpower Account Representative about options for more complex scripts. You can also check out the CXone Mpower Studio guide.
This task covers creating and adding the basic call suppression script to your Proactive WhatsApp skill![]() Used to automate delivery of interactions based on agent skills, abilities, and knowledge..
Used to automate delivery of interactions based on agent skills, abilities, and knowledge..

- Click the app selector and select ACD.
-
Go to Contact Settings > ACD Skills.
-
Click the Proactive WhatsApp skill you want to edit.
- Click Call Suppression.
- Click Edit.
- Click Create a new script.
- Enter a Script Name.
- For Field Name, enter PhoneNumber.
-
Click Save.
Once you have completed this setup, you can manage your Proactive WhatsApp skill and calling lists just as you would any Personal Connection channel![]() Various voice and digital communication mediums that facilitate customer interactions in a contact center..
Various voice and digital communication mediums that facilitate customer interactions in a contact center..