

Set Up Automatic Calling List Deletion
Required Permission: ACD > ACD Configuration > Business Unit Usage
Your environment is limited to no more than 30 days of inventory storage or 1,000,000 total records, whichever is less. It's important to deactivate or delete calling lists that you no longer use. When you delete a calling list, all record information is removed from the tables except for the external ID and phone number for privacy reasons. NiCE CXone retains the phone number and interaction details for your records. You can't download or update a deleted calling list; however, any reporting that used the list is still available.
NiCE CXone permanently removes the calling list 10 days after you delete it.
These settings don't apply to calling lists generated with Proactive XS.
-
Click the app selector
 and select ACD.
 -
Go to ACD Configuration > Business Units.
-
In the Details tab, click Edit.
-
Scroll down to the Outbound Strategy section. In the Days until List Source Is Flagged for Deletion field, type the number of days you want calling list files to be in the system or on the database before NiCE CXone marks them for deletion.
-
Click Done.
If you need to restore a deleted calling list, you can do so within 10 days of deletion. Open the calling list in the table with inactive results enabled, open the deleted list you want to restore, and click Restore.
Delete Calling Lists
Required Permission: ACD > Lists > Calling Lists Delete
Your environment is limited to no more than 30 days of inventory storage or 1,000,000 total records, whichever is less. This includes both calling list and DNC records. It's important to delete calling lists you no longer need. When you delete a calling list, all record information is removed from the tables except for the external ID and phone number for privacy reasons. NiCE CXone retains the phone number and interaction details for your records. You can't download or update a deleted calling list; however, any reporting that used the list is still available.
NiCE CXone permanently removes the calling list 10 days after you delete it.
If you have Automatic Calling List Deletion set up using the Days until List Source Is Flagged for Deletion field, you do not need to perform this task.
If you need to restore the calling list, you can do so within 10 days of deletion. Open the calling list in the table with inactive results enabled, open the deleted list you want to restore, and click Restore.
You can't delete a calling list generated with Proactive XS.
-
Click the app selector
and select ACD. -
Go to Lists > Calling.
-
Click the calling list you want to delete.
-
If the calling list is active, click Deactivate. Click Yes to confirm deactivation and Yes again to confirm deletion.
-
If the calling list is already inactive, click Delete.
Change the Caller ID by Record
Required permissions: ACD > Lists > Calling Lists Create
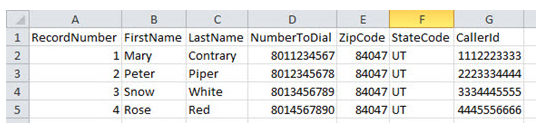
Your system configuration includes a Global Caller ID that outbound customers see as your caller ID. You can override the caller ID for the ACD skill Used to automate delivery of interactions based on agent skills, abilities, and knowledge. or for an individual record. If you prefer to have a caller ID sent with the same area code as the destination number, the law requires that the contact must be able to use the caller ID number to call back to reach you or request removal from your list. To deliver this functionality, you can purchase a phone number for each area code as part of your Telco services and insert them into the caller ID field of each record.
-
In the target calling list, create a new column for the caller ID number. Enter the caller ID number for each record where you don't want to apply the system or skill default. Any cell left blank results in the record using the default skill caller ID if one is set, or the system caller ID if a skill-level caller ID isn't set.
-
Upload the calling list. Verify NiCE CXone mapped the Caller ID field to the column you created for the record-level caller ID. Fix the mapping if it's incorrect.
Set the Default System Record Expiration
Required Permission: ACD > ACD Configuration > Business Unit Usage
-
Click the app selector
and select ACD. -
Go to ACD Configuration > Business Units.
-
Click the Details tab.
-
Click Edit.
-
Scroll down to the Outbound Strategy section. For Default Contact Expiration, enter the days, hours, and minutes that you want contacts to be available for dialing after they are added to NiCE CXone.
-
Click Done at the top of the page.
Set the Default ACD Skill Record Expiration
Required Permission: ACD > Skills Edit
By default, the record expiration settings per ACD skill match the system default, which is 30 days if you didn't change it.
-
Click the app selector
and select ACD. -
Go to Contact Settings > ACD Skills.
-
Click the skill you want to modify to open it.
-
Click the Parameters tab.
- Under General Settings, click Edit.
-
For Default Contact Expiration, set the days, hours, and minutes that you want contacts assigned to this skill to be available for dialing after they are added to NiCE CXone.
- Click Done.
Set an Individual Record Expiration
Required permissions: ACD > Lists > Calling Lists Edit
By default, the expiration settings per record match the ACD skill default.
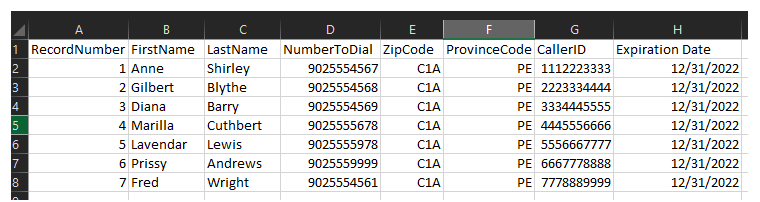
- In the target calling list, add a column for the expiration date and enter a value for each record that you don't want to inherit the skill default expiration.
- Save the calling list.
-
Upload the calling list. Verify NiCE CXone mapped the Expiration Date field to the column you created for record-level contact expiration dates. Fix the mapping if it's incorrect.