

To connect Confluence to a knowledge base, you must either provide the required configuration parameters for Knowledge Hub to NiCE Professional Services or enter them in Knowledge Hub yourself. This page describes how to set up Confluence Cloud so Knowledge Hub can connect to it. Knowledge Hub supports two authentication types:
-
OAuth2: You create an OAuth app in Atlassian, and then sign in to Atlassian from Knowledge Hub. Knowledge Hub generates and refreshes the tokens for you.
-
Basic: You create an API token in your Atlassian account and enter it in Knowledge Hub with your email address and site URL.
Setting up Confluence with OAuth2 takes two steps:
-
Step 1: Create the OAuth App in Atlassian: You create an OAuth 2.0 (3LO) app in the Atlassian Developer Console, give it read-only Confluence permissions, add the Knowledge Hub callback URL, and copy the Client ID and Secret.
-
Step 2: Configure the Connector in Knowledge Hub: You enter the Client ID and Secret in Knowledge Hub, click Authenticate, sign in to Atlassian, and select the spaces to ingest.
For Basic authentication, see Connect Confluence with Basic Authentication. You do not need Python or a script for either method.
Atlassian handles OAuth sign-in centrally for all Confluence Cloud sites. You do not need a separate OAuth setup for each Confluence site. The site Knowledge Hub reads from is the one you choose when you approve access.
Complete each of these tasks in the order given.
Before You Begin
Make sure you have the following:
-
Admin access to the Atlassian organization that owns the Confluence content you want to connect.
-
Access to the Knowledge Hub application in NiCE CXone.
-
A paid Confluence plan, if you want to limit Knowledge Hub to specific spaces. Free plans cannot restrict access per space.
-
A basic understanding of how OAuth 2.0 (3LO) works in Atlassian.
Configure OAuth in Atlassian
Everything on the Atlassian side starts here.
-
Go to the Atlassian Developer Console and sign in with the Atlassian account that owns or administers the Confluence content.
-
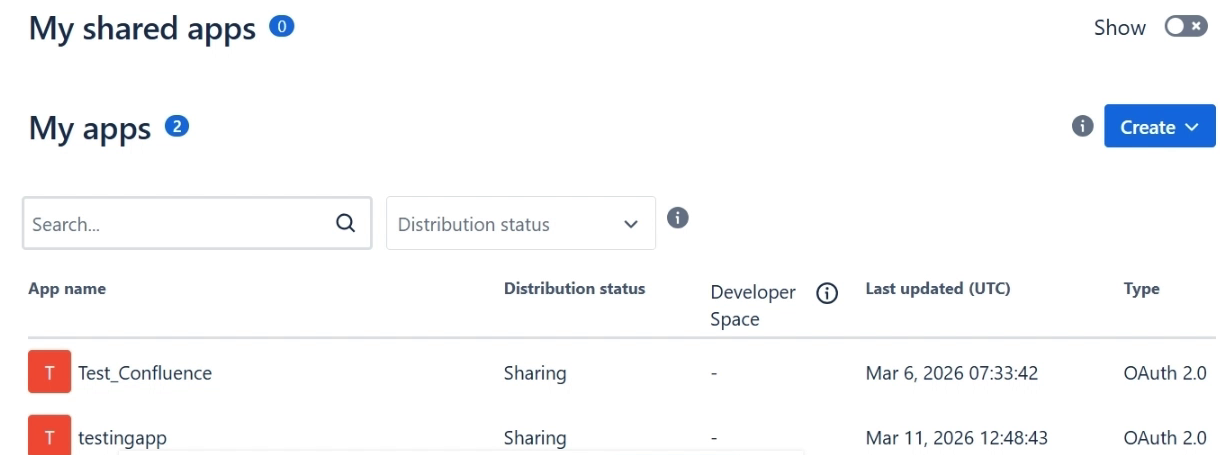
If you do not have an app yet, click Create and choose OAuth 2.0 integration. If you already have an app, select it from the My apps list and skip to step 4.
-
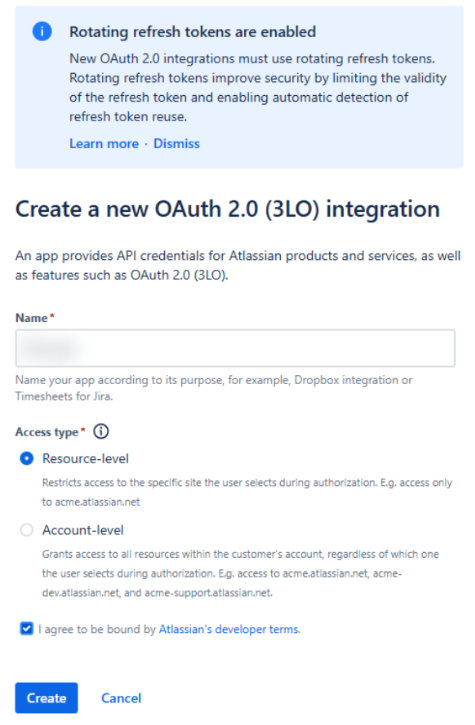
On the Create a new OAuth 2.0 (3LO) integration page, do the following, and then click Create:
-
Enter a Name that describes the app, for example, Knowledge Hub Confluence.
-
Under Access type, select Resource-level. This limits the app to the one site you choose when you approve access. Account-level gives the app access to every site in your Atlassian account.
-
Select the checkbox to agree to Atlassian's developer terms.
-
-
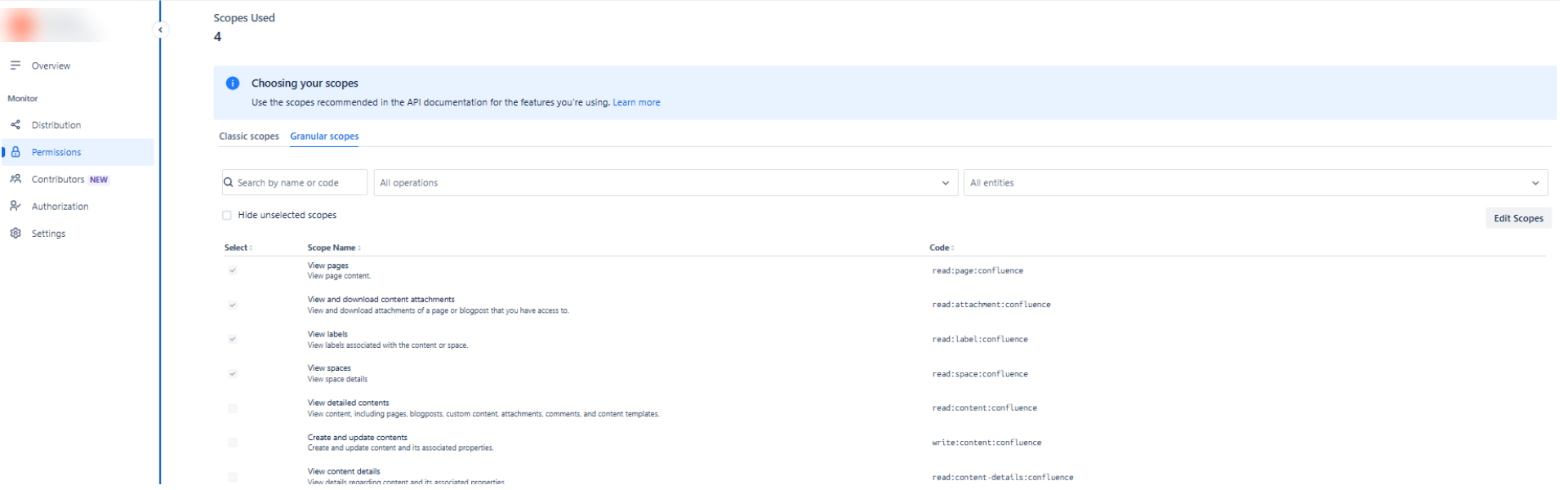
In the left navigation pane, select Permissions.
-
Under Confluence API, select Add, then choose Configure.
-
On the Granular scopes tab, click Edit Scopes, select only these four read scopes, and save:
-
read:space:confluence (View pages)
-
read:page:confluence (View and download content attachments)
-
read:label:confluence (View labels)
-
read:attachment:confluence (View spaces)
Do not add classic scopes or any write or delete scopes. The page shows Scopes Used 4 when you are done.
-
-
In the left navigation pane, select Authorization.
-
Under OAuth 2.0 (3LO), select Add (or Configure if it is already added).
-
In the Callback URLs field, enter the redirect URL for your region from Redirect URLs by Region.
-
Click Save changes.
-
In the left navigation pane, select Settings.
-
Go to the Authentication details section and copy the Client ID and Secret. Store them in a secure location. You need them in Knowledge Hub.
 View image
Redirect URLs by Region
The redirect URL is where Atlassian sends the authorization code after you approve Knowledge Hub. It must match the region your NiCE CXone system runs in. Find your region in the table and enter that URL exactly.
Copy the URL character for character. An extra space, a missing slash, or a URL from the wrong region all cause a redirect URI mismatch error when you authenticate later.
|
Region |
Redirect URI |
|---|---|
| NA1 | https://api-na1.niceincontact.com/eai-kh-public-services/config/v1/knowledgehub/oauth/callback |
| NA2 | https://api-na2.niceincontact.com/eai-kh-public-services/config/v1/knowledgehub/oauth/callback |
| CA1 | https://api-ca1.niceincontact.com/eai-kh-public-services/config/v1/knowledgehub/oauth/callback |
| AU1 | https://api-au1.niceincontact.com/eai-kh-public-services/config/v1/knowledgehub/oauth/callback |
| AU2 | https://api-au2.nicecxone-sov1.au/eai-kh-public-services/config/v1/knowledgehub/oauth/callback |
| DE and EU1 | https://api-eu1.niceincontact.com/eai-kh-public-services/config/v1/knowledgehub/oauth/callback |
| UK1 | https://api-uk1.niceincontact.com/eai-kh-public-services/config/v1/knowledgehub/oauth/callback |
| UK2 | hhttps://api-uk2.nicecxone-sov1.uk/eai-kh-public-services/config/v1/knowledgehub/oauth/callback |
| JP1 | https://api-jp1.niceincontact.com/eai-kh-public-services/config/v1/knowledgehub/oauth/callback |
Least-Privilege Access (Optional)
Knowledge Hub reads only the Confluence content that the account you authenticate with can see. Complete this section if you want to authenticate with a dedicated read-only account instead of an administrator account. The account needs access to Confluence and View access to each space you want to ingest. It does not need an administrator role.
Grant Product Access to the Authorizing Account
-
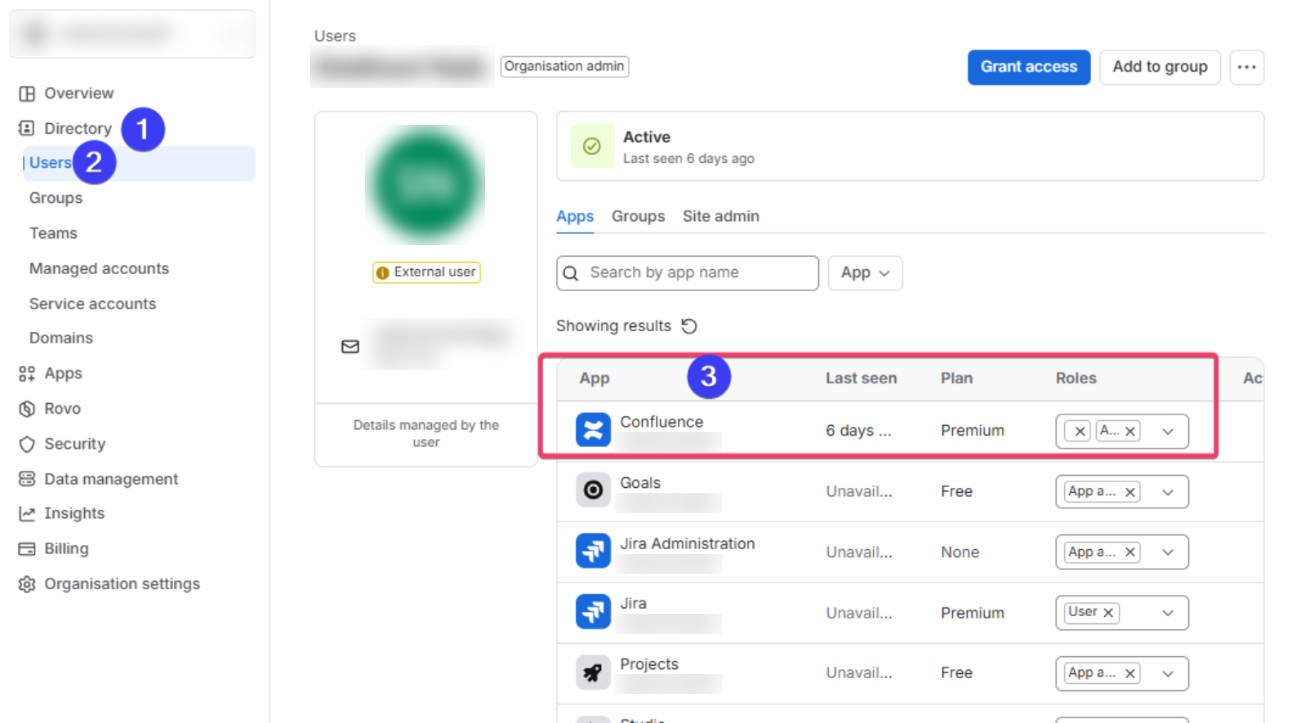
Go to the Atlassian Admin Console.
-
In the left navigation pane, select Directory, then choose Users.
-
In the Users list, select the name of the user. Make sure the account status is Active.
-
On the Apps tab, confirm that Confluence is listed for your site and that the role is User. Do not assign an administrator role.
If Confluence is not listed, click Grant access, select Confluence for your site, select the User role, and click Grant access.
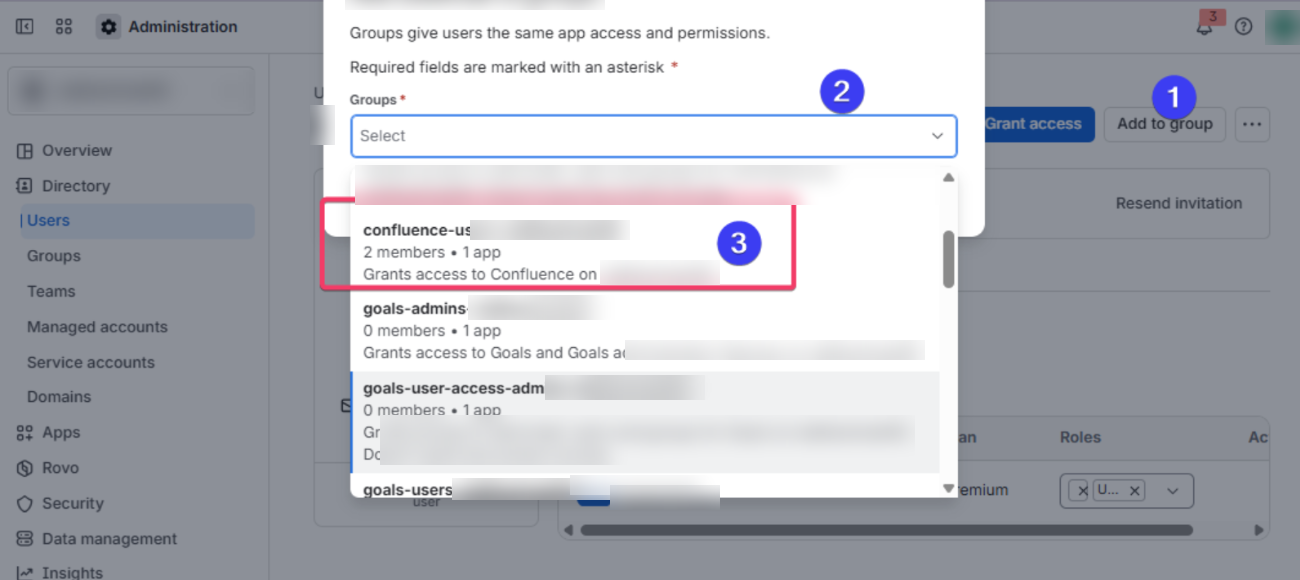
-
Click Add to group, select only the confluence-users-[site name] group for your site, and add it. Do not add the account to administrator groups, such as confluence-admins or org-admins.
Configure Space-level Permissions in Confluence
Space-level permissions in Confluence allow you to control who can view, edit, or administer content within a specific space. Follow these steps to configure permissions for a space:
-
Log in to your Confluence site with an administrator account.
-
Click the Settings
 and select Confluence administration.
-
Select Spaces, and then All spaces.
-
Next to the space you want to ingest, click the Actions icon and select Space settings.
-
Select Users, and then click Add people.
-
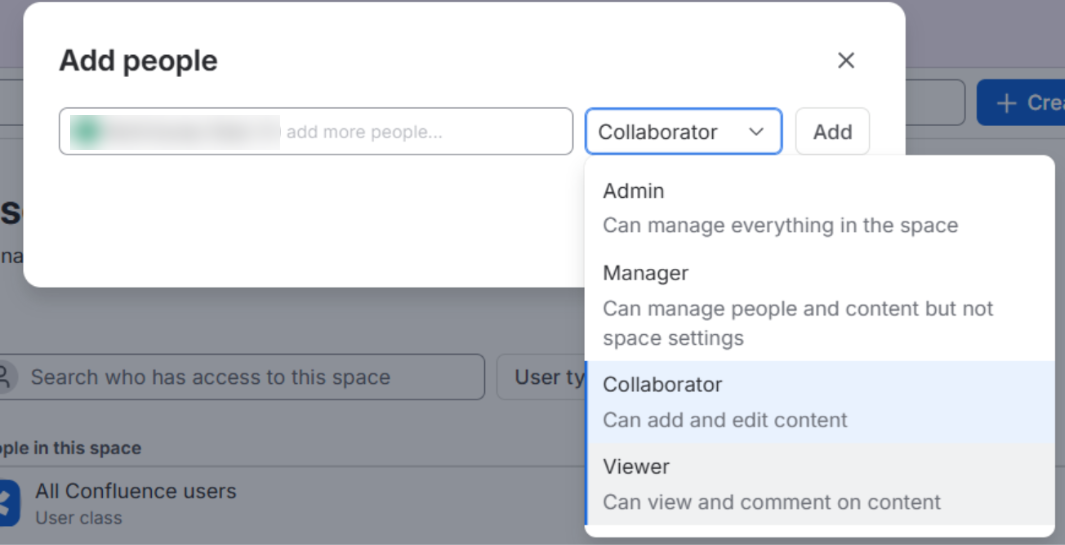
Enter the authorizing account, select the Viewer role (Can view and comment on content), and click Add. The role defaults to Collaborator, so change it before you click Add.
-
Repeat steps 4 through 6 for each space you want Knowledge Hub to ingest.
Confluence Free plans cannot assign roles per space. On a Free plan, the authorizing account can see every space it has access to. Pages with their own page-level restrictions are skipped if the authorizing account cannot view them.
Your Atlassian setup is now complete. The rest of the work happens in Knowledge Hub.
Connect Confluence to Knowledge Hub
You cannot change the configurations after authentication completes. You can edit them only if source creation or the sync has failed.
-
In NiCE CXone, click the app selector
 and select General > AI Studio > Knowledge Hub.
- Select Confluence from the Knowledge Source drop-down.
-
Select OAuth2 from the Authentication Type drop-down. The Authenticate button appears only when OAuth2 is selected.
- Enter the Client ID and Client Secret you copied from Atlassian. The Object Name and Sync Frequency fields are set for you.
- Click Authenticate at the bottom right of the page. An Atlassian window opens.
- Sign in with the Atlassian account you want Knowledge Hub to use. Enter your email address and click Continue. If Atlassian sends a verification code to your email, enter it to continue.
-
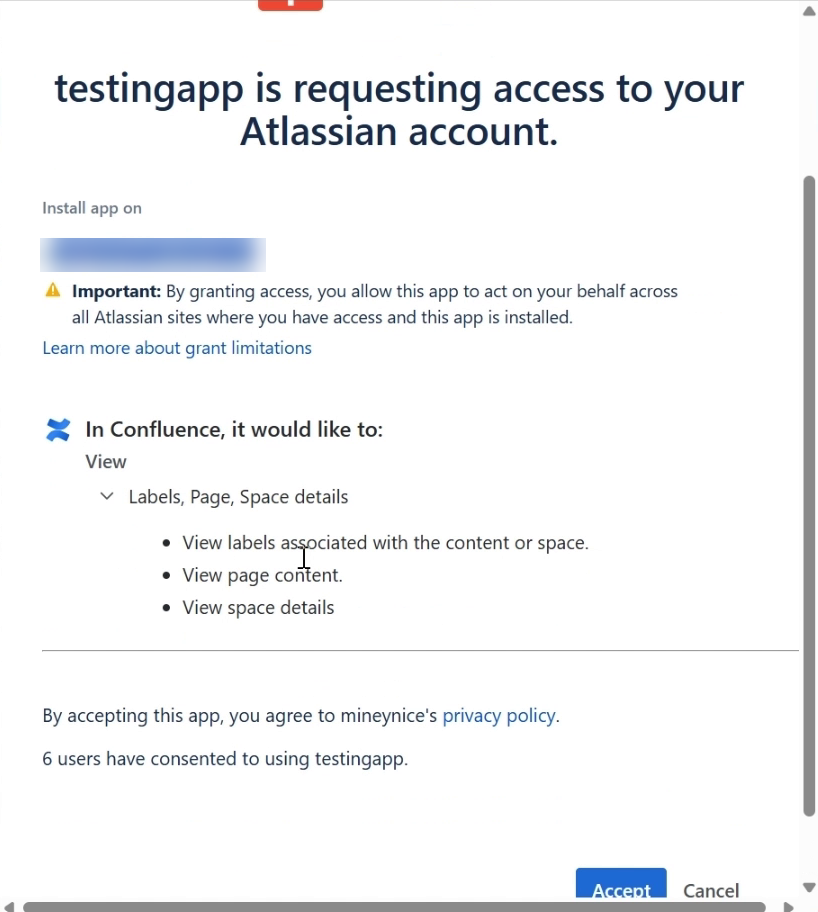
On the consent screen, check the site under Install app on and the permissions listed, and then click Accept.
- Wait for the Atlassian window to close and the Authentication Completed message to appear. The fields become read-only and the Next button is enabled.
- Click Next.
-
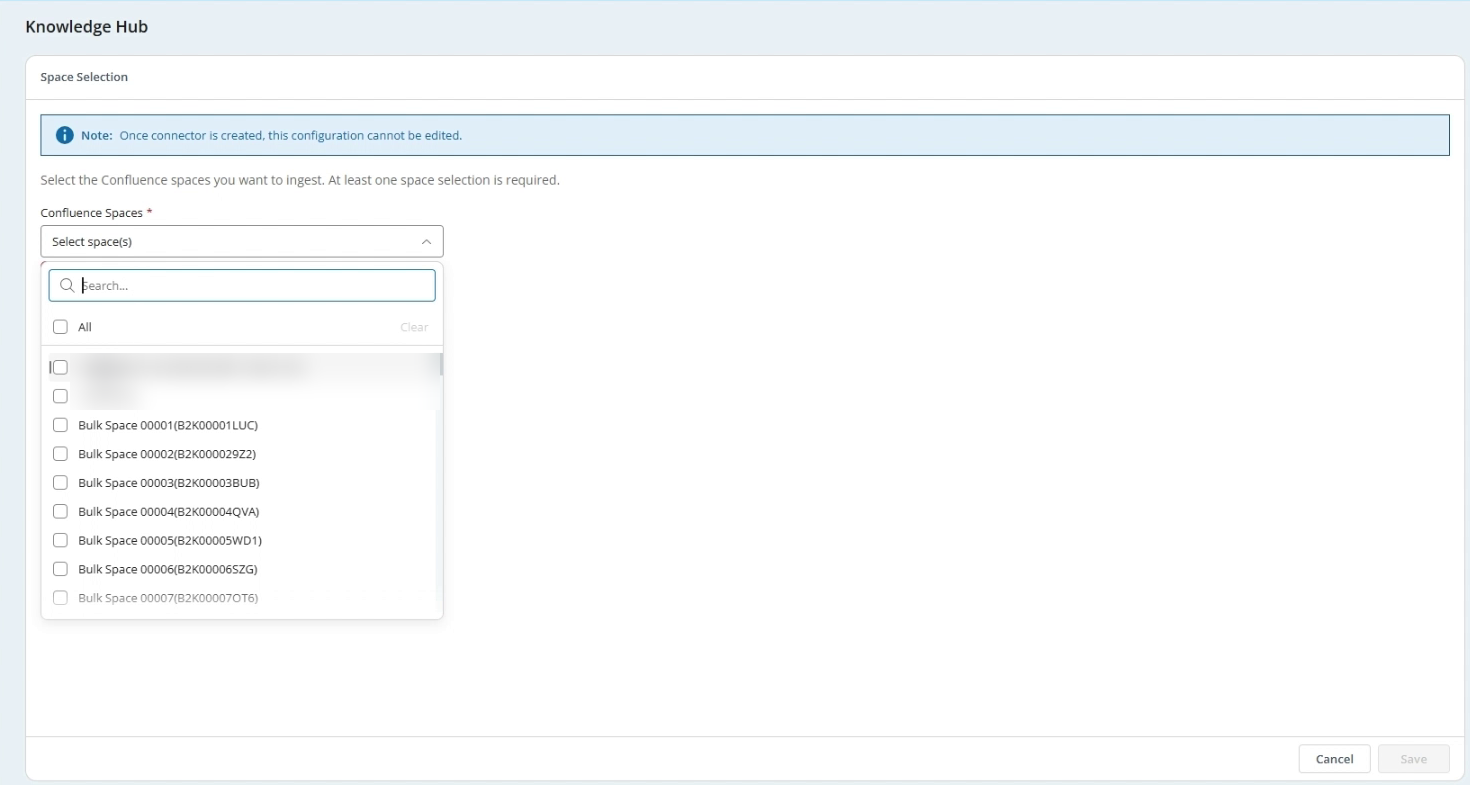
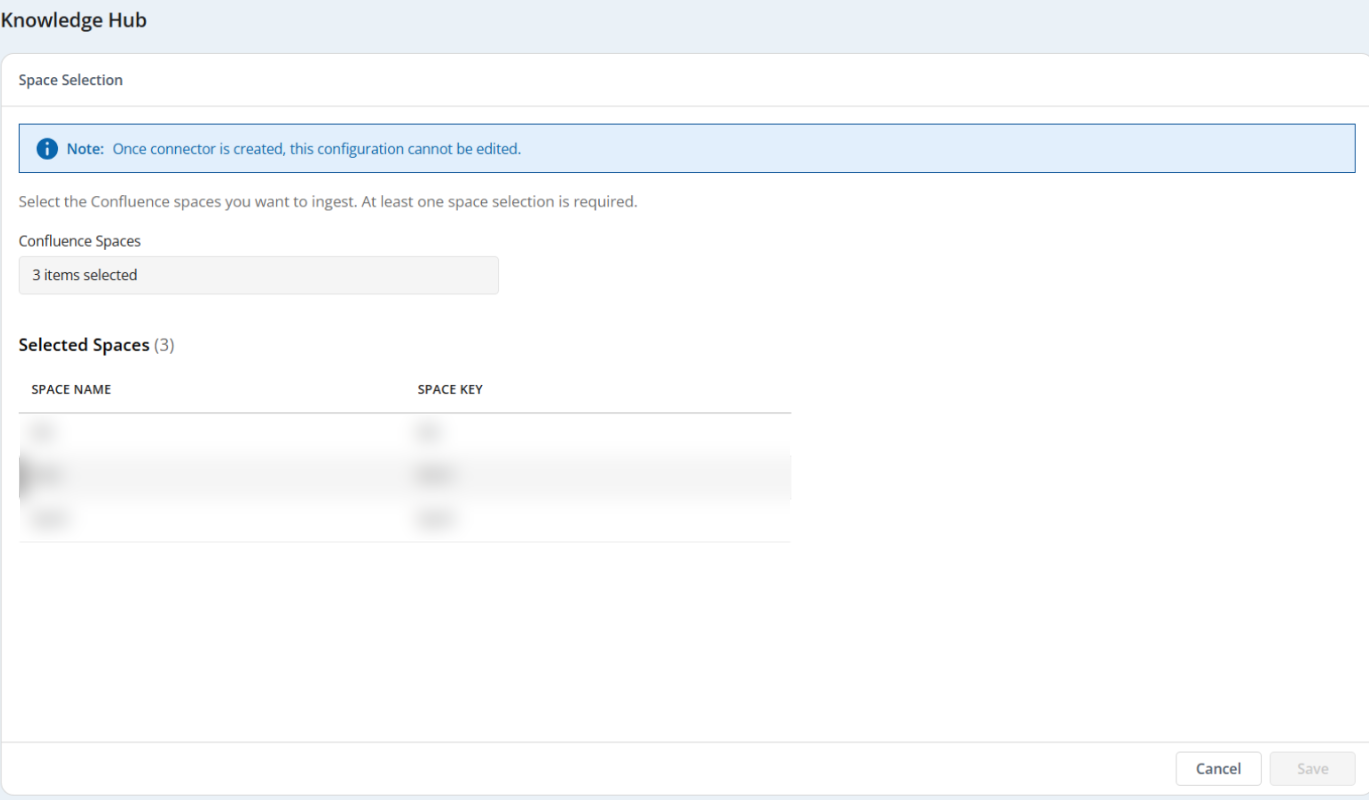
On the Space Selection page, select the spaces to ingest from the Confluence Spaces drop-down. You can search, select All, or select individual spaces. At least one space is required. The Selected Spaces table lists each space by Space Name and Space Key.
Once the connector is created, you cannot edit the space selection.
-
Click Next. On the Summary page, review the knowledge base settings and the Confluence details, and then click Create and Ingest. The Knowledge Base creation started successfully message appears, and the status changes to Pending.
-
If you are adding Confluence as a source to an existing knowledge base, click Save instead. The Source creation started successfully message appears.
-
After five to seven minutes, refresh the page. When Sync Source becomes available, click
 to start the first sync.
A large knowledge base can take several hours to sync. You do not need to stay on the page while it runs. Come back later and refresh to check the status.
- When the sync finishes, the status changes to Active. Your Confluence content is now available in Knowledge Hub.
Connect Confluence with Basic Authentication
Use this method for basic integration with Confluence. You create an API token with read-only Confluence scopes, and then enter it in Knowledge Hub. Create a named anchor Basic for this section.
Create a Scoped API Token
-
Navigate to the Atlassian account settings
 page.
-
Select the Security tab.
-
On the API Tokens page, select Create API token with scopes.
-
On the Name and expiry step, enter a name for the token, select an expiry date and click Create.
API tokens can be valid for up to one year. Make sure to renew them before they expire to avoid interruptions.
-
On the Select app step, select Confluence and click Next.
-
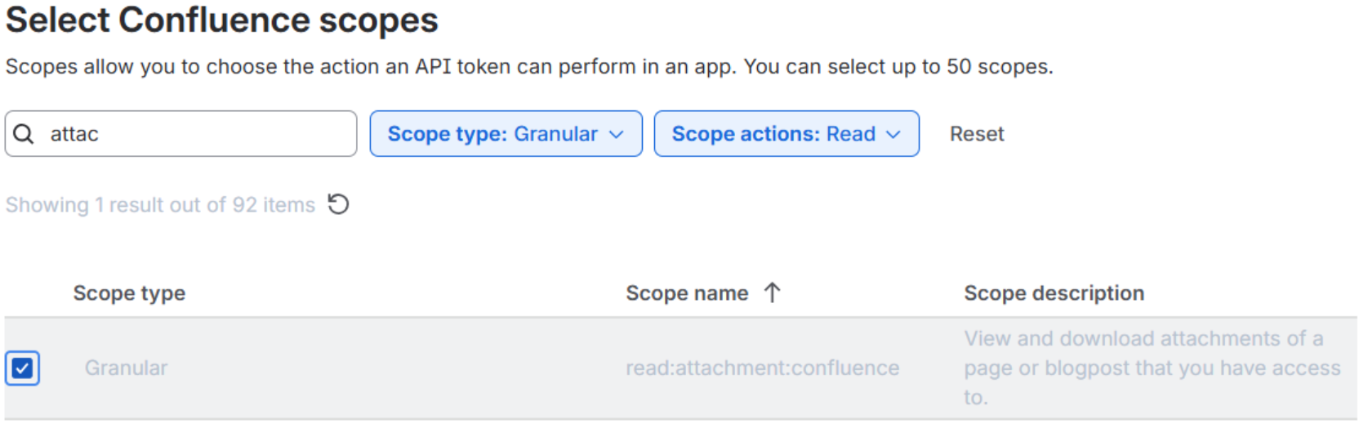
On the Select scopes step, set Scope type to Granular and Scope actions to Read. Search for and select these four scopes:
-
read:page:confluence
-
read:attachment:confluence
-
read:label:confluence
-
read:space:confluence
-
-
Click Next, review the token details, and click Create token.
-
Copy the token and store it in a secure location.
You won’t be able to view the token again after you close the dialog box.
-
Click Next, select spaces on the Space Selection page, and click Save.
Configure Basic Authentication in Knowledge Hub
-
In NiCE CXone, click the app selector
and select General > AI Studio > Knowledge Hub. - Select Confluence from the Knowledge Source drop-down.
-
Select BASIC from the Authentication Type drop-down.
-
Enter the following:
-
Username: The email address of the Atlassian account that owns the API token.
-
API Token: The token you copied.
-
Base URL: Your Confluence site URL, for example, https://your-domain.atlassian.net.
-
-
Click Next. On the Space Selection page, select the spaces to ingest. See Select Confluence Spaces.
-
Click Next, review the Summary page, and click Create and Ingest (or Save when adding a source to an existing knowledge base).
-
After five to seven minutes, refresh the page and click Sync Source
. When the sync finishes, the status changes to Active.
Select Confluence Spaces
Knowledge Hub lists the Confluence spaces your account can access, so you no longer type space keys. Create a named anchor Spaces for this section.
-
Search the list, select one or more spaces, or select All. At least one space is required.
-
The Selected Spaces table shows each space by Space Name and Space Key.
-
Knowledge Hub saves your selection as a list of space keys.
When the space list loads depends on the authentication type:
| Authentication type | When the space list loads |
|---|---|
|
OAuth2 |
After you click Authenticate and approve access. |
| Basic | After you enter the Username, API Token, and Base URL and click Next. |
| Existing connectors created with manually generated tokens | When the Space Selection page opens. |
Once the connector is created, you cannot edit the space selection. When you open an existing Confluence connector, the Space Selection page is read-only and shows the spaces that were saved. To ingest different spaces, create a new connector.
Existing Confluence Connectors
Confluence connectors that were set up with manually generated OAuth tokens keep working. You do not need to recreate them. When you edit one of these connectors, the form still shows the Access Token, OAuth Code, and Refresh Token fields.
If your access token has expired, you won’t be able to make API calls. To fix this, set up the connector again with OAuth2 as described on this page. Knowledge Hub then refreshes the tokens automatically.
Troubleshooting
Use the following table to resolve common Confluence connector problems.
|
Problem |
Possible cause | Solution |
|---|---|---|
| Invalid client | The Client ID or Client Secret is wrong, or the Atlassian app is not active. | Copy both values again from the app Settings page in the Atlassian Developer Console. |
| Invalid grant | The authorization expired or was revoked in Atlassian. | Click Authenticate again in Knowledge Hub. |
| Invalid scope | A required Confluence read scope is missing. | On the app Permissions page, check that the four Granular read scopes are selected. |
| Redirect URI mismatch | The callback URL in the Atlassian app does not match your region. | Compare the URL against Redirect URLs by Region. It must match character for character. |
| The Confluence Spaces drop-down is empty or disabled | Authentication did not complete, the Basic credentials are wrong, or the account has no access to any space. | Authenticate again or check the Username, API Token, and Base URL. Check the account's space access in Least-Privilege Access. |
| The Authenticate button does not appear | The Authentication Type is not set to OAuth2. | Select OAuth2 from the Authentication Type drop-down. |
| You approved access, but no content syncs | The authorizing account cannot view the selected spaces, or the wrong site was chosen on the consent screen. | Give the account View access to the spaces and authenticate again with the correct site. |